设计模式汇总:结构型模型(上)
总体来说设计模式分为三大类:
创建型模式,共五种:工厂方法模式、抽象工厂模式、单例模式、建造者模式、原型模式。
结构型模式,共七种:适配器模式、装饰器模式、代理模式、外观模式、桥接模式、组合模式、享元模式。
行为型模式,共十一种:策略模式、模板方法模式、观察者模式、迭代子模式、责任链模式、命令模式、备忘录模式、状态模式、访问者模式、中介者模式、解释器模式。
其实还有两类:并发型模式和线程池模式。
前面已经介绍了《设计模式汇总:创建型模式》,下面来看结构型模型:
一、适配器模式
适配器模式在Android中比较常见,在ListView中无时无刻不在使用;
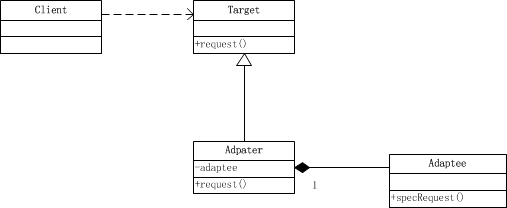
适配器的思想是将一个类的接口转换成客户希望的另外一个接口。其主要涉及三个角色:
模式所涉及的角色有:
目标(Target)角色:这就是所期待得到的接口。注意:由于这里讨论的是类适配器模式,因此目标不可以是类。
源(Adapee)角色:现在需要适配的接口。
适配器(Adaper)角色:适配器类是本模式的核心。适配器把源接口转换成目标接口。显然,这一角色不可以是接口,而必须是具体类。
把Adaptee设想成使用ListView时想要加载的数据如ArrayList;
目标角色Target即是ListView源码中会用到的BaseAdapter这些;
而开发时继承BaseAdater自定义的Adapter即为Adapter角色;
实现适配器的方法有两种,可以分别通过继承和组合来实现适配器效果:
一种是类适配器模式;一种是对象适配器模式;
1)类适配器模式
interface Target {
    void reqeust();
}

class Adaptee {
    void specReqeust() {
        System.out.println("Adaptee specReqeust");
    }
}

class Adapter extends Adaptee implements Target {
    // 为Adaptee适配成Target接口
    @Override
    public void reqeust() {
        specReqeust();
    }
}

class Client {
    public void dosth() {
        Target target = new Adapter();
        target.reqeust();
    }
}
当Target不为接口时,Java不支持多继承,可以采用组合的形式来实现:
2)对象适配器模式
abstract class Target {
    abstract void reqeust();
}

class Adaptee {
    void specReqeust() {
        System.out.println("Adaptee specReqeust");
    }
}

class Adapter extends Target {
    Adaptee adaptee;

    public Adapter(Adaptee adaptee) {
        this.adaptee = adaptee;
    }

    // 为Adaptee适配成Target接口
    @Override
    public void reqeust() {
        adaptee.specReqeust();
    }
}

class Client {
    public void dosth() {
        // 将Adaptee适配成Target来使用
        Target target = new Adapter(new Adaptee());
        target.reqeust();
    }
}
3)适配器模式的优点 :
1)更好的复用性
系统需要使用现有的类,而此类的接口不符合系统的需要。那么通过适配器模式就可以让这些功能得到更好的复用。
2)更好的扩展性
在实现适配器功能的时候,可以调用自己开发的功能,从而自然地扩展系统的功能。
适配器模式的缺点 :
过多的使用适配器,会让系统非常零乱,不易整体进行把握。比如,明明看到调用的是A接口,其实内部被适配成了B接口的实现,一个系统如果太多出现这种情况,无异于一场灾难。因此如果不是很有必要,可以不使用适配器,而是直接对系统进行重构。
二、装饰者模式
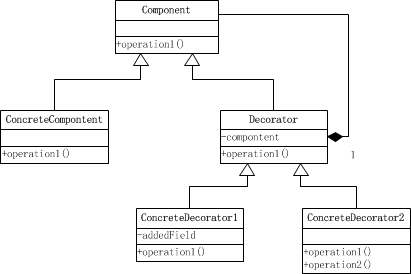
Java中InputStream,FilterInputStream,DataInputStream这些就是典型的装饰者模式。

Decorator模式(别名Wrapper):动态将职责附加到对象上,若要扩展功能,装饰者提供了比继承更具弹性的代替方案。
意图:动态地给一个对象添加一些额外的职责。就增加功能来说,Decorator模式相比生成子类更为灵活。

适用性:
以下情况使用Decorator模式
1)需要扩展一个类的功能,或给一个类添加附加职责。
2)需要动态的给一个对象添加功能,这些功能可以再动态的撤销。
3)需要增加由一些基本功能的排列组合而产生的非常大量的功能,从而使继承关系变的不现实。
4)当不能采用生成子类的方法进行扩充时。一种情况是,可能有大量独立的扩展,为支持每一种组合将产生大量的子类,使得子类数目呈爆炸性增长。另一种情况可能是因为类定义被隐藏,或类定义不能用于生成子类。 比如如下情况所提供的灵活性:
InputStream in = null;
new BufferedInputStream(new DataInputStream(in));
new DataInputStream(new BufferedInputStream(in));
明显采用继承是比较难以实现的;
代码:
abstract class Compontent {
    abstract void operation1();
}

class ConcreteCompontent extends Compontent{
    @Override
    void operation1() {
        System.out.print("ConcreteCompontent operation1");
    }
}

class Decorator extends Compontent {
    Compontent compontent;

    public Decorator(Compontent compontent) {
        this.compontent = compontent;
    }

    @Override
    void operation1() {
        compontent.operation1();
    }
}

class ConcreteDecorator1 extends Decorator {
    int addedField; // 动态添加的变量

    public ConcreteDecorator1(Compontent compontent) {
        super(compontent);
    }

    @Override
    void operation1() {
        System.out.println("do other sth");
        super.operation1();
    }
}

class ConcreteDecorator2 extends Decorator {

    public ConcreteDecorator2(Compontent compontent) {
        super(compontent);
    }

    // 动态添加的操作
    void operation2() {
        System.out.print("ConcreteCompontent operation2");
    }
}

class Client {
    public void dosth() {
        Compontent co = new ConcreteCompontent();
        Compontent compontent0 = new ConcreteDecorator2(co);
        Compontent compontent1 = new ConcreteDecorator1(new ConcreteDecorator2(co));
        Compontent compontent2 = new ConcreteDecorator2(new ConcreteDecorator1(co));
    }
}
装饰者模式的优缺点:
1)优点:
- 通过组合而非继承的方式,实现了动态扩展对象的功能的能力。
- 有效避免了使用继承的方式扩展对象功能而带来的灵活性差,子类无限制扩张的问题。
- 充分利用了继承和组合的长处和短处,在灵活性和扩展性之间找到完美的平衡点。
- 装饰者和被装饰者之间虽然都是同一类型,但是它们彼此是完全独立并可以各自独立任意改变的。
- 遵守大部分GRASP原则和常用设计原则,高内聚、低偶合。
- Decorator模式与继承关系的目的都是要扩展对象的功能,但是Decorator可以提供比继承更多的灵活性。
- 通过使用不同的具体装饰类以及这些装饰类的排列组合,设计师可以创造出很多不同行为的组合
2)缺点:
- 装饰链不能过长,否则会影响效率。
- 因为所有对象都是Component,所以如果Component内部结构发生改变,则不可避免地影响所有子类(装饰者和被装饰者),也就是说,通过继承建立的关系总是脆弱地,如果基类改变,势必影响对象的内部,而通过组合(Decoator HAS A Component)建立的关系只会影响被装饰对象的外部特征。
- 只在必要的时候使用装饰者模式,否则会提高程序的复杂性,增加系统维护难度。
- 这种比继承更加灵活机动的特性,也同时意味着更加多的复杂性。
- 装饰模式会导致设计中出现许多小类,如果过度使用,会使程序变得很复杂。
- 装饰模式是针对抽象组件(Component)类型编程。但是,如果你要针对具体组件编程时,就应该重新思考你的应用架构,以及装饰者是否合适。当然也可以改变Component接口,增加新的公开的行为,实现“半透明”的装饰者模式。在实际项目中要做出最佳选择。
修饰者模式至少有两个关键利益及两个责任(liability):
1)比静态继承更有弹性:修饰者模式提供一个较静态(多重)继承更有弹性的方式附加责任到对象上。使用修饰者责任可以在执行期简单的附加或取消,相对的继承需要为每一个新的附加责任建立一个新的类(如BorderedScrollableTextView、BorderedTextView等),如此会造成使用许多类及增加系统复杂度。更进一步;为特定的Component类提供不同的修饰者类让你比较及混合责任。
避免在层级架构中增加外貌装载(feature-laden《译注:在类中存有许多有关显示外貌的Component或属性等》)类:修饰者提供一个你要才有(pay-as-you-go)的方式附加责任。相对的不去在一个复杂客制化类中提供一所有可预测外貌;而定义一个简单类并在一个修饰者类逐步增加功能,其结果是一个应用系统无须准备一些不会使用到的外貌。同时也容易从他们所扩充的对象类定义一个新的修饰者类;甚至不在预测内。扩充一个复杂类需要揭露与你要附加责任无关的部分。
2)修饰者及其Component不是同一个:修饰者就像透明的围墙(transparent enclosure),但从一个对象界定(identity)的观点;一个被修饰的对象与其本身并不需要去区分(identical),因此当你使用修饰者无区依赖对象界定。
有许多小对象:使用修饰这设计时常常产生在一个系统中组合看起来很像的许多小对象的结果。这些对象的差一点只是互动(interconnect)的方式;而非他的类或者其内不变量的值。虽然只要你了解他们就可以方便客制系统;但是可能难以学习及除错。
接口一致(conformance):修饰者对象的接口必须与其修饰的对象接口一致具体修饰指(ConcreteDecorator)类必须继承一个公用(common)类。
3)忽略(omitting)抽象修饰者类:当你只是附加单一责任时无须定义一个抽象修饰者类,这种情形一般是当你使用现存的类层级架构而非构建一个新的,因此你可以将修饰者传递请求到Component的责任融合(merge)至具体修饰者。
保持轻量(lightweight)的Component类:要确保接口一致,Component及修饰者必须自一个公用Component类继承,保持这个公用Component类轻量是很重要的,即必须专注于定义一个接口而非储存数据。数据责任的定义必须延缓至子类,否则太复杂的Component类会在数量上使用太过于重(heavyweight)。在Component类中放置太多的功能同时会增加其子类为许多没有必要的外表付出代价的可能性。
4)改变对象的外表(skin)或其内部(guts):我们可以想象修饰者就像对象的可以改变行为外表,另一种替代方式是改变其内部,策略模式(Strategy)就是改变其内部的作法。当Component类在本质上(intrinsically)太重(heavyweight)时策略模式是一个比较适当的选择,因为以修饰者模式实现成本太高。在策略模式中组件传递(forward)他的部分行为给另外的策略对象,策略模式让我们以替代的策略对象改变或扩充组件的功能。
动态和静态的问题:
所谓动态是说可以在系统运行时(RunTime)动态给对象增加其它职责而不需要修改代码或重新编译;
所谓静态是说必须通过调整代码(DesignTime)才能给对象增加职责,而且系统还需要重新编译;
从具体技术层面来说,对象的组合和继承正好对应于前面的动态和静态,因为通过对象组合建立的交互关系不是在代码中(DesignTime)固定死的,而是在运行时(RunTime)动态组合的;而通过继承建立的关系是僵硬的难以改变的,因为它是在代码中(DesignTime)固定死了的,根本不存在运行时(RunTime)改变的可能。换个角度说:我们应该多使用对象组合来保持系统的运行时扩展性,尽量少使继承,因为继承让程序变得僵硬,优先使用对象组合,而非类继承。
三、代理模式
代理模式就是给一个对象提供一个代理,并由代理对象控制对原对象的引用。
在代理模式中,proxy代理主要是起到一个中介的作用,它连接客户端和目标对象。
在Android的Binder机制中,代理模式起到很重要的作用。

代理模式适用于:
在某些情况下,我们不希望或是不能直接访问对象 A,而是通过访问一个中介对象 B,由 B 去访问 A 达成目的,这种方式我们就称为代理。
这里对象 A 所属类我们称为委托类,也称为被代理类,对象 B 所属类称为代理类。
代理优点有:
1)隐藏委托类的实现
2)解耦,不改变委托类代码情况下做一些额外处理,比如添加初始判断及其他公共操作
代理模式中有三类角色:
抽象主题角色(Object):声明了目标对象和代理对象的共同接口,这样一来在任何可以使用目标对象的地方都可以使用代理对象。
具体主题角色(RealObject):也称为委托角色或者被代理角色。定义了代理对象所代表的目标对象。
代理主题角色(Proxy):也叫代理类。代理对象内部含有目标对象的引用,从而可以在任何时候操作目标对象;代理对象提供一个与目标对象相同的接口,以便可以在任何时候替代目标对象。代理对象通常在客户端调用传递给目标对象之前或之后,执行某个操作,而不是单纯地将调用传递给目标对象。
Java中根据程序运行前代理类是否已经存在,可以将代理分为静态代理和动态代理。
1)静态代理:
interface IObject {
    void operation1();
    void operation2();
}

class RealObject implements IObject{
    @Override
    public void operation1() {
        System.out.print("RealObject operation1");
    }

    @Override
    public void operation2() {
        System.out.print("RealObject operation2");
    }
}

class Proxy implements IObject {
    private RealObject real;

    public Proxy() {
        real = new RealObject();
    }

    @Override
    public void operation1() {
        real.operation1();
    }

    @Override
    public void operation2() {
        real.operation2();
    }
}

class Client {
    void doSth() {
        Proxy proxy = new Proxy();
        proxy.operation1();
    }
}
由上可见,Proxy就相当于生活中的代理,比如买东西的时候,没必要去生产商品的厂家去购买,直接去代理地点也即是超市购买即可;代理通过调用委托类来未用户提供同样的服务,而又避免了用户去直接调用委托类。
2)动态代理:
由前所见,每一个委托类需要对应一个代理类,这样在大型项目中将会出现众多的代理类,而这些代理类只是一个中介而已,为了优化代码结果,Java提供了动态代理的方式,使用反射来动态生成相应的代理类来为用户提供服务。
2.1)创建动态代理的流程:
1、定义一个代理类和委托类共同使用的接口Operate
2、实现一个委托类继承Interface,它是真正实现操作逻辑的类记为Real
3、继承一个InvocationHandler,传入委托类实例;重写invoke函数
4、使用Proxy.newProxyInstance来动态创建一个代理类,今后的所有操作都通过这个实例proxy来操作;
// 创建委托类和代理类统一的接口
interface Operate {
    void do1();
    void do2();
    void do3();
}

// 具体的委托类
class RealImpl implements Operate {
    @Override
    public void do1() {
        System. out.println("Real do1" );
    }
    @Override
    public void do2() {
        System. out.println("Real do2" );
    }
    @Override
    public void do3() {
        System. out.println("Real do3" );
    }
}

// 自定义InvocationHandler
class MyInvocationHandler implements InvocationHandler {
    private Object target ;

    public MyInvocationHandler(Object target ) {
        this.target = target ;
    }

    @Override
    public Object invoke(Object proxy , Method method, Object[] args)
            throws Throwable {
        // 执行 method之前的一些操作
        Object result = method.invoke( target, args);
        // 执行 method之后的一些自处理操作
        return result ;
    }

}

public class ProxyDynamic {
        // 具体的使用
        public void a() {
              Operate proxy = (Operate) Proxy.newProxyInstance(Operate.class.getClassLoader(), new Class[] {Operate.class},
                            new MyInvocationHandler(new RealImpl()));
               proxy.do1();
               proxy.do2();
       }
}
2.2)原理:
Proxy这个类根据ClassLoader以及interfaces这个数组,获得一个相应的代理类的名称,一般的格式是packagename+$Proxy+num,然后通过
ProxyGenerator.generateProxyClass(proxyName, interfaces , accessFlags );
来创建对应的类;最后通过反射调用该类的构造器创建一个具体实例;这个类是继承Proxy的,Proxy持有InvocationHandler的实例h;
代理类的所有操作都是通过将Method传递到h的invoke函数,通过invoke函数进行最终的处理;
因此InvocationHandler是代理类和委托类之间的中介;
1、来看具体的动态生成的类$Proxy0:
import com.hust.liuyun.Operate;
import java.lang.reflect.InvocationHandler;
import java.lang.reflect.Method;
import java.lang.reflect.Proxy;
import java.lang.reflect.UndeclaredThrowableException;

public final class $Proxy0 extends Proxy
  implements Operate
{
  private static Method m4 ;
  private static Method m1 ;
  private static Method m5 ;
  private static Method m0 ;
  private static Method m3 ;
  private static Method m2 ;

  public $Proxy0(InvocationHandler paramInvocationHandler)
    throws
  {
    super(paramInvocationHandler);
  }

  public final void operateMethod1()
    throws
  {
    try
    {
      h.invoke( this, m4, null );
      return;
    }
    catch (Error|RuntimeException localError)
    {
      throw localError;
    }
    catch (Throwable localThrowable)
    {
      throw new UndeclaredThrowableException(localThrowable);
    }
  }

  public final boolean equals(Object paramObject)
    throws
  {
    try
    {
      return ((Boolean)h.invoke( this, m1, new Object[] { paramObject })).booleanValue();
    }
    catch (Error|RuntimeException localError)
    {
      throw localError;
    }
    catch (Throwable localThrowable)
    {
      throw new UndeclaredThrowableException(localThrowable);
    }
  }

  public final void operateMethod2()
    throws
  {
    try
    {
      h.invoke( this, m5, null );
      return;
    }
    catch (Error|RuntimeException localError)
    {
      throw localError;
    }
    catch (Throwable localThrowable)
    {
      throw new UndeclaredThrowableException(localThrowable);
    }
  }

  public final int hashCode()
    throws
  {
    try
    {
      return ((Integer)h.invoke( this, m0, null )).intValue();
    }
    catch (Error|RuntimeException localError)
    {
      throw localError;
    }
    catch (Throwable localThrowable)
    {
      throw new UndeclaredThrowableException(localThrowable);
    }
  }

  public final void operateMethod3()
    throws
  {
    try
    {
      h.invoke( this, m3, null );
      return;
    }
    catch (Error|RuntimeException localError)
    {
      throw localError;
    }
    catch (Throwable localThrowable)
    {
      throw new UndeclaredThrowableException(localThrowable);
    }
  }

  public final String toString()
    throws
  {
    try
    {
      return (String)h.invoke( this, m2, null );
    }
    catch (Error|RuntimeException localError)
    {
      throw localError;
    }
    catch (Throwable localThrowable)
    {
      throw new UndeclaredThrowableException(localThrowable);
    }
  }

  static
  {
    try
    {
      m4 = Class.forName("com.hust.liuyun.Operate").getMethod( "do1", new Class[0]);
      m1 = Class.forName("java.lang.Object" ).getMethod("equals", new Class[] { Class.forName("java.lang.Object") });
      m5 = Class.forName("com.hust.liuyun.Operate").getMethod( "do2", new Class[0]);
      m0 = Class.forName("java.lang.Object" ).getMethod("hashCode", new Class[0]);
      m3 = Class.forName("com.hust.liuyun.Operate").getMethod( "do3", new Class[0]);
      m2 = Class.forName("java.lang.Object" ).getMethod("toString", new Class[0]);
      return;
    }
    catch (NoSuchMethodException localNoSuchMethodException)
    {
      throw new NoSuchMethodError(localNoSuchMethodException .getMessage());
    }
    catch (ClassNotFoundException localClassNotFoundException)
    {
      throw new NoClassDefFoundError(localClassNotFoundException .getMessage());
    }
  }
}
可以看到该生成类是继承Proxy的,在构造函数中将InvocationHandler的实例传递进来;然后通过反射获取到该类中所有相关的Method的实例。
相关的所有操作都是通过h.invoke来实现的。
2、Proxy#newProxyInstance:
public static Object newProxyInstance(ClassLoader loader,
                 Class[] interfaces, InvocationHandler h )
                  throws IllegalArgumentException {
          Objects. requireNonNull(h);

           final Class[] intfs = interfaces .clone();
           final SecurityManager sm = System.getSecurityManager ();
           if (sm != null) {
                  checkProxyAccess(Reflection. getCallerClass(), loader, intfs);
          }

           /*
           * Look up or generate the designated proxy class.
           */
           // 通过这个重要类,来生成一个动态代理类
          Class cl = getProxyClass0(loader, intfs);

           /*
           * Invoke its constructor with the designated invocation handler.
           */
           try {
                  if (sm != null) {
                        checkNewProxyPermission(Reflection.getCallerClass() , cl);
                 }

                  // 调用动态代理类的构造器来创建一个具体实例
                  final Constructor cons = cl.getConstructor(constructorParams);
                  final InvocationHandler ih = h ;
                  if (!Modifier.isPublic( cl.getModifiers())) {
                       AccessController. doPrivileged(new PrivilegedAction() {
                               public Void run() {
                                      cons.setAccessible( true);
                                      return null ;
                              }
                       });
                 }
                  // 可以看到这里将InvocationHandler这个中介以参数形式加入进来
                  return cons .newInstance(new Object[] { h });
          } catch (IllegalAccessException | InstantiationException e) {
                  throw new InternalError(e.toString(), e);
          } catch (InvocationTargetException e ) {
                 Throwable t = e.getCause();
                  if (t instanceof RuntimeException) {
                        throw (RuntimeException) t ;
                 } else {
                        throw new InternalError(t.toString(), t);
                 }
          } catch (NoSuchMethodException e ) {
                  throw new InternalError(e.toString(), e);
          }
   }
流程:
1)进行一些权限检查之类
2)通过getProxyClass0来获得对应的动态代理类(可能是新创建,也可能是从Cache中取出)
3)调用代理类的构造器来创建一个具体的代理类;
3、getProxyClass0
private static final WeakCache [], Class>
proxyClassCache = new WeakCache <>(new KeyFactory(), new ProxyClassFactory());
/**
 * Generate a proxy class.  Must call the checkProxyAccess method
 * to perform permission checks before calling this.
 */
private static Class getProxyClass0(ClassLoader loader,
                                       Class... interfaces) {
    if (interfaces.length > 65535) {
        throw new IllegalArgumentException("interface limit exceeded");
    }

    // If the proxy class defined by the given loader implementing
    // the given interfaces exists, this will simply return the cached copy;
    // otherwise, it will create the proxy class via the ProxyClassFactory
    return proxyClassCache.get(loader , interfaces );
}
这里有一个WeakCache来存储相关的代理类信息,通过代理类来获取;
4、WeakCache#get:
public V get(K key , P parameter) {
    Objects.requireNonNull(parameter );

    expungeStaleEntries();

    // 根据ClassLoader获取相应的key值
    Object cacheKey = CacheKey.valueOf(key , refQueue);

    // 根据ClassLoader获得其中的ConcurrentMap
    // lazily install the 2nd level valuesMap for the particular cacheKey
    ConcurrentMap> valuesMap = map.get(cacheKey );
    if (valuesMap == null) {
        ConcurrentMap> oldValuesMap
            = map.putIfAbsent(cacheKey,
                              valuesMap = new ConcurrentHashMap<>());
        if (oldValuesMap != null) {
            valuesMap = oldValuesMap ;
        }
    }

    // create subKey and retrieve the possible Supplier stored by that
    // subKey from valuesMap
    // 在ConcurrentMap中,key对应的interfaces,Value则对应着具体的类Class信息
    // 代理类的具体创建逻辑是通过subKeyFactory.apply来实现的
    Object subKey = Objects.requireNonNull(subKeyFactory.apply( key, parameter));
    Supplier supplier = valuesMap .get(subKey );
    Factory factory = null;

    while ( true) {
       // 如果已经存在,则直接返回
        if (supplier != null) {
            // supplier might be a Factory or a CacheValue instance
            V value = supplier.get();
            if (value != null) {
                return value ;
            }
        }
        // else no supplier in cache
        // or a supplier that returned null (could be a cleared CacheValue
        // or a Factory that wasn't successful in installing the CacheValue)

        // lazily construct a Factory
        if (factory == null) {
            factory = new Factory( key, parameter, subKey , valuesMap );
        }

        if (supplier == null) {
            supplier = valuesMap.putIfAbsent(subKey , factory );
            if (supplier == null) {
                // successfully installed Factory
                supplier = factory;
            }
            // else retry with winning supplier
        } else {
            if (valuesMap .replace(subKey, supplier, factory)) {
                // successfully replaced
                // cleared CacheEntry / unsuccessful Factory
                // with our Factory
                supplier = factory;
            } else {
                // retry with current supplier
                supplier = valuesMap.get(subKey );
            }
        }
    }
}
这里的Cache是个两级缓存,通过ClassLoader为key来缓存一个ConcurrentMap;该ConcurrentMap的key对应着传入进来的interface参数;
由前面知道subKeyFactory对应的具体类为:ProxyClassFactory,具体来看其apply函数;
5、ProxyClassFactory#apply:
private static final class ProxyClassFactory
    implements BiFunction[], Class>
{
    // prefix for all proxy class names
    private static final String proxyClassNamePrefix = "$Proxy";

    // next number to use for generation of unique proxy class names
    private static final AtomicLong nextUniqueNumber = new AtomicLong();

    @Override
    public Class apply(ClassLoader loader, Class[] interfaces) {

        Map, Boolean> interfaceSet = new IdentityHashMap<>(interfaces .length );

        /** 对传递进来的interface进行判断
         * 1、先判断该interface是否是通过传递进来的ClassLoader来加载的
         * 2、判断该interface是否为接口
         * 3、判断该接口数组中是否有重复的类  **/
        for (Class intf : interfaces ) {
            /*
             * Verify that the class loader resolves the name of this
             * interface to the same Class object.
             */
            Class interfaceClass = null ;
            try {
                interfaceClass = Class.forName( intf.getName(), false, loader );
            } catch (ClassNotFoundException e ) {
            }
            if (interfaceClass != intf ) {
                throw new IllegalArgumentException(
                    intf + " is not visible from class loader" );
            }
            /*
             * Verify that the Class object actually represents an
             * interface.
             */
            if (!interfaceClass .isInterface()) {
                throw new IllegalArgumentException(
                    interfaceClass.getName() + " is not an interface" );
            }
            /*
             * Verify that this interface is not a duplicate.
             */
            if (interfaceSet .put(interfaceClass , Boolean.TRUE) != null) {
                throw new IllegalArgumentException(
                    "repeated interface: " + interfaceClass .getName());
            }
        }

        String proxyPkg = null;     // package to define proxy class in
        int accessFlags = Modifier.PUBLIC | Modifier. FINAL;

        /*
         * Record the package of a non-public proxy interface so that the
         * proxy class will be defined in the same package.  Verify that
         * all non-public proxy interfaces are in the same package.
         */
        /******** 获取该代理类的名称 ********/
        for (Class intf : interfaces ) {
            int flags = intf .getModifiers();
            if (!Modifier.isPublic( flags)) {
                accessFlags = Modifier.FINAL;
                String name = intf.getName();
                int n = name .lastIndexOf('.');
                String pkg = (( n == -1) ? "" : name .substring(0, n + 1));
                if (proxyPkg == null) {
                    proxyPkg = pkg;
                } else if (!pkg .equals(proxyPkg )) {
                    throw new IllegalArgumentException(
                        "non-public interfaces from different packages" );
                }
            }
        }

        if (proxyPkg == null) {
            // if no non-public proxy interfaces, use com.sun.proxy package
            proxyPkg = ReflectUtil.PROXY_PACKAGE + ".";
        }

        /*
         * Choose a name for the proxy class to generate.
         */
        long num = nextUniqueNumber.getAndIncrement();
        // 代理类的名称一般为包名+$ Proxy+num
        String proxyName = proxyPkg + proxyClassNamePrefix + num;

        /*
         * Generate the specified proxy class.
         */
        /** 通过ProxyGenerator.generateProxyClass来具体创建该代理类的二进制码 **/
        byte[] proxyClassFile = ProxyGenerator.generateProxyClass(
            proxyName, interfaces , accessFlags) ;
        try {
               // 这是一个native类,通过它来具体加载该代理类,返回响应的Class信息
            return defineClass0( loader, proxyName,
                                proxyClassFile, 0, proxyClassFile .length );
        } catch (ClassFormatError e ) {
            /*
             * A ClassFormatError here means that (barring bugs in the
             * proxy class generation code) there was some other
             * invalid aspect of the arguments supplied to the proxy
             * class creation (such as virtual machine limitations
             * exceeded).
             */
            throw new IllegalArgumentException(e.toString());
        }
    }
}
1)对传递进来的interface进行判断
* 先判断该interface是否是通过传递进来的ClassLoader来加载的
* 判断该interface是否为接口
* 判断该接口数组中是否有重复的类
2)获取该代理类的名称;代理类的名称一般为包名+$ Proxy+num
3)通过ProxyGenerator.generateProxyClass来具体创建该代理类的二进制码
4)defineClass0,这是一个native类,通过它来具体加载该代理类,返回响应的Class信息
参考博客:http://blog.csdn.net/u013256816/article/details/51009592
装饰模式和代理模式的区别 :
装饰器模式关注于在一个对象上动态的添加方法,然而代理模式关注于控制对对象的访问。换句话 说,用代理模式,代理类(proxy class)可以对它的客户隐藏一个对象的具体信息。因此,当使用代理模式的时候,我们常常在一个代理类中创建一个对象的实例。并且,当我们使用装饰器模式的时候,我们通常的做法是将原始对象作为一个参数传给装饰者的构造器。
外观模式和代理模式的区别 :
代理与外观的主要区别在于,代理对象代表一个单一对象而外观对象代表一个子系统,代理的客户对象无法直接访问对象,由代理提供单独的目标对象的访问,而通常外观对象提供对子系统各元件功能的简化的共同层次的调用接口。代理是一种原来对象的代表,其他需要与这个对象打交道的操作都是和这个代表交涉的。
适配器模式和代理模式的区别 :
适配器模式改变所考虑的对象的接口,代理模式不能改变所代理对象的接口。

