
前言:突然发现自己给自己埋了一个大坑,毕设好难..每一个小点拎出来都能当一个小题目(手动摆手..),没办法自己选的含着泪也要把坑填完..先一点一点把需要补充的知识学完吧..
Thymeleaf介绍
稍微摘一摘【官网】上面的介绍吧(翻译是找到,有些增加的内容):
1.Thymeleaf is a modern server-side Java template engine for both web and standalone environments.
Thymeleaf是⾯向Web和独⽴环境的现代服务器端Java模板引擎,能够处理HTML,XML,JavaScript,CSS甚⾄纯⽂本。2.Thymeleaf's main goal is to bring elegant natural templates to your development workflow — HTML that can be correctly displayed in browsers and also work as static prototypes, allowing for stronger collaboration in development teams.
Thymeleaf旨在提供⼀个优雅的、⾼度可维护的创建模板的⽅式。 为了实现这⼀⽬标,Thymeleaf建⽴在⾃然模板的概念上,将其逻辑注⼊到模板⽂件中,不会影响模板设计原型。 这改善了设计的沟通,弥合了设计和开发团队之间的差距。3.With modules for Spring Framework, a host of integrations with your favourite tools, and the ability to plug in your own functionality, Thymeleaf is ideal for modern-day HTML5 JVM web development — although there is much more it can do.
对于Spring框架模块,一个允许你集成你最喜欢的工具的平台,并且能够插入自己的功能,Thymeleaf是理想的现代JVM HTML5 web开发工具,虽然它可以做得多。
然后官网还给出了一段看起来仍然像HTML一样工作的集成了Thymeleaf模版的代码,我们大致的来感受一下:
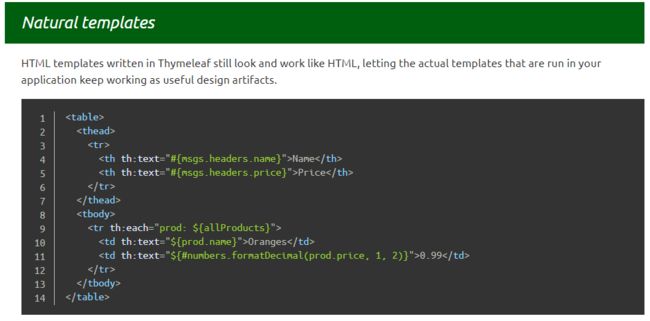
简单说, Thymeleaf 是一个跟 Velocity、FreeMarker 类似的模板引擎,它可以完全替代 JSP。
Thymeleaf与JSP的区别在于,不运行项目之前,Thymeleaf也是纯HTML(不需要服务端的支持)而JSP需要进行一定的转换,这样就方便前端人员进行独立的设计、调试。相较与其他的模板引擎,它有如下三个极吸引人的特点:
1.Thymeleaf 在有网络和无网络的环境下皆可运行,即它可以让美工在浏览器查看页面的静态效果,也可以让程序员在服务器查看带数据的动态页面效果。这是由于它支持 html 原型,然后在 html 标签里增加额外的属性来达到模板+数据的展示方式。浏览器解释 html 时会忽略未定义的标签属性,所以 thymeleaf 的模板可以静态地运行;当有数据返回到页面时,Thymeleaf 标签会动态地替换掉静态内容,使页面动态显示。
2.Thymeleaf 开箱即用的特性。它提供标准和spring标准两种方言,可以直接套用模板实现JSTL、 OGNL表达式效果,避免每天套模板、该jstl、改标签的困扰。同时开发人员也可以扩展和创建自定义的方言。
3.Thymeleaf 提供spring标准方言和一个与 SpringMVC 完美集成的可选模块,可以快速的实现表单绑定、属性编辑器、国际化等功能。
摘自:spring boot(四):thymeleaf使用详解-纯洁的微笑
00#先把需要环境搭起来
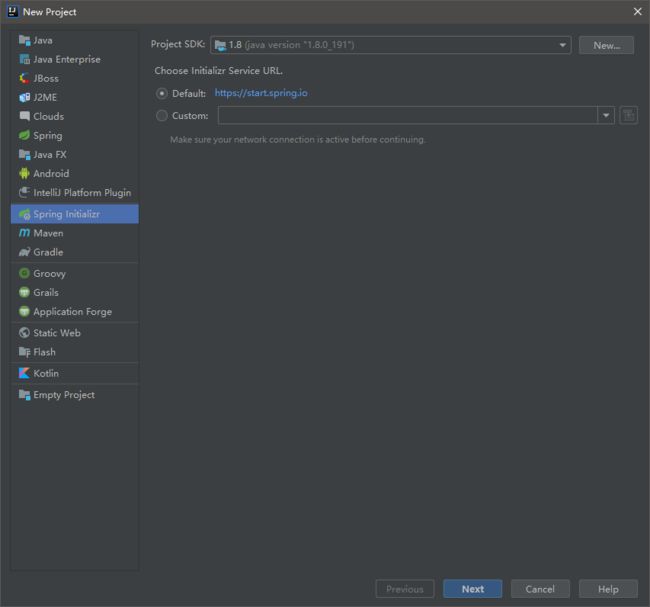
也就是SpringBoot项目的搭建,很常规,快速搭起来:
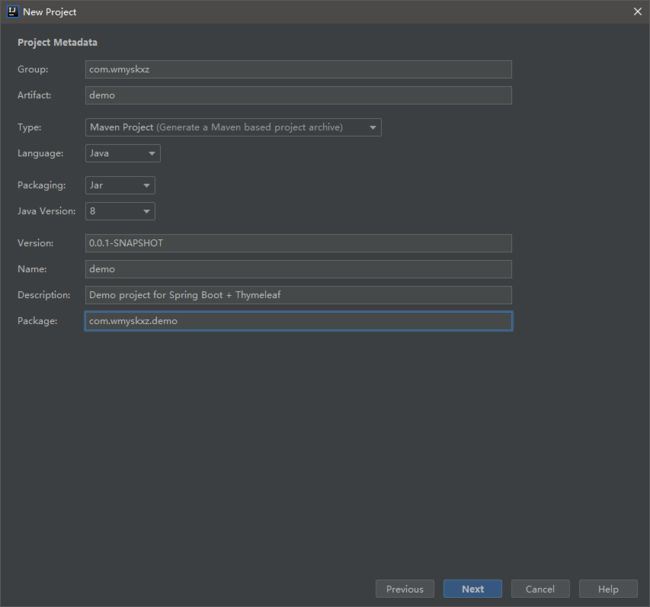
稍微改改包名还有描述,点击【Next】:
勾选上Web/Thymeleaf支持,然后点击【Next】:

选择项目保存位置,点击【Finish】:

至此就简单创建了一个用于学习Thymeleaf的简单环境。
01#创建一个Hello Thymeleaf页面
第一步:新建一个HelloController
在【com.wmyskxz.demo】下新建一个【controller】包,然后新建一个【HelloController】:
package com.wmyskxz.demo.controoler;

import org.springframework.stereotype.Controller;
import org.springframework.ui.Model;
import org.springframework.web.bind.annotation.RequestMapping;

@Controller
public class HelloController {

    @RequestMapping("/hello")
    public String hello(Model model) {
        model.addAttribute("name", "thymeleaf");
        return "hello";
    }
}
第二步:新建一个hello.html页面
在【resources】下的【templates】下新建一个【hello.html】文件,使用这个目录的原因是当你使用模板引擎时Spring Boot会默认在src/main/resources/templates下去找,当然你也可以修改这个默认路径,这里就不做演示了:
    Thymeleaf快速入门-Hello Thymeleaf


name
hello world
hello world
第三步:把项目跑起来
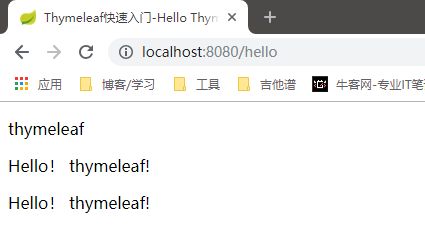
事实上,上面已经展示了三种拼接字符串的方式,你应该也能看出thymeleaf的一点端倪,不过你第一件注意到的事应该是这是一个HTML5文件,可以由任何浏览器正确的显示,因为它不包含任何非HTML得标签(浏览器会忽略他们不明白的所有属性,如:th:text)

项目运行之后,我们在地址栏输入localhost:8080/hello,就会看到意料之中结果正确的页面:
但是你也可能会注意到,这个模板并不是一个真正有效的HTML5文档,因为HTML5规范不允许在th:*形式中使用这些非标准属性。事实上,我们甚至在我们的标签中添加了一个xmlns:th属性,这绝对是非HTML5标准:
不管怎样,你已经看到了我们将如何使用Thymeleaf模板引擎访问model中的数据:“${}”,这和JSP极为相似,下面我们将进一步展示Thymeleaf的用法。
第四步:对项目做一些修改以方便调试
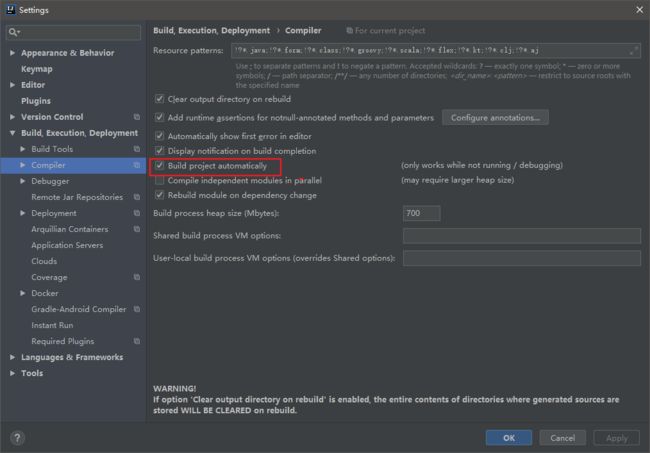
现在我们基础的环境和第一个任务(一个Hello World)页面都已经开发完成了,但是有一点不好的是,每一次我们对页面的修改都不能得到及时的反应,我们需要不断的重启服务器以看到效果,这在实际开发过程中是十分糟糕的表现,我们需要做一些修改,让Thymeleaf页面能够实时的刷新而不需要重启服务器。
打开IDEA->Setting,将下面的选项【Build project automatically】给勾选上:
然后按下快捷键【Ctrl + Alt + Shift + /】,召唤出【Maintenance】菜单,进入【Registry】:

把【compiler.automake.allow.when.app.running】这个选项的 √ 给打上:

然后再把【application.properties】弄成这个样子:
#thymeleaf 配置
spring.thymeleaf.mode=HTML5
spring.thymeleaf.encoding=UTF-8
spring.thymeleaf.servlet.content-type=text/html
#缓存设置为false, 这样修改之后马上生效,便于调试
spring.thymeleaf.cache=false
然后重启项目,对我们的hello.html稍稍做一些修改,稍等一会儿,你就能刷新页面看到效果,完美。
10#更多Thymeleaf的基础用法
1. model 中的数据迭代
Thymeleaf 的迭代和 JSP 的写法也很相似,我们将就上面的hello项目改一下:
    Thymeleaf快速入门-Hello Thymeleaf


        学生id
        学生姓名
为了配合演示,在【com.wmyskxz.demo】下新建一个【pojo】包,然后新建一个【Student】类:
package com.wmyskxz.demo.pojo;

public class Student {
    private String name;
    private Integer id;

    public Student(String name, Integer id) {
        this.name = name;
        this.id = id;
    }

    // getter and setter
}
再把controller改改,给前端添加几条数据:
@RequestMapping("/hello")
public String hello(Model model) {

    List students = new ArrayList<>();
    students.add(new Student("张三", 1));
    students.add(new Student("李四", 2));
    students.add(new Student("王五", 3));
    students.add(new Student("二麻子", 4));
    students.add(new Student("三棒子", 5));

    model.addAttribute("students", students);
    return "hello";
}
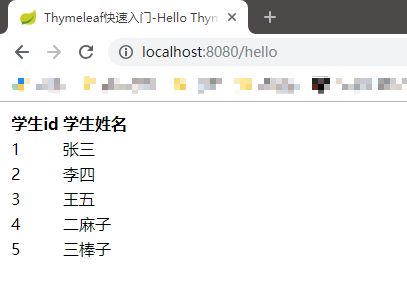
重启项目,然后在地址栏输入:localhost:8080/hello,能看到正确的显示,完美:
代码解释:
使用th:each来做循环迭代(th:each="s:${students}"),s作为迭代元素来使用,然后像上面一样访问迭代元素中的属性,相信这样的用法应该不会陌生。
进阶-带状态的遍历
我们也可以使用th:each="s,status:${students}"方式遍历,就可以把状态放在status里面了,同时还可以用th:class="${stauts.even}?'even':'odd'"来判断奇偶。
status里面包含的信息大致如下:
| 属性 | 说明 |
|---|---|
| index | 从0开始的索引值 |
| count | 从1开始的索引值 |
| size | 集合内元素的总量 |
| current | 当前的迭代对象 |
| even/odd | boolean类型的,用来判断是偶数个还是奇数个 |
| first | boolean类型,判断是否为第一个 |
| last | boolean类型,判断是否为最后一个 |
我们再次来修改一下我们的hello.html,让它多显示一行index属性,并增加一些简单的效果好让单双行区别开来:
Thymeleaf快速入门-Hello Thymeleaf
index
学生id
学生姓名
不用重启,刷新一下页面就可以看到效果,完美:

2. 数据判断
Thymeleaf 的条件判断是通过th:if来做的,只有条件为真的时候才会显示当前元素,取反可以用not(th:if="not 条件")或者th:unless,或者常见的三元判断符(x?y:z)也是适用的,我们动手再来修改我们的hello.html:
Thymeleaf快速入门-Hello Thymeleaf
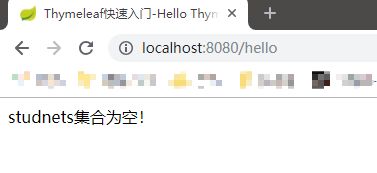
studnets集合为空!
index
学生id
学生姓名
然后我们相应的把Controller丢给hello.html的数据给清空:
@RequestMapping("/hello")
public String hello(Model model) {

    List students = new ArrayList<>();
//        students.add(new Student("张三", 1));
//        students.add(new Student("李四", 2));
//        students.add(new Student("王五", 3));
//        students.add(new Student("二麻子", 4));
//        students.add(new Student("三棒子", 5));

    model.addAttribute("students", students);
    return "hello";
}
重启项目,刷新页面,能看到正确的错误提示信息(对于这样的,需要有错误提示的页面我也不知道应该怎么写好,这里就简单示范一下,如果知道怎么写好的小伙伴记得提示一下啊):
代码解释:
通过${not #lists.isEmpty(students)}表达式,判断了students是否为空,Thymeleaf支持>、<、>=、<=、==、!=作为比较条件,同时也支持将SpringEL表达式语言用于条件中,表达式中的#lists.isEmpty()语法是Thymeleaf模板自带的一种内置工具,像这样的内置工具不仅方便而且能提高我们的效率,完整的内置工具在这里可以看到:【传送门】
3. 在 JavaScript 中访问 model
首先我们需要学习如何在Thymeleaf中引用静态资源,很简单,使用@{}就可以,这在JSP下是极易出错的。我们在【main】目录下新建一个【webapp】目录,然后在【staitc/js】目录下新建一个【thymeleaf.js】文件:
function testFunction(){
    alert("test Thymeleaf.js!");
}
在hello.html的标签中添加上下面这句话:
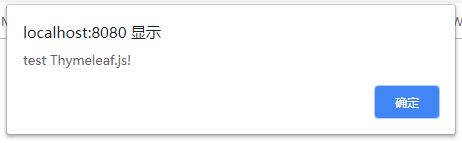
通过th:href="@{/static/js/thymeleaf.js}"这种方式,可以在渲染后的html里自动生成上下文路径,为了方便我们调试,也就是能在显示器中直接打开html文件进行效果的查看,我们还添加了src属性(src="../../webapp/static/js/thymeleaf.js")
刷新项目,能正确得到提示信息:
然后我们把hello.html改写成下面这个样子:
Thymeleaf快速入门-Hello Thymeleaf
再让Controller简单的传一个学生到前台:
@RequestMapping("/hello")
public String hello(Model model) {
    model.addAttribute("student", new Student("我没有三颗心脏", 1));
    return "hello";
}
刷新项目,按下F12,就可以在控制台中看到正确的信息了:

代码解释:
通过th:inline="javascript"添加到script标签,这样JavaScript代码即可访问model中的属性,再通过[[${}]]格式来获得实际的值。
4. 包含
我们在开发中常常都把页面共同的header和footer提取出来,弄成单独的页面,然后让该包含的页面包含进来,我们就拿footer举例,首先在【templates】下新建一个要背其他页面包含的footer页面【include】:
然后直接在我们的hello.html页面中分别引用上面页面定义好的两个foot:
Thymeleaf快速入门-Hello Thymeleaf
刷新页面,可以看到效果:
代码解释:
我们可以使用th:fragment属性来定义被包含的模板片段,然后使用th:include和th:replace两个标签来直接引用标记好的片段,上面hello.html其实就相当于:
Thymeleaf快速入门-Hello Thymeleaf
All Rights Reserved
也可以很明显感觉到两个标签的差别,include会保留自己的主标签,而replace会保留fragment的主标签。
11#一个CRUD+分页的实例
接下来我们沿用上面的基础,把这个项目进行一定的扩展,变成一个CRUD+分页的完整项目,不过首先,我们需要把之前因为不好习惯写的pojo.student类里的id和name顺序交换一下,好匹配数据库里的结构:
package com.wmyskxz.demo.pojo;
public class Student {
    private Integer id;
    private String name;
    // getter and setter
}
第一步:准备好数据库环境
建表SQL:
create database wmyskxz;
use wmyskxz;
CREATE TABLE student (
  id int(11) NOT NULL AUTO_INCREMENT,
  name varchar(30),
  PRIMARY KEY (id)
) DEFAULT CHARSET=UTF8;
第二步:修改application.properties和pom.xml
增加数据库相关配置到application,properties中,完整的文件如下:
#thymeleaf 配置
spring.thymeleaf.mode=HTML5
spring.thymeleaf.encoding=UTF-8
spring.thymeleaf.servlet.content-type=text/html
#缓存设置为false, 这样修改之后马上生效,便于调试
spring.thymeleaf.cache=false

#数据库
spring.datasource.url=jdbc:mysql://127.0.0.1:3306/wmyskxz?characterEncoding=UTF-8
spring.datasource.username=root
spring.datasource.password=123456
spring.datasource.driver-class-name=com.mysql.jdbc.Driver
往pom.xml增加jdbc,mybatis,pageHelper的jar包:
    4.0.0

        org.springframework.boot
        spring-boot-starter-parent
        2.1.1.RELEASE


    com.wmyskxz
    demo
    0.0.1-SNAPSHOT
    demo
    Demo project for Spring Boot + Thymeleaf


        1.8


            org.springframework.boot
            spring-boot-starter-thymeleaf


            org.springframework.boot
            spring-boot-starter-web


            org.springframework.boot
            spring-boot-starter-test
            test


            org.springframework.boot
            spring-boot-devtools
            true


            javax.servlet
            javax.servlet-api


            javax.servlet
            jstl


            org.apache.tomcat.embed
            tomcat-embed-jasper


            org.mybatis.spring.boot
            mybatis-spring-boot-starter
            1.1.1


            mysql
            mysql-connector-java
            5.1.21


            com.github.pagehelper
            pagehelper
            4.1.6


                org.springframework.boot
                spring-boot-maven-plugin
第三步:增加StudentMapper
新建【mapper】包,并在其下新增StudentMapper接口:
package com.wmyskxz.demo.mapper;

import com.wmyskxz.demo.pojo.Student;
import org.apache.ibatis.annotations.*;

import java.util.List;

@Mapper
public interface StudentMapper {

    @Select("select * from student")
    List findAll();

    @Insert("insert into student ( name ) values (#{name}) ")
    int save(Student student);

    @Delete("delete from student where id= #{id} ")
    void delete(int id);

    @Select("select * from student where id= #{id} ")
    Student get(int id);

    @Update("update student set name=#{name} where id=#{id} ")
    int update(Student student);
}
第四步:新增StudentController类
在【controller】包下新增一个【StudentController】类:
package com.wmyskxz.demo.controoler;

import com.github.pagehelper.PageHelper;
import com.github.pagehelper.PageInfo;
import com.wmyskxz.demo.mapper.StudentMapper;
import com.wmyskxz.demo.pojo.Student;
import org.springframework.beans.factory.annotation.Autowired;
import org.springframework.stereotype.Controller;
import org.springframework.ui.Model;
import org.springframework.web.bind.annotation.RequestMapping;
import org.springframework.web.bind.annotation.RequestParam;

import java.util.List;

@Controller
public class StudentController {
    @Autowired
    StudentMapper studentMapper;

    @RequestMapping("/addStudent")
    public String listStudent(Student student) throws Exception {
        studentMapper.save(student);
        return "redirect:listStudent";
    }

    @RequestMapping("/deleteStudent")
    public String deleteStudent(Student student) throws Exception {
        studentMapper.delete(student.getId());
        return "redirect:listStudent";
    }

    @RequestMapping("/updateStudent")
    public String updateStudent(Student student) throws Exception {
        studentMapper.update(student);
        return "redirect:listStudent";
    }

    @RequestMapping("/editStudent")
    public String listStudent(int id, Model m) throws Exception {
        Student student = studentMapper.get(id);
        m.addAttribute("student", student);
        return "editStudent";
    }

    @RequestMapping("/listStudent")
    public String listStudent(Model m, @RequestParam(value = "start", defaultValue = "0") int start, @RequestParam(value = "size", defaultValue = "5") int size) throws Exception {
        PageHelper.startPage(start, size, "id desc");
        List students = studentMapper.findAll();
        PageInfo page = new PageInfo<>(students);
        m.addAttribute("page", page);
        return "listStudent";
    }
}
第五步:配置PageHelper
新建【config】包,并在下面新建【PageHelperConfig】类:
package com.wmyskxz.demo.config;

import com.github.pagehelper.PageHelper;
import org.springframework.context.annotation.Bean;
import org.springframework.context.annotation.Configuration;

import java.util.Properties;

@Configuration
public class PageHelperConfig {

    @Bean
    public PageHelper pageHelper() {
        PageHelper pageHelper = new PageHelper();
        Properties p = new Properties();
        p.setProperty("offsetAsPageNum", "true");
        p.setProperty("rowBoundsWithCount", "true");
        p.setProperty("reasonable", "true");
        pageHelper.setProperties(p);
        return pageHelper;
    }
}
第六步:编写HTML文件
为了演示,我们简单添加两个页面就好了,一个是【listStudent.html】:
Thymeleaf快速入门-CRUD和分页实例
另一个就是编辑Student的页面【editStudent.html】:
Thymeleaf快速入门-CRUD和分页实例
第七步:运行项目
在添加了一些数据之后,可以观察到各项功能都是可以正常使用的,这个例子也是我直接借鉴how2j教程里的源码写的,原文在这里:【传送门】,运行之后,可以看到大概是这样的效果,完美:

至此,我们就差不多算是对Thymeleaf入了门。
按照惯例黏一个尾巴,话说有木有懂公众号运营的小伙伴啊?求指教!
欢迎转载,转载请注明出处!
ID:@我没有三颗心脏
github:wmyskxz
欢迎关注公众微信号:wmyskxz
分享自己的学习 & 学习资料 & 生活
想要交流的朋友也可以加qq群:3382693