springboot-5.全局异常捕获
springboot入门篇集合
- springboot-1.简约版创建第一个应用
- springboot-2.利用接口返回数据(json)
- springboot-3.资源文件属性配置
- springboot-4.模板引擎freemarker&thymeleaf
- springboot-5.全局异常捕获
- springboot-6.整合Mybatis
- springboot-7.快速上手redis
在web应用中,请求处理时,出现异常是非常常见的。所以当应用出现各类异常时,进行异常的捕获或者二次处理(比如sql异常正常是不能外抛)是非常必要的,比如在开发对外api服务时,约定了响应的参数格式,如respCode、respMsg,调用方根据错误码进行自己的业务逻辑。
1 浏览器访问异常时:

2.postman访问异常时:

显然,默认的异常页是对用户或者调用者而言都是不友好的,所以一般上我们都会进行实现自己业务的异常提示信息。
简易版配置参考:https://www.liangzl.com/get-article-detail-2058.html

正文
1.自定义基础接口类+自定义枚举类
public interface BaseErrorInfoInterface {
    /** 错误码*/
    String getResultCode();

    /** 错误描述*/
    String getResultMsg();

    public enum CommonEnum implements BaseErrorInfoInterface {
        // 数据操作错误定义
        SUCCESS("200", "成功!"),
        BODY_NOT_MATCH("400","请求的数据格式不符!"),
        SIGNATURE_NOT_MATCH("401","请求的数字签名不匹配!"),
        NOT_FOUND("404", "未找到该资源!"),
        INTERNAL_SERVER_ERROR("500", "服务器内部错误!"),
        SERVER_BUSY("503","服务器正忙,请稍后再试!")
        ;

        /** 错误码 */
        private String resultCode;

        /** 错误描述 */
        private String resultMsg;

        CommonEnum(String resultCode, String resultMsg) {
            this.resultCode = resultCode;
            this.resultMsg = resultMsg;
        }

        @Override
        public String getResultCode() {
            return resultCode;
        }

        @Override
        public String getResultMsg() {
            return resultMsg;
        }
    }
}
2.自定义异常类
public class BizException extends RuntimeException {

    private static final long serialVersionUID = 1L;

    /**
     * 错误码
     */
    protected String errorCode;
    /**
     * 错误信息
     */
    protected String errorMsg;

    public BizException() {
        super();
    }

    public BizException(BaseErrorInfoInterface errorInfoInterface) {
        super(errorInfoInterface.getResultCode());
        this.errorCode = errorInfoInterface.getResultCode();
        this.errorMsg = errorInfoInterface.getResultMsg();
    }

    public BizException(BaseErrorInfoInterface errorInfoInterface, Throwable cause) {
        super(errorInfoInterface.getResultCode(), cause);
        this.errorCode = errorInfoInterface.getResultCode();
        this.errorMsg = errorInfoInterface.getResultMsg();
    }

    public BizException(String errorMsg) {
        super(errorMsg);
        this.errorMsg = errorMsg;
    }

    public BizException(String errorCode, String errorMsg) {
        super(errorCode);
        this.errorCode = errorCode;
        this.errorMsg = errorMsg;
    }

    public BizException(String errorCode, String errorMsg, Throwable cause) {
        super(errorCode, cause);
        this.errorCode = errorCode;
        this.errorMsg = errorMsg;
    }


    public String getErrorCode() {
        return errorCode;
    }

    public void setErrorCode(String errorCode) {
        this.errorCode = errorCode;
    }

    public String getErrorMsg() {
        return errorMsg;
    }

    public void setErrorMsg(String errorMsg) {
        this.errorMsg = errorMsg;
    }

    public String getMessage() {
        return errorMsg;
    }

    @Override
    public Throwable fillInStackTrace() {
        return this;
    }
}
3.自定义数据格式
public class ResultBody {
    /**
     * 响应代码
     */
    private String code;

    /**
     * 响应消息
     */
    private String message;

    /**
     * 响应结果
     */
    private Object result;

    public ResultBody() {
    }

    public ResultBody(BaseErrorInfoInterface errorInfo) {
        this.code = errorInfo.getResultCode();
        this.message = errorInfo.getResultMsg();
    }

    public String getCode() {
        return code;
    }

    public void setCode(String code) {
        this.code = code;
    }

    public String getMessage() {
        return message;
    }

    public void setMessage(String message) {
        this.message = message;
    }

    public Object getResult() {
        return result;
    }

    public void setResult(Object result) {
        this.result = result;
    }

    /**
     * 成功
     *
     * @return
     */
    public static ResultBody success() {
        return success(null);
    }

    /**
     * 成功
     * @param data
     * @return
     */
    public static ResultBody success(Object data) {
        ResultBody rb = new ResultBody();
        rb.setCode(CommonEnum.SUCCESS.getResultCode());
        rb.setMessage(CommonEnum.SUCCESS.getResultMsg());
        rb.setResult(data);
        return rb;
    }

    /**
     * 失败
     */
    public static ResultBody error(BaseErrorInfoInterface errorInfo) {
        ResultBody rb = new ResultBody();
        rb.setCode(errorInfo.getResultCode());
        rb.setMessage(errorInfo.getResultMsg());
        rb.setResult(null);
        return rb;
    }

    /**
     * 失败
     */
    public static ResultBody error(String code, String message) {
        ResultBody rb = new ResultBody();
        rb.setCode(code);
        rb.setMessage(message);
        rb.setResult(null);
        return rb;
    }

    /**
     * 失败
     */
    public static ResultBody error( String message) {
        ResultBody rb = new ResultBody();
        rb.setCode("-1");
        rb.setMessage(message);
        rb.setResult(null);
        return rb;
    }

    @Override
    public String toString() {
        return JSONObject.toJSONString(this);
    }
}
4.自定义全局异常处理类
@RestControllerAdvice
public class GlobalExceptionHandler {
    private static final Logger logger = LoggerFactory.getLogger(GlobalExceptionHandler.class);
    public static final String Demo_View =  "error";
    /**
     * 处理自定义的业务异常
     * @param req
     * @param e
     * @return
     */
    @ExceptionHandler(value = BizException.class)
    public  Object bizExceptionHandler(HttpServletRequest request,HttpServletRequest req, BizException e){
        if(isAjax(request))
        {
            return jsonResult.errorTokenMsg(e.getMessage());
        }
        else
        {
            ModelAndView mav = new ModelAndView();
            mav.addObject("exception",e);
            mav.addObject("status",e.getErrorCode());
            mav.setViewName(Demo_View);
            return mav;
        }
    }

    /**
     * 处理空指针的异常
     * @param req
     * @param e
     * @return
     */
    @ExceptionHandler(value =NullPointerException.class)
    @ResponseBody
    public ResultBody exceptionHandler(HttpServletRequest req, NullPointerException e){
        logger.error("发生空指针异常!原因是:",e);
        return ResultBody.error(BaseErrorInfoInterface.CommonEnum.BODY_NOT_MATCH);
    }


    /**
     * 处理其他异常
     * @param req
     * @param e
     * @return
     */
    @ExceptionHandler(value =Exception.class)
    public Object exceptionHandler(HttpServletRequest request,HttpServletRequest req, Exception e){
        if(isAjax(request))
        {
            return jsonResult.errorTokenMsg(e.getMessage());
        }
        else
        {
            ModelAndView mav = new ModelAndView();
            mav.addObject("exception",e);
            mav.addObject("status",INTERNAL_SERVER_ERROR);
            mav.setViewName(Demo_View);
            return mav;
        }
    }

    //判断是否是ajax请求
    public static boolean isAjax(HttpServletRequest httpRequest)
    {
        return(httpRequest.getHeader("X-Requested-With")!=null
                &&"XMLHttpRequest".equals(httpRequest.getHeader("X-Requested-With").toString()));
    }
}
5.编写前端异常显示页面
ps:名称对应步骤4里的String Demo_View
为了测试,快速建立一个html
<html xmlns:th="http://www.thymeleaf.org">
<html lang="en">
<head>
    <meta charset="UTF-8">
    <meta name="viewport"
          content="width=device-width, user-scalable=no, initial-scale=1.0, maximum-scale=1.0, minimum-scale=1.0">
    <meta http-equiv="X-UA-Compatible" content="ie=edge">
    <title>Documenttitle>
head>
<body>
<div th:text="${url}">div>
<div th:text="${exception.message}">div>
<div th:text="${status}">div>
body>
html>
此时全局异常捕获已经建立完毕,接下来进行测试
测试
1.web页面跳转
@Controller
@RequestMapping("/err")
public class errorController {
    @RequestMapping("/error")
    public String error()
    {
        int a = 1 / 0; //除以0,产生异常
        return "error";
    }
}
此时访问web页面:

2.ajax形式跳转
更改controller文件
@Controller
@RequestMapping("/err")
public class errorController {
    @RequestMapping("")
    public String err()
    {
        return "thymeleaf/ajaxerror";
    }
    @RequestMapping("getAjaxError")
    public jsonResult ajaxError()
    {
        int a = 1/0;
        return jsonResult.ok(200);
    }
}
新建一个ajaxerror.html文件于thymeleaf文件夹下
<html lang="en">
<html xmlns:th="http://www.thymeleaf.org">
<head>
    <meta charset="UTF-8">
    <title>ajax测试title>
head>
<script src="https://code.jquery.com/jquery-3.1.1.min.js">script>
<body>
<input id="test" value="测试" type="submit">
body>
<script th:src="@{/static/js/ajaxjs.js}">script>
html>
新建一个ajax.js文件编写ajax请求
$("#test").click(function() {
    $.ajax({
        url: "/err/getAjaxError",
        type: "POST",
        async: false,
        success: function (data) {
            if (data.status == 200 && data.msg == 'OK') {
                alert("success");
            } else {
                alert("发生异常" + data.msg);
            }
        },
        error: function (response, ajaxOption, thrownError) {
            alert("error");
        }
    });
});
记得在application文件夹添加静态文件路径配置
  mvc:
    static-path-pattern: /static/**
此时访问


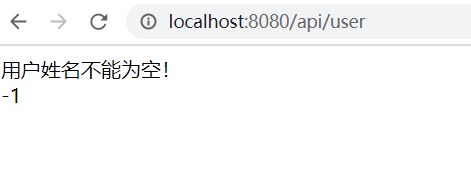
3.测试自定义异常
新建一个controller文件
@Controller
@RequestMapping(value = "/api")
public class UserRestController {
    @RequestMapping("")
    public String api(ModelMap map)
    {
        User u = new User();
        map.addAttribute("user",u);
        return "thymeleaf/api";
    }

    @PostMapping("/user")
    public boolean insert(User user) {
        System.out.println("开始新增...");
        //如果姓名为空就手动抛出一个自定义的异常!
        if (user.getUsername() == null) {
            throw new BizException("-1", "用户姓名不能为空!");
        }
        return true;
    }
}
新建一个api.html文件
<html lang="en">
<html xmlns:th="http://www.thymeleaf.org">
<head>
    <meta charset="UTF-8">
    <title>Titletitle>
head>
<body>
<form action="/api/user" th:method="post">
    <input type="text" th:id="${user.username}" th:name="${user.username}" th:value="${user.username}">
    <input type="submit">
form>
body>
html>
尾言
按照步骤添加即可完成操作~
User类自行添加或者浏览前文即可。
其他
1.SpringBoot异常处理-自定义错误页面
(1) 在Spring Boot中一共提供了几种处理异常的方式?
SpringBoot 中对于异常处理提供了五种处理方式:
自定义错误页面;
@ExceptionHandle 注解处理异常;
@ControllerAdvice+@ExceptionHandler 注解处理异常;
配置 SimpleMappingExceptionResolver 处理异常;
自定义 HandlerExceptionResolver 类处理异常
(2) 什么是自定义错误页面方式?
SpringBoot 默认的处理异常的机制:SpringBoot 默认的已经提供了一套处理异常的机制。一旦程序中出现了异常 SpringBoot 会像/error 的 url 发送请求。在 springBoot 中提供了一个叫 BasicExceptionController 来处理/error 请求,然后跳转到默认显示异常的页面来展示异常信息。
(3) 自义定错误页面应该放到项目的什么位置?
放在一般网页资源存放的位置 即src/main/resources/templates
2.SpringBoot异常处理-@ControlleAdvice
(1) @ControllerAdvice注解的作用是什么?
需要创建一个能够处理异常的全局异常类。 在该类上需要添加@ControllerAdvice 注解。
(2) @ControllerAdvice+@ExceptionHandler注解处理异常有什么特点?
是一个处理异常的全局异常类,整个项目只要产生了该类方法捕获的异常都会被捕获处理。缺点是要根据异常类型不同规定很多的异常处理方法,也就是@ExceptionHandler方法,代码冗余而且没有规定的异常类型无法捕获还是会走SpringBoot默认的异常处理方法。
