微信公众号+vue+微信支付
在上一篇文章中本人讲述了微信公众号的授权以及获取用户信息,在此基础上今天这篇博客跟大家分享一下微信支付的流程及代码,还有自己在开发时的一些坑。
1、在进行微信支付时,除了需要一个公众号之外,你还需要一个微信商户。根据商户申请规则进行商户申请
2、开始配置开发所需要的参数如下所示:
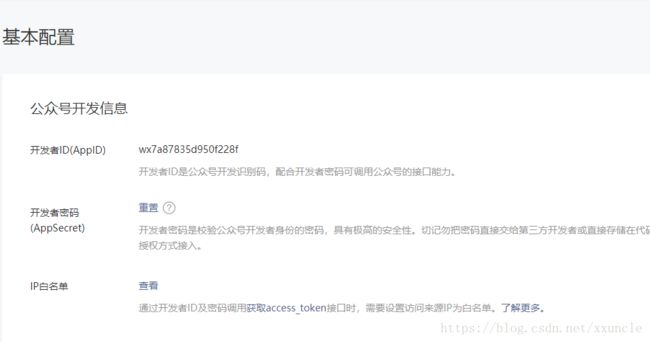
这是公众号的基本开发配置,这里在微信授权的时候就已经需要配置了 但是注意AppSecret在你第一次配置的时候就需要备份下来,如果没有备份那么下次使用的话你就需要去重置它
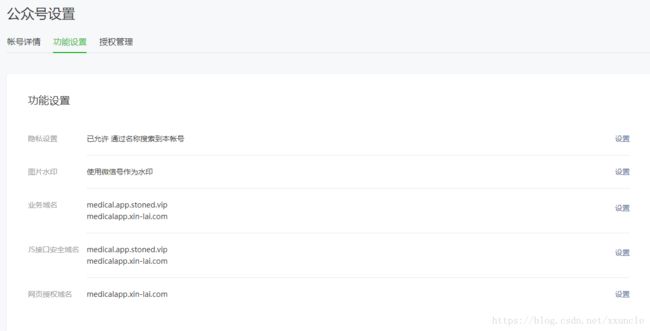
网页域名授权,你需要填写正确的可以访问的项目域名,确保微信可以访问
3、公众号配置好后我们需要开始配置微信商户平台的内容了
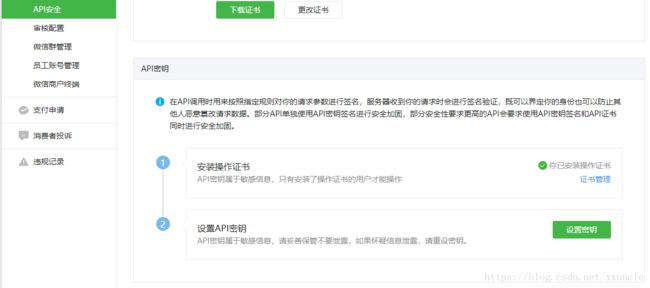
商户平台需要进行的配置是:商户号,支付密钥
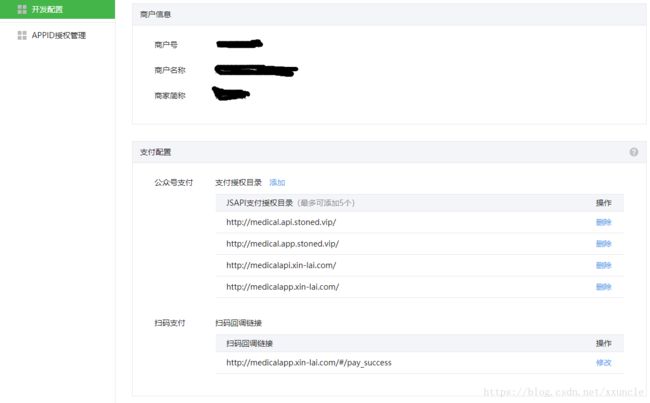
商户号一般都是和自己公众号的商户号是一样的
主要是一个支付密钥的配置
然后是域名配置 和公众号差不多
配置支付的参数完成之后就可以开始进行开发了 不过在支付开发中可能会有些许的麻烦 那就是你不能在线下本机测试,因为IP白名单的限制 除非你将自己的本机地址进行地址映射,但是映射操作比较繁琐,如果自己的项目不是很大的话那就自己麻烦一点部署项目然后进行测试吧,如果你想进行映射之后本机测试这里可以推荐一个组件给你访问链接https://natapp.cn/
4、开始正式的代码书写 这里使用的SDK是(![]() )
)
(1)后台进行支付配置:
//实例配置
var config = new WeChatConfig(){
AppId = "wx7a87835d950f228f",
AppSecret = "97d8581300ed49326c53db5373e07104",
MchId = "1502779501",
Notify = "http://medicalapi.xin-lai.com/PayNotify/0/wechat",//这是支付回调路径(不是前端路径,这个很坑)
TenPayKey = "wlsoftnewhissong3355180meiyanfei",
PayAppId = "wx7a87835d950f228f"
};
WeChatSDKBuilder.Create()
//设置日志记录
.WithLoggerAction((tag, message) =>
{
logger.Debug(string.Format("Tag:{0}\tMessage:{1}", tag, message));
})
//注册Key。不再需要各个控制注册
.Register(WeChatFrameworkFuncTypes.GetKey, model =>
{
return "wx8370799bb85178a8";
}
)
//注册获取配置函数:根据Key获取微信配置(加载一次后续将缓存)
.Register(WeChatFrameworkFuncTypes.Config_GetWeChatConfigByKey,
model =>
{
return config;
})
//注册微信支付配置
.Register(WeChatFrameworkFuncTypes.Config_GetWeChatPayConfigByKey, model =>
{
return config;
}
)
.Build();
你可以将config写在项目的配置文件中然后进行获取 我这里是直接实例化直接了当
(2)支付还需要配置回调处理逻辑:
//支付回调设置
PayNotifyBuilder
.Create()
//设置日志记录
.WithLoggerAction((tag, message) =>
{
logger.Debug(string.Format("Tag:{0}\tMessage:{1}", tag, message));
}).WithPayNotifyFunc(async(input) =>
{
switch (input.Provider)
{
case "wechat":
{
var api = new WeChatPayApi();
var output = api.PayNotifyHandler(input.Request.Body);
if (output.IsSuccess())
{
bool theresult = true;
var resultLog = output.ToJsonString();
logger.Debug("微信支付处理成功: " + resultLog);
//判断支付类别并编辑处理
if (output.Attach.StartsWith("门诊"))
{
OutpatientsAppService outpatientsAppService = new OutpatientsAppService(new XmlSerializeAppService());
theresult= await outpatientsAppService.LoadChargeListInfo(new Outpatients.Dto.LoadChargeListInfoinput()
{
patCardNo = output.Attach.Substring(2),
psOrdNum = output.TransactionId,
hisOrdNum = output.OutTradeNo,
payMode = "WXPay",
payAmt = Convert.ToDecimal(output.TotalFee) % 100,
payTime =output.TimeEnd,
patCardType= "院内诊疗卡",
agtOrdNum= output.Attach.Substring(2),
});
}
else if (output.Attach.StartsWith("住院"))
{
logger.Debug("进入住院缴费!");
}
else if (output.Attach.StartsWith("挂号"))
{
RegistrationsAppService registrationsAppService = new RegistrationsAppService(new XmlSerializeAppService());
theresult= await registrationsAppService.RegistPay(output.Attach.Substring(2));
}
if (theresult == true)
{
logger.Debug(output.Attach.Substring(0, 2) + "缴费支付完成!");
logger.Debug("缴费卡号!"+output.Attach.Substring(2));
}
else
{
logger.Debug(output.Attach.Substring(0,2)+"缴费支付未完成!");
}
}
else
{
//此处编写失败处理逻辑
var failLog = output.ToJsonString();
logger.Error("微信支付处理失败: " + failLog);
return await Task.FromResult("
}
}
break;
default:
break;
}
return null;
}).Build();
(3)支付接口的封装与调用
先是进行微信统一下单
///
/// 支付接口实现类
///
[Produces("application/json")]
[Route(ApiPrefix + "[controller]")]
public class WhechatPayAppService : AppServiceBase, IwhechatPayAppService
{
///
/// 依赖注入
///
private readonly IHttpContextAccessor _httpContextAccessor;
public WhechatPayAppService(IHttpContextAccessor httpContextAccessor)
{
_httpContextAccessor = httpContextAccessor;
}
///
/// 下单 获取微信支付授权
///
///
///
[AbpAllowAnonymous]
[HttpPost("GetPayurl")]
public async Task
{
//获取实际IP
string clientIp = null;
if (clientIp.IsNullOrWhiteSpace())
clientIp = _httpContextAccessor.HttpContext?.Connection?.RemoteIpAddress?.ToString();
clientIp = clientIp ?? "8.8.8.8";
using (UnitOfWorkManager.Current.DisableFilter(AbpDataFilters.MayHaveTenant, AbpDataFilters.MustHaveTenant))
{
var config = WeChatConfigManager.Current.GetPayConfig();
var result = WeChatApisContext.Current.TenPayV3Api.Unifiedorder(new WeChat.SDK.Pays.TenPayV3.UnifiedorderRequest
{
Body = input.Body,
OpenId = input.OpenId,
TimeStart = DateTime.Now.ToString("yyyyMMddHHmmss"),
TimeExpire = DateTime.Now.AddMinutes(10).ToString("yyyyMMddHHmmss"),
TradeType = "JSAPI",
DeviceInfo = "WEB",
TotalFee =Convert.ToInt32(input.Cash * 100).ToString(),
OutTradeNo = input.OutTradeNo,
SpbillCreateIp = clientIp,
Attach=input.Attach,
});
if (result.ReturnCode == "FAIL")
throw new UserFriendlyException(result.Message);
var dict = new Dictionary
{
{"appId", result.AppId},
{"timeStamp", PayUtil.GetTimestamp()},
{"nonceStr", result.NonceStr},
{"package", "prepay_id=" + result.PrepayId},
{"signType", "MD5"}
};
dict.Add("paySign", PayUtil.CreateMd5Sign(dict, WeChatConfigManager.Current.GetPayConfig().TenPayKey));
return new UnifiedorderResult
{
MWebUrl = null,
PrepayId = "prepay_id=" + result.PrepayId,
TradeType = result.TradeType,
AppId = result.AppId,
paySign= dict["paySign"],
nonceStr = result.NonceStr,
timeStamp= dict["timeStamp"],
msg=result.ErrCodeDes,
};
}
}
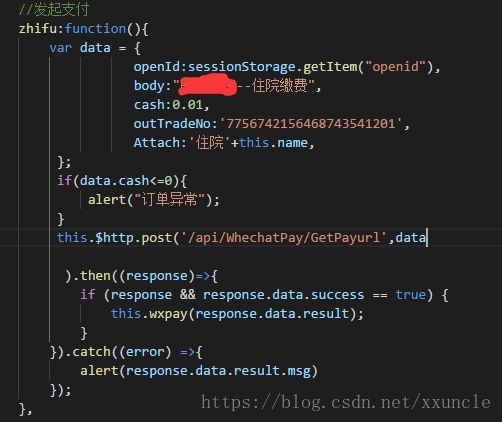
前端调用统一下单接口 发起支付
统一下单完成之后 用完成返回的参数唤起支付
前端js会返回支付的结果给你 同时后台会异步的根据你配置的url返回支付回调的信息
坑:当微信支付完成页面收起之后,会回到你原来的页面 但是这时你的这个页面是没有路径的
在这里一般前端只做简单的页面处理,后台进行具体业务处理如上述支付回调配置所述 这样你的支付就完成了
相比微信授权来说 公众号的内容就比较好理解了!
