spring与mybatis整合总结
1.思路
spring的特点就是对系统的一个调度管理。我们可以使用spring的声明式的方式或者注解方式来以单例的方式管理sqlSessionFactory。
spring整合mybatis,通过生成的代理对象来使用SqlSessionFactory创建SqlSession。或者将mapper交由spring进行管理。
2.整合环境搭建
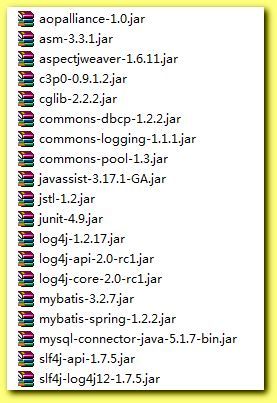
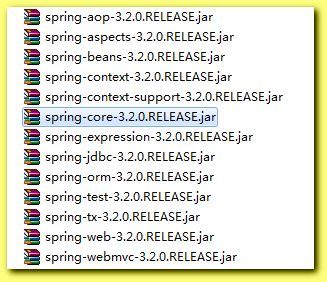
首先要导入jar包:
像上面也导入了dbcp和c3p0数据库连接池的jar包,这么我打算使用c3p0连接池来管理数据库连接,如果你需要什么就使用什么。其实在上面的文件夹中重要的就是用mybatis-spring-1.2.2.jar的包,所有的用到的配置来源于此包。
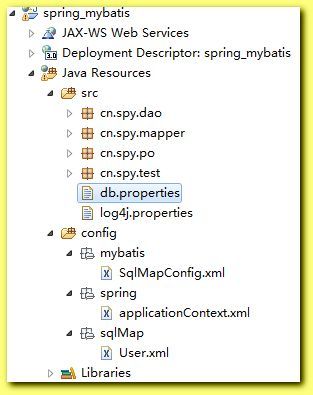
工程目录:
目录介绍:分为src和config两个源文件夹。
db.properties:作为数据库配置的文件。
log4j.properties:作为日志显示配置的文件。
mybaits/SqlMapConfig.xml:作为Mybatis的总文件配置的文件。
spring/applicationContext:作为spring管理业务的配置文件。
sqlMap/User.xml:只用在原dao方式开发的(ibatis方式)与spring整合使用。
cn.spy.dao:dao层开发的包。
cn.spy.mapper:只用在使用mybatis的mapper方式开发与spring整合使用。
cn.spy.po:数据模型包。
cn.spy.test:测试包。
db.properties:
#mysql
jdbc.driverClass=com.mysql.jdbc.Driver
jdbc.jdbcUrl=jdbc:mysql://localhost:3306/spring_mybatis_database?characterEncoding=utf-8
jdbc.user=root
jdbc.password=
jdbc.initialPoolSize=3
jdbc.maxPoolSize=6
jdbc.maxIdleTime=1000
log4j.rootLogger=debug,stdout,logfile
log4j.appender.stdout=org.apache.log4j.ConsoleAppender
log4j.appender.stdout.layout=org.apache.log4j.SimpleLayout
log4j.appender.logfile=org.apache.log4j.FileAppender
log4j.appender.logfile.layout=org.apache.log4j.PatternLayout
log4j.appender.logfile.layout.ConversionPattern=%d{yyyy-MM-dd HH:mm:ss} %F %p %m%n
log4j.logger.com.ibatis=DEBUG
log4j.logger.com.ibatis.common.jdbc.SimpleDataSource=DEBUG
log4j.logger.com.ibatis.common.jdbc.ScriptRunner=DEBUG
log4j.logger.com.ibatis.sqlmap.engine.impl.SqlMapClientDelegate=DEBUG
log4j.logger.java.sql.Connection=DEBUG
log4j.logger.java.sql.Statement=DEBUG
log4j.logger.java.sql.PreparedStatement=DEBUG
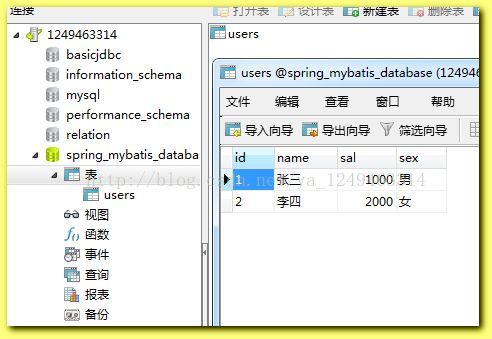
数据库文件:
模型包cn.spy.po中User类:
public class User {
	private String id;
	private String name;
	private double sal;
	private String sex;
	public User() {}
	public User(String id, String name, double sal, String sex) {
		super();
		this.id = id;
		this.name = name;
		this.sal = sal;
		this.sex = sex;
	}
	public String getId() {
		return id;
	}
	public void setId(String id) {
		this.id = id;
	}
	public String getName() {
		return name;
	}
	public void setName(String name) {
		this.name = name;
	}
	public double getSal() {
		return sal;
	}
	public void setSal(double sal) {
		this.sal = sal;
	}
	public String getSex() {
		return sex;
	}
	public void setSex(String sex) {
		this.sex = sex;
	}
	@Override
	public String toString() {
		return "User [id=" + id + ", name=" + name + ", sal=" + sal + ", sex="
				+ sex + "]";
	}
}
3.原生dao方式整合spring开发
使用原生dao方式开发,那么就肯定没mapper什么事了。使用sqlMap文件夹下的User.xml文件:
总配置文件mybatis/SqlConfigMap.xml:
public class UserDaoImpl extends SqlSessionDaoSupport {

	public User findUserById(String id) {
		//继承SqlSessionDaoSupport,通过this.getSqlSession();得到SqlSession
		SqlSession sqlSession =this.getSqlSession();
		User user =sqlSession.selectOne("test.findUserById", id);
		return user;
	}
}测试类:UserTest类:
public class UserTest {

	@Test
	public void doTest(){
		ApplicationContext applicationContext =new ClassPathXmlApplicationContext("classpath:spring/applicationContext.xml");
		UserDaoImpl userDaoImpl =(UserDaoImpl) applicationContext.getBean("userDao");
		User user =userDaoImpl.findUserById("2");
		System.out.println(user);
	}
}4.使用mapper的方式整合spring开发
UserMapper.java接口:
public interface UserMapper {
	public User findUserById(String id);
}
public class UserTest {

	@Test
	public void doTest(){
		ApplicationContext applicationContext =new ClassPathXmlApplicationContext("classpath:spring/applicationContext.xml");
		UserMapper userMapper =(UserMapper) applicationContext.getBean("userMapper");
		User user =userMapper.findUserById("2");
		System.out.println(user);
	}
}对于mapper的开发就没有dao层什么事情了,完全通过代理对象去查询结果。
5.通过与spring整合且使用MapperScannerConfigurer进行mapper批量扫描
对于上面的mapper虽然可以整合spring开发,但每个mapper,我们都需要配置,这样很费事。我们采用MapperScannerConfigurer
来扫描mapper。
这个方式就相当于比4中的mapper便捷于可以扫描多个mapper,所以就只是applicationContext.xml变化了下。
这种mapper批量被扫描,从mapper包中扫描出mapper接口。自动创建代理对象并且在spring容器中注册规则就是mapper.java和mapper.xml映射文件的名称需要保持一致,并且在一个包中。自动扫描出来的mapper的bean的id为mapper类名(首字母小写)。
测试程序:
public class UserTest {

	@Test
	public void doTest(){
		ApplicationContext applicationContext =new ClassPathXmlApplicationContext("classpath:spring/applicationContext.xml");
		UserMapper userMapper =(UserMapper) applicationContext.getBean("userMapper");
		User user =userMapper.findUserById("2");
		System.out.println(user);
	}
}


