Android客户端连接SSM(Spring+SpringMVC+Mybatis)框架Java服务器端
Android客户端开发越来越流行,但是,Android客户端对应的服务器端采用什么框架呢?对于功能较为简单的应用,我建议,直接采用java web开发最简单的MVC框架即可(很多Android应用的服务器端开发框架,我都是采用这种);但是,对于功能较为复杂,数据库表较多,逻辑关系比较复杂的应用开发,服务器端逻辑关系自然也是一样,我们是否可以考虑采用java web开发流行的SSH2/SSM等框架呢?经过实践测试,我将Android客户端连接SSM ( Spring + SpingMVC + Mybatis)框架java web服务器端的开发模式,详细给大家细细介绍一下吧~
其中,这里需要介绍的是,java web服务器端不只是需要处理来自Android客户端的请求,而且,同时需要处理来自后台管理系统(使用jsp开发前台页面)的请求,因此,在编写请求接受和处理函数时,需要分别编写(这里,我采用的是分别编写各自的处理函数)。
1.开发Android应用客户端
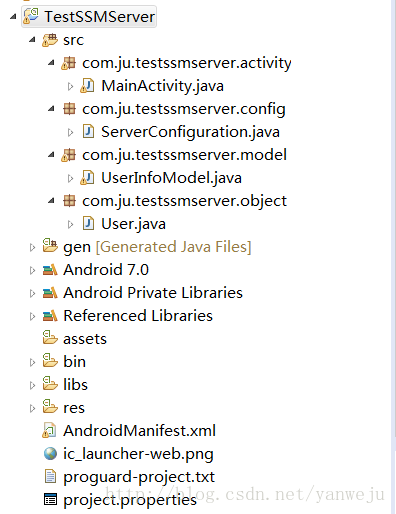
整个的Android客户端(TestSSMServer)的框架结构:

1.1 activity
MainActivity.java
package com.ju.testssmserver.activity;

import com.ju.testssmserver.R;
import com.ju.testssmserver.R.id;
import com.ju.testssmserver.R.layout;
import com.ju.testssmserver.R.menu;
import com.ju.testssmserver.model.UserInfoModel;
import com.ju.testssmserver.object.User;

import android.app.Activity;
import android.app.AlertDialog;
import android.content.DialogInterface;
import android.content.Intent;
import android.os.Bundle;
import android.os.Handler;
import android.os.Message;
import android.util.Log;
import android.view.Menu;
import android.view.MenuItem;
import android.view.View;
import android.view.View.OnClickListener;
import android.view.Window;
import android.widget.Button;
import android.widget.TextView;

public class MainActivity extends Activity {

    private TextView userIDTV;
    private TextView userNameTV;
    private TextView passwordTV;
    private Button getBtn;

    private Intent intent;

    @Override
    protected void onCreate(Bundle savedInstanceState) {
        super.onCreate(savedInstanceState);
        requestWindowFeature(Window.FEATURE_NO_TITLE);
        setContentView(R.layout.activity_main);

        userIDTV = (TextView) findViewById(R.id.userIDTV);
        userNameTV = (TextView) findViewById(R.id.userNameTV);
        passwordTV = (TextView) findViewById(R.id.passwordTV);
        getBtn = (Button)findViewById(R.id.getBtn);

        intent= this.getIntent();

        getBtn.setOnClickListener(new OnClickListener()
        {
            @Override
            public void onClick(View v) {
                initActivity();

            }
        });

    }

    private void initActivity(){
        /**
         * Handler
         * @note 用于子线程和主线程之间的数据传递
         * 解决了andr4.0以上主线程无法访问网络的问题。
         */
        final Handler myhandler = new Handler() {
            public void handleMessage(Message msg) {
                //isNetError = msg.getData().getBoolean("isNetError");
                if(msg.what==0x123)
                {
                    userIDTV.setText(String.valueOf(msg.getData().getInt("userID")));
                    userNameTV.setText(msg.getData().getString("userName"));
                    passwordTV.setText(msg.getData().getString("password"));
                }
            }
        };

        /**
         * 新建子线程
         * @note 用于建立网络连接,从服务器获取IMEI对应的用户信息
         * 解决了andr4.0以上主线程无法访问网络的问题。
         */
        new Thread(){
            public void run(){
                UserInfoModel userInfoModel = new UserInfoModel();
                User user = new User();

                try {
                    user = userInfoModel.getUserInfo(2);

                    if(user == null)
                    {
                        myhandler.post(new Runnable(){
                                public void run(){
                                showDialog("数据库中未查找到你的相关信息!请及时注册!");
                                }
                        });
                    }
                    else
                    {
                        Bundle bundle = new Bundle();
                        Message message = new Message();

                        bundle.putInt("userID", user.getUserID());
                        bundle.putString("userName", user.getUserName());
                        bundle.putString("password", user.getPassword());

                        message.setData(bundle);
                        message.what=0x123;
                        myhandler.sendMessage(message);
                    }
                } catch (Exception e) {
                    e.printStackTrace();
                }
            }
        }.start();
    }


    /**
     * 对话框显示函数
     *
     * @param message是要显示的内容
     */
    private void showDialog(String message) {
        AlertDialog.Builder builder = new AlertDialog.Builder(
                MainActivity.this);
        builder.setMessage(message);

        builder.setPositiveButton("确认", new DialogInterface.OnClickListener() {

            @Override
            public void onClick(DialogInterface dialog, int which) {
                dialog.dismiss();
                MainActivity.this.setResult(RESULT_OK, intent);
                MainActivity.this.finish();
            }
        });
        AlertDialog alert = builder.create();
        alert.show();
    }

    @Override
    public boolean onCreateOptionsMenu(Menu menu) {
        // Inflate the menu; this adds items to the action bar if it is present.
        getMenuInflater().inflate(R.menu.main, menu);
        return true;
    }

    @Override
    public boolean onOptionsItemSelected(MenuItem item) {
        // Handle action bar item clicks here. The action bar will
        // automatically handle clicks on the Home/Up button, so long
        // as you specify a parent activity in AndroidManifest.xml.
        int id = item.getItemId();
        if (id == R.id.action_settings) {
            return true;
        }
        return super.onOptionsItemSelected(item);
    }
}
对应的layout ——activity_main.xml的代码:
<RelativeLayout xmlns:android="http://schemas.android.com/apk/res/android"
    xmlns:tools="http://schemas.android.com/tools"
    android:layout_width="match_parent"
    android:layout_height="match_parent"
    android:paddingBottom="@dimen/activity_vertical_margin"
    android:paddingLeft="@dimen/activity_horizontal_margin"
    android:paddingRight="@dimen/activity_horizontal_margin"
    android:paddingTop="@dimen/activity_vertical_margin"
    tools:context="com.ju.testssmserver.activity.MainActivity" >

    <TableLayout
        android:layout_width="match_parent"
        android:layout_height="match_parent"
        android:layout_marginLeft="26dp"
        android:layout_marginTop="50dp" >

       <TableRow
            android:id="@+id/tableRow5"
            android:layout_width="match_parent"
            android:layout_height="wrap_content" >
            <Button
                android:id="@+id/getBtn"
                android:layout_width="wrap_content"
                android:layout_height="wrap_content"
                android:layout_gravity="center|center_horizontal"
                android:gravity="center|center_vertical"
                android:text="Get信息"
                android:textAppearance="@style/labelText"/>
        TableRow>
        <TableRow
            android:id="@+id/tableRow4"
            android:layout_width="match_parent"
            android:layout_height="wrap_content" >

            <TextView
                android:id="@+id/textView0"
                android:layout_width="match_parent"
                android:layout_height="wrap_content"
                android:layout_gravity="center|center_horizontal"
                android:gravity="center|center_vertical"
                android:text="登录信息"
                android:textAppearance="@style/labelText" />

        TableRow>

        <TableRow
            android:id="@+id/tableRow1"
            android:layout_width="match_parent"
            android:layout_height="wrap_content">

            <TextView
                android:id="@+id/textView1"
                android:layout_width="0dp"
                android:layout_height="40dp"
                android:layout_weight="0.5"
                android:gravity="center_vertical"
                android:text="用\t户\tID:"
                android:textAppearance="@style/labelText" />

            <TextView
                android:id="@+id/userIDTV"
                android:layout_width="0dp"
                android:layout_height="40dp"
                android:layout_marginRight="30dp"
                android:layout_weight="0.5"
                android:gravity="right|center_vertical"
                android:text=""
                android:textAppearance="@style/normalText" />
        TableRow>

        <TableRow
            android:id="@+id/tableRow2"
            android:layout_width="match_parent"
            android:layout_height="wrap_content" >

            <TextView
                android:id="@+id/textView2"
                android:layout_width="0dp"
                android:layout_height="40dp"
                android:layout_weight="0.5"
                android:gravity="center_vertical"
                android:text="用\t户\t名:"
                android:textAppearance="@style/labelText" />

            <TextView
                android:id="@+id/userNameTV"
                android:layout_width="0dp"
                android:layout_height="40dp"
                android:layout_marginRight="30dp"
                android:layout_weight="0.5"
                android:gravity="right|center_vertical"
                android:text=""
                android:textAppearance="@style/normalText" />
        TableRow>

        <TableRow
            android:id="@+id/tableRow3"
            android:layout_width="match_parent"
            android:layout_height="wrap_content" >

            <TextView
                android:id="@+id/textView3"
                android:layout_width="0dp"
                android:layout_height="40dp"
                android:layout_weight="0.5"
                android:gravity="center_vertical"
                android:text="密\t\t\t码:"
                android:textAppearance="@style/labelText" />

            <TextView
                android:id="@+id/passwordTV"
                android:layout_width="0dp"
                android:layout_height="40dp"
                android:layout_marginRight="30dp"
                android:layout_weight="0.5"
                android:gravity="right|center_vertical"
                android:text=""
                android:textAppearance="@style/normalText" />
        TableRow>

    TableLayout>

RelativeLayout>
1.2 object
User.java
/**
 *
 */
package com.ju.testssmserver.object;

/**
 * @author Yan Wenju
 *
 */
public class User {

    private int userID;
    private String userName;
    private String password;

    public int getUserID(){
        return userID;
    }
    public void setUserID(int id){
        this.userID = id;
    }

    public String getUserName(){
        return userName;
    }
    public void setUserName(String userName){
        this.userName = userName;
    }

    public String getPassword(){
        return password;
    }
    public void setPassword(String password){
        this.password = password;
    }
}
1.3 model
UserInfoModel .java
/**
 *
 */
package com.ju.testssmserver.model;

import java.net.URI;
import java.util.ArrayList;
import java.util.List;

import org.apache.http.HttpEntity;
import org.apache.http.HttpResponse;
import org.apache.http.NameValuePair;
import org.apache.http.client.HttpClient;
import org.apache.http.client.methods.HttpGet;
import org.apache.http.client.methods.HttpPost;
import org.apache.http.client.utils.URIUtils;
import org.apache.http.client.utils.URLEncodedUtils;
import org.apache.http.impl.client.DefaultHttpClient;
import org.apache.http.message.BasicNameValuePair;
import org.apache.http.util.EntityUtils;
import org.json.JSONObject;

import com.ju.testssmserver.config.ServerConfiguration;
import com.ju.testssmserver.object.User;

import android.util.Log;

/**
 * @author Yan Wenju
 *
 */
public class UserInfoModel {

    /**
     * 获取用户详细信息
     *
     */
    public User getUserInfo(int userID) throws Exception
    {
        User user = null;
        HttpClient httpclient = new DefaultHttpClient();
        List qparams = new ArrayList();
        //qparams.add(new BasicNameValuePair("method", "getDetail"));
        qparams.add(new BasicNameValuePair("id",String.valueOf(userID)));
        URI uri = URIUtils.createURI("http", ServerConfiguration.IP,
                ServerConfiguration.PORT,
                ServerConfiguration.USERSERVICEURI,
                URLEncodedUtils.format(qparams, "UTF-8"), null);
        Log.i("ju", "uri:"+uri.toString());
        HttpGet httpget = new HttpGet(uri);
        //HttpPost httpget=new HttpPost(uri);
        HttpResponse response = httpclient.execute(httpget);
        HttpEntity entity = response.getEntity();
        JSONObject o = null;
        if (entity != null)
        {
            String contentString = EntityUtils.toString(entity);
            Log.i("ju", contentString);
            o = new JSONObject(contentString);
            int status =o.getInt("status");
            Log.i("ju","status:"+ status);

            if (status != 1)
            {
                Log.i("ju","status:"+ status);
                return user;
            }

            JSONObject e = o.getJSONObject("user");
            user = new User();

            user.setUserID(e.getInt("id"));
            user.setUserName(e.getString("userName"));
            user.setPassword(e.getString("password"));
        }

        httpclient.getConnectionManager().shutdown();
        return user;
    }

}
1.4 config
ServerConfiguration .java
package  com.ju.testssmserver.config;

/**
 * Author YanWenju
 * 这是客服端与服务器端通信的配置信息。
 */

public class ServerConfiguration
{
    public static final String IP = "192.168.0.108";//服务器地址
    public static final int PORT = 8088;//要根据应用服务器tomcat的端口改变
    public static final String USERSERVICEURI = "testSSM/test/getInfo.json";
}
2.搭建SSM服务器端框架
SSM框架结构搭建在网上很多,不过,因为需要与Android客户端进行数据交换(我采用的是json格式),所以,在配置文件时,稍有不同。重点对不同之处进行介绍。
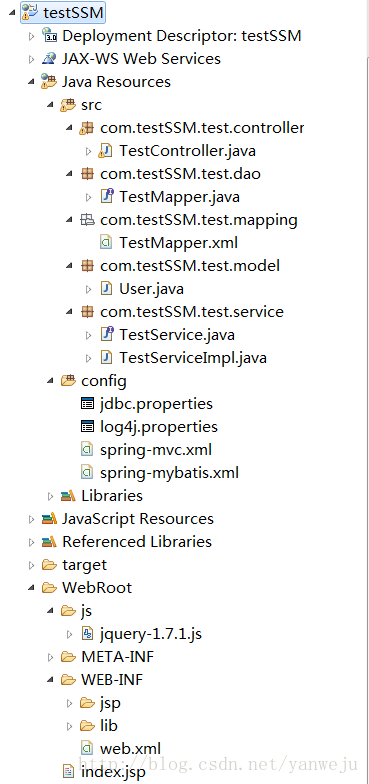
Java web SSM框架结构如下:
2.1 web.xml
<web-app xmlns:xsi="http://www.w3.org/2001/XMLSchema-instance"
    xmlns="http://java.sun.com/xml/ns/javaee"
    xsi:schemaLocation="http://java.sun.com/xml/ns/javaee http://java.sun.com/xml/ns/javaee/web-app_3_0.xsd"
    version="3.0">
    <display-name>Archetype Created Web Applicationdisplay-name>

    <context-param>
        <param-name>contextConfigLocationparam-name>

        <param-value>classpath:spring-mybatis.xmlparam-value>
    context-param>


    <filter>
        <filter-name>encodingFilterfilter-name>
        <filter-class>org.springframework.web.filter.CharacterEncodingFilterfilter-class>
        <async-supported>trueasync-supported>
        <init-param>
            <param-name>encodingparam-name>
            <param-value>UTF-8param-value>
        init-param>
    filter>
    <filter-mapping>
        <filter-name>encodingFilterfilter-name>
        <url-pattern>/*url-pattern>
    filter-mapping>


    <listener>
        <listener-class>org.springframework.web.context.ContextLoaderListenerlistener-class>
    listener>

    <listener>
        <listener-class>org.springframework.web.util.IntrospectorCleanupListenerlistener-class>
    listener>


    <servlet>
        <servlet-name>SpringMVCservlet-name>
        <servlet-class>org.springframework.web.servlet.DispatcherServletservlet-class>
        <init-param>
            <param-name>contextConfigLocationparam-name>
            <param-value>classpath:spring-mvc.xmlparam-value>
        init-param>
        <load-on-startup>1load-on-startup>
        <async-supported>trueasync-supported>
    servlet>
    <servlet-mapping>
        <servlet-name>SpringMVCservlet-name>

        <url-pattern>*.dourl-pattern>

        <url-pattern>*.jsonurl-pattern>
    servlet-mapping>

    <welcome-file-list>
        <welcome-file>/index.jspwelcome-file>
    welcome-file-list>

    <session-config>
        <session-timeout>15session-timeout>
    session-config>

web-app>
解析:
web.xml文件配置,最大的不同在于:DispatcherServlet截获的url格式,添加了一种——*.json,用于区别请求是来自Android客户端还是浏览器的jsp前台页面。
2.2 spring-mvc.xml(即DispatcherServlet前端处理器配置文件)
spring-mvc.xml:
<beans xmlns="http://www.springframework.org/schema/beans"
    xmlns:xsi="http://www.w3.org/2001/XMLSchema-instance" xmlns:p="http://www.springframework.org/schema/p"
    xmlns:context="http://www.springframework.org/schema/context"
    xmlns:mvc="http://www.springframework.org/schema/mvc"
    xsi:schemaLocation="http://www.springframework.org/schema/beans
                        http://www.springframework.org/schema/beans/spring-beans-3.1.xsd
                        http://www.springframework.org/schema/context
                        http://www.springframework.org/schema/context/spring-context-3.1.xsd
                        http://www.springframework.org/schema/mvc
                        http://www.springframework.org/schema/mvc/spring-mvc-4.0.xsd">

    <context:component-scan base-package="com.testSSM.test.controller" />


        <property name="prefix" value="/WEB-INF/jsp/" />
        <property name="suffix" value=".jsp" />
    bean>


    <bean id="multipartResolver"       class="org.springframework.web.multipart.commons.CommonsMultipartResolver">

        <property name="defaultEncoding" value="utf-8" />

        <property name="maxUploadSize" value="10485760000" />

        <property name="maxInMemorySize" value="40960" />
    bean>
beans>
解析:
这里没有特殊需要配置的地方。
2.3 spring-mybatis.xml
接下来,是配置spring容器和mybatis的各种变量(dataSource、SqlSessionFactoryBean、MapperScannerConfigurer、transactionManager等):
<beans xmlns="http://www.springframework.org/schema/beans"
    xmlns:xsi="http://www.w3.org/2001/XMLSchema-instance" xmlns:p="http://www.springframework.org/schema/p"
    xmlns:context="http://www.springframework.org/schema/context"
    xmlns:mvc="http://www.springframework.org/schema/mvc"
    xsi:schemaLocation="http://www.springframework.org/schema/beans
                        http://www.springframework.org/schema/beans/spring-beans-3.1.xsd
                        http://www.springframework.org/schema/context
                        http://www.springframework.org/schema/context/spring-context-3.1.xsd
                        http://www.springframework.org/schema/mvc
                        http://www.springframework.org/schema/mvc/spring-mvc-4.0.xsd">

    <context:component-scan base-package="com.testSSM.test" />

    <bean id="propertyConfigurer"
        class="org.springframework.beans.factory.config.PropertyPlaceholderConfigurer">
        <property name="location" value="classpath:jdbc.properties" />
    bean>

    <bean id="dataSource" class="com.alibaba.druid.pool.DruidDataSource"
        init-method="init" destroy-method="close">
        <property name="driverClassName" value="${driver}" />
        <property name="url" value="${url}" />
        <property name="username" value="${username}" />
        <property name="password" value="${password}" />

        <property name="initialSize" value="${initialSize}">property>

        <property name="maxActive" value="${maxActive}">property>

        <property name="maxIdle" value="${maxIdle}">property>

        <property name="minIdle" value="${minIdle}">property>

        <property name="maxWait" value="${maxWait}">property>
    bean>


    <bean id="sqlSessionFactory" class="org.mybatis.spring.SqlSessionFactoryBean">
        <property name="dataSource" ref="dataSource" />

        <property name="mapperLocations" value="classpath:com/testSSM/test/mapping/*.xml">property>
    bean>


    <bean class="org.mybatis.spring.mapper.MapperScannerConfigurer">
        <property name="basePackage" value="com.testSSM.test.dao" />
        <property name="sqlSessionFactoryBeanName" value="sqlSessionFactory" />
    bean>


    <bean id="transactionManager"
        class="org.springframework.jdbc.datasource.DataSourceTransactionManager">
        <property name="dataSource" ref="dataSource" />
    bean>

beans>
2.4 jdbc.properties
jdbc.properties是存储mybatis各项设置参数的文件(与hibernate等基本相似):
driver=com.mysql.jdbc.Driver
url=jdbc:mysql://localhost:3306/testssm?useUnicode=true&characterEncoding=UTF-8&zeroDateTimeBehavior=convertToNull
username=root
password=123456
#定义初始连接数
initialSize=0
#定义最大连接数
maxActive=20
#定义最大空闲
maxIdle=20
#定义最小空闲
minIdle=1
#定义最长等待时间
maxWait=60000
3.控制器处理函数(controller.java)
Android客户端连接SSM框架服务器端,最关键的问题就在于:如何编写控制器以及相关请求处理函数。
下面,我以“用户登录信息”的增改删查为例,具体函数的编写,请看代码:
3.1 实例代码
控制器controller.java源代码:
package com.testSSM.test.controller;

import java.io.PrintWriter;
import java.util.List;
import javax.annotation.Resource;
import javax.servlet.http.HttpServletRequest;
import javax.servlet.http.HttpServletResponse;
import org.springframework.stereotype.Controller;
import org.springframework.ui.Model;
import org.springframework.web.bind.annotation.RequestMapping;
import org.springframework.web.bind.annotation.RequestParam;
import com.google.gson.Gson;
import com.google.gson.GsonBuilder;
import com.testSSM.test.model.User;
import com.testSSM.test.service.TestService;
import net.sf.json.JSONObject;


@Controller
@RequestMapping("/test")
public class TestController {

    @Resource
    private TestService testService;

    //--------------------添加新用户信息 Start-----------------------
    //访问添加用户信息页面
    @RequestMapping("/addPage.do")
    public String addPage(){
        return "add";
    }
    //处理来自jsp页面的请求,并切换到结果页面
    @RequestMapping("/addUser.do")
    public String addUserFromJspPage(HttpServletRequest request, Model model, @RequestParam("userName") String userName,@RequestParam("password") String password){
/*      第二种获取jsp前台页面传递值的方式:
        String userName=request.getParameter("userName");
        String password=request.getParameter("password");*/
        User user = new User();
        user.setUserName(userName);
        user.setPassword(password);

        try{
            if(testService.add(user)==true){
                model.addAttribute("result", "添加成功了!");
                return "success";
            }else{
                model.addAttribute("result", "添加失败了!");
                return "failure";
            }
        } catch(Exception e){
            model.addAttribute("result", e.toString());
            return "failure";
        }

    }
    //处理来自客户端的请求,并将json格式的数据处理结果返回。
    @RequestMapping("/addUser.json")
    public void addUserFromClient(HttpServletRequest request, HttpServletResponse response, Model model, @RequestParam("userName") String userName,@RequestParam("password") String password){
/*      第二种获取android客户端传递值的方式:
        String userName=request.getParameter("userName");
        String password=request.getParameter("password");*/
        User user = new User();
        user.setUserName(userName);
        user.setPassword(password);

        response.setContentType("application/json");
        PrintWriter out = null;
        JSONObject json = new JSONObject();

        try{
            out = response.getWriter();

            if(testService.add(user)==true){
                json.put("status", 1);
                out.write(json.toString());
            }else{
                json.put("status", 0);
                out.write(json.toString());
            }
        } catch(Exception e){
            e.printStackTrace();
            json.put("status", -1);
            out.write(json.toString());
        }finally{
            out.flush();
            out.close();
        }

    }
    //--------------------添加新用户信息 End-----------------------

    //--------------------查询单个用户信息 Start-----------------------
    //访问查询页面"query.jsp"
    @RequestMapping("/queryPage.do")
    public String queryPage(){
        return "query";
    }
    //处理浏览器的获取单个用户信息请求,页面切换到查询结果页面queryResult.jsp
    @RequestMapping("/getInfo.do")
    public String getInfoFromJspPage(HttpServletRequest request, HttpServletResponse response, Model model, @RequestParam("id") int id) {

        User user = new User();
        user.setId(id);

        try {
            user = testService.queryByID(user);
            if (user != null) {
                model.addAttribute("user", user);

            } else {
                model.addAttribute("user", null);
            }
        } catch (Exception e) {
            e.toString();
        }

        return "queryResult";
    }
    //处理客户端单个用户信息请求,返回json格式请求查询数据
    @RequestMapping("/getInfo.json")
    public void getInfoFromClient(HttpServletRequest request, HttpServletResponse response, Model model, @RequestParam("id") int id) {

        User user = new User();
        user.setId(id);

        response.setContentType("application/json");
        PrintWriter out = null;
        JSONObject json = new JSONObject();

        try {
            out = response.getWriter();

            user = testService.queryByID(user);
            if (user != null) {
                json.put("status", 1);
                json.put("user", user);
                out.write(json.toString());
            } else {
                json.put("status", 0);
                json.put("user", null);
                out.write(json.toString());
            }
        } catch (Exception e) {
            e.toString();
            json.put("status", -1);
            json.put("user", null);
            out.write(json.toString());
        } finally{
            out.flush();
            out.close();
        }
    }
    //--------------------查询单个用户信息 End-----------------------


    //--------------------删除某个用户信息 Start-----------------------
    //访问delete页面
    @RequestMapping("/deletePage.do")
    public String deletePage(){
        return "delete";
    }
    //处理来自浏览器的删除请求,具体逻辑在前台页面的js函数中实现
    @RequestMapping("/delete.do")
    public void deleteFromJspPage(@RequestParam("id") int id,HttpServletRequest request,HttpServletResponse response, Model model){

        String result = "{\"result\":\"error\"}";

        try {
            if(testService.deleteByID(id)){
                result = "{\"result\":\"success\"}";
                System.out.println( "删除成功!\n");
            }else{
                result = "{\"result\":\"failure\"}";
                System.out.println( "删除失败!\n");
            }

            response.setContentType("application/json");
            PrintWriter out = response.getWriter();
            out.write(result);

        } catch (Exception e) {
            e.printStackTrace();
            result = "{\"result\":\"failure\"}";
            System.out.println( "删除失败!\n");
        }
    }
    //处理来自客户端的删除请求,并返回json格式的删除结果(1:成功;0:失败;-1:异常)
    @RequestMapping("/delete.json")
    public void deleteFromClient(@RequestParam("id") int id,HttpServletRequest request,HttpServletResponse response, Model model){

        response.setContentType("application/json");
        PrintWriter out = null;
        JSONObject json = new JSONObject();

        try {
            out = response.getWriter();

            if(testService.deleteByID(id)){
                json.put("status", 1);
                out.write(json.toString());
            }else{
                json.put("status", 0);
                out.write(json.toString());
            }

        } catch (Exception e) {
            e.printStackTrace();
            json.put("status", -1);
            out.write(json.toString());
        } finally{
            out.flush();
            out.close();
        }
    }
    //--------------------删除某个用户信息 End-----------------------


    //--------------------获取所有用户信息 Start-----------------------
    //处理来自浏览器的请求,切换页面到所有用户信息列表
    @RequestMapping("/userlistPage.do")
    public String getAllUserFromJspPage(HttpServletRequest request, Model model){
        try{
            List userList = testService.queryAllUser();
            model.addAttribute("userList", userList);
        }catch (Exception e){
            e.toString();
            model.addAttribute("userList", null);
        }

        return "showAllUser";
    }
    //处理来自客户端的请求,并将json格式的结果返回。
    @RequestMapping("/userListPage.json")
    public void getAllUserFromClient(HttpServletResponse response){

        response.setContentType("application/json");
        PrintWriter out = null;
        JSONObject json = new JSONObject();

        try {
            out = response.getWriter();
            List userList = testService.queryAllUser();

            if(userList !=null){
                json.put("status", 1);
                json.put("userList", userList);
                out.write(json.toString());
            }else{
                json.put("status", 0);
                json.put("userList", null);
                out.write(json.toString());
            }

        } catch (Exception e) {
            e.printStackTrace();
            json.put("status", -1);
            json.put("userList", null);
            out.write(json.toString());
        } finally{
            out.flush();
            out.close();
        }
    }
    //--------------------获取所有用户信息 End-----------------------
}
解析:
- 1.每个函数的作用,具体已经在注释中阐明。这里没有update函数。
- 2.处理来自浏览器jsp前台页面的“删除”请求的deleteFromJspPage()函数有所不同,原因是:jsp前台页面上进行删除某条记录的操作时,删除成功或者失败时,需要给用户一个反馈(例如,“删除成功”“删除失败”),因此,在相关delete操作页面,加了一个js函数,这个js函数需要的也是String类型的json格式结果,因此,才如上编写delete函数。
4.经验总结
在此次案例实践过程中,我犯了几个错误,大大了影响了项目速度,所以,这里总结一下:
-1. android客户端连接服务器时,总是报错:http://192.168.0.108:8088/ refused connection。
原因:第一,android项目的怕配置文件AndroiManifest.xml中,忘记了添加网络访问权限:
<uses-permission android:name="android.permission.INTERNET" />-2. android客户端:serverconfiguration.java,配置服务器访问地址时,地址选择错误:127.0.0.1,localhost,还是本机所在wifi环境下的192.168.0.108,亦或者是公网IP地址?
分析:因为我使用的是真机测试,因此,需要将手机和服务器置于一个网络内。意思就是,或者手机和服务器PC都连接同一个WiFi(这样两者就在一个局域网内了);或者手机和服务器PC都直接连接公网(服务器PC的IP地址或者是公网IP,或者是路由器环境下进行映射操作,指向该服务器);亦或者,将服务器PC通过USB连接手机,通过手机USB上Internet,这样手机和PC也在一个网络内了(手机和PC都会分配一个域内地址:192.168.***.***)。
由于,我将服务器PC连接了路由器wifi,而手机却使用的移动数据,所以,android客户端一直连接不上。
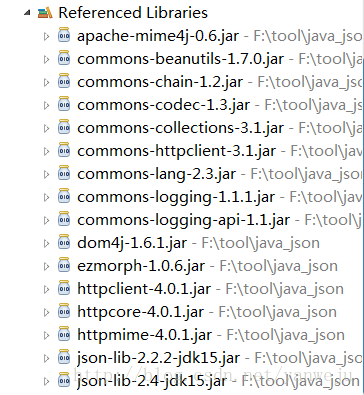
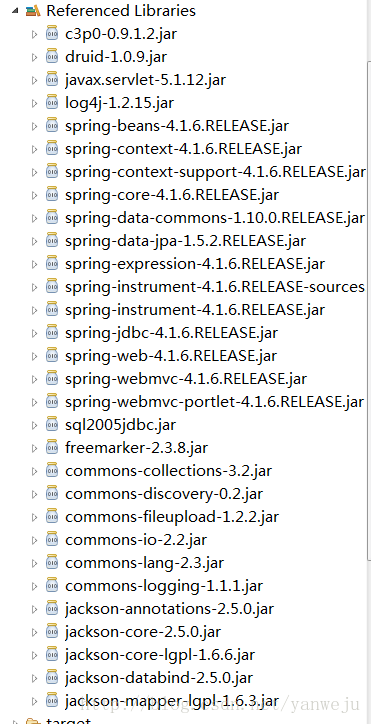
-3. 服务器端项目testSSM和客户端项目testSSMServer,都必须添加json数据传递所必需的jar包,这样json数据才可以在服务器和android客户端之间进行传递和解析。
android:testSSMServer

server:testSSM
希望大家能一次性搭建好环境~
项目源代码下载

