Spring Boot 引入 MyBatis
本文标题:Spring Boot 引入 MyBatis
原始链接: http://www.shuibo.cn/124.html
许可协议: 署名-非商业性使用-禁止演绎 4.0 国际 转载请保留原文链接及作者。
简介
什么是mybatis?
MyBatis 是一款优秀的持久层框架,它支持定制化 SQL、存储过程以及高级映射。MyBatis 避免了几乎所有的 JDBC 代码和手动设置参数以及获取结果集。MyBatis 可以使用简单的 XML 或注解来配置和映射原生类型、接口和 Java 的 POJO(Plain Old Java Objects,普通老式 Java 对象)为数据库中的记录。
安装
1.首先创建一个Spring Boot项目
2.通过maven引入mybatis
<dependency>
    <groupId>org.mybatis.spring.boot</groupId>
    <artifactId>mybatis-spring-boot-starter</artifactId>
    <version>2.0.1</version>
</dependency>
4.从XML中构建SqlSessionFactory
每个基于 MyBatis 的应用都是以一个 SqlSessionFactory 的实例为核心的。SqlSessionFactory 的实例可以通过 SqlSessionFactoryBuilder 获得。而 SqlSessionFactoryBuilder 则可以从 XML 配置文件或一个预先定制的 Configuration 的实例构建出 SqlSessionFactory 的实例。
从 XML 文件中构建 SqlSessionFactory 的实例非常简单,建议使用类路径下的资源文件进行配置。 但是也可以使用任意的输入流(InputStream)实例,包括字符串形式的文件路径或者 file:// 的 URL 形式的文件路径来配置。MyBatis 包含一个名叫 Resources 的工具类,它包含一些实用方法,可使从 classpath 或其他位置加载资源文件更加容易。
String resource = "org/mybatis/example/mybatis-config.xml";
InputStream inputStream = Resources.getResourceAsStream(resource);
SqlSessionFactory sqlSessionFactory = new SqlSessionFactoryBuilder().build(inputStream);
XML 配置文件中包含了对 MyBatis 系统的核心设置,包含获取数据库连接实例的数据源(DataSource)和决定事务作用域和控制方式的事务管理器(TransactionManager)。 XML 配置文件的详细内容后面再探讨,这里先给出一个简单的示例:
<?xml version="1.0" encoding="UTF-8" ?>
<!DOCTYPE configuration
  PUBLIC "-//mybatis.org//DTD Config 3.0//EN"
  "http://mybatis.org/dtd/mybatis-3-config.dtd">
<configuration>
  <environments default="development">
    <environment id="development">
      <transactionManager type="JDBC"/>
      <dataSource type="POOLED">
        <property name="driver" value="${driver}"/>
        <property name="url" value="${url}"/>
        <property name="username" value="${username}"/>
        <property name="password" value="${password}"/>
      </dataSource>
    </environment>
  </environments>
  <mappers>
    <mapper resource="org/mybatis/example/BlogMapper.xml"/>
  </mappers>
</configuration>
当然,还有很多可以在 XML 文件中进行配置,上面的示例指出的则是最关键的部分。 要注意 XML 头部的声明,它用来验证 XML 文档正确性。environment 元素体中包含了事务管理和连接池的配置。mappers 元素则是包含一组映射器(mapper),这些映射器的 XML 映射文件包含了 SQL 代码和映射定义信息。
5.不使用XML构建SqlSessionFactory
如果你更愿意直接从 Java 代码而不是 XML 文件中创建配置,或者想要创建你自己的配置构建器,MyBatis 也提供了完整的配置类,提供所有和 XML 文件相同功能的配置项。
DataSource dataSource = BlogDataSourceFactory.getBlogDataSource();
TransactionFactory transactionFactory = new JdbcTransactionFactory();
Environment environment = new Environment("development", transactionFactory, dataSource);
Configuration configuration = new Configuration(environment);
configuration.addMapper(BlogMapper.class);
SqlSessionFactory sqlSessionFactory = new SqlSessionFactoryBuilder().build(configuration);
注意该例中,configuration 添加了一个映射器类(mapper class)。映射器类是 Java 类,它们包含 SQL 映射语句的注解从而避免依赖 XML 文件。不过,由于 Java 注解的一些限制以及某些 MyBatis 映射的复杂性,要使用大多数高级映射(比如:嵌套联合映射),仍然需要使用 XML 配置。有鉴于此,如果存在一个同名 XML 配置文件,MyBatis 会自动查找并加载它(在这个例子中,基于类路径和 BlogMapper.class 的类名,会加载 BlogMapper.xml)。具体细节稍后讨论。
以上部分信息资料来源于:MyBatis
使用
1.创建于数据库对应的实体类
public class Test implements Serializable {

    private Integer id;

    private String name;

    private Integer age;

    /** 省略get set方法 **/

    @Override
    public String toString() {
        return "Test{" +
                "id=" + id +
                ", name='" + name + '\'' +
                ", age=" + age +
                '}';
    }
}
2.创建Dao
1.使用注解的方式实现增删改查
@Component
@Mapper
@Repository
public interface TestDao {

    @Insert("insert into test(name,age) values(#{name},#{age})")
    int addTest(Test test);

    @Update("update test set name=#{name},age=#{age} where id=#{id}")
    int updateTest(@Param("name")String name,@Param("age")int age,@Param("id")int id);

    @Delete("delete from test where id=#{id}")
    int deleteTestById(@Param("id")int id);

    @Select("select * from test where id = #{id}")
    Test findTestById(@Param("id")int id);

}
简单的语句只需要使用@Insert、@Update、@Delete、@Select这4个注解即可,动态SQL语句需要使用@InsertProvider、@UpdateProvider、@DeleteProvider、@SelectProvider等注解。具体可参考MyBatis官方文档:MyBatis
2.使用xml配置的方式
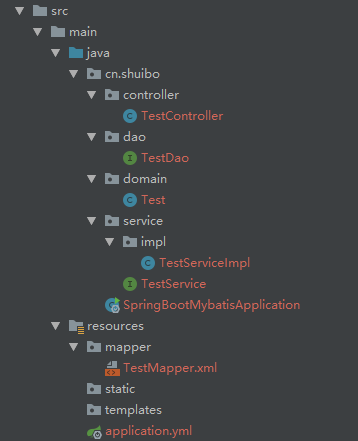
配置扫描路径
mybatis:
  mapper-locations: classpath:mapper/*.xml
  property:
    order: BEFORE
<?xml version="1.0" encoding="UTF-8"?>
<!DOCTYPE mapper PUBLIC "-//mybatis.org//DTD Mapper 3.0//EN" "http://mybatis.org/dtd/mybatis-3-mapper.dtd">
<mapper namespace="cn.shuibo.dao.TestDao">
    <resultMap id="BaseResultMap" type="cn.shuibo.domain.Test">
        <id column="id" jdbcType="INTEGER" property="id" />
        <result column="name" jdbcType="VARCHAR" property="name" />
        <result column="age" jdbcType="INTEGER" property="age" />
    </resultMap>

    <insert id="insetTest" parameterType="cn.shuibo.domain.Test">
        INSERT INTO test(
        name,
        age,
        )
        VALUES(
        #{name},
        #{age})
    </insert>

    <update id="updateTest"  parameterType="cn.shuibo.domain.Test">
        update test
        <set>
            <if test="name!=null and name!=''">
                name = #{name},
            </if>
            <if test="age!=null and age!=''">
                age = #{age}
            </if>
        </set>
        where id = #{id}
    </update>

    <select id="getTest" resultMap="BaseResultMap">
      select * from test
    </select>

    <select id="getTestById" parameterType="int" resultType="cn.shuibo.domain.Test">
        select * from test where id=#{id}
    </select>

    <delete id="deleteTestByIds" parameterType="int">
        delete from test where id=#{id}
    </delete>
</mapper>
简单的增删改查使用这四个标签,动态SQL语句需要使用if,choose,when,otherwise,trim,where,set,foreach,bind具体可参考MyBatis官方文档:MyBatis
测试
1.编写service
public interface TestService {

    Test findTestById(int id);

    int addTest(Test test);

    int updateTest(String name,int age,int id);

    int deleteTestById(int id);

    Test getTestById(int id);
}
2.编写service实现
@Service("testService")
public class TestServiceImpl implements TestService {

    @Autowired
    private TestDao testDao;

    @Override
    public Test findTestById(int id) {
        return testDao.findTestById(id);
    }

    @Override
    public int addTest(Test test) {
        return testDao.addTest(test);
    }

    @Override
    public int updateTest(String name, int age, int id) {
        return testDao.updateTest(name,age,id);
    }

    @Override
    public int deleteTestById(int id) {
        return testDao.deleteTestById(id);
    }

    @Override
    public Test getTestById(int id) {
        return testDao.getTestById(id);
    }

}
3.编写controller
@RestController
public class TestController {

    @Autowired
    private TestService testService;

    @RequestMapping(value = "/test", method = RequestMethod.GET)
    public String getTest(){
        Test test = testService.findTestById(1);
        return test.toString();
    }

    @RequestMapping(value = "/test1", method = RequestMethod.GET)
    public String getTest1(){
        Test test = testService.getTestById(1);
        return test.toString();
    }
}
Test{id=1, name='shuibo.cn', age=18}
总结
本篇内容主要介绍了在Spring Boot中引入MyBatis,介绍了通过注解跟xml两种方式实现数据操作,本篇未及地方日后随缘补。
本文GitHub地址:https://github.com/ishuibo/SpringAll
