yang-sql转换器三
前言
这个插件是个人开发的,功能测试相对不会太完善。目前正在寻找实际项目测试整个功能。这个插件的思想是借助于我上一家就职的公司,有很多值得参考和借鉴之处。
我写这个插件的理由:
1、一直以来都被增删改查所累,哪怕是有了mybatis以及mybatis plus,也还是需要做一些无用的配置,包括查询条件的书写、排序字段,后期如果需要更改一个小字段,也需要牵动整个后台,十分的重复机械。
2、针对mybatis和mybatis plus,其中难免需要书写一些简单的sql关联语句。极大的浪费时间,消磨人的精力
3、我喜欢一个插件具有简约的配置以及良好的使用方式,易于理解,容易上手。
项目github地址
第二篇
第一篇
QQ群:623337780
1、安装
引入maven包:
<dependency>
    <groupId>top.sanguohf.egggroupId>
    <artifactId>yang-sql-starterartifactId>
    <version>1.0.7-releaseversion>
dependency>
2、初次使用
1、在SpringBoot项目中引入Maven包后,你就可以进行测试了。在SpringBoot的主运行类上加上@ScanEntity注解,配置扫描的实体类路径。加上@EnableTransactionManagement注解,可以保证批量操作的事务一致性。如下配置:
@EnableTransactionManagement
@ScanEntity({"top.sanguohf.egg.test.entity"})
@SpringBootApplication
public class YangSqlTest {
    public static void main(String[] args) {
        SpringApplication.run(YangSqlTest.class);
    }
}
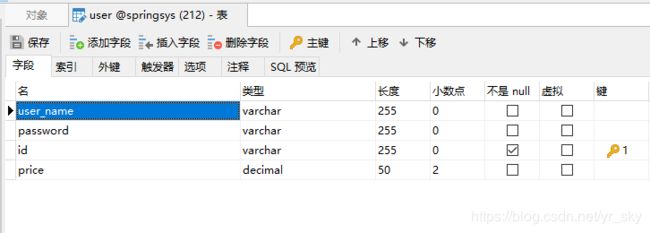
2、创建实体类和数据库表,字段一一对应,采用驼峰命名规则。如下所示
@Data
@TableName("user")
public class User {
    @Id
    @Field("user_name")
    private String userName;
    private String password;
    protected String id;
    private BigDecimal price;
}
3、配置数据源,连接远程数据库,如下配置
spring:
  datasource:
    type: com.alibaba.druid.pool.DruidDataSource
    druid:
      url: jdbc:mysql://xxx:3306/springsys?useUnicode=true&characterEncoding=UTF-8&useSSL=false&serverTimezone=UTC&zeroDateTimeBehavior=convertToNull&&allowPublicKeyRetrieval=true
      username: 账号
      password: 密码
4、编写Test测试文件,代码如下
@RunWith(SpringRunner.class)
@SpringBootTest
public class TestOne {

    @Autowired
    private CommonService commonService;
    @Test
    public void test3() throws NoSuchFieldException, IOException, ClassNotFoundException 		{
        EntityParams params = new EntityParams();
        params.setTableClassName("User");
        List list = commonService.findList(params);
    }
}
3、服务说明
3.1前端传参
可以查看top.sanguohf.egg.param.EntityParams类所对应的属性。源码如下
@Data
public class EntityParams {
    private String tableClassName;

    private JSONObject condition;
    private List<EntityOrderBy> orderBy;

    public List<EntityOrderBy> getOrderBy() {
        if(orderBy==null)
            orderBy=new LinkedList<>();
        return orderBy;
    }
}
属性详解
tableClassName这个属性标识当前操作的实体类名,比如User类,对应的值就是User,和类名一致
condition这个属性用来确定查询的条件,或者是更新的数据,又或者是插入的数据,又或者是删除的数据,它的格式较为复杂,我会单独开一小节进行讲解。
orderBy定义排序字段,前端传递的格式是形如下
[
  {"column": "userName","direct": "desc"},
  {"column": "password","direct": "asc"}
]
3.2通用增删改查类
可以查看top.sanguohf.top.bootcon.service.impl.CommonServiceImpl实现类。下面对方法说明
findPageList(EntityParams params, Page page)通用的分页查询,传入EntityParam和Page参数,返回top.sanguohf.top.bootcon.resp.CommonPageResp对象
findList(EntityParams params)通用的查询,返回List对象
count(EntityParams params)根据查询条件统计数目
insert(EntityParams paramData)插入一条数据
update(EntityParams paramsData)更新一条数据
delete(EntityParams paramsData)删除一条数据
batchInsert(List批量插入数据
batchUpdate(List批量更新数据
batchDelete(List批量删除数据
3.3condition的格式定义
3.3.1插入、更新、删除数据格式
这三种方式传递的数据格式都是一样的,如下示例:
{
  "userName": "张三",
  "password": "王五",
  "id": "10001"
}
简单的JSON对象,列名是key,值是value
3.3.2 查询数据格式
1、基础的查询格式有两种
第一种
{
  "left":"userName",
   "relation":"=",
   "right": "admin"
}
第二种
{
   "condition": [
        {"left": "userName","relation": "like","right": "%admin%"},
        {"left": "password","relation": "=","right": "6547199"}
   ],
   "combine": "and"
}
2、演变出稍微复杂的格式
{
   "left": {
       "condition": [
           {"left": "userName","relation": "=","right": "admin"},
           {"left": "password","relation": "=","right": "123456"}
       ],"combine": "and"
   },
   "relation": "and",
   "right": {
       "condition": [
           {"left": "userName","relation": "like","right": "%admin%"},
           {"left": "password","relation": "=","right": "6547199"}
       ],"combine": "and"
  }
}
3、演变出更为复杂的格式,实现两种基础模式的多层嵌套
{
   "left": {
       "condition": [
           {"left": "userName","relation": "=","right": "admin"},
           {"left": "password","relation": "=","right": "123456"}
       ],"combine": "and"
   },
   "relation": "and",
   "right": {
       "condition": [{
           "left": {
               "condition": [
                   {"left": "userName","relation": "=","right": "admin"},
                   {"left": "password","relation": "=","right": "123456"}
               ],"combine": "and"},
            "relation": "and",
            "right": {"left": "password","relation": "=","right": "6547199"}
           },
           {"left": "password","relation": "=","right": "6547199"}
       ],"combine": "and"
  }
}
3.4、实体类的定义
3.4.1基础实体的定义
先看一个定义实例吧
@TableName("user")
public class User {
    @Id
    @Field("user_name")
    private String userName;
    private String password;
    protected String id;
    @IgnoreSelectReback
    private BigDecimal price;
}
我们详细说明一下:
首先创建一个实体,这个实体的类名默认是采用驼峰命名规则和数据库表名对应,如User类,默认对应user表
类中的实体也是采用驼峰命名规则,和数据库列一一对应
3.4.1.1 @TableName
作用:定义实体对应的数据库表名称
| 属性名 | 类型 | 作用 | 默认值 |
|---|---|---|---|
| value | String[] | 数据库表的名称 | 类名的驼峰转换 |
3.4.1.2 @Id
作用:定义表的主键,更新会使用,默认的主键是名为Id的属性
| 属性名 | 类型 | 作用 |
|---|---|---|
3.4.1.3 @Field
作用:定义属性对应的数据库列名称
| 属性名 | 类型 | 作用 | 默认值 |
|---|---|---|---|
| value | String | 对应的表的列名 | 类属性的驼峰转换 |
| alias | String | 查询列时返回的别名 | 类属性名 |
3.4.1.4 @IgnoreSelectReback
作用:标识这个字段在做查询的时候不会返回
无属性
3.4.1.5 @Condition
作用:定义默认的查询条件
| 属性 | 类型 | 作用 | 默认值 |
|---|---|---|---|
| value | String | 定义查询的值 | |
| type | String | 定义值的类型 | |
| relation | String | 列和值的关系 | = |
| String | 列的名字 |
3.4.1.6 @OrderBy
作用: 定义排序字段
| 属性 | 类型 | 作用 | 默认值 |
|---|---|---|---|
| column | String | 定义列名 | |
| direct | String | 排序方向 | desc |
3.4.2视图实体的定义
我们也先看两个实例
@ViewTable
public class TeacherView {

    @MainTable(tableAlias = "oneOs")
    private Teacher teacher;

    @ReferTable(tableAlias = "op",relation = "inner join",condition = "oneOs.teacherId = op.id")
    private User user;
}
另一个更复杂的带子查询的例子
@ViewTable
public class UserClassesView {

    @Condition(column = "teacherId",value = "1")
    @MainTable(tableAlias = "userOne")
    private TeacherView teacherView;

    @ReferTable(tableAlias = "aliasClass",relation = "left join",condition = "userOne.id = aliasClass.classesId and userOne.userName = aliasClass.name")
    private Classes classes;

    @OrderBys({
            @OrderBy(column = "teacherId",direct = "desc")
    })
    @Conditions({
            @Condition(column = "teacherId",value = "1"),
            @Condition(column = "teacherName",value = "8")
    })
    @ReferTable(tableAlias = "teacher",relation = "left join",condition = "userOne.id = teacher.teacherId",includeColumns = {"teacherName"})
    private Teacher teacher;

}
现在我对其中的注解进行详解
3.4.2.1 @ViewTable
作用:标识当前的实体是视图实体
3.4.2.2 @MainTable
作用:标识关联的主表
| 属性名 | 类型 | 作用 |
|---|---|---|
| tableAlias | String | 主表的别名 |
| includeColumns | String[] | 需要查出的列(优先于excludeColumns) |
| excludeColumns | String[] | 排除掉不需要查出的列(默认是全部都查出) |
3.4.2.3 @ReferTable
作用:标识关联查询的表
| 属性名 | 类型 | 作用 | 默认值 |
|---|---|---|---|
| tableAlias | String | 表别名 | |
| relation | String | 关系 | left join |
| condition | String | 标识关联的条件(on后面的) | |
| includeColumns | String[] | 需要查出的列(优先于excludeColumns) | |
| excludeColumns | String[] | 排除掉不需要查出的列(默认是全部都查出) |
3.4.2.4 @Conditions
作用:是@Condition注解的复数形式
| 属性名 | 类型 | 作用 |
|---|---|---|
| value | Condition[] | 定义多个条件 |
3.4.2.5 @OrderBys
作用:是@OrderBy注解的复数形式
| 属性名 | 类型 | 作用 |
|---|---|---|
| value | OrderBy[] | 定义多个排序字段 |
3.5 配置包扫描
@ScanEntity注解,可以配置多个实体包的扫描路径,如下示例
@EnableTransactionManagement
@ScanEntity({"top.sanguohf.egg.test.entity","top.sanguohf.egg.configure.entity"})
@SpringBootApplication
public class YangSqlTest {
    public static void main(String[] args) {
        SpringApplication.run(YangSqlTest.class);
    }
}
3.6 开启事务
事务采用SpringBoot自带的事务控制,如下示例
@EnableTransactionManagement //开启事务
@ScanEntity({"top.sanguohf.egg.test.entity","top.sanguohf.egg.configure.entity"})
@SpringBootApplication
public class YangSqlTest {
    public static void main(String[] args) {
        SpringApplication.run(YangSqlTest.class);
    }
}
开启事务,用于保证批量操作时的原子性
