Google Authenticator配置SSH登录动态验证码
Google Authenticator配置SSH登录动态验证码
需求说明:
1、一般ssh登录服务器,只需要输入账号和密码。
2、本教程的目的:在账号和密码之间再增加一个验证码,只有输入正确的验证码之,再输入密码才能登录。这样就增强了ssh登录的安全性。
3、账号、验证码、密码三者缺一个都不能登录,即使账号和密码正确,验证码错误,同样登录失败。
4、验证码:是动态验证码,并且是通过手机客户端自动获取(默认每隔30秒失效一次)
5、最终目的:远程ssh登录一台服务器,需要正确的账号、密码、及一个可以获取到动态验证码的手机(目前支持Android和ios手机系统)
具体操作:
操作系统:CentOS
一、关闭SELINUX
vi /etc/selinux/config
#SELINUX=enforcing #注释掉
#SELINUXTYPE=targeted #注释掉
SELINUX=disabled #增加
:wq! #保存退出
setenforce 0 #使配置立即生效
二、安装编辑工具包
1、使用CentOS默认yum源安装
yum install wget gcc make
yum install pam-devel libpng-devel
2、配置repoforge第三方yum源安装mercurial包
CentOS各个版本,请选择正确版本
CentOS 5.x
rpm -ivh http://pkgs.repoforge.org/rpmforge-release/rpmforge-release-0.5.3-1.el5.rf.i386.rpm
rpm -ivh http://pkgs.repoforge.org/rpmforge-release/rpmforge-release-0.5.3-1.el5.rf.x86_64.rpm
CentOS 6.x
rpm -ivh http://pkgs.repoforge.org/rpmforge-release/rpmforge-release-0.5.3-1.el6.rf.i686.rpm
rpm -ivh http://pkgs.repoforge.org/rpmforge-release/rpmforge-release-0.5.3-1.el6.rf.x86_64.rpm
yum install mercurial #安装
三、安装google authenticator PAM插件
cd /usr/local/src
wget https://google-authenticator.googlecode.com/files/libpam-google-authenticator-1.0-source.tar.bz2
注意:打开google需要,可以先想办法下载好libpam-google-authenticator-1.0-source.tar.bz2上传到/usr/local/src目录进行安装,下载不了请留邮箱!
tar jxvf libpam-google-authenticator-1.0-source.tar.bz2 #解压
cd libpam-google-authenticator-1.0 #进入目录
make #编译
make install #安装
四、安装QrenCode,此工具可以在Linux命令行下生成二维码
cd /usr/local/src
wget http://fukuchi.org/works/qrencode/qrencode-3.4.4.tar.gz #下载
tar zxf qrencode-3.4.4.tar.gz #解压
cd qrencode-3.4.4 #进入目录
./configure --prefix=/usr #配置
make #编译
make install #安装
五、配置ssh服务调用google authenticator PAM插件
vi /etc/pam.d/sshd #编辑,在第一行增加以下代码
auth required pam_google_authenticator.so
:wq! #保存退出
vi /etc/ssh/sshd_config #编辑
ChallengeResponseAuthentication yes #修改no为yes
:wq! #保存退出
service sshd restart #重启ssh服务,使配置生效
六、使用google authenticator PAM插件为ssh登录账号生成动态验证码
注意:哪个账号需要动态验证码,请切换到该账号下操作
google-authenticator #运行此命令
Do you want authentication tokens to be time-based (y/n) y #提示是否要基于时间生成令牌,选择y
https://www.google.com/chart?chs=200x200&chld=M|0&cht=qr&chl=otpauth://totp/osyunwei@osyunwei%3Fsecret%3DAXNRWARYQPHI5EAJ
Your new secret key is: AXNRWARYQPHI5WYU ###复制这一窜密钥
Your verification code is 199255
Your emergency scratch codes are:
21767982
60638828
24009000
44681673
28015662
#上面的网址为生成的二维码图形地址(需要才能打开),还会生成密钥,以及5个紧急验证码(当无法获取动态验证码时使用,注意:这5个验证码用一个就会少一个!请保存好!)
Do you want me to update your "/home/jss/.google_authenticator" file (y/n) y #提示是否要更新验证文件,选择y
Do you want to disallow multiple uses of the same authentication
token? This restricts you to one login about every 30s, but it increases
your chances to notice or even prevent man-in-the-middle attacks (y/n) y #禁止使用相同口令
By default, tokens are good for 30 seconds and in order to compensate for
possible time-skew between the client and the server, we allow an extra
token before and after the current time. If you experience problems with poor
time synchronization, you can increase the window from its default
size of 1:30min to about 4min. Do you want to do so (y/n) n
#默认动态验证码在30秒内有效,由于客户端和服务器可能会存在时间差,可将时间增加到最长4分钟,是否要这么做:这里选择是n,继续默认30秒
If the computer that you are logging into isn't hardened against brute-force
login attempts, you can enable rate-limiting for the authentication module.
By default, this limits attackers to no more than 3 login attempts every 30s.
Do you want to enable rate-limiting (y/n) y
#是否限制尝试次数,每30秒只能尝试最多3次,这里选择y进行限制
七、手机安装Google身份验证器,通过此工具扫描上一步生成的二维码图形,获取动态验证码
Android手机下载:
https://play.google.com/store/apps/details?id=com.google.android.apps.authenticator2
iOS手机下载:##手机应用市场输入身份验证器也可以搜到
https://itunes.apple.com/us/app/google-authenticator/id388497605
注意:打开google需要,或者自己想办法下载Google身份验证器安装。
另外,还需要安装条形码扫描器,用来扫描验证二维码,以获取动态验证码
以Android手机为例:
安装好Google身份验证器,输入刚才密钥,打开如下图所示:
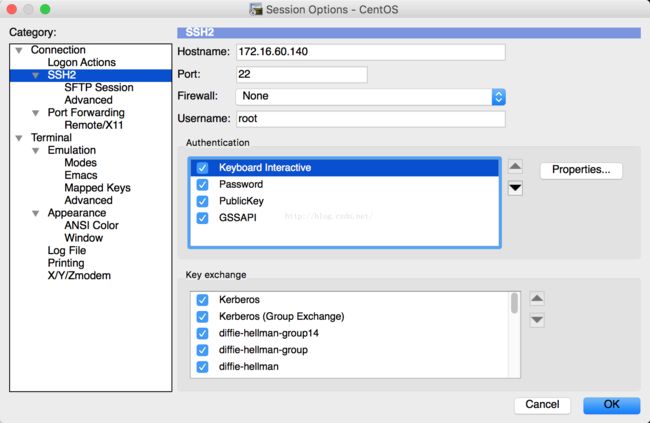
八、ssh远程登录服务器,SecureCRT设置如下:
输入账号之后,会提示输入验证码login as: root
Using keyboard-interactive authentication.
Verification code:
打开手机上的Google身份验证器,输入动态验证码,回车。
注意:动态验证码没有回显,所以在屏幕上看不到输入的内容,但只要保证输入正确即可!
Using keyboard-interactive authentication.
Password:
接着输入密码,即可成功登录系统!
注意:以此步骤必须在30秒内完成。否则动态验证码过期,必须重新操作。
至此,Linux下使用Google Authenticator配置SSH登录动态验证码教程完成!
本文来自http://www.osyunwei.com/archives/9045.html,本人实践可行,稍作修改,在此分享!

