使用JavaAPI进行HDFS文件系统的增删改查
0、事前准备。
0.1 完成HADOOP的集群安装,完成HDFS的配置和初始化。
(具体请参考https://blog.csdn.net/yumi6666/article/details/81735638)
0.2 配置好Linux或Win环境下的Java开发环境。
本文环境为WIN10 + Java1.8 + Eclipse。
(具体参考https://blog.csdn.net/zichen_ziqi/article/details/73995755,此文兼有Java环境和Python环境配置。)
0.3 有一定Java基础。
(推荐一套大数据课程,非常详细,内含Java强化课程。https://www.bilibili.com/video/av21661095/)
1、HDFS的基本工作原理简介。
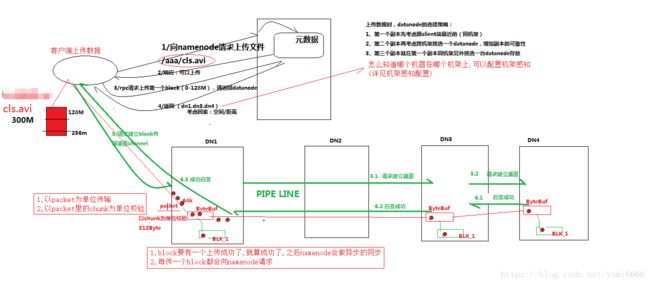
HDFS大体工作流程图如下,可配合https://www.bilibili.com/video/av21661095/?p=76使用。
你现在需要知道的是:
1、HDFS是一套集群系统。集群内机器数量可多可少,由Hadoop框架约束。
2、HDFS系统至少有1个Namenode机(可认为是主机),以及若干Datanode机(可认为是算机)。
3、HDFS系统的最基本功能是分布式储存文件,其命令与Shell命令类似。如 ls,cat, mkdir,rm,mv等等。
4、HDFS系统在正常情况下不会随便被你玩垮!因为存在里面的文件通常有2个甚至更多的备份!
2、HDFS系统的配置加载顺序:
①hadoop.hdfs程序包中hdfs-default.xml默认配置
②Java项目中的hdfs-default.xml配置
③Java文件中,通过Hadoop客户端提供的API进行改写。例如def.replication配置:
//Configuration为org.apache.hadoop.conf.Configuration

Configuration conf = new Configuration();
conf.set("dfs.replication", "5");
三种配置由①→②→③依次读取,优先度依次升高(即③最高)。
3、HDFS的Jar包依赖导入
对于Linux开发者而言,从hadoop.apache.org下载的binary版本,直接导入Java项目即可。
对于Windows开发者,hadoop项目显得并不友好。
我们首先需要下载所需hadoop版本的source版(例如hadoop-2.6.5-src.tar.gz),然后进行source版本本地化编译。
这是一个很有挑战的过程,如果想自行尝试,可参考以下链接 https://blog.csdn.net/yumi6666/article/details/82502169。
个人推荐根据自身的操作系统和所需Hadoop版本情况,从网上直接下载编译好的程序包。
附win10 x64环境编译好的hadoop_2.6.5网盘:
链接:https://pan.baidu.com/s/1Q4DSur-lvnuX4UJCqA-URA 密码:ao8g
4、HDFS系统通过JavaAPI进行操作
先附上代码:
package cn.test.hadoop.hdfs;

import java.io.IOException;
import java.net.URI;
import java.util.Iterator;
import java.util.Map.Entry;

import org.apache.hadoop.conf.Configuration;
import org.apache.hadoop.fs.FileSystem;
import org.apache.hadoop.fs.LocatedFileStatus;
import org.apache.hadoop.fs.Path;
import org.apache.hadoop.fs.RemoteIterator;
import org.junit.Before;
import org.junit.Test;

public class UserTestHdfsClient {

	Configuration conf = null;
	FileSystem fs = null;

	@Before
	public void init() throws Exception {

		conf = new Configuration();
//		conf.set("dfs.replication", "5");
//		fs = FileSystem.get(conf);
		fs = FileSystem.get(new URI("hdfs://hadoop.mini01:9000"), conf, "hadoop");
	}

	/**
	 *	遍历conf中所有属性
	 */
	@Test
	public void testConf() {

		Iterator> it = conf.iterator();
		while(it.hasNext()) {
			Entry entry = it.next();
			System.out.println("The "+ entry.getKey()+" is :" + entry.getValue() + ".\n");
		}

	}

	/**
	 * 	删除某目录下所有文件
	 */
	@Test
	public void testDelete() throws Exception {
		boolean delete = fs.delete(new Path("/testMkdirs"), true);
		System.out.println(delete);
	}

	/**
	 * 	显示文件清单
	 * @throws Exception
	 */
	@Test
	public void testLs() throws Exception {
		RemoteIterator listFiles = fs.listFiles(new Path("/"), true);
		while(listFiles.hasNext()){
			LocatedFileStatus fileStatus = listFiles.next();
			System.out.println("FileName: " + fileStatus.getPath().getName());
			System.out.println("FilePath: " + fileStatus.getPath());
			System.out.println("FileOwner: " + fileStatus.getOwner());
			System.out.println(fileStatus.getReplication());
			System.out.println("********************************");
		}
	}

	/**
	 * 上传文件
	 * @throws IllegalArgumentException
	 * @throws IOException
	 */
	public void testUpload() throws IllegalArgumentException, IOException {

		fs.copyFromLocalFile(new Path("local"), new Path("dst"));
		fs.close();
	}

	/**
	 * 	下载
	 * @throws IOException
	 * @throws IllegalArgumentException
	 */
	public void testDownload() throws IllegalArgumentException, IOException {
		fs.copyToLocalFile(new Path("src"), new Path("dst"));
		fs.close();
	}


}
须注意的点:
1、增删查均可通过API简单实现,但改文件并不能直接通过HDFS实现。在HDFS文件系统中,改文件的方式是Append。
2、代码中的Path需要自行修改。
3、进行运行前,请确保以有权身份登入HDFS系统。
另附流方式实现HDFS文件操作的代码:
package cn.test.hadoop.hdfs;

import java.io.FileInputStream;
import java.io.FileOutputStream;
import java.io.IOException;
import java.net.URI;

import org.apache.commons.io.IOUtils;
import org.apache.hadoop.conf.Configuration;
import org.apache.hadoop.fs.FSDataInputStream;
import org.apache.hadoop.fs.FSDataOutputStream;
import org.apache.hadoop.fs.FileSystem;
import org.apache.hadoop.fs.Path;
import org.junit.Before;
import org.junit.Test;

/**
 * 用stream方式管理hdfs的文件,
 * 可以实现读取指定偏移量范围的文件内容
 * @author Henry
 *
 */

public class HdfsStreamAccess {
	FileSystem fs = null;
	Configuration conf = null;

	@Before
	public void init() throws Exception {
		conf = new Configuration();
		fs = FileSystem.get(new URI("hdfs://hadoop.mini01:9000"),conf,"hadoop");
	}

	/**
	 * 	从本地写到hdfs
	 * @throws Exception
	 */
	@Test
	public void testUpload() throws Exception {
		FSDataOutputStream outputStream = fs.create(new Path("/testabc.txt"), true);
		FileInputStream inputStream = new FileInputStream("d:/kms10.log");

		IOUtils.copy(inputStream, outputStream);
	}

	@Test
	public void testDownload() throws Exception {
		FSDataInputStream inputStream = fs.open(new Path("/testabc.txt"));
		FileOutputStream outputStream = new FileOutputStream("d:/inputstream.txt");

		IOUtils.copy(inputStream, outputStream);
	}

	/**
	 * 	使用流随机读取文件
	 * @throws Exception
	 */
	@Test
	public void testRandomAccess() throws Exception {
		FSDataInputStream inputStream = fs.open(new Path("/testabc.txt"));
		inputStream.seek(12); //此处 “12” 代表从12字节后开始抓取流。可自行实现随机读取。
		FileOutputStream outputStream = new FileOutputStream("d:/inputstream2.txt");

		IOUtils.copy(inputStream, outputStream);
	}

	/**
	 *	从文件系统进行读取
	 * @throws IllegalArgumentException
	 * @throws IOException
	 */
	@Test
	public void testCat() throws IllegalArgumentException, IOException {

		FSDataInputStream inputStream = fs.open(new Path("/testabc.txt"));

		IOUtils.copy(inputStream, System.out);
	}


}
以上代码的运行方式均为Junit直接运行。
5、参考的文档:
链接:https://pan.baidu.com/s/14tdGH--fDjVnV57UV-NSpw 密码:xeo0
