TX2(Ubuntu)下QT(c++) + python3.6 混合编程
一、环境配置
1 TX2 (Ubuntu18.04)
2 QT 5.9.5
3 python 3.6
二、工程创建
2.1 建一个widget工程,这里不做过多描述,搭配一个按键,在按键按下之后调用python的函数。
2.2 添加py文件
#!/usr/bin/env python
# -*- coding: utf-8 -*-
#test.py
def testpy():
    print("hello world this is python")
文件的内容就是打印一句话。
三、python的调用
3.1 .pro文件中添加依赖库以及依赖头文件路径
INCLUDEPATH += -I /usr/include/python3.6/

LIBS += -L  /usr/lib/python3.6/config-3.6m-aarch64-linux-gnu -lpython3.6
3.2 SLOT关键字修改
由于QT中定义了slots作为关键了,而python3中有使用slot作为变量,所以在编译时会有冲突。
需要修改python库中的object.h文件,因为该文件是系统文件,可以在终端中sudo gedit进行修改:
sudo gedit /usr/include/python3.6/object.h//应该是在440-448行
typedef struct{
const char* name;
int basicsize;
int itemsize;
unsigned int flags;
#undef slots //这里取消slots宏定义
PyType_Slot *slots; /* terminated by slot==0. */
#define slots Q_SLOTS //这里恢复slots宏定义与QT中QObjectDefs.h中一致
} PyType_Spec; 3.3 槽函数完成
void Widget::on_pushButton_clicked()
{
    qDebug()<<"test py";

    Py_Initialize();
    PyObject *pModule = nullptr;
    PyObject *pLoadFunc = nullptr;


    if (!Py_IsInitialized()) {

        //printf("inititalize failed");
        qDebug() << "inititalize failed";
        return ;
    }
    else {
        qDebug() << "inititalize success";
    }

    PyRun_SimpleString("import sys");
    PyRun_SimpleString("sys.path.append('./')"); //可执行文件路径

    pModule = PyImport_ImportModule("test_py");// py file name
    if (!pModule) {
        PyErr_Print();
        qDebug() << "not loaded!";
        return ;
    }
    else
    {
        qDebug() << "load module success";
    }


    pLoadFunc = PyObject_GetAttrString(pModule, "testpy"); // function name
    if (!pLoadFunc)
    {
        PyErr_Print();
        qDebug() << "not loaded pLoadFunc!";
        return ;
    }
    else {
        qDebug() << "load pLoadFunc success";
    }

    PyObject_CallFunction(pLoadFunc,NULL);
    Py_Finalize();
}
注意三个地方
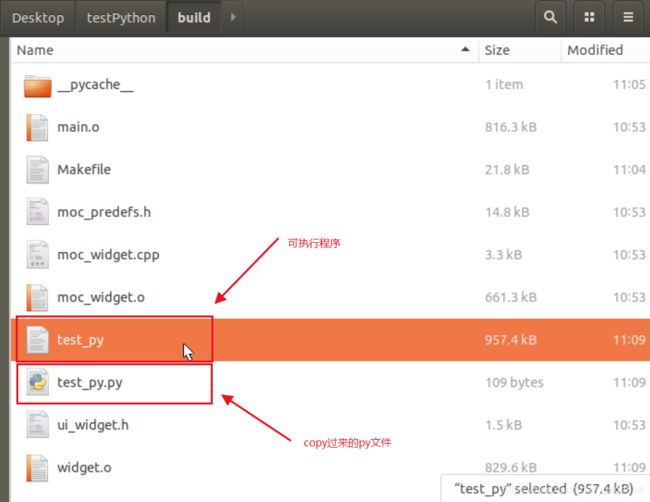
1 可执行文件路径 ./是指当前的可执行文件的路径,确保路径下有test_py.py
2 pModule = PyImport_ImportModule("test_py"); test_py是py文件名
3 pLoadFunc = PyObject_GetAttrString(pModule, "testpy"); testpy是函数名
尤其要注意1 很多人就会说,我的可执行程序路径下并没有test_py.py,test_py.py是在别的路径下,怎么办?
那就把test_py.py copy到可执行程序目录下
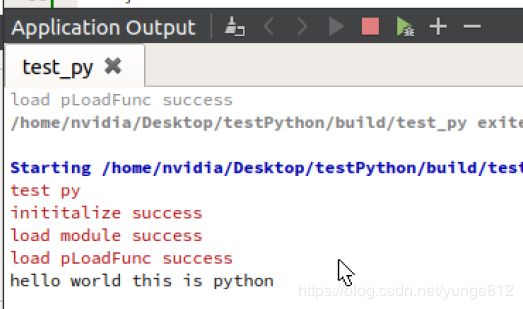
四、执行
五、带参数传递
    pLoadFunc = PyObject_GetAttrString(pModule, "testpy"); // function name
    if (!pLoadFunc)
    {
        PyErr_Print();
        qDebug() << "not loaded pLoadFunc!";
        return ;
    }
    else
    {
        qDebug() << "load pLoadFunc success";
    }

    PyObject* args = PyTuple_New(2);
    PyObject *pInt1=Py_BuildValue("i",20); //i means int
    PyObject *pInt2=Py_BuildValue("i",30);
    PyTuple_SetItem(args, 0, pInt1);
    PyTuple_SetItem(args, 1, pInt2);

    PyObject* pRet = PyObject_CallObject(pLoadFunc,args);
    int ans=0;
    PyArg_Parse(pRet,"i",&ans); //i means int
    qDebug()<<"ans = "<
def testpy(a,b):
    print("hello world this is python build")
    print(a)
    print(b)
    return a+b
参考:https://blog.csdn.net/lwlgzy/article/details/83857297
https://blog.csdn.net/m0_37706052/article/details/103457665
https://blog.csdn.net/qq_41800188/article/details/79709452
https://blog.csdn.net/u010168781/article/details/89927630 带参数传递
https://www.cnblogs.com/jiaping/p/6321859.html

