Spring Cloud Config统一管理微服务配置
一Spring Cloud Config背景及简介
# 集中管理的需求:一个使用微服务架构的应用系统可能会包括成百上千个微服务,因此集中管理很有必要
# 不同环境不同配置:例如数据源在不同的环境(开发,测试,生产)是不同的
# 运行期间可以动态调整。例如根据各个微服务的负载状况,动态调整数据源连接池大小或者熔断阀值,并且调整时不停止微服务
# 配置修改后可以自动更新
故通常做法是使用配置服务管理器配置。
要实现Spring Cloud Config的功能,有很多框架,如百度的disconf,阿里的diamond,协程的apollo
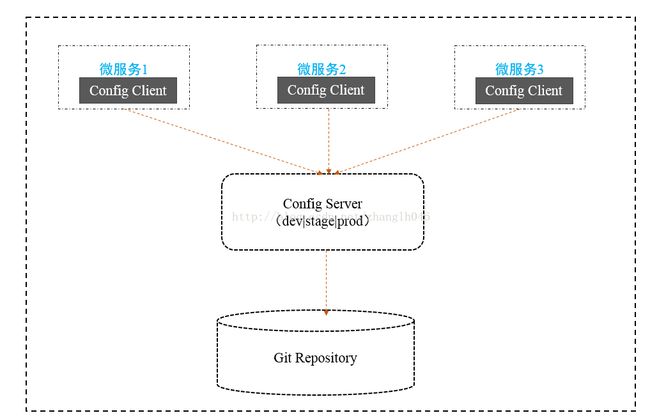
Spring Cloud Config主要是为了分布式系统的外部配置提供了服务器端和客户端的支持,只要体现为Config Server和Config Client两部分。由于Config Server和Config Client都实现了对Spring Environment和PropertySource抽闲的映射,因此Spring Cloud Config很适合spring应用程序。
Config Server: 是一个看横向扩展的,集中式的配置服务器,它用于集中管理应用程序各个环境下配置,默认使用Git存储配置内容。
Config Client: 是一个Config Server的客户端,用于操作存储在Config Server上的配置属性,所有微服务都指向Config Server,启动的时候会请求它获取所需要的配置属性,然后缓存这些属性以提高性能。
二 编写ConfigServer
2.1 创建项目,添加配置文件,push到Git
如果要编写Config Server,我们首先要有一个项目,可以存储配置文件,并且推送到了Git. 比如我在我的Git仓库有以下仓库和文件。
master:
application.yml 内容是profile: default
microservice-config-client-test.yml内容是profile: test
microservice-config-client-prod.yml内容是profile: prod
release:
microservice-config-client-dev.properties内容是profile: dev
2.2 创建Maven项目:microservice-config-server
并添加依赖
2.3 编写启动类,在其启动类上添加注解@EnableConfigServer
@SpringBootApplication
@EnableConfigServer
public classConfigServerApplication {
public static void main(String[] args) throws Exception {
SpringApplication.run(ConfigServerApplication.class, args);
}
}
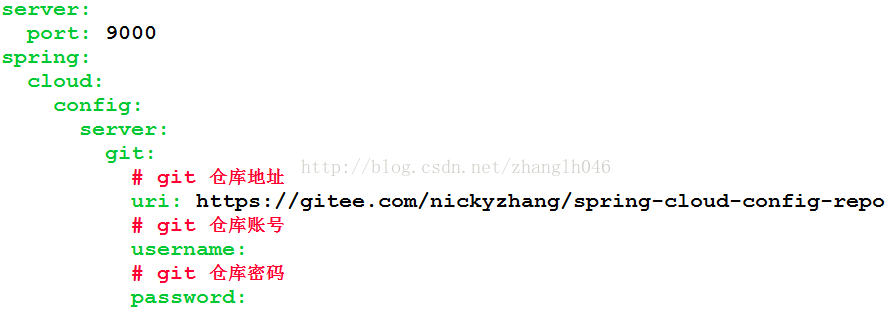
2.4 编写配置文件application.yml,并添加以下内容

2.5 我们可以使用configserver的断点获取配置内容
/{application}/{profile}[/{label}]
/{application}-{profile}.yml
/{label}/{application}-{profile}.yml
/{application}-{profile}.properties
/{label}/{application}-{profile}.properties
application: 表示微服务的虚拟主机名,即配置的spring.application.name
profile: 表示当前的环境,dev,test or production?
label: 表示git仓库分支,master or relase or others repository name?默认是master
如果没有找到,就会找默认的
比如:
http://localhost:9000/microservice-config-client/test
http://localhost:9000/master/microservice-config-client-prod
http://localhost:9000/microservice-config-client/dev
http://localhost:9000/release/microservice-config-client-dev.yml
http://localhost:9000/microservice-config-client-prod.yml
# 以下这个是找不到的,应该会找默认的properties,如果没有properties则会找yml
http://localhost:9000/microservice-config-client/uat
三 编写ConfigClient
我们已经知道如何使用Config Server端点获取配置内容,这一节我们讨论微服务如何获取配置信息
3.1 创建ConfigClient maven项目
添加依赖:
3.2 编写启动类
@SpringBootApplication
public classConfigClientApplication {
public static void main(String[] args) throws Exception {
SpringApplication.run(ConfigClientApplication.class, args);
}
}
3.3 编写配置文件application.yml和 bootstrap.yml
application.yml:
server:
port: 9010
bootstrap.yml:
spring:
cloud:
config:
# Config Server 地址
uri: http://localhost:9000
# 对应的Config Server的配置文件对应的profile,即环境
profile: dev
# 对应的Config Server的配置文件对应的Git分支
label: release
application:
# 对应的Config Server的配置文件对应的application
name: microservice-config-client
有人会问,为什么不都配置在application.yml里面呢,而要配置bootstrap里面呢?
因为boostrap用于应用程序上下文的引导阶段,通常用于引导上下文从外部资源获取配置属性,比如Spring Cloud Config Server,或者 解密外部配置文件的属性等。 默认的Config Server地址是localhost:8888. 所以我们只能在bootstrap.yml或者bootstrap.properties中修改。
如需禁用引导过程,你可以设置
spring.cloud.bootstrap.enabled=false
3.4 编写controller
@RestController
public classConfigClientController {
@Value("${profile}") // 绑定git仓库配置文件属性profile
private String profile;
@RequestMapping("/profile")
public StringgetProfile() {
return this.profile;
}
}
3.5 启动和测试
http://localhost:9010/profile
如果我们在application.yml添加以下代码:
profile: prod
spring:
cloud:
config:
profile: test
第一个peofile并不会改变我们访问http://localhost:9010/profile的值;但是第二个spring.cloud.config.profile却会影响到。它覆盖了bootstrap里面的该值。
四Config Server 的Git仓库配置
4.1 占位符的支持
Config Server占位符支持{application},{profile},{label}
比如:
https://gitee.com/nickyzhang/{application}
测试:
# 创建2个项目simple 和 special
simple项目添加文件
application.yml 内容为profile: simple
simple-prod.yml 内容为profile: simple-prod
special项目添加文件
application.yml 内容为profile: special
simple-prod.yml 内容为profile: special-prod
# Config Server的配置
server:
port: 9000
spring:
cloud:
config:
server:
git:
# git 仓库地址
uri:https://gitee.com/nickyzhang/{application}
# git 仓库账号
username:
# git 仓库密码
password:
# 然后启动config server,测试
http://localhost:9000/master/simple-prod.yml
http://localhost:9000/special-prod.yml
4.2 模式匹配
模式匹配指的是带有通配符的{application}/{profile}名称的列表
如果{application}/{profile}不匹配任何模式,将使用这个配置项spring.cloud.config.server.git.url定义的URL
spring:
cloud:
config:
server:
git:
# git 仓库地址
uri:https://gitee.com/nickyzhang/spring-cloud-config-repo
repos:
simple: https://gitee.com/nickyzhang/simple
special:
pattern: special*/prod/*,*special*/prod*
uri:https://gitee.com/nickyzhang/special
local:
pattern: local*
uri:file:/home/configsvc/config-repo
# git 仓库账号
username:
# git 仓库密码
password:
spring:
cloud:
config:
server:
git:
uri: https://github.com/spring-cloud-samples/config-repo
repos:
development:
pattern:
- '*/development'
- '*/staging'
uri: https://github.com/development/config-repo
staging:
pattern:
- '*/qa'
- '*/production'
uri: https://github.com/staging/config-repo
4.3 搜索目录
有些时候,可能把配置文件放在Git仓库子目录中,此时可以使用search-path指定,而且同样支持占位符
spring:
cloud:
config:
server:
git:
uri:https://github.com/spring-cloud-samples/config-repo
searchPaths: foo,bar*
4.4 启动时加载配置文件
默认情况下,在配置被首次请求时,ConfigServer才会clone git仓库。也可以让Config Server在启动时就clone git仓库,例如:
spring:
cloud:
config:
server:
git:
uri: https://git/common/config-repo.git
repos:
team-a:
pattern: team-a-*
cloneOnStart: true
uri:http://git/team-a/config-repo.git
team-b:
pattern: team-b-*
cloneOnStart: false
uri:http://git/team-b/config-repo.git
team-c:
pattern: team-c-*
uri: http://git/team-a/config-repo.git
我们也可以设置全局的:
spring.cloud.config.git.clone-on-start: true
设置clone-on-start:可以让我们快速识别错误的资源
五Config Server健康状况指示器
六 配置内容的加密和解密
6.1 安装JCE
Config Server加解密的功能依赖Java Cryptography Extension(JCE)
从ORACLE根据你使用的JDK版本下载:
http://www.oracle.com/technetwork/java/javase/downloads/jce8-download-2133166.html
解压然后替换掉\jre1.8.0_92\lib\security下面的jar包
6.2Config Server的加密和解密端
Config Server提供了加密与解密的端点,分别是/encrypt 与 /decrypt,
诸如:
curl -X POST http://localhost:9000/encrypt -d 想要加密的明文
curl -X POST http://localhost:9000/decrypt -d 想要解密的密文
6.3 对称加密
很简单,在application.yml里面设置对称密钥,即encrypt.key: foo
启动Config Server,然后测试。
curl-X POST http://localhost:9000/encrypt -d foo
返回密文:FKSAJDFGYOS8F7GLHAKERGFHLSAJ
输入
curl-X POST http://localhost:9000/decrypt -d FKSAJDFGYOS8F7GLHAKERGFHLSAJ
返回foo,说明可以正常解密
6.4 存储加密的内容
加密后的内容,可使用{cipher}密文的形式存储。准备一个配置文件:
encryption.yml:
spring:
datasource:
username: admin
password:'{cipher}U2FsdGVkX1+6Wfv66BRyKzYVHvN84cvAZQ=='
或者准备一个encryption.properties:
spring.datasource.username=admin
spring.datasource.password={cipher}U2FsdGVkX1+6Wfv66BRyKzYVHvN84cvAZQ==
注意没有加单引号括起来。
然后将其push到Git仓库https://gitee.com/nickyzhang/spring-cloud-config-repo
然后访问http://localhost:9000/encrption-default.yml
则可以正常读取密码123abcABC
6.5 非对称加密
# 执行以下命令,生成server.jks,即可创建一个Key Store
keytool -genkeypair -alias mytestkey -keyalg RSA-dname "CN=Web Server,OU=Unit,O=Organization,L=City,S=State,C=US"-keypass changeme -keystore server.jks -storepass letmein
# 将生成的server.jks复制到项目classpath路径下
# application.yml配置文件添加以下内容
encrypt:
key-store:
location: classpath:/server.jks # jks文件路径
password: letmein # storepass
alias: mytestkey # alias
secret: changeme # keypass
这样的话,使用以下命令
curl http://localhost:9000/encrypt -d mysecret去测试
对称加密和非对称加密的比较:
对称式加密:解密方式是加密方式的逆运算,即加密和解密使用的是同一个密钥(初等加密算法)。
非对称式加密:加密和解密需要两个密钥进行,这两个密钥是公钥和私钥(高等加密算法)。
七 使用/refresh端点手动刷新配置
有时候,我们需要在运行期间动态调整配置。如果配置发生了修改,微服务要如何实现配置的刷新呢?
# 添加依赖,主要是spring-boot-starter-actuator
# 在controller上添加注解
@RestController
@RefreshScope
public classConfigClientController {
@Value("${profile}")
private String profile;
@RequestMapping("/profile")
public StringgetProfile() {
return this.profile;
}
}
# 然后将配置文件更新,并且push到git远程仓库
# 刷新测试
请求http://localhost:9000/profile,发现并没有刷新,此时我们需要调用http://localhost:9000/refresh, 然后再次请求/profile,会发现已经刷新了。
如果遇到以下错误:
{"timestamp":1507270047254,"status":401,"error":"Unauthorized","message":"Fullauthentication is required to access this resource.","path":"/refresh"}
在配置文件中添加:
management:
security:
enabled: false
八 使用SpringCloud Bus自动刷新配置
使用/refresh端点手动刷新配置,但是如果所有微服务节点的配置都需要手刷新,工作量有可能很大。而且随着系统的扩张,越来难以维护。因此实现配置的自动刷新是很有必要的。
8.1 简介
Spring Cloud Bus使用轻量级的消息代理,RabbitMQ, Kafka等连接分布式系统的节点,这样就可以广播状态的改变。可以将Spring Cloud Bus想象成Spring Boot Actuator,架构图如下所示:

由图可知,微服务A的所有实例都通过消息总线连接到了一起,每一个实例都会订阅配置更新事件。当其中一个微服务节点的/bus/refresh端点被请求,该实例就会向消息总线发送一个配置更新事件,其他实例获得该事件后也会更新配置。
8.2 实现自动刷新
# 添加依赖
# 配置application.yml
spring:
rabbitmq:
host:localhost
port:5672
username:guest
password: guest
# 启动config server 和 config client(多个实例)
# 先访问客户端不修改配置文件的情况
直接访问http://localhost:9000/profile
然后再将文件内容修改,再次访问http://localhost:9000/profile看是否发生改变
如果没有,将POST 请求到其中一个Config Client实例的/bus/refresh端点,如curl –X POST http://localhost:8081/bus/refresh
再访问其他的节点profile端点,如果都一致了说明生效了。
借助Git仓库的WebHooks,就可以轻松实现配置的自动刷新:

8.3 局部刷新
某些场景下,我只想刷新部分微服务的配置,可通过/bus/refresh端点的destination参数来定位要刷新的应用程序。
比如/bus/refresh?destination=customers:9000,这样消息总线上微服务实例就会很快根据destination参数值来判断是否需要刷新。其中customers:9000指的就是各个微服务ApplicationContextID
Destination参数也可以用来定位特定的微服务。列如:/bus/refresh?
Destination=customers:** 这样就可以触发customers微服务所有实例的配置刷新
8.4 架构改进
通过请求某个微服务/bus/refresh端点的方式来实现配置刷新,但是这种方式不太优雅,因为:
# 破坏了微服务的职责单一原则
# 破坏了微服务各节点对等性
# 有一定的局限性,比如微服务在迁移的时候,网络地址常常会发生变化,此时如想自动刷新配置,就不得不修改WebHook的配置

将Config Server也加入总线中,并使用Config Server的/bus/refresh端点来实现配置的刷新。这样各个微服务只需要关注自身的业务,而不再承担配置刷新的职责。
8.5 跟踪总线事件
一些场景下,希望知道Spring CloudBus事件的传播细节,可以跟踪总线事件(RemoteApplicationEvent的子类都是总线事件)。
只需要我们设置spring.cloud.bus.trace.enbaled=true
在/bus/refresh端点被请求后,访问/trace端点就可以获得结果
九Spring Cloud Config 配合Eureka使用
前面描述可知,微服务中指定了Config Server地址,这种方式无法利用服务发现组件的优势。下面讨论Config Server注册到Eureka上时,如何使用Spring Cloud Config
9.1 将ConfigServer 和 Config Client 注册到EurekaServer上
9.2Config Client的bootstrap.yml配置如下:
spring:
application:
name: microservice-client-bus
cloud:
config:
uri: http://localhost:8088
profile: prod
label: master
discovery:
enabled: true # 开启通过服务发现组件访问Config Server的功能
# 指定Config Server在服务发现组件中的serviceId
service-id: microservice-config-server-eureka
eureka:
client:
serviceUrl:
defaultZone: http://localhost:8761/eureka/
十 用户认证
在之前的配置中Config Server是允许匿名访问的,为了防止配置内容的泄露,应该保护Config Server的安全。简单的说我们可以为Config Server添加用户认证。
# 先构建一个需要用户认证的Config Server,然后添加依赖
# 修改application.yml配置文件
server:
port: 9000
spring:
cloud:
config:
server:
git:
uri:https://gitee.com/nickyzhang/{application}
username:
password:
security:
basic:
enabled: true
user:
name: nicky
password: 123abcABC
# Config Client连接需要认证的Config Server的时候
方式一:
spring:
cloud:
config:
uri:http://nicky:123abcABC@localhost:9000
方式二:
spring:
cloud:
config:
uri:http://localhost:9000
username: nicky
password: 123ab
方式二的优先级较高。
十一 高可用
11.1 Git仓库的高可用
由于配置内容存储在Git仓库中,所以想要实现Config Server的高可用,必须有一个高可用的Git仓库。有两总方式可以实现Git仓库高可用。
第一种:使用第三方的Git仓库,这种方式很简单,可以使用GitHub,BitBucket等提供的仓库托管服务,这些服务本身已经就是高可用的
第二种:自己搭建的Git仓库管理系统:使用第三方服务虽然省事儿,但很多场景下,更倾向于自己搭建,这时也需要保证Git高可用
以GitLab为例子,可以参考https://about.gitlab.com/high-availability/
11.2 MQ高可用
即RabbitMQ 或者Kafka高可用
11.3 Config Server自身的高可用
11.3.1 Config Server未注册到Eureka Server上
可以借助一个负载均衡器来实现
先将请求打到负载均衡器,再由负载均衡器转发到其代理的其中一个Config Server节点
11.3.2 Config Server注册到了Eureka Server上
这种情况就比较简单了,只需将多个ConfigServer注册到Eureka Server上,即可实现Config Server高可用

