Shiro学习--与SpringMVC整合(数据库,Shiro注解和Shiro标签)
关于Shiro的环境搭建和核心概念参考
http://blog.csdn.net/frankcheng5143/article/details/50815495
http://blog.csdn.net/frankcheng5143/article/details/50818198
通过Shiro官方给的Tutorial我们知道Shiro的操作都是基于Subject的,而Subject来自SecurityManager,如下
    SecurityManager securityManager = factory.getInstance();
    SecurityUtils.setSecurityManager(securityManager);

    // get the currently executing user:
Subject currentUser = SecurityUtils.getSubject();- 1
- 2
- 3
- 4
- 5
通过整合之道我们知道Spring和其他框架的整合就是将其他框架的核心概念通过一个bean交由Spring管理起来,而Shiro的核心概念就是SecurityManager,所以Spring对Shiro的整合就是对SecurityManager的整合。而与SpringMVC的整合是SpringMVC拦截请求的时候还要交给Shiro进行拦截。
先来看一下结果,有个感性的认识,再看细节,直接上图。
没有登录跳转到登录页面,登录后进入刚才输入的页面
不同权限看到的页面
让我们仔细看一下实现细节。
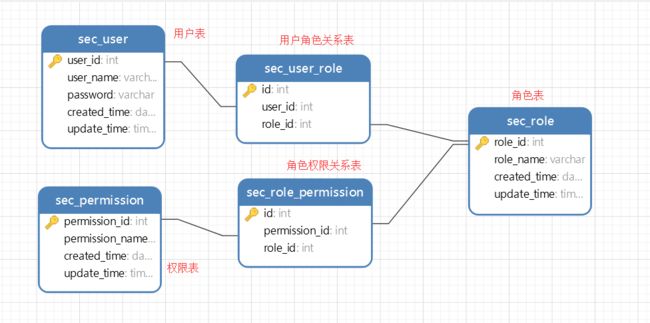
数据库结构
参考
http://blog.csdn.net/chris_mao/article/details/49188699
http://blog.csdn.net/chris_mao/article/details/49215471
总共有五张表,
用户表,存储用户的相关信息
角色表,存储角色的相关信息
权限表,存储权限的相关信息
用户角色表,存储用户和角色的对应关系 一对多
角色权限表,存储角色和权限的对应关系 一对对
关系如下
数据库脚本
数据库名称为shiro_test
/*
Navicat MySQL Data Transfer

Source Server         : 本地连接
Source Server Version : 50620
Source Host           : localhost:3306
Source Database       : shiro_test

Target Server Type    : MYSQL
Target Server Version : 50620
File Encoding         : 65001

Date: 2016-03-09 16:50:54
*/

SET FOREIGN_KEY_CHECKS=0;

-- ----------------------------
-- Table structure for sec_permission
-- ----------------------------
DROP TABLE IF EXISTS `sec_permission`;
CREATE TABLE `sec_permission` (
  `permission_id` int(10) unsigned NOT NULL AUTO_INCREMENT,
  `permission_name` varchar(64) COLLATE utf8_bin DEFAULT NULL,
  `created_time` datetime DEFAULT NULL,
  `update_time` timestamp NULL DEFAULT CURRENT_TIMESTAMP,
  PRIMARY KEY (`permission_id`)
) ENGINE=InnoDB AUTO_INCREMENT=3 DEFAULT CHARSET=utf8 COLLATE=utf8_bin;

-- ----------------------------
-- Table structure for sec_role
-- ----------------------------
DROP TABLE IF EXISTS `sec_role`;
CREATE TABLE `sec_role` (
  `role_id` int(10) unsigned NOT NULL AUTO_INCREMENT,
  `role_name` varchar(64) COLLATE utf8_bin DEFAULT NULL,
  `created_time` datetime DEFAULT NULL,
  `update_time` timestamp NULL DEFAULT CURRENT_TIMESTAMP,
  PRIMARY KEY (`role_id`)
) ENGINE=InnoDB AUTO_INCREMENT=3 DEFAULT CHARSET=utf8 COLLATE=utf8_bin;

-- ----------------------------
-- Table structure for sec_role_permission
-- ----------------------------
DROP TABLE IF EXISTS `sec_role_permission`;
CREATE TABLE `sec_role_permission` (
  `id` int(10) unsigned NOT NULL AUTO_INCREMENT,
  `permission_id` int(10) unsigned NOT NULL,
  `role_id` int(10) unsigned NOT NULL,
  PRIMARY KEY (`id`),
  KEY `permission_id外键` (`permission_id`),
  KEY `role_id外键1` (`role_id`),
  CONSTRAINT `permission_id外键` FOREIGN KEY (`permission_id`) REFERENCES `sec_permission` (`permission_id`) ON DELETE CASCADE ON UPDATE CASCADE,
  CONSTRAINT `role_id外键1` FOREIGN KEY (`role_id`) REFERENCES `sec_role` (`role_id`) ON DELETE CASCADE ON UPDATE CASCADE
) ENGINE=InnoDB AUTO_INCREMENT=2 DEFAULT CHARSET=utf8 COLLATE=utf8_bin;

-- ----------------------------
-- Table structure for sec_user
-- ----------------------------
DROP TABLE IF EXISTS `sec_user`;
CREATE TABLE `sec_user` (
  `user_id` int(10) unsigned NOT NULL AUTO_INCREMENT,
  `user_name` varchar(64) COLLATE utf8_bin DEFAULT NULL,
  `password` varchar(128) COLLATE utf8_bin DEFAULT NULL,
  `created_time` datetime DEFAULT NULL,
  `update_time` timestamp NULL DEFAULT CURRENT_TIMESTAMP,
  PRIMARY KEY (`user_id`)
) ENGINE=InnoDB AUTO_INCREMENT=3 DEFAULT CHARSET=utf8 COLLATE=utf8_bin;

-- ----------------------------
-- Table structure for sec_user_role
-- ----------------------------
DROP TABLE IF EXISTS `sec_user_role`;
CREATE TABLE `sec_user_role` (
  `id` int(10) unsigned NOT NULL AUTO_INCREMENT,
  `user_id` int(10) unsigned DEFAULT NULL,
  `role_id` int(10) unsigned DEFAULT NULL,
  PRIMARY KEY (`id`),
  KEY `user_id外键` (`user_id`),
  KEY `role_id外键` (`role_id`),
  CONSTRAINT `role_id外键` FOREIGN KEY (`role_id`) REFERENCES `sec_role` (`role_id`) ON DELETE CASCADE ON UPDATE CASCADE,
  CONSTRAINT `user_id外键` FOREIGN KEY (`user_id`) REFERENCES `sec_user` (`user_id`) ON DELETE CASCADE ON UPDATE CASCADE
) ENGINE=InnoDB AUTO_INCREMENT=3 DEFAULT CHARSET=utf8 COLLATE=utf8_bin;
- 1
- 2
- 3
- 4
- 5
- 6
- 7
- 8
- 9
- 10
- 11
- 12
- 13
- 14
- 15
- 16
- 17
- 18
- 19
- 20
- 21
- 22
- 23
- 24
- 25
- 26
- 27
- 28
- 29
- 30
- 31
- 32
- 33
- 34
- 35
- 36
- 37
- 38
- 39
- 40
- 41
- 42
- 43
- 44
- 45
- 46
- 47
- 48
- 49
- 50
- 51
- 52
- 53
- 54
- 55
- 56
- 57
- 58
- 59
- 60
- 61
- 62
- 63
- 64
- 65
- 66
- 67
- 68
- 69
- 70
- 71
- 72
- 73
- 74
- 75
- 76
- 77
- 78
- 79
- 80
- 81
- 82
- 83
- 84
初始数据
用户表sec_user

    INSERT INTO `sec_user` VALUES ('1', 'jacky', '9661FD65249B026EBEA0F49927E82F0E', '2016-03-08 16:37:59', '2016-03-08 16:38:06');
INSERT INTO `sec_user` VALUES ('2', 'cheng', '89975C5E5D407916E8080D137C48DDD7', '2016-03-09 15:09:35', '2016-03-09 15:10:16');- 1
- 2
用户jacky密码jacky
用户cheng密码cheng
角色表sec_role

    INSERT INTO `sec_role` VALUES ('1', 'admin', '2016-03-09 11:58:12', '2016-03-09 11:58:16');
INSERT INTO `sec_role` VALUES ('2', 'user', '2016-03-09 15:09:04', '2016-03-09 15:09:08');- 1
- 2
两种角色admin和user
权限表sec_permission

    INSERT INTO `sec_permission` VALUES ('1', 'user:create', '2016-03-09 15:42:07', '2016-03-09 15:42:10');
INSERT INTO `sec_permission` VALUES ('2', 'user:view', '2016-03-09 15:43:35', '2016-03-09 15:43:39');- 1
- 2
两种权限,创建用户user:create和查看用户user:view
情景
用户jacky属于admin组,admin拥有创建用户user:create和查看用户user:view权限
用户cheng输入user组,user组拥有查看用户user:view权限
用户角色表sec_user_role
    INSERT INTO `sec_user_role` VALUES ('1', '1', '1');
INSERT INTO `sec_user_role` VALUES ('2', '2', '2');- 1
- 2
角色权限表sec_role_permission
    INSERT INTO `sec_role_permission` VALUES ('1', '1', '1');
    INSERT INTO `sec_role_permission` VALUES ('2', '2', '1');
INSERT INTO `sec_role_permission` VALUES ('3', '2', '2');- 1
- 2
- 3
与Spring整合
首先需要一个SpringMVC,参考
http://blog.csdn.net/frankcheng5143/article/details/50512340
整合参考
http://shiro.apache.org/spring.html
首先在web.xml中定义shiro的过滤器
配置web.xml
web.xml
    <filter>
        <filter-name>shiroFilterfilter-name>
        <filter-class>org.springframework.web.filter.DelegatingFilterProxyfilter-class>
        <init-param>
            <param-name>targetFilterLifecycleparam-name>
            <param-value>trueparam-value>
        init-param>
    filter>


    <filter-mapping>
        <filter-name>shiroFilterfilter-name>
        <url-pattern>/*url-pattern>
filter-mapping>- 1
- 2
- 3
- 4
- 5
- 6
- 7
- 8
- 9
- 10
- 11
- 12
- 13
- 14
- 15
完整的web.xml
web.xml
<web-app>

    <display-name>Archetype Created Web Applicationdisplay-name>


    <context-param>
        <param-name>contextConfigLocationparam-name>
        <param-value>classpath:spring/spring-core.xmlparam-value>
    context-param>


    <filter>
        <filter-name>charsetEncodingfilter-name>
        <filter-class>org.springframework.web.filter.CharacterEncodingFilterfilter-class>
        <init-param>
            <param-name>encodingparam-name>
            <param-value>UTF-8param-value>
        init-param>
        <init-param>
            <param-name>forceEncodingparam-name>
            <param-value>trueparam-value>
        init-param>
    filter>


    <filter>
        <filter-name>shiroFilterfilter-name>
        <filter-class>org.springframework.web.filter.DelegatingFilterProxyfilter-class>
        <init-param>
            <param-name>targetFilterLifecycleparam-name>
            <param-value>trueparam-value>
        init-param>
    filter>


    <filter-mapping>
        <filter-name>charsetEncodingfilter-name>
        <url-pattern>/*url-pattern>
    filter-mapping>


    <filter-mapping>
        <filter-name>shiroFilterfilter-name>
        <url-pattern>/*url-pattern>
    filter-mapping>


    <listener>
        <listener-class>org.springframework.web.util.IntrospectorCleanupListenerlistener-class>
    listener>


    <listener>
        <listener-class>org.springframework.web.context.ContextLoaderListenerlistener-class>
    listener>


    <servlet>
        <servlet-name>mvcservlet-name>
        <servlet-class>org.springframework.web.servlet.DispatcherServletservlet-class>
        <init-param>
            <param-name>contextConfigLocationparam-name>
            <param-value>classpath:/spring/spring-mvc.xmlparam-value>
        init-param>
        <load-on-startup>1load-on-startup>
    servlet>
    <servlet-mapping>
        <servlet-name>mvcservlet-name>
        <url-pattern>/url-pattern>
    servlet-mapping>

web-app>
- 1
- 2
- 3
- 4
- 5
- 6
- 7
- 8
- 9
- 10
- 11
- 12
- 13
- 14
- 15
- 16
- 17
- 18
- 19
- 20
- 21
- 22
- 23
- 24
- 25
- 26
- 27
- 28
- 29
- 30
- 31
- 32
- 33
- 34
- 35
- 36
- 37
- 38
- 39
- 40
- 41
- 42
- 43
- 44
- 45
- 46
- 47
- 48
- 49
- 50
- 51
- 52
- 53
- 54
- 55
- 56
- 57
- 58
- 59
- 60
- 61
- 62
- 63
- 64
- 65
- 66
- 67
- 68
- 69
- 70
- 71
- 72
- 73
- 74
- 75
- 76
- 77
- 78
- 79
- 80
- 81
配置Bean
其次在Spring的配置文件中定义各种bean
这里新建一个Spring配置文件spring-shiro.xml
结构如下

在web.xml中加载spring的时候会加载springmvc的xml,spring-mvc.xml
和spring的核心配置文件spring-core.xml

再由spring负责加载其他配置文件
关于缓存和hibernate请参考以下文章
Spring文档学习–缓存(Cache Abstraction)
整合之道–Spring4整合Ehcache2.10
整合之道–Spring4整合Hibernate5
接下来看一下spring-shiro的详细配置
spring-shiro.xml
<beans xmlns="http://www.springframework.org/schema/beans"
       xmlns:xsi="http://www.w3.org/2001/XMLSchema-instance"
       xsi:schemaLocation="
       http://www.springframework.org/schema/beans
       http://www.springframework.org/schema/beans/spring-beans-4.2.xsd">


    <import resource="classpath:spring/spring-hibernate.xml"/>


    <bean id="shiroFilter" class="org.apache.shiro.spring.web.ShiroFilterFactoryBean">

        <property name="securityManager" ref="securityManager"/>

        <property name="loginUrl" value="/login.html"/>


        <property name="unauthorizedUrl" value="/error/unauthorized"/>

        <property name="filterChainDefinitions">
            <value>
                /admin/**=authc
            value>
        property>

    bean>


    <bean id="lifecycleBeanPostProcessor" class="org.apache.shiro.spring.LifecycleBeanPostProcessor">bean>

    <bean id="credentialsMatcher" class="org.apache.shiro.authc.credential.Md5CredentialsMatcher">bean>

    <bean id="shiroCacheManager" class="org.apache.shiro.cache.MemoryConstrainedCacheManager">bean>


    <bean id="jdbcRealm" class="org.apache.shiro.realm.jdbc.JdbcRealm">
        <property name="credentialsMatcher" ref="credentialsMatcher">property>
        <property name="permissionsLookupEnabled" value="true">property>
        <property name="dataSource" ref="dataSource">property>
        <property name="authenticationQuery"
                  value="SELECT password FROM sec_user WHERE user_name = ?">property>
        <property name="userRolesQuery"
                  value="SELECT role_name from sec_user_role left join sec_role using(role_id) left join sec_user using(user_id) WHERE user_name = ?">property>
        <property name="permissionsQuery"
                  value="SELECT permission_name FROM sec_role_permission left join sec_role using(role_id) left join sec_permission using(permission_id) WHERE role_name = ?">property>
    bean>


    <bean id="securityManager" class="org.apache.shiro.web.mgt.DefaultWebSecurityManager">
        <property name="realm" ref="jdbcRealm">property>
        <property name="cacheManager" ref="shiroCacheManager">property>
    bean>


beans>
- 1
- 2
- 3
- 4
- 5
- 6
- 7
- 8
- 9
- 10
- 11
- 12
- 13
- 14
- 15
- 16
- 17
- 18
- 19
- 20
- 21
- 22
- 23
- 24
- 25
- 26
- 27
- 28
- 29
- 30
- 31
- 32
- 33
- 34
- 35
- 36
- 37
- 38
- 39
- 40
- 41
- 42
- 43
- 44
- 45
- 46
- 47
- 48
- 49
- 50
- 51
- 52
- 53
- 54
- 55
- 56
- 57
- 58
- 59
- 60
- 61
- 62
- 63
为了开启Shiro注解,必须在spring-mvc.xml中配置,在其他配置文件中不生效
spring-mvc.xml
<beans xmlns="http://www.springframework.org/schema/beans"
       xmlns:xsi="http://www.w3.org/2001/XMLSchema-instance" xmlns:p="http://www.springframework.org/schema/p"
       xmlns:context="http://www.springframework.org/schema/context"
       xmlns:mvc="http://www.springframework.org/schema/mvc"
       xsi:schemaLocation="
        http://www.springframework.org/schema/beans
        http://www.springframework.org/schema/beans/spring-beans-4.2.xsd
        http://www.springframework.org/schema/context
        http://www.springframework.org/schema/context/spring-context-4.2.xsd
        http://www.springframework.org/schema/mvc
        http://www.springframework.org/schema/mvc/spring-mvc-4.2.xsd">


    <import resource="classpath:spring/spring-shiro.xml" />


    <context:component-scan base-package="com.gwc.shirotest.controller" />


    <mvc:view-controller path="/" view-name="index"/>


    <mvc:annotation-driven enable-matrix-variables="true">
    mvc:annotation-driven>


    <mvc:resources location="/assets/" mapping="/assets/**"/>


    <bean id="viewResolver"
          class="org.springframework.web.servlet.view.InternalResourceViewResolver">
        <property name="viewClass"
                  value="org.springframework.web.servlet.view.JstlView"/>
        <property name="prefix" value="/WEB-INF/views/"/>
        <property name="suffix" value=".jsp"/>
    bean>


    <bean id="multipartResolver" class="org.springframework.web.multipart.commons.CommonsMultipartResolver"
          p:defaultEncoding="UTF-8"
          p:maxUploadSize="10485760"
          p:resolveLazily="true"/>


    <bean class="org.springframework.aop.framework.autoproxy.DefaultAdvisorAutoProxyCreator"
          depends-on="lifecycleBeanPostProcessor">
        <property name="proxyTargetClass" value="true" />
    bean>

    <bean class="org.apache.shiro.spring.security.interceptor.AuthorizationAttributeSourceAdvisor">
        <property name="securityManager" ref="securityManager"/>
    bean>

beans>
- 1
- 2
- 3
- 4
- 5
- 6
- 7
- 8
- 9
- 10
- 11
- 12
- 13
- 14
- 15
- 16
- 17
- 18
- 19
- 20
- 21
- 22
- 23
- 24
- 25
- 26
- 27
- 28
- 29
- 30
- 31
- 32
- 33
- 34
- 35
- 36
- 37
- 38
- 39
- 40
- 41
- 42
- 43
- 44
- 45
- 46
- 47
- 48
- 49
- 50
- 51
- 52
- 53
- 54
- 55
- 56
- 57
- 58
- 59
最后两个bean就是配置启用shiro注解的bean,和官方文档中有点不一样
- 1
- 2
如果不配置这个,注解也是开不了的
开发Controller
登录相关
ShiroController.java
package com.gwc.shirotest.controller;
import com.gwc.shirotest.entity.User;
import org.apache.log4j.Logger;
import org.apache.shiro.SecurityUtils;
import org.apache.shiro.authc.*;
import org.apache.shiro.authz.UnauthorizedException;
import org.apache.shiro.subject.Subject;
import org.apache.shiro.web.util.SavedRequest;
import org.apache.shiro.web.util.WebUtils;
import org.springframework.stereotype.Controller;
import org.springframework.ui.Model;
import org.springframework.web.bind.annotation.RequestMapping;
import org.springframework.web.bind.annotation.RequestMethod;
import javax.servlet.http.HttpServletRequest;
/**
* Created by GWCheng on 2016/3/8.
*/
@Controller
public class ShiroController {
private static final Logger logger = Logger.getLogger(ShiroController.class);
@RequestMapping(value="/login.html",method=RequestMethod.GET)
public String login(){
logger.info("======用户进入了ShiroController的/login.html");
return "login";
}
@RequestMapping(value = "/logout.html")
public String doLogout(HttpServletRequest request, Model model) {
logger.info("======用户"+request.getSession().getAttribute("user")+"退出了系统");
SecurityUtils.getSubject().logout();
return "redirect:login.html";
}
@RequestMapping(value="/doLogin.html",method=RequestMethod.POST)
public String doLogin(User user,HttpServletRequest request, Model model){
logger.info("======用户进入了ShiroController的/doLogin.html");
String msg ;
UsernamePasswordToken token = new UsernamePasswordToken(user.getUsername(), user.getPassword());
token.setRememberMe(true);
Subject subject = SecurityUtils.getSubject();
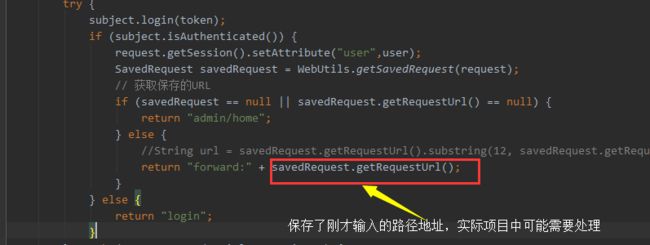
try {
subject.login(token);
if (subject.isAuthenticated()) {
request.getSession().setAttribute("user",user);
SavedRequest savedRequest = WebUtils.getSavedRequest(request);
// 获取保存的URL
if (savedRequest == null || savedRequest.getRequestUrl() == null) {
return "admin/home";
} else {
//String url = savedRequest.getRequestUrl().substring(12, savedRequest.getRequestUrl().length());
return "forward:" + savedRequest.getRequestUrl();
}
} else {
return "login";
}
} catch (IncorrectCredentialsException e) {
msg = "登录密码错误. Password for account " + token.getPrincipal() + " was incorrect.";
model.addAttribute("message", msg);
System.out.println(msg);
} catch (ExcessiveAttemptsException e) {
msg = "登录失败次数过多";
model.addAttribute("message", msg);
System.out.println(msg);
} catch (LockedAccountException e) {
msg = "帐号已被锁定. The account for username " + token.getPrincipal() + " was locked.";
model.addAttribute("message", msg);
System.out.println(msg);
} catch (DisabledAccountException e) {
msg = "帐号已被禁用. The account for username " + token.getPrincipal() + " was disabled.";
model.addAttribute("message", msg);
System.out.println(msg);
} catch (ExpiredCredentialsException e) {
msg = "帐号已过期. the account for username " + token.getPrincipal() + " was expired.";
model.addAttribute("message", msg);
System.out.println(msg);
} catch (UnknownAccountException e) {
msg = "帐号不存在. There is no user with username of " + token.getPrincipal();
model.addAttribute("message", msg);
System.out.println(msg);
} catch (UnauthorizedException e) {
msg = "您没有得到相应的授权!" + e.getMessage();
model.addAttribute("message", msg);
System.out.println(msg);
}
return "login";
}
}
- 1
- 2
- 3
- 4
- 5
- 6
- 7
- 8
- 9
- 10
- 11
- 12
- 13
- 14
- 15
- 16
- 17
- 18
- 19
- 20
- 21
- 22
- 23
- 24
- 25
- 26
- 27
- 28
- 29
- 30
- 31
- 32
- 33
- 34
- 35
- 36
- 37
- 38
- 39
- 40
- 41
- 42
- 43
- 44
- 45
- 46
- 47
- 48
- 49
- 50
- 51
- 52
- 53
- 54
- 55
- 56
- 57
- 58
- 59
- 60
- 61
- 62
- 63
- 64
- 65
- 66
- 67
- 68
- 69
- 70
- 71
- 72
- 73
- 74
- 75
- 76
- 77
- 78
- 79
- 80
- 81
- 82
- 83
- 84
- 85
- 86
- 87
- 88
- 89
- 90
- 91
权限相关
AdminController.java
package com.gwc.shirotest.controller;

import org.apache.shiro.authz.annotation.Logical;
import org.apache.shiro.authz.annotation.RequiresPermissions;
import org.apache.shiro.authz.annotation.RequiresRoles;
import org.springframework.stereotype.Controller;
import org.springframework.web.bind.annotation.RequestMapping;

/**
 * Created by GWCheng on 2016/3/8.
 */
@Controller
public class AdminController {
    // 登录成功的页面
    @RequestMapping(value = "/admin/home")
    public String adminHomePage(){
        return "admin/home";
    }

    // 只有角色为admin的才能访问
    @RequiresRoles("admin")
    @RequestMapping(value = "/admin/role")
    public String adminWithRole(){
        return "admin/withrole";
    }

    // 只用同时具有user:view和user:create权限才能访问
    @RequiresPermissions(value={"user:view","user:create"}, logical= Logical.AND)
    @RequestMapping(value = "/admin/auth")
    public String adminWithAuth(){
        return "admin/withauth";
    }
}
- 1
- 2
- 3
- 4
- 5
- 6
- 7
- 8
- 9
- 10
- 11
- 12
- 13
- 14
- 15
- 16
- 17
- 18
- 19
- 20
- 21
- 22
- 23
- 24
- 25
- 26
- 27
- 28
- 29
- 30
- 31
- 32
- 33
- 34
开发页面
结构
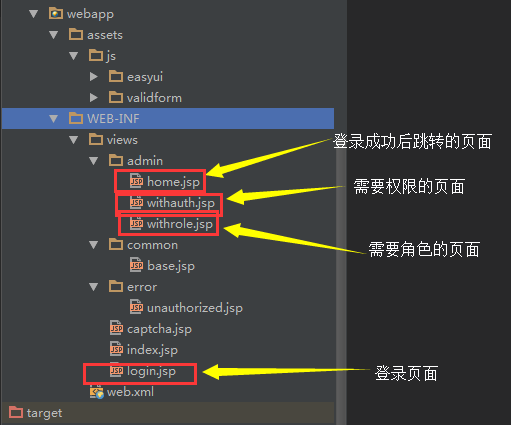
登录页面
login.jsp
<%@ page language="java" contentType="text/html; charset=UTF-8"
pageEncoding="UTF-8"%>
<%@ taglib uri="http://java.sun.com/jsp/jstl/core" prefix="c"%>
<%@ page isELIgnored="false" %>
<html>
<head>
<meta http-equiv="Content-Type" content="text/html; charset=UTF-8">
<title>hellotitle>
<c:catch var="importError0">
<c:import url="common/base.jsp" charEncoding="utf-8">c:import>
c:catch>
<c:out value="${importError0}">c:out>
head>
<body>
<h1>login pageh1>
<form action="- 1
- 2
- 3
- 4
- 5
- 6
- 7
- 8
- 9
- 10
- 11
- 12
- 13
- 14
- 15
- 16
- 17
- 18
- 19
- 20
- 21
- 22
- 23
- 24
- 25
- 26
- 27
- 28
登录成功的页面
<%@ page language="java" contentType="text/html; charset=UTF-8"
pageEncoding="UTF-8"%>
<%@ taglib uri="http://java.sun.com/jsp/jstl/core" prefix="c"%>
<%@ page isELIgnored="false" %>
<html>
<head>
<meta http-equiv="Content-Type" content="text/html; charset=UTF-8">
<title>hellotitle>
<c:catch var="importError0">
<c:import url="../common/base.jsp" charEncoding="utf-8">c:import>
c:catch>
<c:out value="${importError0}">c:out>
head>
<body>
欢迎${user.username}登录
<a href="- 1
- 2
- 3
- 4
- 5
- 6
- 7
- 8
- 9
- 10
- 11
- 12
- 13
- 14
- 15
- 16
- 17
- 18
- 19
- 20
- 21
- 22
有角色才能访问的页面
<%@ page language="java" contentType="text/html; charset=UTF-8"
pageEncoding="UTF-8"%>
<%@ taglib uri="http://java.sun.com/jsp/jstl/core" prefix="c"%>
<%@ taglib prefix="shiro" uri="http://shiro.apache.org/tags" %>
<%@ page isELIgnored="false" %>
<html>
<head>
<meta http-equiv="Content-Type" content="text/html; charset=UTF-8">
<title>hellotitle>
<c:catch var="importError0">
<c:import url="../common/base.jsp" charEncoding="utf-8">c:import>
c:catch>
<c:out value="${importError0}">c:out>
head>
<body>
欢迎${user.username}登录
您有角色访问该页面
<a href="- 1
- 2
- 3
- 4
- 5
- 6
- 7
- 8
- 9
- 10
- 11
- 12
- 13
- 14
- 15
- 16
- 17
- 18
- 19
- 20
- 21
- 22
- 23
- 24
- 25
- 26
- 27
- 28
- 29
- 30
有权限才能访问的页面
<%@ page language="java" contentType="text/html; charset=UTF-8"
pageEncoding="UTF-8"%>
<%@ taglib uri="http://java.sun.com/jsp/jstl/core" prefix="c"%>
<%@ page isELIgnored="false" %>
<html>
<head>
<meta http-equiv="Content-Type" content="text/html; charset=UTF-8">
<title>hellotitle>
<c:catch var="importError0">
<c:import url="../common/base.jsp" charEncoding="utf-8">c:import>
c:catch>
<c:out value="${importError0}">c:out>
head>
<body>
欢迎${user.username}登录
你有权限访问该页面
<a href="- 1
- 2
- 3
- 4
- 5
- 6
- 7
- 8
- 9
- 10
- 11
- 12
- 13
- 14
- 15
- 16
- 17
- 18
- 19
- 20
- 21
- 22
- 23
- 24
- 25
- 26
- 27
- 28
- 29
- 30
- 31
- 32
测试
运行项目
访问测试
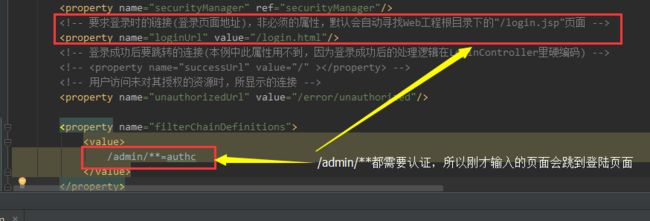
输入一个后台的页面,发现用户未登录就跳转到登录页面
逻辑在spring-shiro.xml中

当我们输入一个需要登陆的页面时直接跳转到登录页面,而登录成功后跳转到刚才输入的地址,如下
控制逻辑
跳转逻辑
授权测试
管理员jacky登录
普通用户cheng登录
分析

修改权限为只要一个满足就可以,那么cheng,也就可以访问那个权限页面
@RequiresPermissions(value={"user:view","user:create"}, logical= Logical.OR)
    @RequestMapping(value = "/admin/auth")
    public String adminWithAuth(){
        return "admin/withauth";
}- 1
- 2
- 3
- 4
- 5
Shiro标签测试
现在cheng和jacky都可以访问权限页面了
我们通过Shiro标签来让admin权限的用户可以创建用户,查看用用
而user权限的只能查看用户
具体的授权标签
<shiro:hasRole name="admin">
    <a href="user/show">查看用户a><br>
    <a href="user/create">创建用户a>
shiro:hasRole>

<shiro:hasRole name="user">
<a href="user/show">查看用户a>
shiro:hasRole>- 1
- 2
- 3
- 4
- 5
- 6
- 7
- 8
需要引入
<%@ taglib prefix="shiro" uri="http://shiro.apache.org/tags" %>
- 1
- 2
好了,Shiro与SpringMVC的整合,数据库的连接,Shiro注解以及Shiro标签就介绍到这里
项目下载地址
http://download.csdn.net/detail/frankcheng5143/9457411
参考文献
http://shiro.apache.org/web.html
http://shiro.apache.org/spring.html#Spring-WebApplications
http://blog.csdn.net/chris_mao/article/details/49288251
http://blog.csdn.net/chris_mao/article/details/49188699#comments