全世界最好的编辑器VIM之Windows配置(gvim)
全世界最好的编辑器VIM之Windows配置(gvim),vundle插件管理,NERDTree插件,ctrlp插件,vim-nerdtree-tabs插件等 。vim本来就是很强大,很方便的编辑器,再加上这些杀手级的插件,那就真的无敌了
官方网站:http://www.vim.org
平时习惯在linux上面使用vim,但是在windows下面,总感觉没有找到比vim好用的编辑器,所以,决定在windows下也安装一个vim , ^^ go…
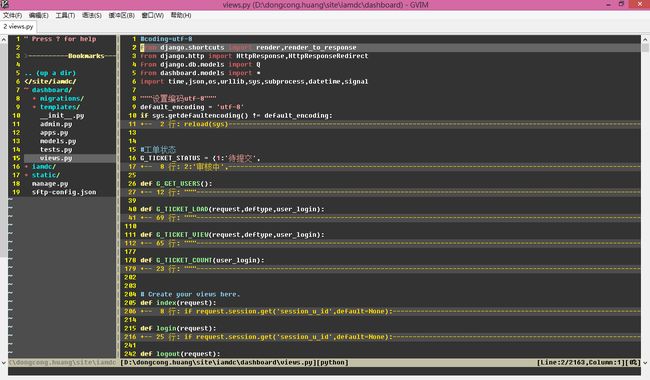
先放一张我自己的vim配置效果图,简单而美丽
1、安装GVIM
A、下载 GVIM
B、运行下载的安装程序,并按照说明一步一步正确安装即可
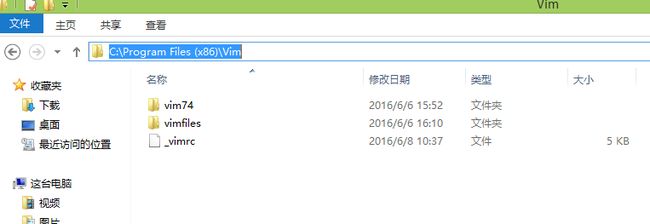
我这里安装的路径是 C:\Program Files (x86)\Vim\
桌面图标:

2、安装vim插件管理工具vundle
注意:安装vundle前提需要先安装 git 和 配置curl
(1)、安装git客户端:msysgit
msysgit只是提供了git的核心功能,而且是基于命令行的
A、下载 msysgit
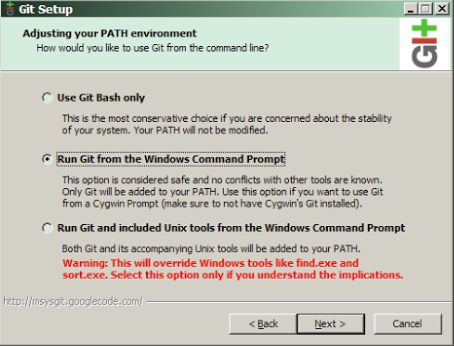
B、运行下载的安装程序,并安装说明一步一步正确安装即可,需要注意的一点就是PATH环境选择界面;
注意:在 adjusting your PATH environment (调整PATH环境)界面,我们选择第二个 run git from the windows command prompt ;如图
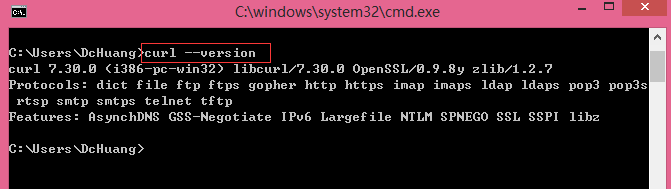
C、安装完成,打开cmd 命令提示符,运行命令( git –version )检查git 版本号
D、msysgit 的安装路径是 C:\Program Files (x86)\Git (我的安装路径)

(2)、配置 curl
在windows下安装curl与msysgit结合非常简单,只需要在git的cmd目录创建文件curl.cmd即可
路径:C:\Program Files\Git\cmd\curl.cmd ,文件内容如下
|
1
2
3
4
5
6
7
8
9
10
11
12
13
|
@
rem
Do
not
use
"echo off"
to
not
affect
any
child
calls
.
@
setlocal
@
rem
Get
the
abolute
path
to
the
parent
directory
,
which
is
assumed
to
be
the
@
rem
Git
installation
root
.
@
for
/
F
"delims="
%
%
I
in
(
"%~dp0.."
)
do
@
set
git_install_root
=
%
%
~
fI
@
set
PATH
=
%
git_install_root
%
\
bin
;
%
git_install_root
%
\
mingw
\
bin
;
%
git_install_root
%
\
mingw64
\
bin
;
%
PATH
%
@
rem
!
!
!
!
!
!
!
For
64bit
msysgit
,
replace
'mingw'
above
with
'mingw64'
!
!
!
!
!
!
!
@
if
not
exist
"%HOME%"
@
set
HOME
=
%
HOMEDRIVE
%
%
HOMEPATH
%
@
if
not
exist
"%HOME%"
@
set
HOME
=
%
USERPROFILE
%
@
curl
.
exe
%
*
|
打开cmd 命令提示符,运行命令( curl –version )检查curl 版本号
好了,我们开始安装 vundle 了,也很简单
(2)、安装Vundle (Vundle on Windows)
A、打开cmd 命令提示符,只要运行一条命令即可,我们将vundle安装到 C:\Program Files (x86)\Vim\vimfiles 目录,目录如下:
|
1
|
git
clone
https
:
//github.com/gmarik/Vundle.vim.git C:\Program Files (x86)\Vim\vimfiles\bundle\Vundle.vim
|

B、添加一个gvim目录的 环境变量 $VIM ,步骤 :我的电脑->属性->高级系统设置->高级->环境变量->新建 ;如图

C、在vim启动设定文件_vimrc添加 bundle的配置 ,vim的启动设定文件 _vimrc (在linux文件名是 .vimrc , 在windows下面是 _vimrc);这里直接配置一个全局的 _vimrc 文件,路径:C:\Program Files (x86)\Vim\_vimrc , 添加如下内容
|
1
2
3
4
5
6
7
8
9
|
"插件管理
set rtp+=$VIM\vimfiles\bundle\Vundle.vim\
call vundle#begin()
"
let
Vundle
manage
Vundle
,
required
Plugin
'VundleVim/Vundle.vim'
"
my
bundle
plugin
call
vundle
#end()
filetype
plugin
indent
on
|
在Github vim-scripts 用户下的repos,只需要写出repos名称
在Github其他用户下的repos, 需要写出”用户名/repos名”
不在Github上的插件,需要写出git全路径
D、Bundle 插件管理器使用
相关命令
安装插件:BundleInstall
更新插件:BundleUpdate
清除不再使用的插件:BundleClean
列出所有插件:BundleList
查找插件:BundleSearch
例如安装插件
打开一个gvim, 运行:BundleInstall 或者在命令行运行 vim +BundleInstall +qall
安装完成后插件就能用了

3、VIM之文件管理插件NERDTree 和 共享插件vim-nerdtree-tabs
A、安装和基本用法
通过vim插件管理工具Vundle安装NERDTree和vim-nerdtree-tabs就很简单,只需要将插件路径添加到bundle的配置即可,添加两行
Plugin ‘scrooloose/nerdtree’
Plugin ‘jistr/vim-nerdtree-tabs’
NERDTree和vim-nerdtree-tabs的 github路径可以自行查询一下
配置如下
|
1
2
3
4
5
6
7
8
|
"插件管理
set
rtp
+=
$
VIM
\
vimfiles
\
bundle
\
Vundle
.
vim
\
call
vundle
#begin()
Plugin
'VundleVim/Vundle.vim'
Plugin
'scrooloose/nerdtree'
Plugin
'jistr/vim-nerdtree-tabs'
call
vundle
#end()
|
打开一个gvim, 运行 :BundleInstall 即可
NERDTree的一些基本操作快捷键
|
1
2
3
4
5
6
7
8
9
10
11
12
13
14
15
16
17
18
19
20
21
22
23
24
25
26
27
|
?
:
快速帮助文档
o
:
打开一个目录或者打开文件,创建的是
buffer,也可以用来打开书签
go
:
打开一个文件,但是光标仍然留在
NERDTree,创建的是
buffer
t
:
打开一个文件,创建的是
Tab,对书签同样生效
T
:
打开一个文件,但是光标仍然留在
NERDTree,创建的是
Tab,对书签同样生效
i
:
水平分割创建文件的窗口,创建的是
buffer
gi
:
水平分割创建文件的窗口,但是光标仍然留在
NERDTree
s
:
垂直分割创建文件的窗口,创建的是
buffer
gs
:
和
gi,
go类似
x
:
收起当前打开的目录
X
:
收起所有打开的目录
e
:
以文件管理的方式打开选中的目录
D
:
删除书签
P
:
大写,跳转到当前根路径
p
:
小写,跳转到光标所在的上一级路径
K
:
跳转到第一个子路径
J
:
跳转到最后一个子路径
<
C
-
j
>和
<
C
-
k
>
:
在同级目录和文件间移动,忽略子目录和子文件
C
:
将根路径设置为光标所在的目录
u
:
设置上级目录为根路径
U
:
设置上级目录为跟路径,但是维持原来目录打开的状态
r
:
刷新光标所在的目录
R
:
刷新当前根路径
I
:
显示或者不显示隐藏文件
f
:
打开和关闭文件过滤器
q
:
关闭
NERDTree
A
:
全屏显示
NERDTree,或者关闭全屏
|
B、在vim启动设定文件_vimrc添加NERDTree的配置
|
1
2
3
4
5
6
7
8
9
10
11
12
13
14
15
|
" 关闭NERDTree快捷键
map
"
显示行号
let
NERDTreeShowLineNumbers
=
1
let
NERDTreeAutoCenter
=
1
" 是否显示隐藏文件
let NERDTreeShowHidden=1
"
设置宽度
let
NERDTreeWinSize
=
21
" 在终端启动vim时,共享NERDTree
let g:nerdtree_tabs_open_on_console_startup=1
"
忽略一下文件的显示
let
NERDTreeIgnore
=
[
'\.pyc'
,
'\~$'
,
'\.swp'
]
"
显示书签列表
let
NERDTreeShowBookmarks
=
1
|
4、VIM之搜索定位打开文件插件CtrlP
A、安装和基本用法
安装跟NERDTree和vim-nerdtree-tabs插件安装方法一样,只需要添加一行 Plugin ‘kien/ctrlp.vim’ 即可,完整如下
|
1
2
3
4
5
6
7
8
|
"插件管理
set
rtp
+=
$
VIM
\
vimfiles
\
bundle
\
Vundle
.
vim
\
call
vundle
#begin()
Plugin
'VundleVim/Vundle.vim'
Plugin
'scrooloose/nerdtree'
Plugin
'jistr/vim-nerdtree-tabs'
Plugin
'kien/ctrlp.vim'
call
vundle
#end()
|
打开一个gvim, 运行 :BundleInstall 即可
ctrlp的 github路径可以自行查询一下
在网上找到 ctrlp 的一个gif 文件,如下

最后,附上我的_vimrc 完整配置,我只安装了这三个插件
5 、我自己的 _vimrc 完整配置,可参考
|
1
2
3
4
5
6
7
8
9
10
11
12
13
14
15
16
17
18
19
20
21
22
23
24
25
26
27
28
29
30
31
32
33
34
35
36
37
38
39
40
41
42
43
44
45
46
47
48
49
50
51
52
53
54
55
56
57
58
59
60
61
62
63
64
65
66
67
68
69
70
71
72
73
74
75
76
77
78
79
80
81
82
83
84
85
86
87
88
89
90
91
92
93
94
95
96
97
98
99
100
101
102
103
104
105
106
107
108
109
110
111
112
113
114
115
116
117
118
119
120
121
122
123
124
125
126
127
|
set
nocompatible
source
$
VIMRUNTIME
/
vimrc_example
.
vim
"source $VIMRUNTIME/mswin.vim
"
behave
mswin
set
diffexpr
=
MyDiff
(
)
function
MyDiff
(
)
let
opt
=
'-a --binary '
if
&
diffopt
=
~
'icase'
|
let
opt
=
opt
.
'-i '
|
endif
if
&
diffopt
=
~
'iwhite'
|
let
opt
=
opt
.
'-b '
|
endif
let
arg1
=
v
:
fname_in
if
arg1
=
~
' '
|
let
arg1
=
'"'
.
arg1
.
'"'
|
endif
let
arg2
=
v
:
fname_new
if
arg2
=
~
' '
|
let
arg2
=
'"'
.
arg2
.
'"'
|
endif
let
arg3
=
v
:
fname_out
if
arg3
=
~
' '
|
let
arg3
=
'"'
.
arg3
.
'"'
|
endif
let
eq
=
''
if
$
VIMRUNTIME
=
~
' '
if
&
sh
=
~
'\
let
cmd
=
'""'
.
$
VIMRUNTIME
.
'\diff"'
let
eq
=
'"'
else
let
cmd
=
substitute
(
$
VIMRUNTIME
,
' '
,
'" '
,
''
)
.
'\diff"'
endif
else
let
cmd
=
$
VIMRUNTIME
.
'\diff'
endif
silent
execute
'!'
.
cmd
.
' '
.
opt
.
arg1
.
' '
.
arg2
.
' > '
.
arg3
.
eq
endfunction
"设置文件的代码形式 utf8
set encoding=utf-8
set termencoding=utf-8
set fileencoding=utf-8
set fileencodings=ucs-bom,utf-8,chinese,cp936
"
vim的菜单乱码解决
source
$
VIMRUNTIME
/
delmenu
.
vim
source
$
VIMRUNTIME
/
menu
.
vim
"vim提示信息乱码的解决
language messages zh_CN.utf-8
filetype on
filetype plugin indent on
"
colorscheme
evening
"配色方案
colorscheme desert
set helplang=cn "设置中文帮助
set
history
=
500
"保留历史记录
set guifont=Monaco:h10 "设置字体为
Monaco,大小
10
set
tabstop
=
4
"设置tab的跳数
set expandtab
set backspace=2 "设置退格键可用
"set nu! "设置显示行号
set
wrap
"设置自动换行
"
set
nowrap
"设置不自动换行
set linebreak "整词换行,与自动换行搭配使用
"set list "显示制表符
set
autochdir
"自动设置当前目录为正在编辑的目录
set hidden "自动隐藏没有保存的缓冲区,切换
buffer时不给出保存当前
buffer的提示
set
scrolloff
=
5
"在光标接近底端或顶端时,自动下滚或上滚
"
Toggle
Menu
and
Toolbar
"隐藏菜单栏和工具栏
"
set
guioptions
-=
m
"set guioptions-=T
set showtabline=2 "设置显是显示标签栏
set
autoread
"设置当文件在外部被修改,自动更新该文件
set mouse=a "设置在任何模式下鼠标都可用
set
nobackup
"设置不生成备份文件
"
set
go
=
"不要图形按钮
set guioptions-=T "
隐藏工具栏
"set guioptions-=m "
隐藏菜单栏
"===========================
"查找
/替换相关的设置
"===========================
set hlsearch "高亮显示查找结果
set
incsearch
"增量查找
"
===
===
===
===
===
===
===
===
===
"状态栏的设置
"
===
===
===
===
===
===
===
===
===
set
statusline
=
[
%
F
]
%
y
%
r
%
m
%
*
%=
[
Line
:
%
l
/
%
L
,
Column
:
%
c
]
[
%
p
%
%
]
"显示文件名:总行数,总的字符数
set ruler "在编辑过程中,在右下角显示光标位置的状态行
"===========================
"代码设置
"===========================
syntax enable "打开语法高亮
syntax
on
"打开语法高亮
set showmatch "设置匹配模式,相当于括号匹配
set
smartindent
"智能对齐
"
set
shiftwidth
=
4
"换行时,交错使用4个空格
set autoindent "设置自动对齐
set
ai
!
"设置自动缩进
"
set
cursorcolumn
"启用光标列
set cursorline "启用光标行
set
guicursor
+=
a
:
blinkon0
"设置光标不闪烁
set fdm=indent "
"插件管理
set rtp+=$VIM\vimfiles\bundle\Vundle.vim\
call vundle#begin()
Plugin 'VundleVim/Vundle.vim'
Plugin 'scrooloose/nerdtree'
Plugin 'jistr/vim-nerdtree-tabs'
"
Plugin
'Xuyuanp/nerdtree-git-plugin'
Plugin
'kien/ctrlp.vim'
Plugin
'eshion/vim-sync'
call
vundle
#end()
" 关闭NERDTree快捷键
map
"
显示行号
let
NERDTreeShowLineNumbers
=
1
let
NERDTreeAutoCenter
=
1
" 是否显示隐藏文件
let NERDTreeShowHidden=1
"
设置宽度
let
NERDTreeWinSize
=
21
" 在终端启动vim时,共享NERDTree
let g:nerdtree_tabs_open_on_console_startup=1
"
忽略一下文件的显示
let
NERDTreeIgnore
=
[
'\.pyc'
,
'\~$'
,
'\.swp'
]
"
显示书签列表
let
NERDTreeShowBookmarks
=
1
|
遇到几个错误的地方及方法 提示一下
“设置文件的代码形式 utf8
set encoding=utf-8
set termencoding=utf-8
set fileencoding=utf-8
set fileencodings=ucs-bom,utf-8,chinese,cp936
“vim的菜单乱码解决
source $VIMRUNTIME/delmenu.vim
source $VIMRUNTIME/menu.vim
“vim提示信息乱码的解决
language messages zh_CN.utf-8