springboot 简单应用案例
一、简单描述
Spring Boot是由Pivotal团队提供的全新框架,其设计目的是用来简化新Spring应用的初始搭建以及开发过程。该框架使用了特定的方式来进行配置,从而使开发人员不再需要定义样板化的配置。从最根本上来讲,Spring Boot就是一些库的集合,它能够被任意项目的构建系统所使用。
建独立的Spring应用程序,是一个基于spring容器来启动的spring应用。嵌入的Tomcat,无需部署WAR文件
简化Maven配置,自动配置Spring,autoConfiguration的功能。可以简化spring的配置信息。
提供生产就绪型功能,如指标,健康检查和外部配置,没有代码生成并且对XML也没有配置要求
二、servlet
1. servlet
pom.xml
		1.8


			org.springframework.boot
			spring-boot-starter-web


			javax.servlet
			jstl


			org.apache.tomcat.embed
			tomcat-embed-jasper
			provided


			org.springframework.boot
			spring-boot-starter-freemarker
第一种方式:通过注解@WebServlet配置servlet
@WebServlet(name="first", urlPatterns={"/first","/first1"},
initParams={@WebInitParam(name="test", value="value")}, loadOnStartup=1)
public class FirstServlet extends HttpServlet {
@Override
protected void service(HttpServletRequest req, HttpServletResponse resp) throws ServletException, IOException {
resp.setContentType("text/html;charset=UTF-8");
resp.getWriter().println("测试Servlet1
第二种方式(推荐):通过@Configuration配置servlet
public class SecondServlet extends HttpServlet {
@Override
protected void service(HttpServletRequest req, HttpServletResponse resp) throws ServletException, IOException {
resp.setContentType("text/html;charset=UTF-8");
resp.getWriter().println("测试Servlet2
一般来说,@Configuration文件会被优先加载。
@Configuration
public class MyServletConfiguration {
/*
* test value 1
bean.setLoadOnStartup(1);
return bean;
}
}
springboot启动
@SpringBootApplication - 注解当前类是一个spring应用入口类型。
@ServletComponentScan - 通知spring容器,扫描Servlet注解的。如: @WebServlet
- 默认的扫描路径是,当前启动类所在包及其所有的子孙包。
@SpringBootApplication
@ServletComponentScan
public class AppStarter {

	public static void main(String[] args) {
		SpringApplication.run(AppStarter.class, args);
	}
}
2. filter
@WebFilter 注解 - 配置一个filter过滤器。
urlPatterns - 过滤器要过滤的路径。字符串数组。
拦截器一:
@WebFilter(urlPatterns="/*", initParams={@WebInitParam(name="test", value="test init param value")})
public class FirstFilter implements Filter {

	/**
	 * init方法只在容器启动的时候初始化运行一次。
	 */
	@Override
	public void init(FilterConfig filterConfig) throws ServletException {
		// 处理初始化参数?
		String initParamValue = filterConfig.getInitParameter("test");
		System.out.println("init param value : " + initParamValue);
	}

	@Override
	public void doFilter(ServletRequest request, ServletResponse response, FilterChain chain)
			throws IOException, ServletException {
		System.out.println("first filter run...");
		chain.doFilter(request, response);
		System.out.println("first filter end...");
	}

	/**
	 * destroy方法运行唯一一次,在容器关闭的时候执行。
	 */
	@Override
	public void destroy() {

	}

}
拦截器二:
public class SecondFilter implements Filter {

	@Override
	public void init(FilterConfig filterConfig) throws ServletException {

	}

	@Override
	public void doFilter(ServletRequest request, ServletResponse response, FilterChain chain)
			throws IOException, ServletException {
		System.out.println("second filter run...");
		chain.doFilter(request, response);
		System.out.println("second filter end...");
	}

	@Override
	public void destroy() {

	}

}
@Configuration
public class MyFilterConfiguration {

	@Bean
	public FilterRegistrationBean getFilterRegistrationBean(){
		FilterRegistrationBean bean = new FilterRegistrationBean(new SecondFilter());
		List urlPatterns = new ArrayList<>();
		urlPatterns.add("/*");
		bean.setUrlPatterns(urlPatterns);
		// 设置初始化参数
		// bean.addInitParameter("", "");
		return bean;
	}

}
扩展:
过滤器和拦截器如何选择?
Filter - 过滤器,是Servlet技术的一部分。是在所有的Servlet执行前执行的。是用于处理安全相关校验的。如:注册的时候,用户名格式是否正确,密码格式是否正确。
Interceptor - 拦截器,一般都是框架提供的一个处理逻辑,在Spring中是AOP切面实现的处理逻辑,在Struts2中是责任链模式开发的处理逻辑。拦截器都是和框架耦合的,是需要先执行入口逻辑,再执行拦截逻辑。在执行效率上比Filter低,在功能上比Filter强。一般都是做业务逻辑增强使用的。如:京东登录需要同步购物车数据,可以使用拦截器。
3. listener
带初始化参数:
@WebListener
public class FirstListener implements ServletContextListener {

	@Override
	public void contextInitialized(ServletContextEvent sce) {
		String p = sce.getServletContext().getInitParameter("p1");
		System.out.println("init parameter p1 = " + p);

		System.out.println("first listener initialized ...");
	}

	@Override
	public void contextDestroyed(ServletContextEvent sce) {

	}

}
@Configuration
public class FirstListenerConf implements ServletContextInitializer {

	/**
	 * 在系统启动的时候,进行的初始化逻辑。
	 */
	@Override
	public void onStartup(ServletContext servletContext) throws ServletException {
		// 设置初始化参数
		servletContext.setInitParameter("p1", "test");
	}

}
无初始化参数:
public class SecondListener implements ServletContextListener {

	@Override
	public void contextInitialized(ServletContextEvent sce) {
		System.out.println("second listener initialized ...");
	}

	@Override
	public void contextDestroyed(ServletContextEvent sce) {

	}

}
@Configuration
public class SecondListenerConfiguration {

	@Bean
	public ServletListenerRegistrationBean getListenerRegistrationBean(){
		ServletListenerRegistrationBean bean =
				new ServletListenerRegistrationBean<>(new SecondListener());
		return bean;
	}

}
4. static sources静态资源
定义静态资源的目录是:src/main/resources/static目录或/src/main/webapp目录。
这两个目录需要手工创建。推荐:src/main/resources/static

5. 文件上传
略。
6. jsp
略。
三、views
采用模板技术可实现页面静态化。
1. freemarker
Freemarker视图模板是保存在classpath/templates目录中的,通常定义在src/main/resources/templates目录中。这个目录是受保护的,外部不能直接通过HTTP协议访问templates中的freemarker视图模板。
@Controller
public class FreemarkerTestController {

	/**
	 * 如果模板中引用的外部文件404则页面无法正常解析。
	 * @param model
	 * @return
	 */
	@RequestMapping("/testFreemarker")
	public String testFreemarker(Model model){
		List list = new ArrayList<>();
		list.add("test 1");
		list.add("test 2");
		list.add("test 3");
		model.addAttribute("list", list);
		 return "index";
	}
			<#list list as text >
					${text}
2. thymeleaf
springboot官方推荐。
thymeleaf视图逻辑存储在classpath/templates目录中,通常定义在src/main/resources/templates路径下。
Thymeleaf是用于Web和独立环境的现代服务器端Java模板引擎。
Thymeleaf的主要目标是将优雅的自然模板带到您的开发工作流程中—HTML能够在浏览器中正确显示,并且可以作为静态原型,从而在开发团队中实现更强大的协作。Thymeleaf能够处理HTML,XML,JavaScript,CSS甚至纯文本。
Thymeleaf的主要目标是提供一个优雅和高度可维护的创建模板的方式。 为了实现这一点,它建立在自然模板的概念之上,以不影响模板作为设计原型的方式将其逻辑注入到模板文件中。 这改善了设计沟通,弥合了前端设计和开发人员之间的理解偏差。
Thymeleaf可以处理六种模板,每种模板都称为模板模式。有两种标记模板模式(HTML和XML),三种文本模板模式(TEXT,JAVASCRIPT和CSS)和一种无操作模板模式(RAW)。HTML模板模式将允许任何类型的HTML输入,包括HTML5,HTML4和XHTML。
依赖:
			org.springframework.boot
			spring-boot-starter-thymeleaf
版本修改:
		1.8
		2.3.0
		3.0.9.RELEASE
html:
Insert title here


Hello World


		地址
		电话
		行星
controller
@Controller
public class ThyTestController2 {

	@RequestMapping("/testthy")
	public String testFreemarker(Model model){

		model.addAttribute("hello", "大家好");

		List list=new ArrayList<>();
		User user=new User();
		user.setA(1);
		user.setB(2);
		user.setC(3);
		list.add(user);
		model.addAttribute("list", list);

		 return "test";
	}

}
thymeleaf api
四、持久化
1. JDBC & JDBCTemplate
依赖
            org.springframework.boot
            spring-boot-starter-jdbc
配置:application.properties
spring.datasource.url=jdbc:mysql://localhost:3306/my_example?autoReconnect=true&useUnicode=true&characterEncoding=utf-8
spring.datasource.username=root
spring.datasource.password=root
spring.datasource.driver-class-name=com.mysql.jdbc.Driver
SpringBoot在默认情况下,会创建一个类型为org.apache.tomcat.jdbc.pool.DataSource的数据源对象。如果需要修改数据源类型,可以通过application.properties修改:
spring.datasource.type=com.alibaba.druid.pool.DruidDataSource
如果需要对数据源进行详细配置,可以通过Configuration来实现
配置加载顺序:application.properties —> @Configuration
@Configuration
public class DataSourceConfiguration {

	@Autowired
	private Environment env;

	@Bean
    public DataSource dataSource() {
        DruidDataSource dataSource = new DruidDataSource();
        dataSource.setUrl(env.getProperty("spring.datasource.url"));
        dataSource.setUsername(env.getProperty("spring.datasource.username"));
        dataSource.setPassword(env.getProperty("spring.datasource.password"));
        dataSource.setDriverClassName(env.getProperty("spring.datasource.driver-class-name"));
        dataSource.setInitialSize(2);
        dataSource.setMaxActive(20);
        dataSource.setMinIdle(0);
        dataSource.setMaxWait(60000);
        dataSource.setValidationQuery("SELECT 1");
        dataSource.setTestOnBorrow(false);
        dataSource.setTestWhileIdle(true);
        dataSource.setPoolPreparedStatements(false);
        return dataSource;
    }
}
2. mybatis
			org.mybatis.spring.boot
			mybatis-spring-boot-starter
			1.3.2
别名包路径配置,定义Mapper接口(Mapper映射文件)。
mybatis.type-aliases-package=com.bjsxt.boot.pojo
mybatis.mapper-locations=classpath:/com/bjsxt/boot/mapper/*.xml
springboot启动类添加注解:
@MapperScan通知spring容器在哪一个包中扫描MyBatis Mapper接口和配置文件。
@MapperScan("com.bjsxt.boot.mapper")
3. spring-data-jpa
单数据源
多数据源
jpa详尽资料
4. mangodb
数据库应用简单配置
5. redis
简单案例
redis做缓存
更多参考资料
6. ehcache
注解ehcache
扩展Memcached
五、数据校验
1. 启用校验方式
一旦数据校验出错,SpringBoot会将校验错误通知封装到BindingResult类型的对象中,并通过Model传递到视图逻辑。所以,需要启用校验的方法参数表中,必须增加一个新的参数,类型是BindingResult。
方法: method(@Valid User user, BindingResult result)。
2. 常用校验
@NotBlank - 字符串非null且trim后长度大于0。
@NotEmpty - 字符串非null且原数据长度大于0。
@NotNull - 引用类型数据非null
@Length - 限定字符串长度范围。
@Min - 限定最小值。
@Max - 限定最大值。
@Email - 校验电子邮箱格式。 .+@.+
@URL - 校验统一资源路径地址格式
校验规则注解还是比较多的,常见于包:
javax.validation.constraints.*
org.hibernate.validator.constraints.*
支持正则:
@Email(regexp=“正则表达式”)
六、 异常处理
1. 默认异常处理
在SpringBoot启动的WEB应用中,如果控制器抛出异常,并没有处理的话,都会统一转发到一个error.html的错误结果页面,此页面由SpringBoot(spring-boot-starter-web)提供。
SpringBoot启动的WEB应用中,会自动的提供一个映射,URL是/error,处理了这个请求的是类型BasicErrorController,其中的处理逻辑是将异常信息分类封装到作用域中,并传递给视图逻辑’error’。
2. @ExceptionHandler
Spring支持异常的细致化处理,可以在控制器中定义若干方法,专门用于处理异常。处理异常的方法使用注解@ExceptionHandler来描述,注解的value属性是Class[]类型,代表该方法可以处理的异常种类。
这种异常处理方式力度较细,处理方式多样化。其缺陷是,如果定义了太多的异常处理方法,会提升维护成本;且异常处理方法只对当前控制器有效。
这种开发方式适合针对性处理。因为定义在控制器中的异常处理方法处理优先级最高。
3. @ControllerAdvice&@ExceptionHandler
Spring支持控制器Advice定义。可以独立定义一个类型作为ControllerAdvice,类型需要使用@ControllerAdvice来描述,类型中定义若干异常处理方法,方法使用@ExceptionHandler来描述。
当应用中发生异常时,异常的处理顺序是: 当前控制器中定义的@ExceptionHandler方法 -> @ControllerAdvice类中定义的@ExceptionHandler方法 -> BasicErrorController中定义的服务方法(error.html默认异常页面)
可以解决异常处理通用性。
这种处理异常的方式,需要定义一个Advice类型和若干异常处理方法。
4. 接口HandlerExceptionResolver
Spring支持使用@Configuration的配置方式,为控制器配置一个HandlerExceptionResolver来处理异常。
HandlerExceptionResolver是一个接口,这个接口有若干实现类,常用实现类SimpleMappingExceptionResolver。这个类型通过一个Properties对象来配置异常种类和错误页面的映射关系,并通过Model向客户端传递异常对象,attribute名称为exception。在视图逻辑中,可以通过异常对象来获取需要使用的异常信息。
当应用中发生异常时,异常的处理顺序是: 当前控制器中定义的@ExceptionHandler方法 -> @ControllerAdvice类中定义的@ExceptionHandler方法 -> @Configuration类中配置的HandlerExceptionResolver -> BasicErrorController中定义的服务方法(error.html默认异常页面)
优点: 使用一个Configuration来定义若干的错误处理映射,开发效率更高。
缺点: 优先级太低。会被大多数的异常处理逻辑覆盖。
5. 自定义HandlerExceptionResolver
HandlerExceptionResolver也可以自定义提供实现。只需要为其定义的抽象方法提供实现即可
@Configuration
public class MyHandlerExceptionResolver implements HandlerExceptionResolver {

	@Override
	public ModelAndView resolveException(HttpServletRequest request, HttpServletResponse response,
			Object handler,
			Exception ex) {

		// 异常信息收集
		// String message = ex.getMessage();
		// request.setAttribute("message", message);

		ModelAndView mv = new ModelAndView();
		// 异常信息收集
		mv.addObject("message",  ex.getMessage());
		mv.setViewName("error");

		return mv;
	}

}
七、全局配置
在SpringBoot工程中,全局配置文件通常使用两种配置文件类型来进行配置,分别是properties和yml。这两种配置文件的命名都是application,所在位置都是classpath。
SpringBoot官方推荐properties文件进行配置,这种文件的定义方式比较简单、可读性比较高,且对文件的解析更加简单快捷。
全局配置文件可配置的内容有:
固定参数:固定参数是SpringBoot及其所有驱动器可识别的内置配置参数,所有参数的命名都可以在xxx-autoconfigure.jar中查找,具体是:META-INF/ spring-configuration-metadata.json。
自定义数据:这是用于配置工程中需要使用的可配置数据,这些配置数据都可以在Spring管理的代码中,使用@Value注解来获取,具体语法为:@Value(${paramName})。
在SpringBoot中,为配置环境提供了多种选择,如:开发、测试、准生产、生产环境等。在不同的情况下,加载不同的配置文件,可以初始化不同的环境。用于定义配置环境的参数为:spring.profiles.active,其数据值为任意字符串,这个字符串代表了配置文件命名后缀。如:
applicatoin.properties配置文件中定义spring.profiles.active=dev,则代表了,有效的全局配置文件是application-dev.properties。
虽然SpringBoot支持在一个配置文件中配置多个环境,但是这种方式并不推荐,因为SpringBoot需要解析的内容过多,其中大多数可能都是无效配置内容,且部分SpringBoot版本在加载配置文件的同时会初始化容器环境,从而导致初始化多个环境,只使用一个环境,影响启动效率并大量消耗内存。
当然,SpringBoot多环境启动支持命令选择环境,就是在工程中不提供application.xxx配置文件,直接提供application-dev.xxx,application-prod.xxx等配置文件,在启动工程应用的时候,通过启动参数来决定具体的环境。命令为: java -jar xxx.jar --spring.profiles.active=dev
1. 系统参数
2. 自定义参数
@Value(${paramName})
3. 引用配置
test=zhangsan
name=${test}
4. 随机数配置
随机生成一个整数,范围是Integer的取值范围
test1= r a n d o m . i n t n u m 1 = {random.int} num1= random.intnum1={test1}
随机生成一个整数,范围是0 <= 随机数 <= 99
test2= r a n d o m . i n t [ 0 , 99 ] n u m 2 = {random.int[0,99]} num2= random.int[0,99]num2={test2}
八、热部署
1.springloader
1.1 插件启动
依赖
				org.springframework.boot
				spring-boot-maven-plugin


						org.springframework
						springloaded
						1.2.8.RELEASE
在启动应用的时候,需要通过Maven命令来启动。在run as -> maven build…面板的goals中输入: spring-boot:run来启动应用。
SpringLoader插件启动的应用,会启动一个系统进程来提供服务,进程是java.exe(windows系统中)。所以在eclipse中关闭执行线程是不能关闭这个应用的。只能在任务管理器中关闭这个进程才能完整关闭应用。
SpringLoader热部署启动,只能热部署java代码应用,对thymeleaf等静态资源无法实现热部署。
1.2 代码启动
SpringLoader热部署功能也可以通过SpringApplication来启动。这需要在工程中存在SpringLoader的jar包,如:

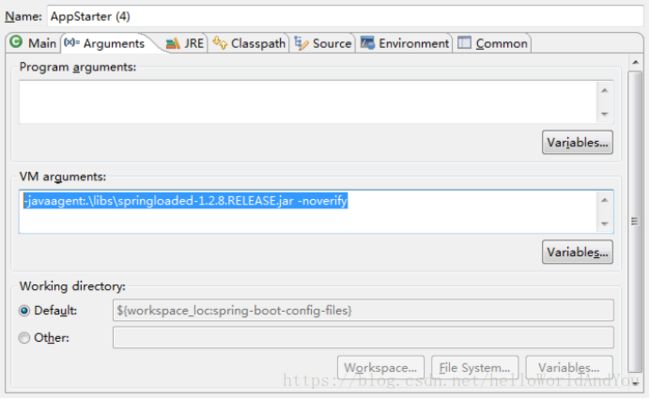
jar包不需要add to build path。因为这个jar包用于JVM启动参数提供的。只需要在run as -> run configurations面板中,添加VM arguments即可。添加内容为:
-javaagent:.\libs\springloaded-1.2.8.RELEASE.jar -noverify

这种启动方式不会开启新的java进程,可以在eclipse中完整关闭应用。
2. DevTools
DevTools工具并不是严格意义上的热部署,是使用重新部署的方式实现应用环境再次加载的。也就是DevTools会导致应用瞬间的关闭和启动。
			org.springframework.boot
			spring-boot-devtools

			true
DevTools是用于重新加载环境的工具,具体实现java代码热部署功能仍旧是由SpringLoader来实现,本案例中使用代码启动-提供JVM启动参数的形式加载SpringLoader工具。
DevTools的深层原理是使用了两个ClassLoader,一个Classloader加载那些不会改变的类(第三方Jar包),另一个ClassLoader加载会更改的类,称为restart ClassLoader,这样在有代码更改的时候,原来的restart ClassLoader 被丢弃,重新创建一个restart ClassLoader,由于需要加载的类相比较少,所以实现了较快的重启时间。
DevTools可以通过全局配置文件,配置下述内容:
# DevTools热部署生效
spring.devtools.restart.enabled=true
# 设置文件变化需要重启服务的路径
spring.devtools.restart.additional-paths=src/main/java
# 设置文件不变化需要重启服务的路径,默认/META-INF/maven,/META-INF/resources,/resources,/static,/templates,/public
# 路径中的内容修改不会重启服务,但是会重新加载静态内容。
# spring.devtools.restart.exclude: WEB-INF/**
九、定时任务
注解@EnableScheduling ,支持cron表达式
十、restful
swagger
十一、跨域
@CrossOrigin
跟多参考
十二、消息
rabbitmq
十三、监控
Actuator监控端点
在传统Spring应用中使用spring-boot-actuator模块提供监控端点
使用Actuator的/info端点输出Git版本信息
图形化监控页面
参考资料:
springboot参考资料1
jpa详尽资料


