Hyperledger Fabric Rest API服务开发教程【含源码】
Hyperledger Fabric Rest API服务开发教程【含源码】
Hyperledger Fabric 提供了软件开发包/SDK以帮助开发者访问fabric网络 和部署在网络上的链码,但是Hyperledger Fabric官方没有提供简单易用的REST API访问接口,在这个教程里我们将学习如何利用Hyperledger Fabric的SDK 来开发REST API服务器。
1、系统结构概述
相关推荐:H..Fabric Java 开发教程 | H..Fabric Nodejs开发教程
整个系统包含两个物理节点:
- Fabric节点:运行Fabric示例中的First Network,并且实例化了Fabcar链码
- API服务器节点:运行REST API Server代码供外部访问
下面是部署在AWS上的两个节点实例的情况:
首先参考官方文档安装hyperledger fabric。
然后运行脚本fabcar/startFabric.sh:
1 2 |
cd fabric-samples/fabcar ./startFabric.sh |
上述脚本运行之后,我们就得到一个正常运转的Hyperledger Fabric网络(著名的演示网络First Network),包含2个机构/4个对等节点, 通道为mychannel,链码Fabcar安装在全部4个对等节点上并且在mychannel上激活。账本中有10条车辆记录,这是调用 合约的initLedger方法的结果。
现在我们为REST API Server准备身份标识数据。使用fabcar/javascript创建一个用户标识user1,我们将在REST API Server 中使用这个身份标识:
1 2 3 4 5 |
cd javascript npm install node enrollAdmin.js node registerUser.js ls wallet/user1 |
运行结果如下:
现在Rest API Server需要的东西都备齐了:
- org1的连接配置文件:first-network/connection-org1.json
- Node.js包文件:fabcar/package.json
- User1身份钱包:fabcar/javascript/wallet/user1/
后面我们会把这些数据文件拷贝到Rest API Server。
2、Rest API Server设计
我们使用ExressJS来开发API服务,利用query.js和invoke.js 中的代码实现与fabric交互的逻辑。API设计如下:
- GET /api/queryallcars:返回全部车辆记录
- GET /api/query/CarID:返回指定ID的车辆记录
- POST /api/addcar/:添加一条新的车辆记录
- PUT /api/changeowner/CarID:修改指定ID的车辆记录
3、Rest API Server代码实现
apiserver.js代码如下:
express
1 2 3 4 5 6 7 8 9 10 11 12 13 14 15 16 17 18 19 20 21 22 23 24 25 26 27 28 29 30 31 32 33 34 35 36 37 38 39 40 41 42 43 44 45 46 47 48 49 50 51 52 53 54 55 56 57 58 59 60 61 62 63 64 65 66 67 68 69 70 71 72 73 74 75 76 77 78 79 80 81 82 83 84 85 86 87 88 89 90 91 92 93 94 95 96 97 98 99 100 101 102 103 104 105 106 107 108 109 110 111 112 113 114 115 116 117 118 119 120 121 122 123 124 125 126 127 128 129 130 131 132 133 134 135 136 137 138 139 140 141 142 143 144 145 146 147 148 149 150 151 152 153 154 155 156 157 158 159 160 161 162 163 164 165 166 167 168 169 170 171 172 173 174 175 176 177 |
var bodyParser = require('body-parser');

var app = express();
app.use(bodyParser.json());

// Setting for Hyperledger Fabric
const { FileSystemWallet, Gateway } = require('fabric-network');
const path = require('path');
const ccpPath = path.resolve(__dirname, '.',  'connection-org1.json');


app.get('/api/queryallcars', async function (req, res) {
    try {

        // Create a new file system based wallet for managing identities.
        const walletPath = path.join(process.cwd(), 'wallet');
        const wallet = new FileSystemWallet(walletPath);
        console.log(`Wallet path: ${walletPath}`);

        // Check to see if we've already enrolled the user.
        const userExists = await wallet.exists('user1');
        if (!userExists) {
            console.log('An identity for the user "user1" does not exist in the wallet');
            console.log('Run the registerUser.js application before retrying');
            return;
        }

        // Create a new gateway for connecting to our peer node.
        const gateway = new Gateway();
        await gateway.connect(ccpPath, { wallet, identity: 'user1', discovery: { enabled: true, asLocalhost: false } });

        // Get the network (channel) our contract is deployed to.
        const network = await gateway.getNetwork('mychannel');

        // Get the contract from the network.
        const contract = network.getContract('fabcar');

        // Evaluate the specified transaction.
        // queryCar transaction - requires 1 argument, ex: ('queryCar', 'CAR4')
        // queryAllCars transaction - requires no arguments, ex: ('queryAllCars')
        const result = await contract.evaluateTransaction('queryAllCars');
        console.log(`Transaction has been evaluated, result is: ${result.toString()}`);
        res.status(200).json({response: result.toString()});

    } catch (error) {
        console.error(`Failed to evaluate transaction: ${error}`);
        res.status(500).json({error: error});
        process.exit(1);
    }
});


app.get('/api/query/:car_index', async function (req, res) {
    try {

        // Create a new file system based wallet for managing identities.
        const walletPath = path.join(process.cwd(), 'wallet');
        const wallet = new FileSystemWallet(walletPath);
        console.log(`Wallet path: ${walletPath}`);

        // Check to see if we've already enrolled the user.
        const userExists = await wallet.exists('user1');
        if (!userExists) {
            console.log('An identity for the user "user1" does not exist in the wallet');
            console.log('Run the registerUser.js application before retrying');
            return;
        }

        // Create a new gateway for connecting to our peer node.
        const gateway = new Gateway();
        await gateway.connect(ccpPath, { wallet, identity: 'user1', discovery: { enabled: true, asLocalhost: false } });

        // Get the network (channel) our contract is deployed to.
        const network = await gateway.getNetwork('mychannel');

        // Get the contract from the network.
        const contract = network.getContract('fabcar');

        // Evaluate the specified transaction.
        // queryCar transaction - requires 1 argument, ex: ('queryCar', 'CAR4')
        // queryAllCars transaction - requires no arguments, ex: ('queryAllCars')
        const result = await contract.evaluateTransaction('queryCar', req.params.car_index);
        console.log(`Transaction has been evaluated, result is: ${result.toString()}`);
        res.status(200).json({response: result.toString()});

    } catch (error) {
        console.error(`Failed to evaluate transaction: ${error}`);
        res.status(500).json({error: error});
        process.exit(1);
    }
});

app.post('/api/addcar/', async function (req, res) {
    try {

        // Create a new file system based wallet for managing identities.
        const walletPath = path.join(process.cwd(), 'wallet');
        const wallet = new FileSystemWallet(walletPath);
        console.log(`Wallet path: ${walletPath}`);

        // Check to see if we've already enrolled the user.
        const userExists = await wallet.exists('user1');
        if (!userExists) {
            console.log('An identity for the user "user1" does not exist in the wallet');
            console.log('Run the registerUser.js application before retrying');
            return;
        }

        // Create a new gateway for connecting to our peer node.
        const gateway = new Gateway();
        await gateway.connect(ccpPath, { wallet, identity: 'user1', discovery: { enabled: true, asLocalhost: false } });

        // Get the network (channel) our contract is deployed to.
        const network = await gateway.getNetwork('mychannel');

        // Get the contract from the network.
        const contract = network.getContract('fabcar');

        // Submit the specified transaction.
        // createCar transaction - requires 5 argument, ex: ('createCar', 'CAR12', 'Honda', 'Accord', 'Black', 'Tom')
        // changeCarOwner transaction - requires 2 args , ex: ('changeCarOwner', 'CAR10', 'Dave')
        await contract.submitTransaction('createCar', req.body.carid, req.body.make, req.body.model, req.body.colour, req.body.owner);
        console.log('Transaction has been submitted');
        res.send('Transaction has been submitted');

        // Disconnect from the gateway.
        await gateway.disconnect();

    } catch (error) {
        console.error(`Failed to submit transaction: ${error}`);
        process.exit(1);
    }
})

app.put('/api/changeowner/:car_index', async function (req, res) {
    try {

        // Create a new file system based wallet for managing identities.
        const walletPath = path.join(process.cwd(), 'wallet');
        const wallet = new FileSystemWallet(walletPath);
        console.log(`Wallet path: ${walletPath}`);

        // Check to see if we've already enrolled the user.
        const userExists = await wallet.exists('user1');
        if (!userExists) {
            console.log('An identity for the user "user1" does not exist in the wallet');
            console.log('Run the registerUser.js application before retrying');
            return;
        }

        // Create a new gateway for connecting to our peer node.
        const gateway = new Gateway();
        await gateway.connect(ccpPath, { wallet, identity: 'user1', discovery: { enabled: true, asLocalhost: false } });

        // Get the network (channel) our contract is deployed to.
        const network = await gateway.getNetwork('mychannel');

        // Get the contract from the network.
        const contract = network.getContract('fabcar');

        // Submit the specified transaction.
        // createCar transaction - requires 5 argument, ex: ('createCar', 'CAR12', 'Honda', 'Accord', 'Black', 'Tom')
        // changeCarOwner transaction - requires 2 args , ex: ('changeCarOwner', 'CAR10', 'Dave')
        await contract.submitTransaction('changeCarOwner', req.params.car_index, req.body.owner);
        console.log('Transaction has been submitted');
        res.send('Transaction has been submitted');

        // Disconnect from the gateway.
        await gateway.disconnect();

    } catch (error) {
        console.error(`Failed to submit transaction: ${error}`);
        process.exit(1);
    }
})

app.listen(8080);
|
代码中对原来fabcar的query.js和invoke.js修改如下:
- ccpPath修改为当前目录,因为我们要使用同一路径下的连接配置文件connection-org1.json
- 在gateway.connect调用中,修改选项discovery.asLocalhost为false
4、Rest API Server的连接配置文件
API服务依赖于连接配置文件来正确连接fabric网络。文件 connection-org1.json 可以直接从 fabric网络中获取:
1 2 3 4 5 6 7 8 9 10 11 12 13 14 15 16 17 18 19 20 21 22 23 24 25 26 27 28 29 30 31 32 33 34 35 36 37 38 39 40 41 42 43 44 45 46 47 48 49 50 51 52 53 54 55 56 57 58 59 60 61 62 63 64 65 66 67 68 69 70 71 72 73 74 75 76 77 78 79 80 81 82 83 84 |
{
    "name": "first-network-org1",
    "version": "1.0.0",
    "client": {
        "organization": "Org1",
        "connection": {
            "timeout": {
                "peer": {
                    "endorser": "300"
                }
            }
        }
    },
    "organizations": {
        "Org1": {
            "mspid": "Org1MSP",
            "peers": [
                "peer0.org1.example.com",
                "peer1.org1.example.com"
            ],
            "certificateAuthorities": [
                "ca.org1.example.com"
            ]
        }
    },
    "peers": {
        "peer0.org1.example.com": {
            "url": "grpcs://localhost:7051",
            "tlsCACerts": {
                "pem": "-----BEGIN CERTIFICATE-----\nMIICVjCCAf2gAwIBAgIQEB1sDT11gzTv0/N4cIGoEjAKBggqhkjOPQQDA
jB2MQsw\nCQYDVQQGEwJVUzETMBEGA1UECBMKQ2FsaWZvcm5pYTEWMBQGA1UEBxMNU2FuIEZy\nYW5jaXNjbzEZMBcGA1UEChMQb3JnMS5leGF
tcGxlLmNvbTEfMB0GA1UEAxMWdGxz\nY2Eub3JnMS5leGFtcGxlLmNvbTAeFw0xOTA5MDQwMjQzMDBaFw0yOTA5MDEwMjQz\nMDBaMHYxCzAJB
gNVBAYTAlVTMRMwEQYDVQQIEwpDYWxpZm9ybmlhMRYwFAYDVQQH\nEw1TYW4gRnJhbmNpc2NvMRkwFwYDVQQKExBvcmcxLmV4YW1wbGUuY29tM
R8wHQYD\nVQQDExZ0bHNjYS5vcmcxLmV4YW1wbGUuY29tMFkwEwYHKoZIzj0CAQYIKoZIzj0D\nAQcDQgAEoN0qd5hM2SDfvGzNjTCXuQqyk+X
K4VISa16/y9iXBPpa0onyAXJuv7T0\noPf+mh3T7/g8uYtV2bwTpT2XFO3Q6KNtMGswDgYDVR0PAQH/BAQDAgGmMB0GA1Ud\nJQQWMBQGCCsGA
QUFBwMCBggrBgEFBQcDATAPBgNVHRMBAf8EBTADAQH/MCkGA1Ud\nDgQiBCCalpyChmrLtpgOll6TVmlMOO/2iiyI2PadNPsIYx51mTAKBggqh
kjOPQQD\nAgNHADBEAiBLNoAYWe9LvoxxBxl3sUM64kl7rx6dI3JU+dJG6FRxWgIgCu1ONEyp\nfux9lZWr6gcrIdsn/8fQuWiOIbAgq0HSr60
=\n-----END CERTIFICATE-----\n"
            },
            "grpcOptions": {
                "ssl-target-name-override": "peer0.org1.example.com",
                "hostnameOverride": "peer0.org1.example.com"
            }
        },
        "peer1.org1.example.com": {
            "url": "grpcs://localhost:8051",
            "tlsCACerts": {
                "pem": "-----BEGIN CERTIFICATE-----\nMIICVjCCAf2gAwIBAgIQEB1sDT11gzTv0/N4cIGoEjAKBggqhkjOPQQDA
jB2MQsw\nCQYDVQQGEwJVUzETMBEGA1UECBMKQ2FsaWZvcm5pYTEWMBQGA1UEBxMNU2FuIEZy\nYW5jaXNjbzEZMBcGA1UEChMQb3JnMS5leGF
tcGxlLmNvbTEfMB0GA1UEAxMWdGxz\nY2Eub3JnMS5leGFtcGxlLmNvbTAeFw0xOTA5MDQwMjQzMDBaFw0yOTA5MDEwMjQz\nMDBaMHYxCzAJB
gNVBAYTAlVTMRMwEQYDVQQIEwpDYWxpZm9ybmlhMRYwFAYDVQQH\nEw1TYW4gRnJhbmNpc2NvMRkwFwYDVQQKExBvcmcxLmV4YW1wbGUuY29tM
R8wHQYD\nVQQDExZ0bHNjYS5vcmcxLmV4YW1wbGUuY29tMFkwEwYHKoZIzj0CAQYIKoZIzj0D\nAQcDQgAEoN0qd5hM2SDfvGzNjTCXuQqyk+X
K4VISa16/y9iXBPpa0onyAXJuv7T0\noPf+mh3T7/g8uYtV2bwTpT2XFO3Q6KNtMGswDgYDVR0PAQH/BAQDAgGmMB0GA1Ud\nJQQWMBQGCCsGA
QUFBwMCBggrBgEFBQcDATAPBgNVHRMBAf8EBTADAQH/MCkGA1Ud\nDgQiBCCalpyChmrLtpgOll6TVmlMOO/2iiyI2PadNPsIYx51mTAKBggqh
kjOPQQD\nAgNHADBEAiBLNoAYWe9LvoxxBxl3sUM64kl7rx6dI3JU+dJG6FRxWgIgCu1ONEyp\nfux9lZWr6gcrIdsn/8fQuWiOIbAgq0HSr60
=\n-----END CERTIFICATE-----\n"
            },
            "grpcOptions": {
                "ssl-target-name-override": "peer1.org1.example.com",
                "hostnameOverride": "peer1.org1.example.com"
            }
        }
    },
    "certificateAuthorities": {
        "ca.org1.example.com": {
            "url": "https://localhost:7054",
            "caName": "ca-org1",
            "tlsCACerts": {
                "pem": "-----BEGIN CERTIFICATE-----\nMIICUTCCAfegAwIBAgIQSiMHm4n9QvhD6wltAHkZPTAKBggqhkjOPQQDA
jBzMQsw\nCQYDVQQGEwJVUzETMBEGA1UECBMKQ2FsaWZvcm5pYTEWMBQGA1UEBxMNU2FuIEZy\nYW5jaXNjbzEZMBcGA1UEChMQb3JnMS5leGF
tcGxlLmNvbTEcMBoGA1UEAxMTY2Eu\nb3JnMS5leGFtcGxlLmNvbTAeFw0xOTA5MDQwMjQzMDBaFw0yOTA5MDEwMjQzMDBa\nMHMxCzAJBgNVB
AYTAlVTMRMwEQYDVQQIEwpDYWxpZm9ybmlhMRYwFAYDVQQHEw1T\nYW4gRnJhbmNpc2NvMRkwFwYDVQQKExBvcmcxLmV4YW1wbGUuY29tMRwwG
gYDVQQD\nExNjYS5vcmcxLmV4YW1wbGUuY29tMFkwEwYHKoZIzj0CAQYIKoZIzj0DAQcDQgAE\nz93lOhLJG93uJQgnh93QcPPal5NQXQnAutF
KYkun/eMHMe23wNPd0aJhnXdCjWF8\nMRHVAjtPn4NVCJYiTzSAnaNtMGswDgYDVR0PAQH/BAQDAgGmMB0GA1UdJQQWMBQG\nCCsGAQUFBwMCB
ggrBgEFBQcDATAPBgNVHRMBAf8EBTADAQH/MCkGA1UdDgQiBCDK\naDhLwl3RBO6eKgHh4lHJovIyDJO3jTNb1ix1W86bFjAKBggqhkjOPQQDA
gNIADBF\nAiEA8KTKkjQwb1TduTWWkmsLmKdxrlE6/H7CfsdeGE+onewCIHJ1S0nLhbWYv+G9\nTbAFlNCpqr0AQefaRT3ghdURrlbo\n-----
END CERTIFICATE-----\n"
            },
            "httpOptions": {
                "verify": false
            }
        }
    }
}
|
当fabcar/startFabric.sh执行时,我们可以交叉检查证书的传播是否正确。 peer0.org1和 peer1.org1 的证书是org1的 TLS root CA 证书签名的。
注意所有的节点都以localhost引用,我们稍后会将其修改为Fabric Node的 公开IP地址。
5、用户身份标识
我们已经在Fabric节点上生成了一个用户标识user1并保存在wallet目录中, 我们可以看到有三个对应的文件:私钥、公钥和证书对象:
稍后我们会把这些文件拷贝到Rest API Server上。
6、安装Rest API Server节点
1、首先在Rest API Server节点上安装npm、node:
1 2 3 4 5 6 |
sudo apt-get update sudo apt install curl curl -sL https://deb.nodesource.com/setup_8.x | sudo bash - sudo apt install -y nodejs sudo apt-get install build-essentialnode -v npm -v |
验证结果如下:
2、然后在Rest API Server上创建一个目录:
1 2 |
mkdir apiserver cd apiserver |
3、接下来将下面的文件从Fabric节点拷贝到Rest API Server节点。我们 利用loccalhost在两个EC2实例间拷贝:
1 2 3 4 5 6 7 |
# localhost (update your own IP of the two servers) # temp is an empty directory cd temp scp -i ~/Downloads/aws.pem ubuntu@[Fabric-Node-IP]:/home/ubuntu/fabric-samples/first-network/connection-org1.json . scp -i ~/Downloads/aws.pem ubuntu@[Fabric-Node-IP]:/home/ubuntu/fabric-samples/fabcar/javascript/package.json . scp -r -i ~/Downloads/aws.pem ubuntu@[Fabric-Node-IP]:/home/ubuntu/fabric-samples/fabcar/javascript/wallet/user1/ . scp -r -i ~/Downloads/aws.pem * ubuntu@[API-Server-Node-IP]:/home/ubuntu/apiserver/ |
运行结果如下:
4、可以看到现在所有的文件都拷贝到Rest API Server了,为了保持一致,我们将user1/改名为wallet/user1/:
1 2 3 |
cd apiserver mkdir wallet mv user1 wallet/user1 |
运行结果如下:
5、现在在Rest API Server上创建上面的apiserver.js文件。
6、修改连接配置文件connection-org1.json 中的fabric节点的ip地址:
1 |
sed -i 's/localhost/[Fabric-Node-IP]/g' connection-org1.json |
运行结果如下:
![]()
7、在/etc/hosts中增加条目以便可以正确解析fabric节点的IP:
1 2 3 4 5 6 |
127.0.0.1 localhost [Fabric-Node-IP] orderer.example.com [Fabric-Node-IP] peer0.org1.example.com [Fabric-Node-IP] peer1.org1.example.com [Fabric-Node-IP] peer0.org2.example.com [Fabric-Node-IP] peer1.org2.example.com |
运行结果如下:
8、安装必要的依赖包:
1 2 |
npm install npm install express body-parser --save |
9、万事俱备,启动Rest API Server:
1 |
node apiserver.js |
7、访问API
我们的API服务在8080端口监听,在下面的示例中,我们使用curl来 演示如何访问。
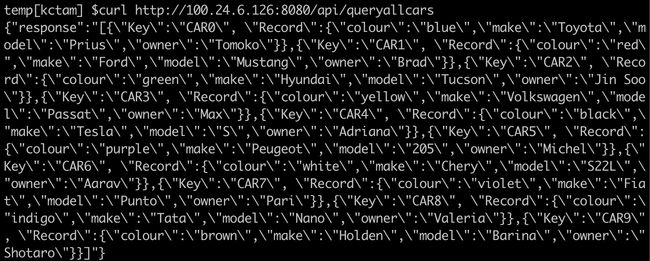
1、查询所有车辆记录
1 |
curl http://[API-Server-Node-IP]:8080/api/queryallcars |
运行结果如下:
2、添加新的车辆记录并查询
1 2 3 |
curl -d '{"carid":"CAR12","make":"Honda","model":"Accord","colour":"black","owner":"Tom"}' -H "Content-Type: application/json" -X POST http://[API-Server-Node-IP]:8080/api/addcar

curl http://[API-Server-Node-IP]:8080/api/query/CAR12
|
运行结果如下:
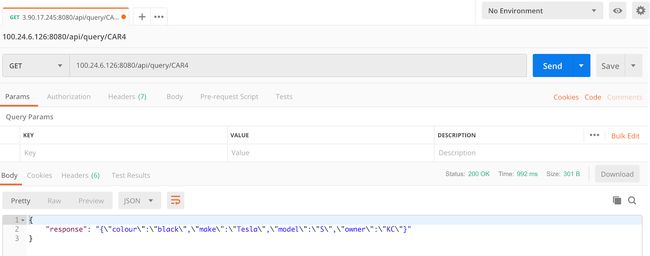
3、修改车辆所有者并再次查询
1 2 3 4 5 |
curl http://[API-Server-Node-IP]:8080/api/query/CAR4

curl -d '{"owner":"KC"}' -H "Content-Type: application/json" -X PUT http://[API-Server-Node-IP]:8080/api/changeowner/CAR4

curl http://[API-Server-Node-IP]:8080/api/query/CAR4
|
运行结果如下:
我们也可以用postman得到同样的结果:
原文链接:An Implementation of API Server for Hyperledger Fabric Network


