iOS开发多线程-GCD的常见用法
一、延迟执行
1.介绍
iOS常见的延时执行有2种方式(1)调用NSObject的方法
[self performSelector:@selector(run) withObject:nil afterDelay:2.0];

// 2秒后再调用self的run方法
(2)使用GCD函数
dispatch_after(dispatch_time(DISPATCH_TIME_NOW, (int64_t)(2.0 * NSEC_PER_SEC)), dispatch_get_main_queue(), ^{

    // 2秒后异步执行这里的代码...

});
2.说明
第一种方法,该方法在那个线程调用,那么run就在哪个线程执行(当前线程),通常是主线程。[self performSelector:@selector(run) withObject:nil afterDelay:3.0];代码示例:
#import "ViewController.h"

@interface ViewController ()

@end

@implementation ViewController

- (void)viewDidLoad {
    [super viewDidLoad];
    NSLog(@"打印当前线程-----%@", [NSThread currentThread]);

    // 第一种方法: 延迟2.0秒钟调用run函数
    [self performSelector:@selector(run) withObject:nil afterDelay:2.0];
}

- (void)run
{
    NSLog(@"%s---延迟执行-----%@", __func__, [NSThread currentThread]);
}

- (void)touchesBegan:(NSSet *)touches withEvent:(UIEvent *)event
{
    // 在异步函数中执行
    dispatch_queue_t queue = dispatch_queue_create("CoderYLiu", 0);

    dispatch_async(queue, ^{
        [self performSelector:@selector(test) withObject:nil afterDelay:1.0];
    });

    NSLog(@"异步函数");
}

- (void)test
{
    NSLog(@"%s---异步函数中延迟执行-----%@", __func__, [NSThread currentThread]);
}

@end 说明:如果把该方法放在异步函数中执行,则方法不会被调用(BUG?)
第二种方法:
dispatch_after(dispatch_time(DISPATCH_TIME_NOW, (int64_t)(5.0 * NSEC_PER_SEC)), dispatch_get_main_queue(), ^{

       //延迟执行的方法

});参数说明:

什么时间,执行这个队列中的这个任务。
代码示例:
#import "ViewController.h"

@interface ViewController ()

@end

@implementation ViewController

- (void)viewDidLoad {
    [super viewDidLoad];

    NSLog(@"打印当前线程-----%@", [NSThread currentThread]);

    // 第二种方式:延迟执行
    // 可以安排其线程(1),主队列
    dispatch_queue_t queue = dispatch_get_main_queue();
    dispatch_after(dispatch_time(DISPATCH_TIME_NOW, (int64_t)(5.0 * NSEC_PER_SEC)), queue, ^{
        NSLog(@"主队列---延迟执行-----%@", [NSThread currentThread]);
    });

    // 可以安排其线程(2),并发队列
    // 获取全局并发队列
    dispatch_queue_t queue2 = dispatch_get_global_queue(DISPATCH_QUEUE_PRIORITY_DEFAULT, 0);

    // 计算任务执行的时间
    dispatch_time_t when = dispatch_time(DISPATCH_TIME_NOW, (int64_t)(5.0 * NSEC_PER_SEC));

    // 会在when这个时间点,执行queue2中的这个任务
    dispatch_after(when, queue2, ^{
        NSLog(@"并发队列---延迟执行-----%@", [NSThread currentThread]);
    });

}

@end
延迟执行:不需要再写方法,且它还传递了一个队列,我们可以指定并安排其线程。
如果队列是主队列,那么就在主线程执行,如果队列是并发队列,那么会新开启一个线程,在子线程中执行。
二、一次性代码
1.实现一次性代码
需求:点击控制器只有第一次点击的时候才打印。
实现代码:
#import "ViewController.h"

@interface ViewController ()

@property (nonatomic, assign, getter=isLog) BOOL log;


@end

@implementation ViewController

- (void)touchesBegan:(NSSet *)touches withEvent:(UIEvent *)event
{
    if (!self.isLog) {
        NSLog(@"该行代码只执行一次");
        self.log = YES;
    }
}

@end
缺点:这是一个对象方法,如果又创建一个新的控制器,那么打印代码又会执行,因为每个新创建的控制器都有自己的布尔类型,且新创建的默认为NO,因此不能保证该行代码在整个程序中只打印一次。
2.使用dispatch_once一次性代码
使用dispatch_once函数能保证某段代码在程序运行过程中只被执行1次
static dispatch_once_t onceToken;

dispatch_once(&onceToken, ^{

    // 只执行1次的代码(这里面默认是线程安全的)

});
整个程序运行过程中,只会执行一次。
代码示例:
#import "ViewController.h"

@interface ViewController ()

@property (nonatomic, assign, getter=isLog) BOOL log;


@end

@implementation ViewController

//- (void)touchesBegan:(NSSet *)touches withEvent:(UIEvent *)event
//{
//    if (!self.isLog) {
//        NSLog(@"该行代码只执行一次");
//        self.log = YES;
//    }
//}

- (void)touchesBegan:(NSSet *)touches withEvent:(UIEvent *)event
{
    //一次性代码:整个程序运行过程中只会执行一次
    /*不能放在懒加载里面的*/
    static dispatch_once_t onceToken;
    dispatch_once(&onceToken, ^{
        // 只执行1次的代码(这里面默认是线程安全的)
         NSLog(@"该行代码只执行一次");
    });
}

@end
效果(程序运行过程中,打印代码只会执行一次):
三、快速迭代
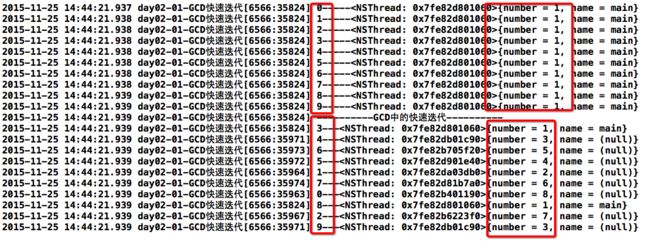
使用dispatch_apply函数能进行快速迭代遍历dispatch_apply(10, dispatch_get_global_queue(0, 0), ^(size_t index) {
// 执行10次代码,index顺序不确定
}代码示例1:
#import "ViewController.h"

@interface ViewController ()

@end

@implementation ViewController

- (void)viewDidLoad {
    [super viewDidLoad];

    // 迭代
    for (NSInteger i = 0; i < 10; i++) {
        NSLog(@"%zd-----%@", i, [NSThread currentThread]);
    }

    // GCD中的快速迭代
    NSLog(@"----------GCD中的快速迭代----------");

    /**
     *
     *  参数1:要遍历的次数
     *  参数2:队列(并发)
     *  参数3:size_t 索引
     *
     */
    dispatch_apply(10, dispatch_get_global_queue(0, 0), ^(size_t index) {
        NSLog(@"%zd---%@", index, [NSThread currentThread]);
    });
}

@end
执行效果:

需求: 将一个文件夹中的文件剪切到另一个文件夹中
代码示例:
#import "ViewController.h"

@interface ViewController ()

@end

@implementation ViewController

/**
 *  需求: 将一个文件夹中的文件剪切到另一个文件夹
 */
- (void)viewDidLoad {
    [super viewDidLoad];
    // 要剪切的文件夹路径
    NSString *fromPath = @"/Users/Apple/Desktop/from";

    // 目标文件夹的路径
    NSString *toPath = @"/Users/Apple/Desktop/to";

    // 得到文件管理者
    NSFileManager *fileManager = [NSFileManager defaultManager];

    // 得到文件夹中的子路径
    NSArray *subPaths = [fileManager subpathsAtPath:fromPath];

    NSLog(@"%@", subPaths);

    // 遍历文件并执行剪切文件的操作
    NSInteger count = subPaths.count;
    dispatch_apply(count, dispatch_get_global_queue(0, 0), ^(size_t index) {

        // 文件的名称
        NSString *fileName = subPaths[index];

        // 拼接文件的全路径
        NSString *subPath = [fromPath stringByAppendingPathComponent:fileName];

        // 拼接剪切的目标路径
        NSString *fullPath = [toPath stringByAppendingPathComponent:fileName];

        // 执行剪切操作
        [fileManager moveItemAtPath:subPath toPath:fullPath error:nil];

        NSLog(@"%@--%@,%@",subPath,fullPath,[NSThread currentThread]);
    });

}

- (void)MoveFile
{
    // 要剪切的文件夹路径
    NSString *fromPath = @"/Users/Apple/Desktop/from";

    // 目标文件夹的路径
    NSString *toPath = @"/Users/Apple/Desktop/to";

    // 得到文件管理者
    NSFileManager *fileManager = [NSFileManager defaultManager];

    // 得到文件夹中的子路径
    NSArray *subPaths = [fileManager subpathsAtPath:fromPath];

    NSLog(@"%@", subPaths);

    // 遍历文件并执行剪切文件的操作
    NSInteger count = subPaths.count;
    for (NSInteger i = 0; i < count; i++) {
        // 文件的名称
        NSString *fileName = subPaths[i];

        // 拼接文件的全路径
        NSString *subPath = [fromPath stringByAppendingPathComponent:fileName];

        // 拼接剪切的目标路径
        NSString *fullPath = [toPath stringByAppendingPathComponent:fileName];

        // 执行剪切操作
        [fileManager moveItemAtPath:subPath toPath:fullPath error:nil];

        NSLog(@"%@--%@,%@",subPath,fullPath,[NSThread currentThread]);
    }
}

@end
两种迭代方法的打印效果
for循环:
dispatch_apply:
实际效果可以自己测试
四、队列组
需求:从网络上下载两张图片,把两张图片合并成一张最终显示在view上。
1.第一种方法
代码示例:
#import "ViewController.h"

@interface ViewController ()

@property (weak, nonatomic) IBOutlet UIImageView *imageView1;
@property (weak, nonatomic) IBOutlet UIImageView *imageView2;
@property (weak, nonatomic) IBOutlet UIImageView *imageView3;

@end

@implementation ViewController

- (void)touchesBegan:(NSSet *)touches withEvent:(UIEvent *)event
{
    // 获取全局并发队列
    dispatch_queue_t globalQuque = dispatch_get_global_queue(DISPATCH_QUEUE_PRIORITY_DEFAULT, 0);
    // 获取主队列
    dispatch_queue_t mainQueue= dispatch_get_main_queue();

    dispatch_async(globalQuque, ^{
        // 下载图片1
        UIImage *image1 = [self imageWithUrl:@"http://img5.hao123.com/data/1_02d75d1d077f83a767fb530ac4a0b80d_510"];

        NSLog(@"图片1下载完成---%@", [NSThread currentThread]);

        // 下载图片2
        UIImage *image2 = [self imageWithUrl:@"http://img1.gamedog.cn/2013/11/12/95-1311120Z3400.jpg"];

        NSLog(@"图片2下载完成---%@", [NSThread currentThread]);

        // 回到主线程显示图片
        dispatch_async(mainQueue, ^{
            NSLog(@"显示图片---%@", [NSThread currentThread]);
            self.imageView1.image = image1;
            self.imageView2.image = image2;

            // 合并两张图片
            UIGraphicsBeginImageContextWithOptions(CGSizeMake(300, 300), NO, 0.0);
            [image1 drawInRect:CGRectMake(0, 0, 150, 300)];
            [image2 drawInRect:CGRectMake(150, 0, 150, 300)];
            self.imageView3.image = UIGraphicsGetImageFromCurrentImageContext();
            // 关闭位图上下文
            UIGraphicsEndImageContext();
            NSLog(@"图片合并完成---%@", [NSThread currentThread]);
        });

    });

}

// 封装一个方法,传人一个url参数,返回一张从网络资源中下载的图片
- (UIImage *)imageWithUrl:(NSString *)urlStr
{
    NSURL *url = [NSURL URLWithString:urlStr];
    NSData *data = [NSData dataWithContentsOfURL:url];
    return [UIImage imageWithData:data];
}

@end
显示效果:

打印查看:

问题:这种方式的效率不高,需要等到图片1.图片2都下载完成后才行。
提示:使用队列组可以让图片1和图片2的下载任务同时进行,且当两个下载任务都完成的时候回到主线程进行显示。
2.使用队列组解决
步骤:
创建一个组
开启一个任务下载图片1
开启一个任务下载图片2
同时执行下载图片1\下载图片2操作
等group中的所有任务都执行完毕, 再回到主线程执行其他操作
代码示例
#import "ViewController.h"
// 宏定义全局并发队列
#define global_quque dispatch_get_global_queue(DISPATCH_QUEUE_PRIORITY_DEFAULT, 0)
// 宏定义主队列
#define main_queue dispatch_get_main_queue()

@interface ViewController ()

@property (weak, nonatomic) IBOutlet UIImageView *imageView1;
@property (weak, nonatomic) IBOutlet UIImageView *imageView2;
@property (weak, nonatomic) IBOutlet UIImageView *imageView3;

@end

@implementation ViewController

- (void)touchesBegan:(NSSet *)touches withEvent:(UIEvent *)event
{
    // 创建一个队列组
    dispatch_group_t group = dispatch_group_create();

    //同时执行下载图片1和下载图片2的操作
    // 开启一个任务下载图片1
    __block UIImage *image1 = nil;
    dispatch_group_async(group, global_quque, ^{
        image1 = [self imageWithUrl:@"http://img5.hao123.com/data/1_02d75d1d077f83a767fb530ac4a0b80d_510"];
        NSLog(@"图片1下载完成---%@", [NSThread currentThread]);
    });

    // 开启一个任务下载图片2
    __block UIImage *image2 = nil;
    dispatch_group_async(group, global_quque, ^{
        image2 = [self imageWithUrl:@"http://img1.gamedog.cn/2013/11/12/95-1311120Z3400.jpg"];
        NSLog(@"图片2下载完成---%@", [NSThread currentThread]);
    });

    //等队列组group中的所有任务都执行完毕,在回到主线程执行其它操作
    dispatch_group_notify(group, main_queue, ^{
        NSLog(@"显示图片---%@", [NSThread currentThread]);
        self.imageView1.image = image1;
        self.imageView2.image = image2;

        // 合并两张图片
        // 注意最后一个参数是浮点数(0.0),不要写成0
        UIGraphicsBeginImageContextWithOptions(CGSizeMake(300, 300), NO, 0.0);
        [image1 drawInRect:CGRectMake(0, 0, 150, 300)];
        [image2 drawInRect:CGRectMake(150, 0, 150, 300)];
        self.imageView3.image = UIGraphicsGetImageFromCurrentImageContext();
        // 关闭位图上下文
        UIGraphicsEndImageContext();
        NSLog(@"图片合并完成---%@", [NSThread currentThread]);
    });
}

@end
打印查看(同时开启了两个子线程,分别下载图片):
2.补充说明
有这么1种需求:
首先:分别异步执行2个耗时的操作
其次:等2个异步操作都执行完毕后,再回到主线程执行操作
如果想要快速高效地实现上述需求,可以考虑用队列组
dispatch_group_t group =  dispatch_group_create();

dispatch_group_async(group, dispatch_get_global_queue(DISPATCH_QUEUE_PRIORITY_DEFAULT, 0), ^{

    // 执行1个耗时的异步操作

});

dispatch_group_async(group, dispatch_get_global_queue(DISPATCH_QUEUE_PRIORITY_DEFAULT, 0), ^{

    // 执行1个耗时的异步操作

});

dispatch_group_notify(group, dispatch_get_main_queue(), ^{

    // 等前面的异步操作都执行完毕后,回到主线程...

});
五、补充
使用Crearte函数创建的并发队列和全局并发队列的主要区别:1.全局并发队列在整个应用程序中本身是默认存在的,并且对应有高优先级、默认优先级、低优先级和后台优先级一共四个并发队列,我们只是选择其中的一个直接拿来用。而Crearte函数是实打实的从头开始去创建一个队列。
2.在iOS6.0之前,在GCD中凡是使用了带Crearte和retain的函数在最后都需要做一次release操作。而主队列和全局并发队列不需要我们手动release。当然了,在iOS6.0之后GCD已经被纳入到了ARC的内存管理范畴中,即便是使用retain或者create函数创建的对象也不再需要开发人员手动释放,我们像对待普通OC对象一样对待GCD就OK。
3.在使用栅栏函数的时候,苹果官方明确规定栅栏函数只有在和使用create函数自己的创建的并发队列一起使用的时候才有效(没有给出具体原因)
4.其它区别涉及到XNU内核的系统级线程编程,不一一列举。
5.给出一些参考资料(可以自行研究):
GCDAPI:https://developer.apple.com/library/ios/documentation/Performance/Reference/GCD_libdispatch_Ref/index.html#//apple_ref/c/func/dispatch_queue_create
Libdispatch版本源码:http://www.opensource.apple.com/source/libdispatch/libdispatch-187.5/
注意:在iOS9 beta中,苹果将原http协议改成了https协议,使用 TLS1.2 SSL加密请求数据,所以不能直接使用http协议访问网络资源,需要在info.plist 加入key
NSAppTransportSecurity

NSAllowsArbitraryLoads

