Latex排版工具入门
| 目录 |
| - - - 1. 安装 - 1.1 基础概念 - 1.1.1 Tex - 1.1.2 Texlive - 1.1.3 编辑器 - 1.2 安装 - 2 语法入门 - 2.1 Hello World与基础概念 - 2.2 基本排版 - 2.3 宏包的使用 - 2.3.1 公式 - 2.3.2 图片 - 3. 语法 - 3.1 公式 - 3.3 浮动块,自动编号,引用 - 3.4 页面设置
|
概要
这是一份Latex快速入门的教程。一点都不复杂,不要害怕,实际上只需要安装好,理解一些基础概念,然后把2,3之中给出的代码跑一遍,理解注释,就可以快速入门。
然后,后面就是实践 + 查文档,查google。
Latex的主要特点,纯文本标记,自动排版,熟练之后写论文,修改论文方便。然后是纯文本可以方便使用版本控制。
Ref:https://liam.page/2014/09/08/latex-introduction/
1. 安装
1.1 基础概念
1.1.1 Tex
“TeX 是高德纳(Donald Ervin Knuth,1938年1月10日 --)教授愤世嫉俗追求完美做出来的排版引擎,同时也是该引擎使用的标记语言(Markup Language)的名称。而 LaTeX则是 L. Lamport (1941年2月7日 -- ) 教授开发的基于 TeX 的排版系统。实际上 LaTeX 利用 TeX 的控制命令,定义了许多新的控制命令并封装成一个可执行文件。这个可执行文件会去解释 LaTeX 新定义的命令成为 TeX 的控制命令,并最终交由 TeX 引擎进行排版。”
换句话来说Tex是一种自动排版的标记语言,而Latex则是工具,排版系统。
然后就有很多xxTex,例如pdfTex生成pdf,XeLaTex默认UTF8,解决中文等语言的显示问题。
1.1.2 Texlive
那么Texlive是什么呢?在Tex基础上,为了完成排版的各种需求,出现了大量的库,这些库对接Tex提供简单的API,所以就需要一个套件整合起这些工具,Texlive就是其中之一,而且是官方默认指定的套件。
1.1.3 编辑器
我们知道,latex文件是一种纯文本文件,你可以想象成代码,或者就是复杂版的markdown,因此同样需要编辑器,就像代码一样,编辑完,需要编译成格式化文档。
编辑器有非常多,套件自带了TeXworks,功能比较简单。这里推荐一个,TeXstudio。也可以用vs code加上插件的形式。
1.2 安装
安装需要安装Texlive和一个编辑器(可选)。没什么好讲的,非常简单。
2 语法入门
2.1 Hello World与基础概念
我们先从一个demo来解释一些基础概念。
打开编辑器,编辑代码如下,然后就可以编译输出了。
| 1 2 3 4 5 |
\documentclass{article} % 这里是导言区 \begin{document} Hello, world! \end{document} |
\命令:这是Tex的基本形式,命令之后
参数: {}跟着必要参数,[]跟着可选参数
环境:\beging{ducument}到\end{document}之间,Tex称为环境……其实等同于html标签之间的区域。
引言区:\begin{document}之前是引言区,一般用于引入各种库,页面设置,标题等。
文档区:\beging{ducument}到\end{document}之间的则是正文,只有放在该环境里的文本才有效。
2.2 基本排版
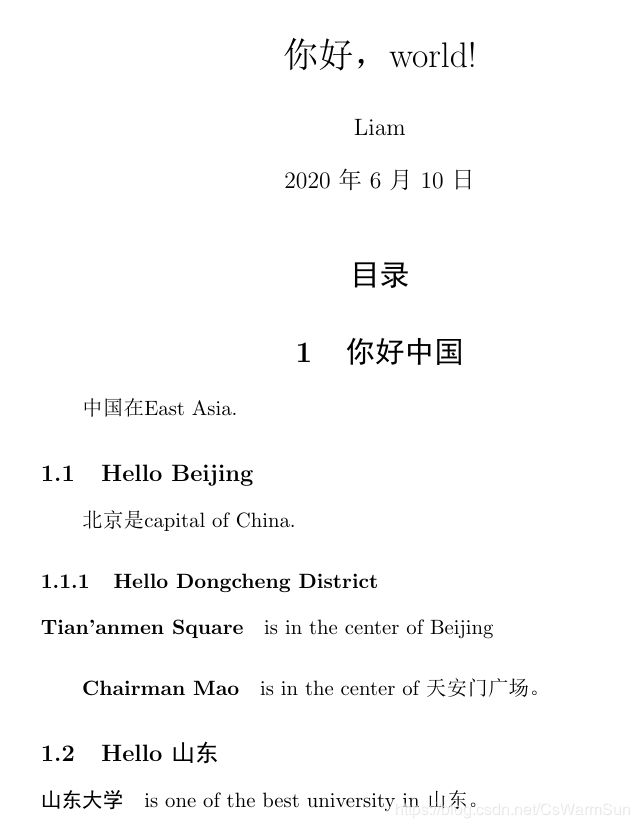
还是直接用代码来说明问题,请运行以下代码,仔细对照注释理解各个命令即可。
\documentclass[UTF8]{ctexart}
\title{你好,world!}
\author{Liam}
\date{\today}
\begin{document}
% maketilte会强制引言区的内容按照特定格式排版
\maketitle
% 加入目录,目录放在maketitle前面的话就会自动生成目录
\tableofcontents
% section subsection subsubsention控制标题
\section{你好中国}
中国在East Asia.
\subsection{Hello Beijing}
北京是capital of China.
\subsubsection{Hello Dongcheng District}
\paragraph{Tian'anmen Square}
is in the center of Beijing
\subparagraph{Chairman Mao}
is in the center of 天安门广场。
\subsection{Hello 山东}
\paragraph{山东大学} is one of the best university in 山东。
\end{document}
output:
中英混排:现在中文支持得较好,只需要把文档设置为\documentclass[UTF8]{ctexart},然后使用XeLatex编译即可。
2.3 宏包的使用
上面说了,为了方便各种排版,我们需要引用很多包,例如数学公式的包,图片显示,页眉页脚设计等。可以说,复杂的需求都只需要引入各种各样的包来解决。
例如,引入数学包。通过\usepackage{}引入。
2.3.1 公式
\documentclass{article}
\usepackage{amsmath}
\begin{document}
\begin{equation}
E=mc^2.
\end{equation}
\end{document}
2.3.2 图片
\documentclass{article}
\usepackage{graphicx}
\begin{document}
\includegraphics{a.jpg}
\end{document}
3. 语法
其实latex上手主要就是上面的东西,然后剩下的就是各种语法了,本节的阅读,建议按照给出的代码运行以下,然后仔细看注释,理解语句的作用,然后使用到再查即可。
以下几个部分比较重要,单独叙述。
3.1 公式
公式应该可以说是latex的一个招牌之一了。
公式的使用主要注意行内形式和独立形式,就是公式插入段落的行中还是自成一段。分别用$ $和\[ \]指定。如果想要公式自动编号,则使用公式环境\begin{equation} \end{equation}。
公式的对齐。\begin{aligned}指定公式内部对齐子环境,利用&标注对齐位置(请参考下面代码中对齐部分,通过运行理解)。\begin{align}和前者功能有点像,但它是一个带编号、带对齐环境独立公式环境,相当于\begin{equation} 中设置了对齐。
\documentclass{article}
\usepackage{amsmath}
\begin{document}
Einstein's $E=mc^2$
\[ E = mc^2.\]
\begin{equation}
E = mc^2
\end{equation}
% \sqrt{x} \frac{1}{2}
% 根号 分数
\[\sqrt{x} \frac{1}{2}\]
% ^{} _{} \sum \quad \prod
% 上标 下标 连加 制表符 连乘
\[ \sum_{i=1}^n i\quad \prod_{i=1}^n \]
% \limits 显示指定是都压缩上下标
% \nolimits 不压缩上下标
\[ \lim_{x\to0}x^2 \quad \int_a^b x^2 dx \]
\[ \lim\nolimits _{x\to0}x^2\quad \int\nolimits_a^b x^2 dx \]
% \int 积分系列
\[ \iint\quad \iiint\quad \iiiint\quad \idotsint \]
% 括号,直接使用,注意{}需要转义\{
% |和||建议使用\rvert \lvert 和 \rVert \lVert
% 需要调整大小可以使用 \big, \Big, \bigg, \Bigg
\[ () [] \]
\[ \Biggl(\biggl(\Bigl(\bigl((x)\bigr)\Bigr)\biggr)\Biggr) \]
% \dots, \cdots, \vdots, \ddots 各种省略号
\[ x_1,x_2,\dots ,x_n\quad 1,2,\cdots ,n\quad \vdots\quad \ddots \]
% 对齐子环境需要再数学公式之内,利用&定位
\[\begin{aligned}
x =& a+b+c \\
&d+e+f+g
\end{aligned}\]
% 公式组,带编号,不要和对齐子环境混淆
\begin{align}
a &= b+c+d \\
x &= y+z
\end{align}
% 分段函数
\[ y= \begin{cases}
-x,\quad x\leq 0 \\
x,\quad x>0
\end{cases} \]
\end{document}
3.3 浮动块,自动编号,引用
有时候我们在论文中插入图片,表格,一个经常遇到的问题是——不小心就多出很多空白。写毕业论文的时候,这个是一个很烦人的问题,如果非要图片固定相对位置,那么这些排版就很容易出问题。
所以latex的策略是设置浮动块,利用子环境指定浮动状态,例如\begin{figure}[h],h指定为当前位置here,还可以设置为p,paper,独立成页,t,top,顶部,b,bottom,底部。
另一个要注意的地方是,表格的浮动设置和表格内容是分开的,\begin{table}[b]指定浮动,\begin{tabular}{l||c|c|c|p{2.5cm}}指定表格内容。
\documentclass[UTF8]{ctexart}
\usepackage{graphicx}
\begin{document}
% 插入图片,比例控制
\includegraphics[width = .8\textwidth]{a.png}
% 正式图片插入,自动浮动,引用的使用
\begin{figure}[h]
% \centering 图片居中
\centering
\includegraphics[width = .8\textwidth]{a.png}
\caption{有图有真相}
% 标签用于引用
\label{fig:myphoto}
\end{figure}
% 引用
图\ref{fig:myphoto}中指出
% 表格
\begin{table}[b]
\centering
\caption{国一小分队}
\label{tab:mytab}
% \begin{tabular}表格内容,{|l|c|r|} lcr指定每一列的对齐方式,|指定竖线
\begin{tabular}{l||c|c|c|p{2.5cm}}
% \hline横线,多次加粗
\hline
\hline
姓名 &职责 &院系 &实力 &期望\\
\hline
孙旭森 &编程 &信科 &0 &国一\\
\hline
彬哥 &全能 &数学 &深不可测 &无\\
\hline
\end{tabular}
\end{table}
\end{document}
3.4 页面设置
页边距,页大小,页眉页脚。
\documentclass[UTF8]{ctexart}
\usepackage{graphicx}
% 设定页面大小,页面边距
\usepackage{geometry}
\geometry{papersize={20cm,15cm}}
\geometry{left=1cm,right=1cm,top=3cm,bottom=4cm}
% 页眉页脚
\usepackage{fancyhdr}
\pagestyle{fancy}
% 设置文字
\lhead{lhead}
\chead{chead}
% bfseries
\rhead{\bfseries The performance of new graduates}
\lfoot{From: K. Grant}
\cfoot{To: Dean A. Smith}
\rfoot{\thepage}
% 设置上下横线
\renewcommand{\headrulewidth}{0.4pt}
\renewcommand{\footrulewidth}{0.4pt}
% 设置行距1.5倍
\usepackage{setspace}
\onehalfspacing
% 设置段间距 原有基础上增加或减少
\addtolength{\parskip}{.8em}
\begin{document}
hellohellohellohellohellohellohellohellohellohellohellohellohellohellohellohellohellohellohellohellohellohellohellohellohellohellohellohellohellohellohellohellohellohellohellohellohellohellohellohellohellohellohellohellohellohellohellohellohellohellohellohellohellohellohellohellohellohellohellohellohellohellohellohellohellohellohellohellohellohellohellohellohellohellohellohellohellohellohellohello
hello
hello
hello
hello
hello
hello
hello
\end{document}
