PyTorch 《动手学深度学习》学习笔记(Dive-into-DL-Pytorch)
参考文章1:PyTorch版《动手学深度学习》PDF 版开源了
参考文章2:https://download.csdn.net/download/Dontla/12371960
文章目录
- 1.1 安装pytorch
- 1.2 数据操作
- 2.2.2 操作
- 2.2.5 TENSOR 和 NUMPY的相互转换
- 2.2.6 TENSOR ON GPU
- 2.3 自动求梯度
1.1 安装pytorch
安装CUDA和cuDNN
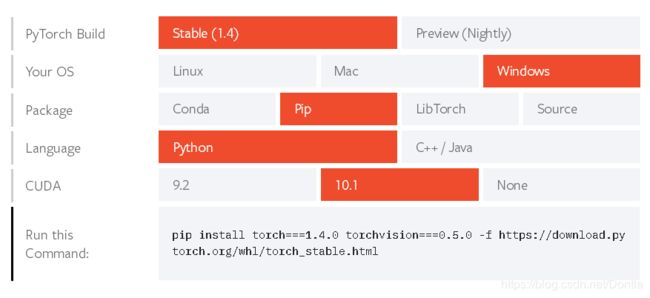
安装pytorch:
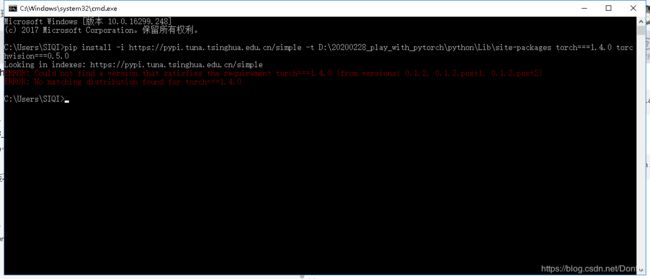
pip install -i https://pypi.tuna.tsinghua.edu.cn/simple -t D:\20200228_play_with_pytorch\python\Lib\site-packages torch===1.4.0 torchvision===0.5.0
pip install torch===1.4.0 torchvision===0.5.0 -f https://download.pytorch.org/whl/torch_stable.html
还是用原来的装吧
pip install -t D:\20200228_play_with_pytorch\python\Lib\site-packages torch===1.4.0 torchvision===0.5.0 -f https://download.pytorch.org/whl/torch_stable.html
不搞了,貌似没法指定安装目录
直接pip吧,不指定位置了
pip也慢。。。
我的笔记本上cuda刚好装的9.0的,找到支持9.0cuda的最新版本的pytorch,

在这里安装老版本的pytorch
# CUDA 9.0
Download and install wheel from https://download.pytorch.org/whl/cu90/torch_stable.html
我的python是3.6的,安装这个版本:

直接下太慢,右键用迅雷下

下载好,就可以安装了,安装方法:python pip如何安装wheel文件?.whl(pip install [wheel])
1.2 数据操作
# -*- coding: utf-8 -*-
"""
@File    : 2.2.1 创建 TENSOR.py
@Time    : 2020/3/4 15:05
@Author  : Dontla
@Email   : [email protected]
@Software: PyCharm
"""
import torch

# 创建⼀一个5x3的未初始化的 Tensor
x = torch.empty(5, 3)
# print(x)
# tensor([[1.0286e-38, 1.0653e-38, 1.0194e-38],
#         [8.4490e-39, 9.6429e-39, 8.4490e-39],
#         [9.6429e-39, 9.2755e-39, 1.0286e-38],
#         [9.0919e-39, 8.9082e-39, 9.2755e-39],
#         [8.4490e-39, 1.0194e-38, 1.0194e-38]])

# 创建⼀一个5x3的随机初始化的 Tensor
x = torch.rand(5, 3)
# print(x)
# tensor([[0.0680, 0.7391, 0.4845],
#         [0.2930, 0.1596, 0.7253],
#         [0.9158, 0.4388, 0.4839],
#         [0.3747, 0.3134, 0.2967],
#         [0.5608, 0.2200, 0.3671]])

# 创建⼀一个5x3的long型全0的 Tensor
x = torch.zeros(5, 3, dtype=torch.long)
# print(x)
# tensor([[0, 0, 0],
#         [0, 0, 0],
#         [0, 0, 0],
#         [0, 0, 0],
#         [0, 0, 0]])

# 直接根据数据创建tensor
x = torch.tensor([5.5, 3])
# print(x)
# tensor([5.5000, 3.0000])

# 通过现有的 Tensor 来创建,此方法会默认重用输入 Tensor 的一些属性,例如数据类型,除⾮非⾃自定义数据类型。
x = x.new_ones(5, 3, dtype=torch.float64)  # 返回的tensor默认具有相同的torch.dtype和torch.device
print(x)
x = torch.randn_like(x, dtype=torch.float)  # 指定新的数据类型
print(x)
2.2.2 操作
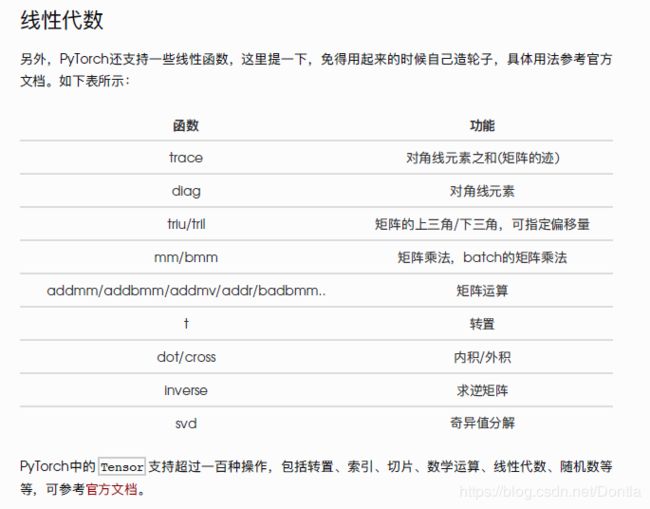
其他略了,自己看文档去
2.2.5 TENSOR 和 NUMPY的相互转换
torch.Tensor.numpy() # 转换成numpy数组
torch.from_numpy() # 将numpy数组转换成Tensor
2.2.6 TENSOR ON GPU
# -*- coding: utf-8 -*-
"""
@File    : test.py
@Time    : 2020/4/1 19:24
@Author  : Dontla
@Email   : [email protected]
@Software: PyCharm
"""
import torch

# 以下代码只有在PyTorch GPU版本上才能执行
x = torch.empty(5, 3)
if torch.cuda.is_available():
    device = torch.device("cuda")  # GPU
    y = torch.ones_like(x, device=device)  # 直接创建一个在GPU上的Tensor
    x = x.to(device)  # 等价于.to("cuda")
    z = x + y
    print(z)
    print(z.to("cpu", torch.double))  # to()还可以同时更改数据类型
结果:
D:\20191031_tensorflow_yolov3\python\python.exe C:/Users/SIQI/Desktop/PyQt5/test.py
tensor([[1., 1., 1.],
        [1., 1., 1.],
        [1., 1., 1.],
        [1., 1., 1.],
        [1., 1., 1.]], device='cuda:0')
tensor([[1., 1., 1.],
        [1., 1., 1.],
        [1., 1., 1.],
        [1., 1., 1.],
        [1., 1., 1.]], dtype=torch.float64)

Process finished with exit code 0


