本文内容来自熊丽兵老师在登链学院上的《以太坊Dapp开发实战》课程
简介
Dapp VS App
去中心化的应用的后端是一个分布式的网络(中心化应用后端是一个中心化的节点)。前端连接到网络中的任意一个节点都一样。
去中心化应用给节点发送的请求叫交易,节点不单自己处理请求,还把请求转发到网络的其他节点,请求的最终执行需要网络的共识,所以应用不能直接拿到结果,是异步的,前端想要知道状态的改变需要监听事件的方法。
第一个去中心化应用
本应用使用Truffle来开发Dapp。功能与 第一个去中心化应用 一样。
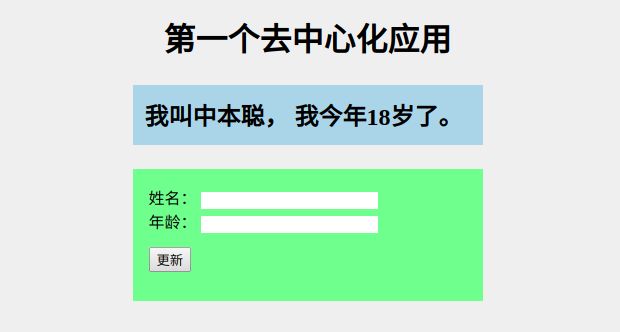
应用效果图如下
应用的功能很简单
浅蓝色部分用来显示区块链上的姓名和年龄信息
浅绿色部分用来修改区块链上的姓名和年龄信息
准备
全局安装truffle框架
sudo npm install -g truffle //安装truffle。-g代表全局
Truffle是DApps开发用到的一个最流行的开发框架。本身基于Javascript。
Truffle也可以理解为是一个脚手架:集成了合约的编译、链接、测试、部署
Truffle官网:https://truffleframework.com/truffle
Truffle文档:https://truffleframework.com/docs/truffle
Truffle命令:https://truffleframework.com/docs/truffle/reference/truffle-commands
Truffle里有个box的概念,相当于把一些代码框架给打包好了,想用哪个box直接下载就可以使用,在此基础上编写自己的Dapp。比如有一个react的box,整合了react的代码,不用专门下载react了,非常方便。
Truffle box: https://github.com/truffle-box
本文为了梳理开发流程,没有使用box。
全局安装ganache节点
sudo npm install -g ganache-cli //安装ganache-cli节点
ganache-cli //启动ganache-cli节点,后续会用到。可单独开一个终端
以太坊节点也叫以太坊客户端。智能合约必须部署到以太坊节点上来运行。
以太坊节点有Ganache虚拟节点、Geth节点、以太坊测试节点(Ropsten、kovan、Rinkeby)、以太坊主网(Main Ethereum Network)
开发过程中需要不断的修改代码和测试,需要得到及时的反馈。Truffle官方推荐使用适合开发的客户端Ganache(前身为EtherumJS TestRPC)。
Ganache是一个完整的在内存中的区块链(因为在内存中,所以重启后数据会丢失),仅仅存在于你开发的设备上。它在执行交易时是实时返回,而不等待默认的出块时间,可以快速验证新写的代码,当出现错误时能够即时反馈。它同时还是一个支持自动化测试的功能强大的客户端。Truffle充分利用它的特性,能将测试运行时间提速近90%。
ganache有命令行版和界面版两个版本,使用哪个都可以。本文使用的是命令行版
ganache命令行版:https://github.com/trufflesuite/ganache-cli/tree/master
ganache界面版:https://github.com/trufflesuite/ganache/releases
安装文档:https://truffleframework.com/docs/ganache/quickstart
节点选择
| 开发 | 部署 | 正式部署前测试 | 正式部署 |
|---|---|---|---|
| ganache | Geth | 以太坊测试节点 | 以太坊主网 |
MetaMask连接ganache节点
MetaMask是一款浏览器插件钱包,不需下载安装客户端,只需添加至浏览器扩展程序即可使用。它不仅是一个简单的钱包,还可以很方便的调试和测试以太坊的智能合约。
官网:https://metamask.io/
Github地址:https://github.com/MetaMask/metamask-extension
文档:https://metamask.github.io/metamask-docs/
使用教程参考:https://www.jianshu.com/p/4a28566c425d
将MetaMask连接ganache节点并导入一个ganache自动创建的账户。用此账户部署合约以及发送交易。
连接节点
MetaMask的network选择ganache-cli的节点url(localhost 8545),连接到ganache-cli节点
MetaMask导入账户
在MetaMask的import Account里导入Private Key。用此账户部署合约以及发送交易。
ganache-cli开启时会默认创建十个账户,每个账户都有一个Private Key
创建项目
mkdir Dapp      //创建项目目录

cd Dapp

truffle init    //truffle创建项目,得到项目框架(当然也可以用truffle提供的box来创建项目,在box的基础上修改)

npm init        //将项目转换为npm项目(提示时都使用默认值即可)
本文采用truffle init创建空项目,当然还可以使用truffle的box创建带有其他框架的项目。
npm init是将项目转换为一个npm的项目,方便管理。
项目根目录下安装lite-server服务器
npm install lite-server //安装项目服务器
应用需要一个web服务器,而像nginx、apache等web服务器需要单独安装,在项目外。而lite-server服务器本身就是项目的一部分,环境容易统一,方便开发和维护。
项目根目录下安装truffle-contract
npm install truffle-contract //安装truffle框架提供的contract,对web3进行了封装,方便与合约进行交互
truffle-contract是web3的一个封装,在应用与智能合约交互时用。
truffle-contract文档:https://truffleframework.com/docs/truffle/getting-started/interacting-with-your-contracts
web3中文文档:https://web3.learnblockchain.cn/
初始框架结构
|-- Dapp
    |-- contracts                    //Solidity合约代码
        -- Migrations.sol            //此文件为必须
    |-- migrations                    //合约部署脚本
        -- 1_initial_migration.js    //用来部署Migrations.sol的
    |-- test                        //测试代码
    |-- node_modules                //npm模块,lite-server和truffle-contract在里面
    -- truffle-config.js            //windows下的truffle配置文件
    -- truffle.js                    //linux、mac下的truffle配置文件
    -- package.json             //npm init后的配置文件
后端(智能合约)
开发合约
Solidity文档:https://solidity.readthedocs.io/en/v0.5.1/
直接将项目导入自己喜欢的编辑器,在contracts目录下新建 Simple.sol 文件,或者终端中使用命令来创建Simple.sol文件
truffle create contract Simple
结构如下
|-- contracts
    -- Migrations.sol
    -- Simple.sol
内容如下
pragma solidity ^0.4.24;

contract Simple{
    string name;
    uint age;

    //定义事件
    event Instructor(string name, uint age);

    function set(string _name, uint _age) public {
        name = _name;
        age = _age;
        //触发事件
        emit Instructor(name, age);
    }

    function get() public view returns(string, uint) {
        return (name, age);
    }
}
编译合约
truffle compile
编译完成后,根目录下会生成一个build目录,其下的contracts目录下是合约的json文件
|-- build
    |-- contracts
        -- Migrations.json
        -- Simple.json      //包含abi、地址等信息
对合约部署的时候,truffle会更新此文件,写入truffle.js里的网络网络信息
测试合约
测试合约有solidity和js两种方式
solidity方式文档:https://truffleframework.com/docs/truffle/testing/writing-tests-in-solidity
js方式文档:https://truffleframework.com/docs/truffle/testing/writing-tests-in-javascript
test目录下创建测试文件
|-- Dapp
    |-- test
        -- TestSimple.sol
        -- Simple.js
TestSimple.sol
pragma solidity ^0.4.24;

import "truffle/Assert.sol";
import "truffle/DeployedAddresses.sol";
import "../contracts/Simple.sol";

contract TestSimple {

    Simple info = Simple(DeployedAddresses.Simple());

    string name;
    uint age;

    function testInfo() public {

        info.set("中本聪",18);
        (name, age) = info.get();

        Assert.equal(name, "中本聪", "设置姓名出错");
        Assert.equal(age, 18, "设置年龄出错");
    }
}
Simple.js
var Simple = artifacts.require("Simple");

contract('Simple', function(accounts){
    it("set() should be equal set", function(){
        return Simple.deployed().then(function(instance){
            instance.set("中本聪", 18);

            return instance.get().then(function(data){
                assert.equal(data[0], "中本聪");
                assert.equal(data[1], 18);
            });
        });
    });
});
执行测试命令
truffle test    //执行所有测试文件
truffle test ./test/TestSimple.sol  //指定测试哪个文件
测试需要用到网络,配置部分参考部署合约时的truffle.js的网络配置
结果如下,说明测试通过
 TestSimple
    ✓ testInfo (90ms)

  Contract: Simple
    ✓ set() should be equal set (46ms)

  2 passing (865ms)
部署合约
配置truffle.js文件
可参考truffle官网配置部分:http://truffleframework.com/docs/advanced/configuration
module.exports = {
    networks: {
        development: {
            host: "127.0.0.1",
            port: 8545,
            network_id: "*" //watch any network id
        }
    }
};
创建并配置部署的脚本
直接在contracts目录下新建 Simple.js 文件,或者终端中使用命令来创建Simple.js文件
truffle create migration simple
在migrations目录下就会创建一个部署脚本
|-- migrations
    -- 1_initial_migration.js
    -- 1544177454_simple.js //命令创建的。前面数字应该是随机的
配置脚本
参考:https://truffleframework.com/docs/truffle/getting-started/running-migrations
var Simple = artifacts.require("./Simple.sol");

module.exports = function(deployer) {
  // deployment steps
  deployer.deploy(Simple);
};
部署
truffle migrate

truffle migrate --reset //如果修改了合约重新部署,需要加reset参数
运行上面指令发生的事情
运行了1_initial_migration.js、2_deploy_contracts.js文件,ganache客户端中生成了transaction信息。
contracts目录里的Migrations.json文件里增加了networks内容,最主要的是一个address信息。
前端
|-- Dapp
    |-- src             //项目根目录下创建src目录,存放前端文件
        -- index.html
        -- index.css
        |-- js
            -- index.js
            -- truffle-contract.min.js //从node_modules/truffle-contract/dist/truffle-contract.min.js复制过来的
index.html
第一个去中心化应用
第一个去中心化应用
index.css
body{background:#f0f0f0;}
#content{width:350px;margin:0 auto;}
#title{text-align: center;}
#info{padding:0.5em;background: lightblue;margin:1em 0;}
#update{padding:1em;background: lightgreen}
#name{border:none;}#age{border:none;}
button{margin:1em 0;}
index.js
这部分是应用与智能合约交互的部分,跟智能合约一样,是Dapp的关键部分
在第一个去中心化应用中,获取智能合约对象是通过在js代码里写入合约abi和合约地址的硬编码方式,每次变更合约都要重新修改为新的合约abi和合约地址,非常繁琐,不容易维护。
truffle提供了一个truffle-contract的抽象,对web3进行了封装,并且引入了promise的用法,方便与合约进行交互。合约编译的时候会在build/contracts目录下生成合约对应的json文件(重新编译部署会自动更新json文件),truffle-contract会利用这些信息生成合约对象,避免了硬编码方式。
两者对比
web3硬编码方式
var infoContract = web3.eth.contract(合约ABI);
var  Simple = infoContract.at('合约地址');
truffle-contract方式
TruffleContract('合约的json文件').deployed()
.then(function(instance) {

});
完整的js文件
App = {

    web3Provider: null,
    contracts: {},

    //初始化
    init: function(){
        return App.initweb3();
    },

    //初始化web3
    initweb3: function(){
        //获取web3对象
        if (typeof web3 !== 'undefined') {
            App.web3Provider = web3.currentProvider;
            web3 = new Web3(App.web3Provider);
        } else {
            // Set the provider you want from Web3.providers
            App.web3Provider = new Web3.providers.HttpProvider("http://localhost:8545");
            web3 = new Web3(App.web3Provider);
        }
        return App.initContract();
    },

    //初始化合约
    initContract: function(){
        //拿到Simple.json的内容,回调函数的参数data即为拿到的内容
        $.getJSON("Simple.json",function(data){
            //得到TruffleContract对象,并赋值给App.contracts.Simple
           App.contracts.Simple = TruffleContract(data);
           //设置Provider
           App.contracts.Simple.setProvider(App.web3Provider);
           //调用合约的get方法
           App.get();
           //事件监听,更新显示的内容
           App.watchChanged();
        });

        //调用事件
        App.bindEvents();
    },

    //合约的get方法
    get: function(){
        //deployed得到合约的实例,通过then的方式回调拿到实例
        App.contracts.Simple.deployed().then(function(instance){
            return instance.get.call();
        }).then(function(result){ //异步执行,get方法执行完后回调执行then方法,result为get方法的返回值
            $("#loader").hide();
            $("#info").html(`我叫` + result[0] + `, 我今年` + result[1] + `岁了。`);
        }).catch(function(err){ //get方法执行失败打印错误
            console.log(err);
        })
    },

    //事件,更新操作
    bindEvents: function(){
        $("#button").click(function(){
            $("#loader").show();
            App.contracts.Simple.deployed().then(function(instance){
                return instance.set.sendTransaction($("#name").val(),$("#age").val());
            }).then(function(result){
                    App.get(); //set方法执行完后调用get方法,获取最新值(可没有,通常使用事件监听的方式)
                }).catch(function(err){
                    console.log(err);
                });
            });
    },

    //事件监听
    watchChanged: function(){
        App.contracts.Simple.deployed().then(function(instance){
            var infoEvent = instance.Instructor();
            infoEvent.watch(function(err, result){
                $("#loader").hide();
                $("#info").html(`我叫` + result.args.name + `, 我今年` + result.args.age + `岁了。`);
            })
        });
    }
}

//加载应用
$(function(){
    $(window).load(function(){
        App.init();
    });
});
开启服务
原始方式如下
根目录下输入
node_modules/lite-server/bin/lite-server
弹出来的页面中定位到index.html文件,就可以看到应用了
localhost:3000/src/index.html
这种方式 index.js里
$.getJSON第一个参数路径为../build/contracts/Simple.json。上面index.js文件是配置bs-config.json后的写法,如果使用此方式需要修改路径。
但这种方式显然是太麻烦了。可以通过配置lite-server的baseDir来自动定位,通过配置服务脚本的方式来简化输入命令
配置bs-config.json
bs-config.json或bs-config.js为lite-server的配置文件
在项目根目录下创建bs-config.json,然后写入配置
{
    "server":
    {"baseDir": ["./src", "./build/contracts"] }
}
配置./src,直接localhost:3000 即可打开index.html
配置./build/contracts,index.js里$.getJSON第一个参数路径就可以省略,直接写Simple.json即可
修改package.json,加入脚本
"scripts": {
    "test": "echo \"Error: no test specified\" && exit 1",
    "dev": "lite-server"    //新加入的脚本
  },
在项目根目录下直接输入
npm run dev
即可打开项目(自动定位到src下)
交互
与应用交互
应用中在淡绿色区域为交互区域,修改姓名、年龄,点击更新按钮,会弹出MetaMask的对话框,显示的是交易的信息,点击确定,应用页面淡蓝色区域的姓名、年龄就会更新了。
与ganache节点交互
truffle console
通过上面指令进入控制台,可以运行web3.js的指令。web3.js指令具体查看:以太坊 web3.js 中文版文档
比如
truffle(development)> web3.eth.accounts
truffle(development)> web3.currentProvider //web3所链接的ethereum网络的相关信息
附最终的文件目录结构
|-- Dapp
    |-- build                       //编译合约后生成的json文件目录
        |-- contracts
            -- Migrations.json
            -- Simple.json
    |-- contracts                    //Solidity合约代码
        -- Migrations.sol            //此文件为必须
        -- Simple.sol               //合约文件
    |-- migrations                    //合约部署脚本
        -- 1_initial_migration.js    //用来部署Migrations.sol的
        -- 1544177454_simple.js     //合约迁移文件
    |-- test                        //测试文件目录
        -- TestSimple.sol
        -- Simple.js
    |-- node_modules                //npm模块,lite-server和truffle-contract在里面
    |-- src                         //资源文件目录
        -- index.html
        -- index.css
            |-- js
                -- index.js
                -- truffle-contract.min.js
    -- truffle-config.js            //windows下的truffle配置文件
    -- truffle.js                    //linux、mac下的truffle配置文件
    -- package.json             //npm init后的配置文件
    -- bs-config.json           //lite-server的配置文件

