spring security学习总结
代码:https://download.csdn.net/download/SICAUliuy/12277906
本博客是对学习《权限管理SpringSecurity(SpringBoot)》的记录
概述
- 是什么
基于spring AOP和servlet过滤器的安全框架,同时在Web请求级(url请求拦截)和方法调用级(controller层中的方法)处理身份确认和授权。
- 功能
认证
验证
安全防护
- 原理技术
filter
servelet
spring DI
spring AOP
初体验
- 依赖
<dependency>
 <groupId>org.springframework.bootgroupId>
 <artifactId>spring-boot-starter-securityartifactId>
 dependency>
 <dependency>
 <groupId>org.springframework.bootgroupId>
 <artifactId>spring-boot-starter-webartifactId>
 dependency>
- 示例类
@RestController // 等效 @Controller和@RequestBody
public class loginController {
 @GetMapping("/hello")
 public String hello() {
 return "hello, Spring Security";
 }
}
默认用户名为 user,密码在控制台输出
- 关闭security功能
在启动类中添加 exclude = SecurityAutoConfiguration.class
@SpringBootApplication(exclude = SecurityAutoConfiguration.class)
public class SpringSecurityApplication {
 public static void main(String[] args) {
 SpringApplication.run(SpringSecurityApplication.class, args);
 }
}
- 指定用户名和密码
在application.yml文件中配置
spring:
 security:
 user:
 name: liuyang
 password: 123456
基于内存的认证信息
- 步骤
需要重写WebSecurityConfigurerAdapter的configure(AuthenticationManagerBuilder auth)方法,通过auth对象的inMemoryAuthentication()方法指定认证信息
@Configuration // 表明这是一个配置类
@EnableWebSecurity // 开启spring security
public class WebSecurityConfig extends WebSecurityConfigurerAdapter {
 @Override
 protected void configure(AuthenticationManagerBuilder auth) throws Exception {
 auth.inMemoryAuthentication()
 .withUser("admin")
 .password(new BCryptPasswordEncoder().encode("123456"))
 .roles();
 // 使用自己封装的加密方式
 auth.inMemoryAuthentication()
 .withUser("user")
 .password(passwordEncoder().encode("123456"))
 .roles();
 }
 // 注入封装自己的加密方式
 @Bean
 public PasswordEncoder passwordEncoder() {
 return new BCryptPasswordEncoder();
 }
}
基于内存的角色授权
-
步骤
-
WebSecurityConfigurerAdapter继承类上添加 EnableGlobalMethodSecurity注解
-
通过auth对象的inMemoryAuthentication()方法指定角色信息roles(“xxx”)
-
使用 @PreAuthorize(“hasAnyRole(‘xxx’)”)注解配置访问角色
-
示例代码
WebSecurityConfig
@Configuration // 表明这是一个配置类
@EnableWebSecurity // 开启spring security
@EnableGlobalMethodSecurity(prePostEnabled = true) // 会拦截 @preAuthrize配置的角色
public class WebSecurityConfig extends WebSecurityConfigurerAdapter {
 @Override
 protected void configure(AuthenticationManagerBuilder auth) throws Exception {
 auth.inMemoryAuthentication()
 .withUser("admin")
 .password(new BCryptPasswordEncoder().encode("123456"))
 .roles("admin");
 // 使用自己封装的加密方式
 auth.inMemoryAuthentication()
 .withUser("user")
 .password(passwordEncoder().encode("123456"))
 .roles("user");
 }
 // 注入封装自己的加密方式
 @Bean
 public PasswordEncoder passwordEncoder() {
 return new BCryptPasswordEncoder();
 }
}
controller层
@GetMapping("/helloAdmin")
 @PreAuthorize("hasAnyRole('admin')")
 public String helloAdmin() {
 return "hello, Admin";
 }
 @GetMapping("/helloUser")
 @PreAuthorize("hasAnyRole('user','admin')")
 public String helloUser() {
 return "hello, user";
 }
基于内存数据库的身份认证和角色授权
- pom.xml依赖
  <dependency>
 <groupId>org.springframework.bootgroupId>
 <artifactId>spring-boot-starter-data-jpaartifactId>
 dependency>
 <dependency>
 <groupId>org.hsqldbgroupId>
 <artifactId>hsqldbartifactId>
 <scope>runtimescope>
 dependency>
hsqldb: (Hypersonic SQL)是纯Java开发的关系型数据库,并提供JDBC驱动存取数据。支持ANSI-92 标准 SQL语法。而且他占的空间很小。大约只有160K,拥有快速的数据库引擎。在spring boot 中引入依赖,可以不用安装数据库。
- UserInfo实体类
@Entity
public class UserInfo {
 // @Id @GeneratedValue
 private long uid; // 主键
 private String username;//用户名
 private String password;//密码
 @Enumerated(EnumType.STRING)
 private Role role;
 public enum Role{
 admin,normal
 }
 public long getUid() {
 return uid;
 }
 public void setUid(long uid) {
 this.uid = uid;
 }
 public String getUsername() {
 return username;
 }
 public void setUsername(String username) {
 this.username = username;
 }
 public String getPassword() {
 return password;
 }
 public void setPassword(String password) {
 this.password = password;
 }
 public Role getRoles() {
 return roles;
 }
 public void setRoles(Role roles) {
 this.roles = roles;
 }
}
- UserInfoRepository类
public interface UserInfoRepository extends JpaRepository<UserInfo,Long> {
 public UserInfo findByUsername(String username);
}
- UserInfoService接口类
public interface UserInfoService {
 public UserInfo findByUsername(String username);
}
- UserInfoServiceImpl 实现类
@Service
public class UserInfoServiceImpl implements UserInfoService {
 @Autowired
 private UserInfoRepository userInfoRepository;
 @Override
 public UserInfo findByUsername(String username) {
 return userInfoRepository.findByUsername(username);
 }
}
- UserDetailsService实现类
重写loadUserByUsername方法:
-
通过UserInfoService向数据库查找UserInfo
-
定义权限列表,并向权限列表添加该用户权限
-
新建一个user,并返回user.(系统提供的类,实现了UserDetails)
@Service
public class CustomUserDetailService implements UserDetailsService {
 @Autowired
 private UserInfoService userInfoService;
 @Autowired
 private PasswordEncoder passwordEncoder;
 @Override
 public UserDetails loadUserByUsername(String username) throws UsernameNotFoundException {
 System.out.println("CustomUserDetailService.loadUserByUsername:"+ username);
 // 根据用户名查找用户
 UserInfo userInfo = userInfoService.findByUsername(username);
 System.out.println(userInfo);
 if (userInfo == null) {
 throw new UsernameNotFoundException("没有发现该用户!");
 }
 // 定义权限列表
 List<GrantedAuthority> authorities = new ArrayList<>();
 // 将查询到的用户添加到权限列表
 authorities.add(new SimpleGrantedAuthority("ROLE_" + userInfo.getRole().name()));
 User user = new User(userInfo.getUsername(),userInfo.getPassword(),authorities);
 return user;
 }
}
- 数据初始化定义
通过UserInfoRepository添加2个权限用户,添加的用户存储在hsqldb数据库中
@Service
public class DataInit {
 @Autowired
 private UserInfoRepository userInfoRepository;
 @Autowired
 private PasswordEncoder passwordEncoder;
 /*@PostConstruct服务器加载Servle的时候运行,并且只会被服务器执行一次*/
 @PostConstruct
 public void dataInit() {
 UserInfo admin = new UserInfo();
 admin.setUsername("admin");
 admin.setPassword(passwordEncoder.encode("123"));
 admin.setRole(UserInfo.Role.admin);
 userInfoRepository.save(admin);
 UserInfo user = new UserInfo();
 user.setUsername("user");
 user.setPassword(passwordEncoder.encode("123"));
 user.setRole(UserInfo.Role.normal);
 userInfoRepository.save(user);
 }
}
基于MySQL数据库
在内存数据的基础上,进行一下两部操作
-
pom.xml添加依赖
-
application.yml进行数据库配置
spring:
 datasource:
 url: jdbc:mysql://localhost:3306/mydb?useUnicode=true&characterEncoding=utf-8&serverTimezone=GMT%2B8
 username: root
 password: 123456
 driver-class-name: com.mysql.cj.jdbc.Driver
 jpa:
 database: mysql
 show-sql: true
 hibernate:
 ddl-auto: update
spring.jpa.hibernate.ddl-auto属性:
create 启动时删数据库中的表,然后创建,退出时不删除数据表
create-drop 启动时删数据库中的表,然后创建,退出时删除数据表 如果表不存在报错 update 如果启动时表格式不一致则更新表,原有数据保留
validate 项目启动表结构进行校验 如果不一致则报错
退出和自定义登录
- 登录配置
http.
.formLogin()
.loginPage(”/login_page”) // 登录页面地址
.loginProcessingUrl(”/login”) // 前后端分离登录请求连接
.usernameParameter(”name”)
.passwordParameter(”passwd”)
- 退出
spring security默认的退出连接为 /logout
动态加载角色
- 在websecurityconfig中配置configure(HttpSecurity http)
http
.formLogin()
 .loginPage(”/login_page”) // 登录页面地址
 .and()
 .authorizeRequests()
 .antMatchers("/login").permitAll() // 允许所有人可以访问登录页面
 .anyRequest().authenticated() // 所有的请求需要在登录之后才能访问
这里需要注意:登录页请求需要先于其他请求配置,这种允许个别连接访问的情况称为白名单。
- 角色表与用户表关系配置
在jpa中配置多对多:用户表中配置
@Entity
public class UserInfo {
 // @Id @GeneratedValue
 private long uid; // 主键
 private String username;//用户名
 private String password;//密码
 // 用户 -- 角色: 多对多的关系
 @ManyToMany(fetch = FetchType.EAGER) // 立即从数据库中进行加载数据
// joinColumns UserInfo数据表对应的表名对应的主键;inverseJoinColumns数据库对应的表名对应的主键
 @JoinTable(name="UserRole", joinColumns = { @JoinColumn(name = "uid")}, inverseJoinColumns = { @JoinColumn(name = "role_id")})
 private List<Role> roles;
 public long getUid() {
 return uid;
 }
 public void setUid(long uid) {
 this.uid = uid;
 }
 public String getUsername() {
 return username;
 }
 public void setUsername(String username) {
 this.username = username;
 }
 public String getPassword() {
 return password;
 }
 public void setPassword(String password) {
 this.password = password;
 }
 public List<Role> getRoles() {
 return roles;
 }
 public void setRoles(List<Role> roles) {
 this.roles = roles;
 }
}
Filter
对web资源进行保护,最好使用Filter;对方法调用进行保护,最好用AOP,spring对web资源的保护,就是靠Filter实现的。
Spring Security提供的Filter不少,有十多个,过滤器顺序从上到下:
-
ChannelProcessingFilter (访问协议控制过滤器)如果你访问的channel错了,那首先就会在channel之间进行跳转,如http变为https。
-
SecurityContextPersistenceFilter ( SecurityContext持久化过滤器)用来创建一个SecurityContext并存储在SecurityContextHolder中,因为后续filter需要用
SecurityContext存储的认证相关信息,所以需要在请求一开始就要把这些信息设置好 ,这样也能使在认证过程中对SecurityContext的任何修改都可以保存下来,并在请求结束后存储在HttpSession中(以在下次请求时使用) -
ConcurrentSessionFilter (并发访问控制过滤器)主要是判断session是否过期以及更新最新访问时间。
-
HeaderWriterFilter (请求头部写入过滤器)往该请求的Header中添加相应的信息
-
CsrfFilter ( CSRF过滤器)为了防止跨站提交攻击。
-
LogoutFilter (退出过滤器)退出当前登录的账号。
-
X509AuthenticationFilter ( X509认证过滤器)基于X509证书的认证过滤器。
-
AbstractPreAuthenticatedProcessingFilter处理form登陆的过滤器,与form登陆有关的所有操作都是在此进行的。这个请求应该是用户使用form登陆后的提交地址
-
CasAuthenticationFilter ( CAS认证过滤器)基于CAS的认证过滤器。
-
UsernamePasswordAuthenticationFilter (用户名密码认证过滤器)基于用户名和密码的认证过滤器。
-
BasicAuthenticationFilter ( basic认证过滤器)此过滤器用于进行basic验证,功能与AuthenticationProcessingFilter类似,只是Basic验证方式相比较而言用的不是太多,默认会对密码进行base64加密
-
SecurityContextHolderAwareRequestFilter此过滤器用来包装客户的请求。通过查看其源码可以发现其doFilter方法中会创建一个包装类SecurityContextHolderAwareRequestWrapper 对ServletRequest对象进行包装,主要实现了servlet api的一些接口方法isUserInRole、getRemoteUser,为后续程序提供一些额外的数据。即可以从request对象中获取到用户信息
-
JaasApiIntegrationFilter如果SecurityContextHolder中拥有的Authentication是一个JaasAuthenticationToken ,那么该Filter将使用包含在JaasAuthenticationToken中的Subject继续执行FilterChain。
-
RememberMeAuthenticationFilter (记住我认证过滤器)当用户没有登录而直接访问资源时,从cookie里找出用户的信息, 如果Spring Security能够识别出用户提供的remembermecookie, 用户将不必填写用户名和密码,而是直接登录进入系统.它先分析SecurityContext里有没有Authentication对象.如果有,则不做任何操作,直接跳到下一个过滤器.如果没有,则检查request里有没有包含remember- me的cookie信息.如果有,则解析出cookie里的验证信息,判断是否有权限。
-
AnonymousAuthenticationFilter (匿名认证过滤器)用于支持Spring Security的匿名访问, 适用于-些公共资源希望所有人都可以看到。对于匿名访问的用户, Spring Security支持为其建立一个匿名的AnonymousAuthenticationToken存放在SecurityContextHolder中,这就是所谓的匿名认证。这样在以后进行权限认证或者做其它操作时我们就不需要再判断SecurityContextHolder中持有的Authentication对象是否为null了,而直接把它当做-个正常的Authentication进行使用就0K了。
-
SessionManagementFilter根据认证的安全实体信息跟踪session ,保证所有关联一个安全实体的session都能被跟踪到。
-
ExceptionTranslationFilter解决在处理一个请求时产生的指定异常。
-
FilterSecurityInterceptor简化授权和访问控制决定,委托一个AccessDecisionManager完成授权的判断。
-
SwitchUserFilterSwitchUserFilter是用来做账户切换的
认证管理器和决策管理器Spring Security提供了多个Provider的实现类, 如果我们想用
数据库来储存用户的认证数据,那么我们就选择DaoAuthenticationProvider。对于Voter,我们一般选择RoleVoter就够用了,它会根据我们配置文件中的设置来决定是否允许某–个用户访问制定的Web资源。而DaoAuthenticationProvider也是不直接操作数据库的,它把
任务委托给了UserDetailService,如下图:
自定义filter
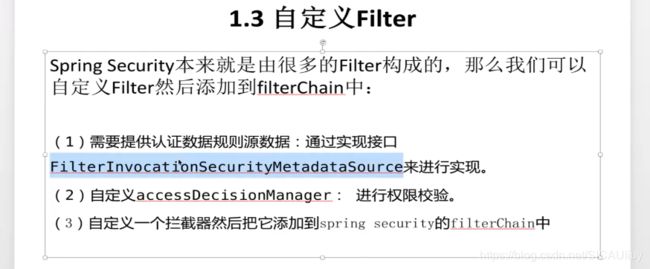
怎么在Spring Security中的Filter指定位置加入自定义的Filter呐? SpringSecurity的HttpSecurity为此提供了三个常用方法
来配置:
-
addFilterBefore(Filter filter, Class beforeFilter)
在beforeFilter之前添加filter -
addFilterAfter(Filter filter, Class afterFilter)
在afterFilter之后添加filter -
addFilterAt(Filter filter, Class atFilter)
在atFilter相同位置添加filter ,此filter不覆盖filter
案例:
BeforeFilter
public class BeforeLoginFilter extends GenericFilterBean {
 @Override
 public void doFilter(ServletRequest servletRequest, ServletResponse servletResponse, FilterChain filterChain) throws IOException, ServletException {
 System.out.println("this is beforeLoginFilter");
 filterChain.doFilter(servletRequest,servletResponse);
 }
}
AtFilter
public class AtLoginFilter extends GenericFilterBean {
 @Override
 public void doFilter(ServletRequest servletRequest, ServletResponse servletResponse, FilterChain filterChain) throws IOException, ServletException {
 System.out.println("this is AtLoginFilter");
 filterChain.doFilter(servletRequest,servletResponse);
 }
}
AfterFilter
public class AfterLoginFilter extends GenericFilterBean {
 @Override
 public void doFilter(ServletRequest servletRequest, ServletResponse servletResponse, FilterChain filterChain) throws IOException, ServletException {
 System.out.println("this is AfterLoginFilter");
 filterChain.doFilter(servletRequest,servletResponse);
 }
}
在configure(HttpSecurity http)配置
添加filter调用方法的第二个参数是参照位置过滤器,这里添加在登录请求发起时。
http.addFilterBefore(new BeforeLoginFilter(),UsernamePasswordAuthenticationFilter.class);
http.addFilterBefore(new AtLoginFilter(),UsernamePasswordAuthenticationFilter.class);
http.addFilterBefore(new AfterLoginFilter(),UsernamePasswordAuthenticationFilter.class);
动态权限的集中方案
-
使用@PreAuthorize硬编码
-
access()的SpEL表达式
.antMatchers("/xxx/xx").access("hasRole('USER') and hasIpAddress('211.143.161.130')")
扩展SpEL表达式
.anyRequest().access("@authService.canAccess(request,authentication)")
其中authService是一个类,canAccess是其中的方法:
@Service
public class AuthService {
 @Autowired
 private PermissionService permissionService;
 public boolean canAccess(HttpServletRequest request, Authentication authentication) {
 System.out.println("canAccess(1)");
 boolean b =false;
 Object principal = authentication.getPrincipal();
 /**
 * 1/未登录的情况下,需要做一个判断或者拦截
 */
 if (principal == null || "anonymousUser".equals(principal)) {
 return b;
 }
 System.out.println("canAccess(2)");
 /**
 * 2/ 匿名的角色 ROLE_ANONYMOUS
 * 这里不涉及
 */
 if(authentication instanceof AnonymousAuthenticationToken){
 // 匿名角色
 // check
 // return
 }
 /**
 * 3/ 通过request对象的url() 获取到权限信息
 */
 Map<String, Collection<ConfigAttribute>> map = permissionService.getPermissionMap();
 /**
 * /hello/helloUser 与 /hello/**无法通过下面的方法进行比较
 */
// Collection collection = map.get(request.getRequestURI());
 // AntPathRequestMatcher
 Collection<ConfigAttribute> configAttributes = null;
 for(Iterator<String> it = map.keySet().iterator();it.hasNext();) {
 String curUrl = it.next();
 AntPathRequestMatcher matcher = new AntPathRequestMatcher(curUrl);
 if (matcher.matches(request)){
 configAttributes = map.get(curUrl);
 break;
 }
 }
 if(configAttributes == null || configAttributes.size() == 0) {
 return b;
 }
 System.out.println("canAccess(3)");
 /**
 * 4/将获取的权限信息和当前的登录账号的权限信息进行对比
 */
 for(Iterator<ConfigAttribute> it = configAttributes.iterator();it.hasNext();) {
 ConfigAttribute cfa = it.next();
 String role = cfa.getAttribute(); // ROLE_admin | ROLE_normal
 for (GrantedAuthority authority : authentication.getAuthorities()){
 if (role.equals(authority.getAuthority())) {
 b = true;
 break;
 }
 }
 }
 return b;
 }
}
该类的方法通过获取权限信息和当前用户的权限信息进行比对,如果返回true则可以访问。
其中用到的对应类:
权限实体类
@Entity
public class Permission {
 @Id
 @GeneratedValue
 private long id;
 private String name; // 权限名
 private String description;// 描述
 private String url; // 地址
 private long pid;// 父id
 @ManyToMany(fetch = FetchType.EAGER)
 @JoinTable(name = "role_permission",joinColumns= {@JoinColumn(name="permission_id")},
 inverseJoinColumns = {@JoinColumn(name = "role_id")})
 private List<Role> roles;
 public long getId() {
 return id;
 }
 public void setId(long id) {
 this.id = id;
 }
 public String getName() {
 return name;
 }
 public void setName(String name) {
 this.name = name;
 }
 public String getDescription() {
 return description;
 }
 public void setDescription(String description) {
 this.description = description;
 }
 public String getUrl() {
 return url;
 }
 public void setUrl(String url) {
 this.url = url;
 }
 public long getPid() {
 return pid;
 }
 public void setPid(long pid) {
 this.pid = pid;
 }
 public List<Role> getRoles() {
 return roles;
 }
 public void setRoles(List<Role> roles) {
 this.roles = roles;
 }
}
权限业务实现类
@Service
public class PermissionServiceImpl implements PermissionService {
 @Autowired
 private PermissionRepository permissionRepository;
 private Map<String, Collection<ConfigAttribute>> permissionMap = null;
 @PostConstruct
 public void initPermission() {
 // 从数据库中获取所有权限信息,然后遍历,存储到permissionmMap集合中
 permissionMap = new HashMap<>();
 List<Permission> permissions = permissionRepository.findAll();
 for (Permission p : permissions) {
 Collection<ConfigAttribute> collection = new ArrayList<>();
 for (Role role : p.getRoles()) {
 ConfigAttribute configAttribute = new SecurityConfig("ROLE_"+role.getName());
 collection.add(configAttribute);
 }
 permissionMap.put(p.getUrl(),collection);
 }
 System.out.println(permissionMap);
 }
 // 获取权限map
 @Override
 public Map<String, Collection<ConfigAttribute>> getPermissionMap() {
 if(permissionMap == null || permissionMap.size() == 0) {
 initPermission();
 }
 System.out.println(permissionMap);
 return permissionMap;
 }
}
标签sec:authorize的使用
- 步骤1:依赖
<dependency>
 <groupId>org.thymeleaf.extrasgroupId>
 <artifactId>thymeleaf-extras-springsecurity5artifactId>
 dependency>
- html中添加命名空间,并使用
<!DOCTYPE html>
<html xmlns:="http://www.w3.org/1999/xhtml"
 xmlns:th="http://www.thymeleaf.org"
 xmlns:sec="http://www.thymeleaf.org/thymeleaf-extras-springsecurity5">
<head>
 <meta charset="UTF-8">
 <title>Spring Security 入门</title>
</head>
<body>
 <h1>欢迎使用Spring Security! <label th:text="${name}"></label></h1>
 <p sec:authorize="hasRole('admin')"><a th:href="@{/helloAdmin}">admin page</a></p>
 <p sec:authorize="hasAnyRole('admin','normal')"><a th:href="@{/helloUser}">user page</a></p>
 <form th:action="@{/login}" method="post">
 <input type="submit" value="退出登录">
 </form>
</body>
</html>
页面获取用户信息
设置最大session数
在WebSecurityConfigurerAdapter类中设置
.sessionManagement().maximumSessions(1)
登录数超过1,会将之前的登录挤掉
@Secured和@PostAuthorize用法
- @Secured
开启注解:在WebSecurityConfigurerAdapter集成类上添加
@EnableGlobalMethodSecurity(securedEnabled = true)
在方法中使用
 @GetMapping("/helloUser")
 @ResponseBody
 //@PreAuthorize("hasAnyRole('normal','admin')")
 @Secured({"ROLE_admin","ROLE_normal"})// 需要在前面加上ROLE_
 public String helloUser() {
 return "hello, user";
 }
- @PostAuthorize
在方法执行后再进行权限验证,适合验证带有返回值的权限,Spring EL提供返回对象能够在表达式语言中获取返回的对象returnObject
开启注解:在WebSecurityConfigurerAdapter集成类上添加
@EnableGlobalMethodSecurity(prePostEnabled= true)
在方法中使用
@GetMapping("/helloUser")
 @ResponseBody
 @PostAuthorize("returnObject !=null && returnObject.username == authentication.name")
 public User helloUser() {
 Object principle = SecurityContextHolder.getContext().getAuthentication().getPrincipal();
 User user;
 if("anonymousUser".equals(principle)) {
 user = null;
 }else {
 user = (User) principle;
 }
 return user;
 }
加密
自定义加密方式
这里以MD5加密方式为例
MD5加密工具类
/**
 * MD5加密工具
 */
public class MD5Util {
// 自定义盐
 private static final String SALT = "liuyang";
 public static String encode(String password) {
 password = password + SALT;
 MessageDigest md5 = null;
 try {
 md5 = MessageDigest.getInstance("MD5");
 } catch (NoSuchAlgorithmException e) {
 throw new RuntimeException(e);
 }
 char[] charArray = password.toCharArray();
 byte[] byteArray = new byte[charArray.length];
 for (int i = 0; i < charArray.length; i++) {
 byteArray[i] = (byte) charArray[i];
 }
 byte[] md5Bytes = md5.digest(byteArray);
 StringBuffer hexValue = new StringBuffer();
 for (int i = 0; i < md5Bytes.length; i++) {
 int val = (int)md5Bytes[i] & 0xff;
 if(val < 16) {
 hexValue.append("0");
 }
 hexValue.append(Integer.toHexString(val));
 }
 return hexValue.toString();
 }
}
自定义实现PasswordEncoder接口的密码编辑器
public class MD5PasswordEncoder implements PasswordEncoder {
 // 加密
 @Override
 public String encode(CharSequence charSequence) {
 return MD5Util.encode((String) charSequence);
 }
 // 匹配
 @Override
 public boolean matches(CharSequence charSequence, String s) {
 return s.equals(MD5Util.encode((String) charSequence));
 }
}
在WebSecurityConfigurerAdapter配置类中设置加密方式
// 注入封装自己的加密方式
 @Bean
 public PasswordEncoder passwordEncoder() {
// return new BCryptPasswordEncoder();
 return new MD5PasswordEncoder();
 }
使用工厂模式设置加密方式
将密码编码之后的hash值和加密方式一起存储,并提供一个DelegatingPasswordEncoder来作为众多密码编码方式的集合
- 简单方式:在WebSecurityConfigurerAdapter设置
// 注入封装自己的加密方式
 @Bean
 public PasswordEncoder passwordEncoder() {
 return PasswordEncoderFactories.createDelegatingPasswordEncoder();
 }
createDelegatingPasswordEncoder() 方法
public static PasswordEncoder createDelegatingPasswordEncoder() {
 String encodingId = "bcrypt";
 Map<String, PasswordEncoder> encoders = new HashMap();
 encoders.put(encodingId, new BCryptPasswordEncoder());
 encoders.put("ldap", new LdapShaPasswordEncoder());
 encoders.put("MD4", new Md4PasswordEncoder());
 encoders.put("MD5", new MessageDigestPasswordEncoder("MD5"));
 encoders.put("noop", NoOpPasswordEncoder.getInstance());
 encoders.put("pbkdf2", new Pbkdf2PasswordEncoder());
 encoders.put("scrypt", new SCryptPasswordEncoder());
 encoders.put("SHA-1", new MessageDigestPasswordEncoder("SHA-1"));
 encoders.put("SHA-256", new MessageDigestPasswordEncoder("SHA-256"));
 encoders.put("sha256", new StandardPasswordEncoder());
 encoders.put("argon2", new Argon2PasswordEncoder());
 return new DelegatingPasswordEncoder(encodingId, encoders);
 }
密码格式:
- 进阶:将自己的加密方式添加到工厂模式中,并将其设置为默认加密方式
public class MyPasswordEncoderFactories {
 public static PasswordEncoder createDelegatingPasswordEncoder() {
 String encodingId = "myMD5";
 Map<String, PasswordEncoder> encoders = new HashMap();
 //encoders.put(encodingId, new BCryptPasswordEncoder());
 encoders.put("ldap", new LdapShaPasswordEncoder());
 encoders.put("MD4", new Md4PasswordEncoder());
 encoders.put("MD5", new MessageDigestPasswordEncoder("MD5"));
 encoders.put("noop", NoOpPasswordEncoder.getInstance());
 encoders.put("pbkdf2", new Pbkdf2PasswordEncoder());
 encoders.put("scrypt", new SCryptPasswordEncoder());
 encoders.put("SHA-1", new MessageDigestPasswordEncoder("SHA-1"));
 encoders.put("SHA-256", new MessageDigestPasswordEncoder("SHA-256"));
 encoders.put("sha256", new StandardPasswordEncoder());
 encoders.put("argon2", new Argon2PasswordEncoder());
// 将自己密码方式添加进来
 encoders.put(encodingId, new MD5PasswordEncoder());
 return new DelegatingPasswordEncoder(encodingId, encoders);
 }
 private MyPasswordEncoderFactories() {
 }
}
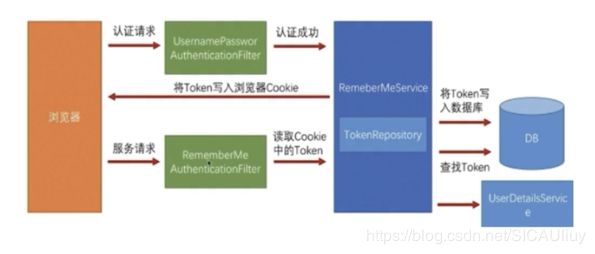
Remember-Me
- 原理
通常是通过服务端发送一个cookie给客户端浏览器,下次浏览器再访问服务端时服务端能够自动检测客户端的cookie ,根据cookie值触发自动登录操作。对于Spring Security的cookie的默认名称是: remember-me
举例说明:
remember-me : YWRtaW46MTU1NTAOMTYyNTIxOToyYzdkNDIwMWUzNmRmODc5MmMzNDYOMjJmNTdiGJmMA
基于简单加密token方法
用户选择了记住我成功登陆后,spring security将会生成一个cookie发送给客户端浏览器,cookie值由如下方式组成:
base64(username+":"+expirationTime+":"+md5Hex(username+":"+expirationTime+":"+password+":"+key))
expirationTime:失效时间,以毫秒为单位
key:用来防止修改
- 需要一个rememberMeService方法:使用spring security提供的TokenBaseRememberMeService进行配置@Autowired
private String rememberMeKey = "liuyang20120";
@Autowired
private CustomUserDetailService customUserDetailService;
@Bean
 public RememberMeServices rememberMeServices() {
 TokenBasedRememberMeServices rememberMeServices = new TokenBasedRememberMeServices(
 rememberMeKey, customUserDetailService
 );
 // 过期时间设置,单位秒;默认为2周
 // rememberMeServices.setTokenValiditySeconds(60);
 // checkbox 的name,默认:rember-me
 //rememberMeServices.setParameter("remember-me");
 return rememberMeServices;
 }
- 在WebSecurityConfigurerAdapter实现类中,进行配置
.and().rememberMe().key(rememberMeKey).rememberMeServices(rememberMeServices());
- 登陆页面修改
 <div>
 <label>记住我:<input type="checkbox" name="remember-me"/>label>
 div>
- 效果
基于持久化token的方法
通过数据库或其他持久化存储机制的保存生成token,会保存用户的基本信息:username、series、token、last_used_

注意几点:
(1)如何开启持久化token方式:可以使用and().rememberMe()进行开启记住我,然后指定tokenRepository(),即指定token持久方式
(2) tokenRepository怎么实现:这里我们可以使用Spring Security提供的JdbcTokenRepositoryImpl即可,这里只需要配置一个数据源即可.
(3)持久化token的数据保存在哪里:这里的数据是保存在persistent_ logins表中。
(4)persistent__logins表生成方式:有两种方式可以生成,第-种就是手动方式,根据表结构自己创建表;第种方式就是使用JdbcTokenRepositoryImpl配置为自动创建,这种方式虽然会自动生成,但是存在的一个小问题就是第二次运行程序的就会保存了,因为persistent__logins已经存在了。使用方式就是第一次执行的时候,打开配置,生成表之后,注释掉配置。
代码方式:
- 实现tokenRepository方法
@Autowired
 private CustomUserDetailService customUserDetailService;
 @Autowired
 private DataSource dataSource;
@Bean
 public PersistentTokenRepository tokenRepository() {
 JdbcTokenRepositoryImpl jdbcTokenRepository = new JdbcTokenRepositoryImpl();
 jdbcTokenRepository.setDataSource(dataSource);
 // 自动创建表
 jdbcTokenRepository.setCreateTableOnStartup(true);
 return jdbcTokenRepository;
 }
- 配置
.and().rememberMe().tokenRepository(tokenRepository()).tokenValiditySeconds(60).userDetailsService(customUserDetailService);
- 前端设置同上
生成表
零散记录
- csrf
csrf就是诱导已登录过的用户在不知情的情况下,使用自己的登录凭据来完成一些不可告人之事。比如利用img标签或者script标签的src属性自动访问一些敏感api,或者是伪造一个form标签,action写的是一些敏感api,通过js自动提交表单等。
在spring security中默认是开启的,需要关闭
- 允许访问文件
http.antMatchers("/res/**/.{js,html}").permitAll() // 允许访问/res下的js和html文件
- 在controller层获取当前登录用户对象
Object principal = SecurityContextHolder.getContext().getAuthentication().getPrincipal();
注意: 未登陆情况下,返回的是一个字符串:anonymousUser;登陆情况下,返回的是在loadUserByUsername 方法中返回的User对象
- SpEL(Spring Expression Language),即Spring表达式语言,是比JSP的EL更强大的一种表达式语言。
注解积累
@PostConstruct : 程序初始化时加载对应方法


