再谈原型链,深刻理解原型及原型链(案例分析,详细图解,一目了然)
一、前言:这个案例稍微有些难度,需要掌握基本的原型、原型链、构造函数、继承等相关知识,如若还没有掌握,不妨看看我的这篇博客,详细介绍了这些知识及关系:http://blog.csdn.net/spicyboiledfish/article/details/71123162
二、首先看看这个案例,源代码附上:
function Person(name,age){
      this.name=name;
      this.age=age;
}
Person.prototype.hi=function(){
      console.log("Hi,my name is"+this.name+",I'm"+this.age+"years old now.");
};
Person.prototype.LEGS_NUM=2;
Person.prototype.ARMS_NUM=2;
Person.prototype.walk= function () {
      console.log(this.name+"is walking...");
};

function Student(name,age,className){
      Person.call(this,name,age);
      this.className=className;
}
Student.prototype=Object.create(Person.prototype);
Student.prototype.constructor=Student;

Student.prototype.hi=function(){
      console.log("Hi,my name is "+this.name+" ,I'm "+ this.age+" years old now,and from "+this.className+".");
};

Student.prototype.learn=function(subject){
     console.log(this.name+"is learning "+subject+" at "+this.className+".");
};

//test
var bosn=new Student("Bosn",27,"Class 3,Grade 2");
bosn.hi();               //Hi,my name is Bosn,I'm 27 years old now,and from Class 3,Grade 2.
bosn.LEGS_NUM;            //2
bosn.walk();             //Bosnis walking...
bosn.learn("math");      //Bosnis learning math at Class 3,Grade 2.
三、由以上代码,可以轻松在控制台打印出相应的结果。
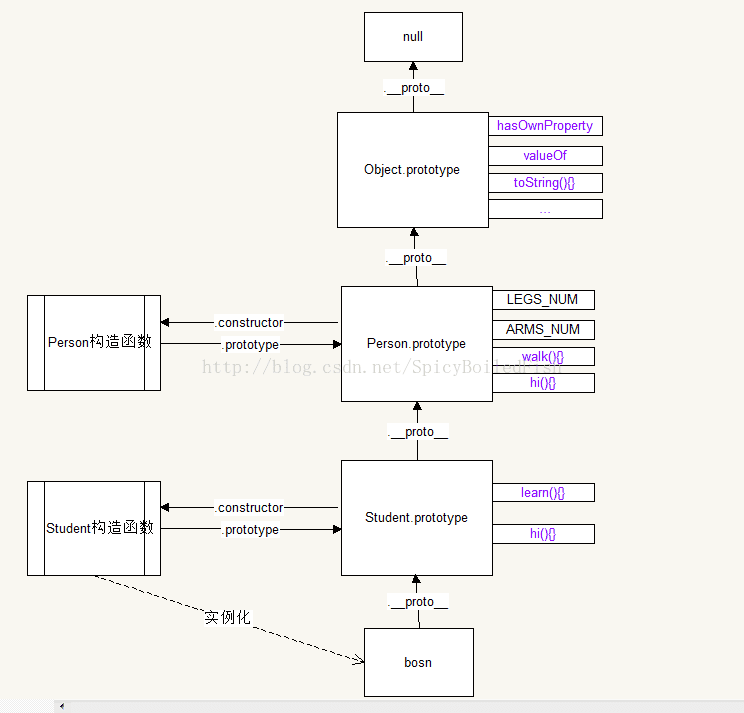
有个难点:Student.prototype=Object.create(Person.prototype);是将Student.prototype的原型继承指向Person.prototype;为什么不使用Student.prototype=Person.prototype呢?因为Student.prototype会有自己独有的方法,譬如learn(){},如果改成这句代码,那么添加或修改Student.prototype的属性方法后,Person.prototype的属性和方法也会跟着被修改了,因为这两者已经指向了同一个对象。
如下:即为以上代码所体现出的完整的原型链结构图,尽情观赏:
四、如果修改Student.prototype属性方法,结果又如何呢?上源码并附上详细图解:
Student.prototype.x=101;
console.log(bosn.x);       //101
Student.prototype={y:2};
console.log(bosn.y);       //undefined
console.log(bosn.x);       //101

var nunnly=new Student("Nunnly",3,"Class LOL KengB");
console.log(nunnly.x);     //undefined
console.log(nunnly.y);     //2
解释:
1.Student.prototype.x=101;意思为Student.prototype添加一个属性x为101,所以访问bosn.x=101;
2.Student.prototype={y:2};意思是替换对象属性,系统会重新开辟一块空间放一个对象{y:2},且指针的指向也变化了,Student.prototype就指向了新的对象{y:2};
3.访问bosn.y;首先在bosn对象本身寻找,没有,去bosn的原型找,发现也没有,这时候只能返回undefined;访问bosn.x仍然返回时101;
4.重新创建一个对象nunnly,那么这个实例划对象的原型是指向新的原型对象的{y:2};
5.访问nunnly.x未找到,返回undefined;访问nunnly.y返回2;
五、Github源码:https://github.com/spicyboiledfish/JavaScript-testJS
