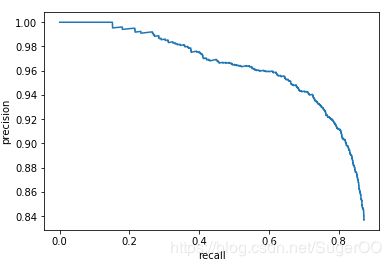
FPN YOLOv3 Faster R-CNN PR 曲线 Precision-Recall 曲线 绘制
本文所使用的代码库:
FPN:https://github.com/DetectionTeamUCAS/FPN_Tensorflow
YOLOv3:https://github.com/ultralytics/yolov3
Faster R-CNN:https://github.com/jwyang/faster-rcnn.pytorch
之前研究了半天,解决之后才发现很简单。。。
方法:
其实大部分代码的作者已经实现了这部分内容,只要找到具体位置就可以了。
如果你用的不是这三个版本的代码,或者你所用的版本没有直接实现绘制 pr 曲线的代码也没关系,只要代码中可以输出模型最终的 ap 值,那么也能绘制出 pr 曲线。
因为计算 ap 值需要用到所有检测框的 precision 和 recall,而这两个变量也是绘制 pr 曲线所需的数据,所以只要你在代码中找到这两个变量的位置就可以绘制出 pr 曲线了。
precision 和 recall 这两个变量应该还是蛮好找的,一般会出现在 eval.py 或 test.py 之类的文件中。可以使用编辑器的全局查找功能,找到这两个变量。
需要注意的是,有些作者会使用这两个单词的简写,比如:prec,rec 等,或者搜索 ap ,mean ap 之类的关键词也可以。
下面就是本文用到的三个代码库中 绘制 PR(precision-recall) 曲线的具体位置:
FPN
FPN:https://github.com/DetectionTeamUCAS/FPN_Tensorflow
在 voc_val.py 文件下,找到这个函数,把注释部分取消掉就好了。
运行 eval.py 文件会调用 voc_eval.py 中的这个函数,这样就可以得到 PR(precision-recall) 曲线图。
def do_python_eval(test_imgid_list, test_annotation_path):
  AP_list = []
  # import matplotlib.pyplot as plt
  # import matplotlib.colors as colors
  # color_list = colors.cnames.keys()[::6]

  for cls, index in NAME_LABEL_MAP.items():
    if cls == 'back_ground':
      continue
    recall, precision, AP = voc_eval(detpath=os.path.join(cfgs.EVALUATE_DIR, cfgs.VERSION),
                                     test_imgid_list=test_imgid_list,
                                     cls_name=cls,
                                     annopath=test_annotation_path)
    AP_list += [AP]
    print("cls : {}|| Recall: {} || Precison: {}|| AP: {}".format(cls, recall[-1], precision[-1], AP))
    # plt.plot(recall, precision, label=cls, color=color_list[index])
    # plt.legend(loc='upper right')
    print(10*"__")
  # plt.show()
  # plt.savefig(cfgs.VERSION+'.jpg')
  print("mAP is : {}".format(np.mean(AP_list)))
YOLOv3
YOLOv3:https://github.com/ultralytics/yolov3
在 util.py 文件中 找到下面的 ap_per_class 函数,取消注释部分。
运行 test.py 文件,其中有语句会调用 ap_per_class 函数,完成 PR(precision-recall) 曲线绘制。
def ap_per_class(tp, conf, pred_cls, target_cls):
    """ Compute the average precision, given the recall and precision curves.
    Source: https://github.com/rafaelpadilla/Object-Detection-Metrics.
    # Arguments
        tp:    True positives (list).
        conf:  Objectness value from 0-1 (list).
        pred_cls: Predicted object classes (list).
        target_cls: True object classes (list).
    # Returns
        The average precision as computed in py-faster-rcnn.
    """

    # Sort by objectness
    i = np.argsort(-conf)
    tp, conf, pred_cls = tp[i], conf[i], pred_cls[i]

    # Find unique classes
    unique_classes = np.unique(target_cls)

    # Create Precision-Recall curve and compute AP for each class
    ap, p, r = [], [], []
    for c in unique_classes:
        i = pred_cls == c
        n_gt = (target_cls == c).sum()  # Number of ground truth objects
        n_p = i.sum()  # Number of predicted objects

        if n_p == 0 and n_gt == 0:
            continue
        elif n_p == 0 or n_gt == 0:
            ap.append(0)
            r.append(0)
            p.append(0)
        else:
            # Accumulate FPs and TPs
            fpc = (1 - tp[i]).cumsum()
            tpc = (tp[i]).cumsum()

            # Recall
            recall = tpc / (n_gt + 1e-16)  # recall curve
            r.append(recall[-1])

            # Precision
            precision = tpc / (tpc + fpc)  # precision curve
            p.append(precision[-1])

            # AP from recall-precision curve
            ap.append(compute_ap(recall, precision))

            # 这里绘制pr曲线
            # Plot
            # fig, ax = plt.subplots(1, 1, figsize=(4, 4))
            # ax.plot(np.concatenate(([0.], recall)), np.concatenate(([0.], precision)))
            # ax.set_xlabel('YOLOv3-SPP')
            # ax.set_xlabel('Recall')
            # ax.set_ylabel('Precision')
            # ax.set_xlim(0, 1)
            # fig.tight_layout()
            # fig.savefig('PR_curve.png', dpi=300)

    # Compute F1 score (harmonic mean of precision and recall)
    p, r, ap = np.array(p), np.array(r), np.array(ap)
    f1 = 2 * p * r / (p + r + 1e-16)

    return p, r, ap, f1, unique_classes.astype('int32')
Faster R-CNN
Faster R-CNN:https://github.com/jwyang/faster-rcnn.pytorch
这一版的作者没有直接实现绘制 PR(precision-recall) 曲线的代码,但有代码将绘制PR(precision-recall) 曲线的数据保存下来,可以利用保存下来的数据绘制PR(precision-recall) 曲线。
保存数据的代码在 pascal_voc.py 文件夹下的 _do_python_eval 函数中,不建议在这里直接加入绘制 PR(precision-recall) 曲线 的代码,使用保存下来的数据绘制要更稳妥一些。后面会介绍绘制的方法。
我这里保存数据的路径是:
output\res101\voc_2007_test\faster_rcnn_10*.pkl
或
output\res101\voc_2007_test\faster_rcnn_10*_pr.pkl
pkl文件就是保存数据的文件,每个类别有单独的 pkl 文件,除此之外还有一个总的检测结果文件。
    def _do_python_eval(self, output_dir='output'):
        annopath = os.path.join(
            self._devkit_path,
            'VOC' + self._year,
            'Annotations',
            '{:s}.xml')
        imagesetfile = os.path.join(
            self._devkit_path,
            'VOC' + self._year,
            'ImageSets',
            'Main',
            self._image_set + '.txt')
        cachedir = os.path.join(self._devkit_path, 'annotations_cache')
        aps = []
        # The PASCAL VOC metric changed in 2010
        use_07_metric = True if int(self._year) < 2010 else False
        print('VOC07 metric? ' + ('Yes' if use_07_metric else 'No'))
        if not os.path.isdir(output_dir):
            os.mkdir(output_dir)
        for i, cls in enumerate(self._classes):
            if cls == '__background__':
                continue
            filename = self._get_voc_results_file_template().format(cls)
            rec, prec, ap = voc_eval(
                filename, annopath, imagesetfile, cls, cachedir, ovthresh=0.5,
                use_07_metric=use_07_metric)
            aps += [ap]
            print('AP for {} = {:.4f}'.format(cls, ap))
            # 这里保存数据
            with open(os.path.join(output_dir, cls + '_pr.pkl'), 'wb') as f:
                pickle.dump({'rec': rec, 'prec': prec, 'ap': ap}, f)
        print('Mean AP = {:.4f}'.format(np.mean(aps)))
        print('~~~~~~~~')
        print('Results:')
        for ap in aps:
            print('{:.3f}'.format(ap))
        print('{:.3f}'.format(np.mean(aps)))
        print('~~~~~~~~')
        print('')
        print('--------------------------------------------------------------')
        print('Results computed with the **unofficial** Python eval code.')
        print('Results should be very close to the official MATLAB eval code.')
        print('Recompute with `./tools/reval.py --matlab ...` for your paper.')
        print('-- Thanks, The Management')
        print('--------------------------------------------------------------')
绘制 PR 曲线
import matplotlib
import pickle
import matplotlib.pyplot as plt
def draw_single_pr_curve(pkl_file_path):
    # 若在图中添加中文,可加入下面两行
    #plt.rcParams['font.sans-serif']=['SimHei'] #用来正常显示中文标签
    #plt.rcParams['axes.unicode_minus']=False #用来正常显示负号
    #有中文出现的情况,需要u'内容'
    pkl_file = open(pkl_file_path,'rb')
    pr_curve_data = pickle.load(pkl_file)

    recall = pr_curve_data['rec']
    precision = pr_curve_data['prec']

    plt.xlabel('recall')
    plt.ylabel('precision')
    plt.plot(recall,precision)
    plt.show()
your_pkl_file_path = '你的pkl文件路径'
draw_single_pr_curve(your_pkl_file_path )
