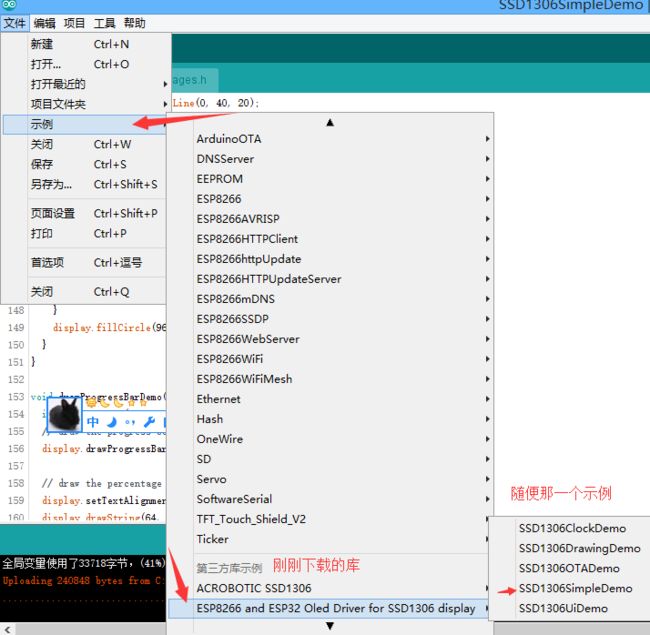
虽然资料没有U8glib和u8g2那么详细,但是能用8266驱动已经不错了,后面有空在折腾
库有很多可以自己去试试那个好,欢迎留言 !
搜索1306(因为这个OLED芯片是1306,这是以前自己搜索的资料然后实验出来的 )
搜索出来版本很多 各种写法都不一样 ,可以自己实验一下 ,
安装了然后在示例里面有个代码
然后呢重点来了:
SSD1306Brzo display这个函数里面就是接那个脚的 我查了下官方的资料是2和14脚
然后
SSD1306Brzo display(0x3c, SDA, SCL);
填上自己对应的脚就是 (通用ESP8266系列)
SSD1306 display(0x3c, 2, 14);
然后上传试试

忘记说怎么下载了:
更据官方的资料 安装BOOt这个键然后在把开关拨打开!然后上电 (个人测试了上电后按了下载失败的)
这哈就能看到了 (小E开发板要吧1开关拨上去)我这是直接连接的IO所以不管
相信应该有人也像我一样,用arduino的板子能直接用U8g的库能驱动oled屏幕,可用esp8266的始终不行,我也是用库的时候才想起可以直接搜索,然后试试就点亮了 !有问题回帖,如果没及时回复QQ496631085

以下是修改了脚的代码:
/**
* The MIT License (MIT)
*
* Copyright (c) 2016 by Daniel Eichhorn
*
* Permission is hereby granted, free of charge, to any person obtaining a copy
* of this software and associated documentation files (the "Software"), to deal
* in the Software without restriction, including without limitation the rights
* to use, copy, modify, merge, publish, distribute, sublicense, and/or sell
* copies of the Software, and to permit persons to whom the Software is
* furnished to do so, subject to the following conditions:
*
* The above copyright notice and this permission notice shall be included in all
* copies or substantial portions of the Software.
*
* THE SOFTWARE IS PROVIDED "AS IS", WITHOUT WARRANTY OF ANY KIND, EXPRESS OR
* IMPLIED, INCLUDING BUT NOT LIMITED TO THE WARRANTIES OF MERCHANTABILITY,
* FITNESS FOR A PARTICULAR PURPOSE AND NONINFRINGEMENT. IN NO EVENT SHALL THE
* AUTHORS OR COPYRIGHT HOLDERS BE LIABLE FOR ANY CLAIM, DAMAGES OR OTHER
* LIABILITY, WHETHER IN AN ACTION OF CONTRACT, TORT OR OTHERWISE, ARISING FROM,
* OUT OF OR IN CONNECTION WITH THE SOFTWARE OR THE USE OR OTHER DEALINGS IN THE
* SOFTWARE.
*
*/
// Include the correct display library
// For a connection via I2C using Wire include
#include // Only needed for Arduino 1.6.5 and earlier
#include "SSD1306.h" // alias for `#include "SSD1306Wire.h"`
// or #include "SH1106.h" alis for `#include "SH1106Wire.h"`
// For a connection via I2C using brzo_i2c (must be installed) include
// #include // Only needed for Arduino 1.6.5 and earlier
// #include "SSD1306Brzo.h"
// #include "SH1106Brzo.h"
// For a connection via SPI include
// #include // Only needed for Arduino 1.6.5 and earlier
// #include "SSD1306Spi.h"
// #include "SH1106SPi.h"
// Include custom images
#include "images.h"
// Initialize the OLED display using SPI
// D5 -> CLK
// D7 -> MOSI (DOUT)
// D0 -> RES
// D2 -> DC
// D8 -> CS
// SSD1306Spi display(D0, D2, D8);
// or
// SH1106Spi display(D0, D2);
// Initialize the OLED display using brzo_i2c
// D3 -> SDA
// D5 -> SCL
// SSD1306Brzo display(0x3c, SDA, SCL);
// or
// SH1106Brzo display(0x3c, D3, D5);
// Initialize the OLED display using Wire library
// SSD1306Brzo display(0x3c, SDA, SCL);
SSD1306 display(0x3c, 2, 14);
//小和提示:上面这句就是对应的 ESP8266的那个脚 各个系列的脚稍有不同自行修改 小E开发板看了资料是2和14so
// SH1106 display(0x3c, D3, D5);
#define DEMO_DURATION 3000
typedef void (*Demo)(void);
int demoMode = 0;
int counter = 1;
void setup() {
Serial.begin(115200);
Serial.println();
Serial.println();
// Initialising the UI will init the display too.
display.init();
display.flipScreenVertically();
display.setFont(ArialMT_Plain_10);
}
void drawFontFaceDemo() {
// Font Demo1
// create more fonts at http://oleddisplay.squix.ch/
display.setTextAlignment(TEXT_ALIGN_LEFT);
display.setFont(ArialMT_Plain_10);
display.drawString(0, 0, "he4966 XiaoHe");
display.setFont(ArialMT_Plain_16);
display.drawString(0, 10, "Hello XiaoHe");
display.setFont(ArialMT_Plain_24);
display.drawString(0, 26, "Hi XiaoHe");
}
void drawTextFlowDemo() {
display.setFont(ArialMT_Plain_10);
display.setTextAlignment(TEXT_ALIGN_LEFT);
display.drawStringMaxWidth(0, 0, 128,
"Lorem ipsum\n dolor sit amet, consetetur sadipscing elitr, sed diam nonumy eirmod tempor invidunt ut labore." );
}
void drawTextAlignmentDemo() {
// Text alignment demo
display.setFont(ArialMT_Plain_10);
// The coordinates define the left starting point of the text
display.setTextAlignment(TEXT_ALIGN_LEFT);
display.drawString(0, 10, "Left aligned (0,10)");
// The coordinates define the center of the text
display.setTextAlignment(TEXT_ALIGN_CENTER);
display.drawString(64, 22, "Center aligned (64,22)");
// The coordinates define the right end of the text
display.setTextAlignment(TEXT_ALIGN_RIGHT);
display.drawString(128, 33, "Right aligned (128,33)");
}
void drawRectDemo() {
// Draw a pixel at given position
for (int i = 0; i < 10; i++) {
display.setPixel(i, i);
display.setPixel(10 - i, i);
}
display.drawRect(12, 12, 20, 20);
// Fill the rectangle
display.fillRect(14, 14, 17, 17);
// Draw a line horizontally
display.drawHorizontalLine(0, 40, 20);
// Draw a line horizontally
display.drawVerticalLine(40, 0, 20);
}
void drawCircleDemo() {
for (int i=1; i < 8; i++) {
display.setColor(WHITE);
display.drawCircle(32, 32, i*3);
if (i % 2 == 0) {
display.setColor(BLACK);
}
display.fillCircle(96, 32, 32 - i* 3);
}
}
void drawProgressBarDemo() {
int progress = (counter / 5) % 100;
// draw the progress bar
display.drawProgressBar(0, 32, 120, 10, progress);
// draw the percentage as String
display.setTextAlignment(TEXT_ALIGN_CENTER);
display.drawString(64, 15, String(progress) + "%");
}
void drawImageDemo() {
// see http://blog.squix.org/2015/05/esp8266-nodemcu-how-to-create-xbm.html
// on how to create xbm files
display.drawXbm(34, 14, WiFi_Logo_width, WiFi_Logo_height, WiFi_Logo_bits);
}
Demo demos[] = {drawFontFaceDemo, drawTextFlowDemo, drawTextAlignmentDemo, drawRectDemo, drawCircleDemo, drawProgressBarDemo, drawImageDemo};
int demoLength = (sizeof(demos) / sizeof(Demo));
long timeSinceLastModeSwitch = 0;
void loop() {
// clear the display
display.clear();
// draw the current demo method
demos[demoMode]();
display.setTextAlignment(TEXT_ALIGN_RIGHT);
display.drawString(10, 128, String(millis()));
// write the buffer to the display
display.display();
if (millis() - timeSinceLastModeSwitch > DEMO_DURATION) {
demoMode = (demoMode + 1) % demoLength;
timeSinceLastModeSwitch = millis();
}
counter++;
delay(10);
}


