hyperledger fabric 源码调试(peer)环境搭建教程
前面写了一篇[hyperledger fabric 源码调试(orderer)环境搭建教程],按照相同的思路,这次来搭建peer的调试环境。部分相同的步骤和讲解请看上一篇,这里不再重新解释。
peer
first-network示例中包含4个peer,我们只把peer0.org1配置成源码调试。
一、Run/Debug Configuration 配置。新增一个Go build 配置具体如下:
name: peer0.org1
Run kind: Package
Package path: /work_dir/bin              #最好都使用绝对路径
Output directory: /work_dir/bin
Working directory: /work_dir/peer
二、环境变量(还是Run/Debug Configuration)
还是一样的思路,从base/peer-base.yaml, base/docker-compose-base.yaml, docker-compose-cli.yaml中查找peer0.org1.example.com相关的环境变量以及volumes配置,对照修改成本地路径映射,结果如下:
# 注意,这个虽然找不到替换,但能找到/var/run:/host/var/run的volume项,可推断出来
CORE_VM_ENDPOINT=unix:///var/run/docker.sock
# 这一项能找到first-network下.env中有COMPOSE_PROJECT_NAME=net,故硬编码
CORE_VM_DOCKER_HOSTCONFIG_NETWORKMODE=net_byfn
FABRIC_LOGGING_SPEC=INFO
CORE_PEER_TLS_ENABLED=true
CORE_PEER_GOSSIP_USELEADERELECTION=true
CORE_PEER_GOSSIP_ORGLEADER=false
CORE_PEER_PROFILE_ENABLED=true
CORE_PEER_TLS_CERT_FILE=../first-network/crypto-config/peerOrganizations/org1.example.com/peers/peer0.org1.example.com/tls/server.crt
CORE_PEER_TLS_KEY_FILE=../first-network/crypto-config/peerOrganizations/org1.example.com/peers/peer0.org1.example.com/tls/server.key
CORE_PEER_TLS_ROOTCERT_FILE=../first-network/crypto-config/peerOrganizations/org1.example.com/peers/peer0.org1.example.com/tls/ca.crt

CORE_PEER_ID=peer0.org1.example.com
CORE_PEER_ADDRESS=peer0.org1.example.com:7051
CORE_PEER_LISTENADDRESS=0.0.0.0:7051
CORE_PEER_CHAINCODEADDRESS=peer0.org1.example.com:7052
CORE_PEER_CHAINCODELISTENADDRESS=0.0.0.0:7052
CORE_PEER_GOSSIP_BOOTSTRAP=peer1.org1.example.com:8051
CORE_PEER_GOSSIP_EXTERNALENDPOINT=peer0.org1.example.com:7051
CORE_PEER_LOCALMSPID=Org1MSP

# 添加一项配置,理由同orderer
FABRIC_CFG_PATH=../config
跟orderer的配置一样,最后添加了一行FABRIC_CFG_PATH,不加的话运行时会遇到提示的,可以试试。
注意:你可能发现有一行volumes映射没有找到要用的地方,先记着,后边会解释:
 volumes:
  ../first-network/crypto-config/peerOrganizations/org1.example.com/peers/peer0.org1.example.com/msp:/etc/hyperledger/fabric/msp
尝试运行一下做个粗略检查。确定Run/Debug Configuration是选中的peer0.org1,点击run按钮,报错:
2019-12-19 20:28:32.170 CST [main] InitCmd -> ERRO 001 Cannot run peer because cannot init crypto, folder “< go path >/src/github.com/hyperledger/fabric/work_dir/config/msp” does not exist
从错误提示来看程序是尝试从work_dir/config/下去找msp然后没找到。记得吗?config目录是之前从fabric-samples下直接拷贝过来的,里头原本就只有三个yaml文件,并没有msp文件夹:
cd work_dir
tree config

config
├── configtx.yaml
├── core.yaml
└── orderer.yaml
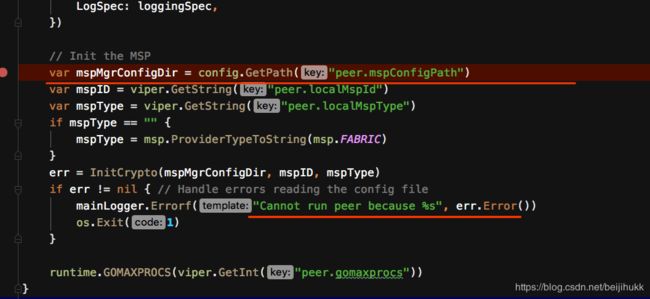
找不到方法,索性直接在源码中搜错误信息"Cannot run peer because",找到fabric/peer/common/common.go中有这么一段:

其实现在已经可以debug了,只是环境还没有完全配置好而已,所以可以通过单步调试来分析错误原因。经调试分析后就会发现一个大致思路:
peer 程序启动时去FABRIC_CFG_PATH下读取了core.yaml,然后找到该文件中的 mspConfigPath: msp 拼接上FABRIC_CFG_PATH得到了…/work_dir/config/msp这么个路径。
现在回想前面说到的有一行volumes没有用上就能明白了:这个路径没有直接使用,而是两处路径拼接出来的。合在一起来看:
volumes:
…/first-network/crypto-config/peerOrganizations/org1.example.com/peers/peer0.org1.example.com/msp:/etc/hyperledger/fabric/msp[ …/work_dir/config/msp ] 等于 [ work_dir/config 拼接 core.yaml中的mspConfigPath项 ]
所以我们只需要修改core.yaml中的mspConfigPath,使得上述拼接值与volume配置中的路径相同即可,修改core.yaml如下:
...
mspConfigPath: ../first-network/crypto-config/peerOrganizations/org1.example.com/peers/peer0.org1.example.com/msp
保存再运行,已经不再报msp找不到的问题了,当然还会有其他错:“mkdir /var/hyperledger: permission denied”,这个在orderer的配置中有提过的,直接改core.yaml就好:
...
fileSystemPath: ../peer #怕出错可用绝对路径
再次尝试运行,已经不再报错,可以准备网络测试了。
3.配合网络设置
道理同orderer,需要在docker-compose-cli.yaml中禁用掉peer0.org1的启动配置,已经为其他节点配上指向peer0.org1.example.com的extra_hosts映射。为了互相不影响我们直接复制一份原始docker-compose-cli.yaml改名为docker-compose-cli-no-peer.yaml,修改如下:
...
volumes:
#  peer0.org1.example.com:
...


#  peer0.org1.example.com:
#    container_name: peer0.org1.example.com
#    extends:
#      file:  base/docker-compose-base.yaml
#      service: peer0.org1.example.com
#    networks:
#      - byfn
#    extra_hosts:
#      - "orderer.example.com:< host IP >"
...

peer1.org1.example.com:
...
    extra_hosts:
      - "peer0.org1.example.com:< host IP >"
peer0.org2.example.com:
...
    extra_hosts:
      - "peer0.org1.example.com:< host IP >"
peer1.org2.example.com:
...
    extra_hosts:
     - "peer0.org1.example.com:< host IP >"

cli:
...
    depends_on:
      - orderer.example.com
#      - peer0.org1.example.com
      - peer1.org1.example.com
      - peer0.org2.example.com
      - peer1.org2.example.com
...
    extra_hosts:
      - "peer0.org1.example.com:< host IP >"
这就是没有peer0的first-network了。
4.启动docker网络,注意用新配置的yaml文件
cd work_dir/first-network
./byfn.sh down
# 清理peer0的数据
rm -rf work_dir/peer/*

./byfn.sh generate
docker-compose -f docker-compose-cli-no_peer.yaml up -d
5.特别注意。虽说本文大致参照orderer的配置思路完成,但是难度并未减小,因为有3个新的地方需要注意:
- peer在执行chaincode的时候会启动一个chaincode容器并与其保持通信,peer0是在本机,chaincode是在容器里,它找不到peer0.org1.example.com的ip,现象是链码初始化不成功,chaincode容器起来几秒钟就会退出:container exited with 0. 排查起来很费劲(参考踩坑之chaincode无法实例化-“container exited with 0”)https://www.jianshu.com/p/dbed4e210956;
- peer还需要与orderer,peer1.org1通信,peer1.org1相对好排查一点,因为一启动peer0就会有报错出现;但orderer需要在操作网络的时候才会报错来,而那时候可能注意力不在这上边很容易错过;
- 最后是关于docker网络的知识,先见下方代码中的注释,以后再详细补一篇这方面的博文。
所以需要再为/etc/hosts添加两行:
参考链接:
https://pythonspeed.com/articles/docker-connection-refused/https://stackoverflow.com/questions/31249112/allow-docker-container-to-connect-to-a-local-host-postgres-database
sudo vi /etc/hosts

# 为chaincode容器添加peer0映射,注意不能是127.0.0.1,
# 得是路由器分配的ip地址,换一个网路就得更新(可能有别的法子)
< host IP >peer0.org1.example.com

# 为peer0添加peer1.org1.example.com地址映射,这是从local链接到container的,可以是127.0.0.1
# 不加的话会报类似错误
# 2019-12-20 16:19:25.110 CST [gossip.discovery] func1 -> WARN 024 Could not connect to Endpoint: peer1.org1.example.com:8051, InternalEndpoint: peer1.org1.example.com:8051, PKI-ID: , Metadata:  : context deadline exceeded

127.0.0.1 peer1.org1.example.com

# 为peer0添加orderer的地址映射,同上,错误信息会更隐秘一点
127.0.0.1 orderer.example.com
测试
确认Run/Debug Configuration是刚设置好的peer0.org1,然后点击debug按钮。
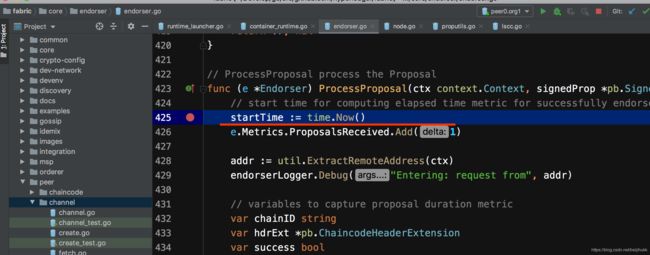
1.打断点。在fabric/core/endorser/endorser.go下的ProcessProposal处打个断点;
2.跟orderer源码调试的测试类似,参照build your first network的手动执行部分(但只选择peer0相关的即可),在控制台创建channel后做链码安装和调用操作:
docker exec -it cli bash

# 发送channel创建请求
export CHANNEL_NAME=mychannel

peer channel create -o orderer.example.com:7050 -c $CHANNEL_NAME -f ./channel-artifacts/channel.tx --tls --cafile /opt/gopath/src/github.com/hyperledger/fabric/peer/crypto/ordererOrganizations/example.com/orderers/orderer.example.com/msp/tlscacerts/tlsca.example.com-cert.pem

# peer0 加入到mychannel
peer channel join -b mychannel.block

# 安装链码到peer0
peer chaincode install -n mycc -v 1.0 -p github.com/chaincode/chaincode_example02/go/

# 初始化链码 会触发断点
peer chaincode instantiate -o orderer.example.com:7050 --tls --cafile /opt/gopath/src/github.com/hyperledger/fabric/peer/crypto/ordererOrganizations/example.com/orderers/orderer.example.com/msp/tlscacerts/tlsca.example.com-cert.pem -C $CHANNEL_NAME -n mycc -v 1.0 -c '{"Args":["init","a", "100", "b","200"]}' -P "AND ('Org1MSP.peer','Org2MSP.peer')"

# 链码查询调用 会触发断点
peer chaincode query -C $CHANNEL_NAME -n mycc -c '{"Args":["query","a"]}'
可以看到断点触发成功:
附言
以下是我在调试排查“context deadline exceeded”错误时的部分笔记,很乱,而且还有些是错误的。贴在这里是想分享我个人的一个观点:源码分析就是一个“猜想 -> 调试验证 -> 猜想”不断重复的过程,通常并不像博客里那么清晰自然方向明确,别人也是先看些说明资料,然后按照猜想一步步反复调试分析,最后把错误的或者无关紧要的分支去掉整理好写成文分享出来。所以有源码在手不要慌,一定要多调试。
cc, err := grpc.DialContext(ctx, remotePeer.Endpoint, dialOpts...)
... ->
if !cc.WaitForStateChange(ctx, s) {

这是用cc.msMgr下的notifyChan来接收通知,但并未找到该chan的写入操作,只有在updateState下有close操作,经验证,这也会导致chan的读操作返回,所以追踪到
func (csm *connectivityStateManager) updateState(state connectivity.State)
经排查,其调用来自于func (ccb *ccBalancerWrapper) UpdateBalancerState() 来自
func (b *pickfirstBalancer) HandleResolvedAddrs(addrs []resolver.Address, err error) 来自
func (ccb *ccBalancerWrapper) watcher() 这已经是线程入口了,直接分析HandleResolvedAddrs

HandleResolvedAddrs 先将状态置为Idle(此次不触发notifyChan),然后调用b.sc.Connect()
Connect() 内部跟进去先检查当前状态是否为Idle,如果是的话就修改状态Connecting,将状态通过
func (ccb *ccBalancerWrapper) handleSubConnStateChange 放进了queue:
ccb.stateChangeQueue.put
这个queue的值会由watcher轮询读取,按理应该能及时到达WaitForStateChange
及时到达,并调用func (b *pickfirstBalancer) HandleSubConnStateChange
最后到func (csm *connectivityStateManager) updateState(state connectivity.State)
问题是此时csm.state已经是Shutdown了,所以设置不成功。(应该与单步调试有关)
该csm.state就是要updateState的对象,也就是说,可能在本次updateState之前有其他地方调了updateState并将其设为Shutdown了,经条件断点得到验证
shutdown的状态来自于
func (cc *ClientConn) Close() error 来自于
func DialContext(ctx context.Context, target string, opts ...DialOption) 下的
defer func
所以重点调试defer func后续的代码,看是否正常执行完毕,看起来似乎没毛病,最后到WaitForStateChange,
看起来似乎不是从defer func 调用的Close,还有别处?
经断点,没有其他地方调用Close,且该Close是WaitForStateChange之后才调的,也就是说不是由Close引起。
那还有别处调用updateState更新shutdown?
经在func (ccb *ccBalancerWrapper) watcher()中添加日志打印state发现CONNECTING状态正常,然后有个transientFailure导致了Close:
state is:CONNECTING
state is:TRANSIENT_FAILURE
2019-12-20 14:52:40.588 CST [gossip.discovery] func1 -> WARN 024 Could not connect to Endpoint: peer1.org1.example.com:8051, InternalEndpoint: peer1.org1.example.com:8051, PKI-ID: , Metadata:  : context deadline exceeded

查这个状态,追到如下关系(顺序) connect->resetTransport->createTransport:ac.state = connectivity.TransientFailure
经调试是在createTransport中的transport.NewClientTransport()失败了
追查后是如下调用关系(顺序)失败:
func NewClientTransport() ->
func newHTTP2Client(connectCtx, ctx context.Context, addr TargetInfo, opts ConnectOptions, onSuccess func())->
func dial(ctx context.Context, fn func(context.Context, string) -> mapAddress -> httpProxyFromEnvironment

其中httpProxyFromEnvironment是一个func,取值 envProxyFuncValue func(*url.URL) 这是找代理的,如果有代理就走代理,如果没有设置代理就继续往下,所以失败了没关系

往下的代码还是会连接,不详述了,结论是grpc底层发起解析peer1.org1.example.com的请求,因为网络上并没有这么个ip,解析自然超时,最后失败:
解决方案:编辑/etc/hosts 添加127.0.0.1 peer1.org1.example.com,重新启动网络和debug,成功!
(完)
公众号: 区块链架构
![]()
技术交流群:
![]()
