前端单元测试框架Jest学习总结
1.而那些适合引入测试场景大概有这么几个:
• 需要长期维护的项目。它们需要测试来保障代码可维护性、功能的稳定性
• 较为稳定的项目、或项目中较为稳定的部分。给它们写测试用例,维护成本低
• 被多次复用的部分,比如一些通用组件和库函数。因为多处复用,更要保障质量
2.测试的步骤:
• 写测试说明,针对你的每条测试说明测试了什么功能,预期结果是什么。
• 写测试主体,通常是 输入 -> 输出。
• 判断测试结果,拿输出和预期做对比。如果输出和预期相符,则测试通过。反之,不通过。
3.安装Jest:
npm i jest -D(安装到本地)
npm i jest -g(安装到全局)
2 安装Jest
2.1 初始化package.json
在shell中输入以下命令,初始化前端项目并生成package.json:
npm init -y
2.2 安装Jest及相关依赖
在shell中输入以下命令,安装测试所需要的依赖:
npm install -D jest babel-jest babel-core babel-preset-env regenerator-runtime
babel-jest、 babel-core、 regenerator-runtime、babel-preset-env这几个依赖是为了让我们可以使用ES6的语法特性进行单元测试,ES6提供的 import 来导入模块的方式,Jest本身是不支持的。(直接在项目根目录下执行:npm install)
2.3 添加.babelrc文件
在项目的根目录下添加.babelrc文件,并在文件复制如下内容:
{
“presets”: [“env”]
}
2.4 修改package.json中的test脚本
打开package.json文件,将script下的test的值修改为jest:
“scripts”: {
“test”: “jest”
}
安装方式
yarn
yarn add --dev jest
OR npm
npm install --save-dev jest
(一)配置位置
- package.json
在package.json添加配置项"jest" : { 配置项 } - jest.config.js
新建jest.config.js并添加配置项module.exports = { 配置项 } - 命令行(独有的option)
见:命令行配置
(二)配置项 - testMatch
设置识别哪些文件是测试文件(glob形式),与testRegex互斥,不能同时写
testMatch: [’**/__tests__/**/*.js?(x)’,’**/?(*.)(spec|test).js?(x)’] - testRegex
设置识别哪些文件是测试文件(正则形式),与testMatch互斥,不能同时写
testRegex: ‘(/__tests__).*|(\\.|/)(test|spec))\\.jsx?$’ - testRnviroment
测试环境,默认值是:jsdom,可修改为node
testEnvironment: ‘jsdom’ - rootDir
默认值:当前目录,一般是package.json所在的目录。
rootDir: ’ ’ - moduleFileExtensions
测试文件的类型
moduleFileExtensions: [‘js’,‘json’,‘jsx’,‘node’]
一般配置:
module.exports = {
testMatch: [’/test/**/*.js’],
testEnvironment: ‘jsdom’,
rootDir: ‘’,
moduleFileExtensions: [‘js’,‘json’,‘jsx’,‘node’] - 编写你的第一个Jest测试
运行:
npx jest(安装到本地的前提下)
jest(安装到全局的前提下)
修改"script" 中的"test" 为"jest"后使用npm run test或npm t
创建src和test目录及相关文件
1.在项目根目录下创建src目录,并在src目录下添加functions.js文件
2.在项目根目录下创建test目录,并在test目录下创建functions.test.js文件
Jest会自动找到项目中所有使用.spec.js或.test.js文件命名的测试文件并执行,通常我们在编写测试文件时遵循的命名规范:测试文件的文件名 = 被测试模块名 + .test.js,例如被测试模块为functions.js,那么对应的测试文件命名为functions.test.js。
在src/functions.js中创建被测试的模块
export default {
sum(a, b) {
return a + b;
}
}
在test/functions.test.js文件中创建测试用例
import functions from ‘…/src/functions’;
test(‘sum(2 + 2) 等于 4’, () => {
expect(functions.sum(2, 2)).toBe(4);
})
运行npm run test, Jest会在shell中打印出以下消息:
PASS test/functions.test.js
√ sum(2 + 2) 等于 4 (7ms)
Test Suites: 1 passed, 1 total
Tests: 1 passed, 1 total
Snapshots: 0 total
Time: 4.8s
4.断言:
import server from ‘…/…/app.js’
import request from ‘supertest’
afterEach(() => {
server.close()
})
test(‘Failed to login if typing Molunerfinn & 1234’, async () => {
const response = await request(server)
.post(’/auth/user’)
.send({
name: ‘Molunerfinn’,
password: ‘1234’
})
expect(response.body.success).toBe(false)
})
test(‘Successed to login if typing Molunerfinn & 123’, async () => {
const response = await request(server)
.post(’/auth/user’)
.send({
name: ‘Molunerfinn’,
password: ‘123’
})
expect(response.body.success).toBe(true)
})
test(‘Failed to login if typing MARK & 123’, async () => {
const response = await request(server)
.post(’/auth/user’)
.send({
name: ‘MARK’,
password: ‘123’
})
expect(response.body.info).toBe(‘用户不存在!’)
})
test(‘Getting the user info is null if the url is /auth/user/10’, async () => {
const response = await request(server)
.get(’/auth/user/10’)
expect(response.body).toEqual({})
})
test(‘Getting user info successfully if the url is /auth/user/2’, async () => {
const response = await request(server)
.get(’/auth/user/2’)
expect(response.body.user_name).toBe(‘molunerfinn’)
})
简单来说,toBe()适合===这个判断条件。比如1 === 1,‘hello’ === ‘hello’。但是[1] === [1]是错的。具体原因不多说,js的基础。所以要判断比如数组或者对象相等的话需要用toEqual()这个方法。
在实际的测试中,我们有时候需要区分undefined、null和false。以下的一些规则有助于我们进行。
toBeNull只匹配null
toBeUndefined只匹配undefined
toBeDefine与toBeUndefined相反
toBeTruthy匹配任何if语句为真
toBeFalsy匹配任何if语句为假
数字匹配器
大多数的比较数字有等价的匹配器。
大于。toBeGreaterThan()
大于或者等于。toBeGreaterThanOrEqual()
小于。toBeLessThan()
小于或等于。toBeLessThanOrEqual()
toBe和toEqual同样适用于数字
注意:对比两个浮点数是否相等的时候,使用toBeCloseTo而不是toEqual
字符串
使用toMatch()测试字符串,传递的参数是正则表达式。不包含可以使用not.toMatch()
test(‘there is no I in team’, () => {
expect(‘team’).not.toMatch(/I/);
});
test(‘but there is a “stop” in Christoph’, () => {
expect(‘Christoph’).toMatch(/stop/);
});
数组
如何检测数组中是否包含特定某一项?可以使用toContain()
const shoppingList = [
‘diapers’,
‘kleenex’,
‘trash bags’,
‘paper towels’,
‘beer’,
];
test(‘购物清单(shopping list)里面有啤酒(beer)’, () => {
expect(shoppingList).toContain(‘beer’);
});
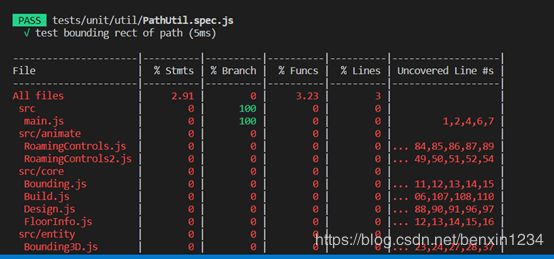
5.打印测试报告统计覆盖率
1).测试生命周期
afterAll(fn, timeout): 当前文件中的所有测试执行完成后执行 fn, 如果 fn 是 promise,jest 会等待 timeout 毫秒,默认 5000
afterEach(fn, timeout): 每个 test 执行完后执行 fn,timeout 含义同上
beforeAll(fn, timeout): 同 afterAll,不同之处在于在所有测试开始前执行
beforeEach(fn, timeout): 同 afterEach,不同之处在于在每个测试开始前执行
2).设置打印覆盖报告设置
在jest.config.js或者package.json中设置如下,如果不开启的话将collectCoverage设置为false;
collectCoverage: true, // 是否收集测试时的覆盖率信息
collectCoverageFrom: [’/src/**/*.{js,jsx,mjs}’], // 哪些文件需要收集覆盖率信息
coverageDirectory: ‘/tests/coverage’, // 输出覆盖信息文件的目录
3) 测试报告参数代表意义:
%stmts是语句覆盖率(statement coverage):是不是每个语句都执行了
%Branch分支覆盖率(branch coverage):是不是每个if代码块都执行了
%Funcs函数覆盖率(function coverage):是不是每个函数都调用了
%Lines行覆盖率(line coverage):是不是每一行都执行了
