Easyui-Datagrid实例-----动态加载数据生成Datagrid
上次说到tree的使用,点击tree节点的时候,新增tabs,今天顺便讲一下生成增加tabs的同时生成Datagrid。首先说一下我的想法,根据API提供的通过iframe加载新的页面或者一个url请求后台数据的实例。觉得应该可以加载新的页面,并在加载完成之后初始化页面定义的datagrid。想法很好,但是.......................................
先看看代码:
userinfo.jsp
hello, welcome !
userinfo.js
$(function(){
	console.info("2222222222222222");
	$('#user_info_table').datagrid({
	    url:click_node.attributes+"id="+click_node.id,
  		toolbar: [{
  			iconCls: 'icon-add',
  			handler: function(){alert('add')}
  		},'-',{
  			iconCls: 'icon-edit',
  			handler: function(){alert('edit')}
  		}],
	    columns:[[
	        {field:'name',title:'姓名',width:100},
	        {field:'sex',title:'性别',width:100},
	        {field:'age',title:'年龄',width:100},
	        {field:'telephone',title:'电话',width:100},
	        {field:'address',title:'地址',width:100},
	        {field:'nation',title:'民族',width:100},
	        {field:'nativePlace',title:'籍贯',width:100}
	    ]]
});
})
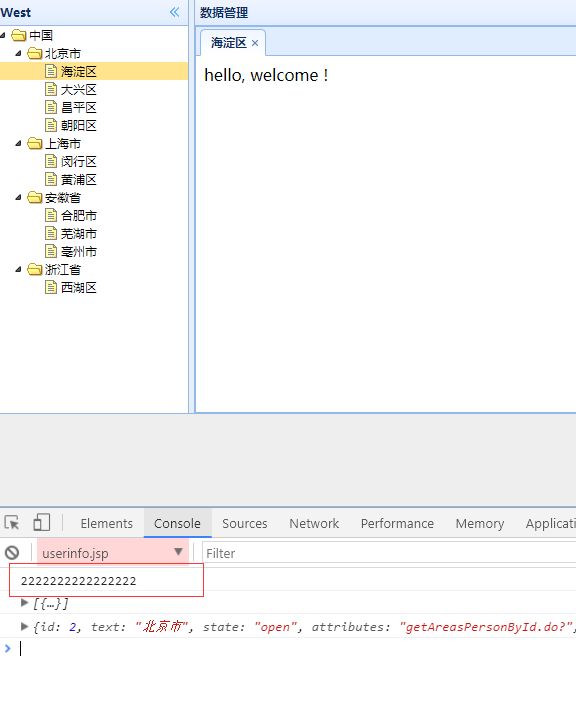
再看看效果是怎么样的,:
并没有我想要的表格数据,在network中并没有看到请求,但是console中打印出来了,这说明方法是走了,但是
没有请求,那就是没走下去,为什么没走下去呢,是不是没有找到我的table呢。由此联想出一个问题,
"Iframe跨域" !!!!!!!!!!!!!!!!!!!!!!!!!!!!!!
想去官方看看有没有什么解决办法,一看之下傻眼了,原来官方在生 成tabs的时候也没有使用到iframe,而是简单的往content中添加了新的内容,也可以是一段html代码片段:
那如果这样的话,我左侧的树节点对应的datagrid属性不一致怎么办,你怎么给我生成呢?即使能生成也是维护起来相当麻烦,研究了半天也没研究出什么所以然来,所以暂时不处理这块了,等有时间了再研究研究。
先看看怎么通过添加content生成datagrid吧。
1.前端添加datagrid绑定数据
前面既然不支持jsp那种初始化datagrid,只能使用点击节点时生成html代码片段来实现了。
onClick:function(node){// 添加tab
if(node.attributes){
click_node = node;
node1=$("#tree").tree('getParent',node.target);
var tt = $("#tt");
if(tt.tabs('exists',node.text)){
tt.tabs('select',node.id);
}else{
var content="";
tt.tabs('add',{
title:node.text,
closable:true,
content:content
});
$('#user_info_table_'+node.id).datagrid({
url:node.attributes+"id="+node.id,
toolbar: [{
iconCls: 'icon-add',
handler: function(){alert('add')}
},'-',{
iconCls: 'icon-edit',
handler: function(){alert('edit')}
}],
columns:[[
{field:'name',title:'姓名',width:100},
{field:'sex',title:'性别',width:100},
{field:'age',title:'年龄',width:100},
{field:'telephone',title:'电话',width:100},
{field:'address',title:'地址',width:100},
{field:'nation',title:'民族',width:100},
{field:'nativePlace',title:'籍贯',width:100}
]]
});
}
}
},
对,你也看到了,由于每个节点的id是不一样的且不会重复的,所以我们给他生成一个个对应的div并绑定id,来实现。打开tabs的同时来初始化datagrid。在这里使用tabs的exists的时候,参数只能是text的,用id的话验证不通过的,也就是校验结果始终是false。只有为text的时候他才能判断出你当前点击的节点对应的tabs是否已经打开了。
2.后台支持
2.1 person数据库设计
其中area_id对应着tree的id作为外键,查询的也是该区域下的人员信息。
2.2 定义java类
person类:
package com.chenqk.springmvc.entity;
public class Person {
private int id;
private int areaId;
private String name;
private String sex;
private int age;
private String telephone;
private String address;
private String nation;
private String nativePlace;
public int getId() {
return id;
}
public void setId(int id) {
this.id = id;
}
public int getAreaId() {
return areaId;
}
public void setAreaId(int areaId) {
this.areaId = areaId;
}
public String getName() {
return name;
}
public void setName(String name) {
this.name = name;
}
public String getSex() {
return sex;
}
public void setSex(String sex) {
this.sex = sex;
}
public int getAge() {
return age;
}
public void setAge(int age) {
this.age = age;
}
public String getTelephone() {
return telephone;
}
public void setTelephone(String telephone) {
this.telephone = telephone;
}
public String getAddress() {
return address;
}
public void setAddress(String address) {
this.address = address;
}
public String getNation() {
return nation;
}
public void setNation(String nation) {
this.nation = nation;
}
public String getNativePlace() {
return nativePlace;
}
public void setNativePlace(String nativePlace) {
this.nativePlace = nativePlace;
}
}
Dao层及其实现类:
package com.chenqk.springmvc.dao;
import java.util.List;
import com.chenqk.springmvc.entity.Person;
public interface PersonDao {
public List getAreasPersonById(int id);
}
package com.chenqk.springmvc.dao.impl;
import java.util.List;
import org.apache.ibatis.session.SqlSession;
import org.apache.ibatis.session.SqlSessionFactory;
import org.springframework.beans.factory.annotation.Autowired;
import org.springframework.stereotype.Repository;
import com.chenqk.springmvc.dao.PersonDao;
import com.chenqk.springmvc.entity.Person;
/**
*
* @author chenqk
*
* @Repository 标识数据访问层DAO,将其标识为spring bean,并根据spring配置为扫描功能
* 来识别该注解 getAreasPersonById(int id) {
SqlSession sqlSession =(SqlSession) this.getSqlSessionFactory().openSession();
return sqlSession.selectList("com.chenqk.springmvc.entity.Person.getAreasPersonById", id);
}
}
service及其实现类:
package com.chenqk.springmvc.service;
import java.util.List;
import com.chenqk.springmvc.entity.Person;
public interface PersonService {
public List getAreasPersonById(int id);
}
package com.chenqk.springmvc.service.impl;
import java.util.List;
import org.springframework.beans.factory.annotation.Autowired;
import org.springframework.beans.factory.annotation.Qualifier;
import org.springframework.stereotype.Repository;
import com.chenqk.springmvc.dao.PersonDao;
import com.chenqk.springmvc.entity.Person;
import com.chenqk.springmvc.service.PersonService;
/**
* 逻辑业务层
* @author chenqk
*
* @Qualifier 匹配者,按类型自动装配可能多个bean实例的情况,可以使用Spring的@Qualifier
* 注解缩小范围(或指定唯一),也可以指定单独的构造器参数或方法参数。
*
* @Resource 默认是按照名称来装配注入的,只有当找不到与名称匹配的bean才会按照类型来装配注入
* @Resource 有两个属性是比较重要的,分是name和type,Spring将@Resource注解的name
* 属性解析为bean的名字,而type属性则解析为bean的类型。所以如果使用name属性,
* 则使用byName的自动注入策略,而使用type属性时则使用byType自动注入策略。如果既不指定name
* 也不指定type属性,这时将通过反射机制使用byName自动注入策略。
@Resource 装配顺序
1. 如果同时指定了name和type,则从Spring上下文中找到唯一匹配的bean进行装配,找不到则抛出异常
2. 如果指定了name,则从上下文中查找名称(id)匹配的bean进行装配,找不到则抛出异常
3. 如果指定了type,则从上下文中找到类型匹配的唯一bean进行装配,找不到或者找到多个,都会抛出异常
4. 如果既没有指定name,又没有指定type,则自动按照byName方式进行装配;如果没有匹配,则回退为
一个原始类型进行匹配,如果匹配则自动装配;
*
* @Autowired 默认是按照类型装配注入的,默认情况下它要求依赖对象必须存在,如果允许null值,
* 可以设置它required属性为false。如果我们想使用按名称装配,
* 可以结合@Qualifier注解一起使用。如下:
*
*/
@Repository("PersonService")
public class PersonServiceImpl implements PersonService{
@Autowired
@Qualifier("PersonDao")
private PersonDao personDao;
@Override
public List getAreasPersonById(int id) {
return personDao.getAreasPersonById(id);
}
}
controller控制层:
package com.chenqk.springmvc.controller;
import java.io.IOException;
import java.util.List;
import javax.servlet.http.HttpServletResponse;
import net.sf.json.JSONArray;
import org.springframework.beans.factory.annotation.Autowired;
import org.springframework.beans.factory.annotation.Qualifier;
import org.springframework.stereotype.Controller;
import org.springframework.web.bind.annotation.RequestMapping;
import org.springframework.web.bind.annotation.RequestMethod;
import org.springframework.web.bind.annotation.RequestParam;
import com.chenqk.springmvc.entity.Person;
import com.chenqk.springmvc.service.PersonService;
/**
* 控制层
* @author chenqk
* @RequestMapping 是一个用来处理请求地址映射的注解,可用于类或方法上。用于类上,
* 表示类中的所有响应请求的方法都是以该地址作为父路径。
* 该注解分为6个属性
* value: 指定请求的实际地址,指定的地址可以是URI Template 模式,其中可以为普通的具体值,
* 含有某变量的一类值,包含正则表达式的一类值;
* method: 指定请求的method类型, GET、POST、PUT、DELETE等;
* consumes: 指定处理请求的提交内容类型(Content-Type),例如application/json, text/html;
* produces: 指定返回的内容类型,仅当request请求头中的(Accept)类型中包含该指定类型才返回;
* params: 指定request中必须包含某些参数值是,才让该方法处理。
* headers: 指定request中必须包含某些指定的header值,才能让该方法处理请求。
*/
@RequestMapping("/")
@Controller
public class PersonController {
@Autowired
@Qualifier("PersonService")
private PersonService personService;
public PersonService getPersonService() {
return personService;
}
public void setPersonService(PersonService personService) {
this.personService = personService;
}
@RequestMapping(value="/getAreasPersonById",method=RequestMethod.POST)
public void getAreasPersonById(@RequestParam("id") int id,HttpServletResponse response){
response.setCharacterEncoding("utf8");
List personList = personService.getAreasPersonById(id);
try {
response.getWriter().print(JSONArray.fromObject(personList));
} catch (IOException e) {
e.printStackTrace();
}
}
}
2.3 配置文件
spring配置文件:
mapper配置文件:
效果图如下:
你可能感兴趣的:(Easyui-Datagrid实例-----动态加载数据生成Datagrid)


