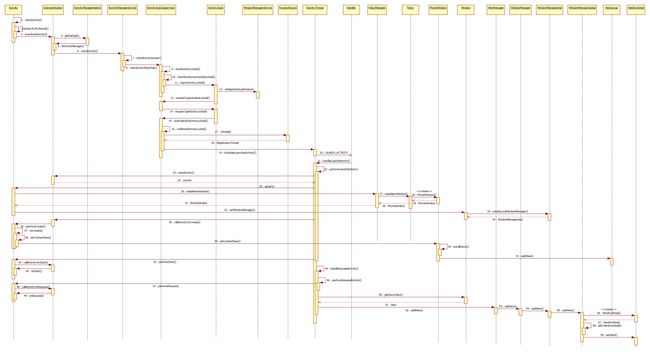
Activity启动过程中做了哪些事情?下面的时序图展示里启动过程中函数的调用过程, 从图中可以知道大概流程。
在介绍细节的时候是从上往下函数调用过程介绍的,如果不知道某个函数是在哪里被谁调用的,可以回过头来看下时序图。下面是对一些细节进行介绍。
1. 在Android中有两种操作会引发Activity的启动,一种用户点击Launcher的应用程序图标时,Launcher会为启动应用程序的主Activity。另外一种是在已经起来的Activity内部通过调用startActvity接口启动新的Activity。每一个Activity都可以在内部启动新的Activity。图中就是从一个Activity调用startActivity启动另外一个Activity开始。
startActivity()@Activity.java
public void startActivity(Intent intent, Bundle options) {
        if (options != null) {
            startActivityForResult(intent, -1, options);
        } else {
            // Note we want to go through this call for compatibility with
            // applications that may have overridden the method.
            startActivityForResult(intent, -1);
        }
}
startActivity()中调用携带requestCode参数的startActivityForResult()启动新的activity。
startActivityForResult()@Activity.java
public void startActivityForResult(Intent intent, int requestCode, Bundle options) {
    //一般的Activity的mParent为null
    if (mParent == null) {
        //调用Instrumentation.execStartActivity()启动新的Activity。mMainThread类型为ActivityThread, 在attach()函数被回调时被赋值。
        Instrumentation.ActivityResult ar = mInstrumentation.execStartActivity(this, mMainThread.getApplicationThread(), mToken, this, intent, requestCode, options);
        if (ar != null) {    // 如果activity之前已经启动,而且处于阻塞状态,execStartActivity函数直接返回要启动的activity的result或者null。(注意:这就是Activity.onActivityResult()会在启动另外一个activity启动时被回调的原因。
            // 若result非空,发送结果给本activity,即onActivityResult会被调用。
            mMainThread.sendActivityResult(mToken, mEmbeddedID, requestCode, ar.getResultCode(),
                                            ar.getResultData());
        }
        if (requestCode >= 0) {
            // 如果这次启动需要被启动的activity返回一个结果,则在收到返回结果前,本activity保持不可见。
            mStartedActivity = true;
        }

        final View decor = mWindow != null ? mWindow.peekDecorView() : null;
        if (decor != null) {
            decor.cancelPendingInputEvents();
        }
        // TODO Consider clearing/flushing other event sources and events for child windows.
    } else {
        //在ActivityGroup内部的Activity调用startActivity的时候会走到这里,内部处理逻辑和上面是类似的
        if (options != null) {
            mParent.startActivityFromChild(this, intent, requestCode, options);
        } else {
            mParent.startActivityFromChild(this, intent, requestCode);
        }
    }
}
Instrumentation类的功能是辅助Activity的监控和测试,接着看execStartActivity()函数的实现。
execStartActivity()@Instrumentation.java
 1 public ActivityResult execStartActivity(
 2         Context who, IBinder contextThread, IBinder token, Activity target,
 3         Intent intent, int requestCode, Bundle options) {
 4     //将contextThread转成ApplicationThread.
 5     IApplicationThread whoThread = (IApplicationThread) contextThread;
 6     if (mActivityMonitors != null) {
 7         synchronized (mSync) {
 8              //检查是否存在这个activity
 9             final int N = mActivityMonitors.size();
10             for (int i=0; i= 0 ? am.getResult() : null;
16                      }
17                      break;
18                 }
19             }
20         }
21     }
22     try {
23         intent.migrateExtraStreamToClipData();     //转移数据
24         intent.prepareToLeaveProcess();            //准备让intent离开一个app进程
25         //通过AcitivityManagerNative与ActivityManagerService关联起来,两个类的关系如下图,由ActivityManagerService去执行实际动作。
26         int result = ActivityManagerNative.getDefault()
27             .startActivity(whoThread, who.getBasePackageName(), intent,
28                     intent.resolveTypeIfNeeded(who.getContentResolver()),
29                     token, target != null ? target.mEmbeddedID : null,
30                     requestCode, 0, null, null, options);
31         //检查启动结果,如果无法打开activity,则抛出诸如ActivityNotFoundException类似的各种异常
32         checkStartActivityResult(result, intent);
33     } catch (RemoteException e) {
34     }
35     return null;
36 }
2. ActivityManager的功能是与系统中所有运行着的Activity交互提供了接口,主要的接口围绕着运行中的进程信息,任务信息,服务信息等,它的大多数功能都是调用了ActivityManagerNative类接口来完成的。
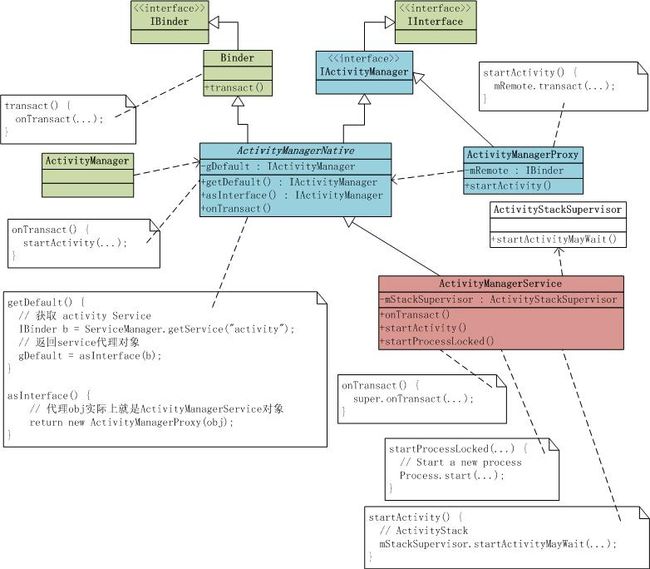
ActivityManager相关静态类图如下图,可以看出这是典型的Proxy模式:
结合面的类结构图,其中ActivityManager是一个客户端,为了减少它与ActivityManagerService的耦合度,在这中间使用了ActivityManagerNative类,该类内部使用ActivityManagerProxy代理类,所有对 ActivityManagerService的访问都转换成对代理类的访问,这样ActivityManager就与ActivityManagerService解耦了。
为了让代理类与被代理类保持一致的接口,由IActivityManager作为ActivityManagerProxy和ActivityManagerNative的公共接口,ActivityManagerService继承于ActivityManagerNative,也具有相同的接口。
图中绿色的部分是在SDK中开放给应用程序开发人员的接口,蓝色的部分是Proxy模式的实现,红色的部分是底层的服务实现,是真正的动作执行者。
3. startActivity()@ActivityManagerService.java
 @Override
 public final int startActivity(IApplicationThread caller, String callingPackage,
           Intent intent, String resolvedType, IBinder resultTo,
           String resultWho, int requestCode, int startFlags,
           String profileFile, ParcelFileDescriptor profileFd, Bundle options) {
     return startActivityAsUser(caller, callingPackage, intent, resolvedType, resultTo,
                                resultWho, requestCode, startFlags, profileFile, profileFd, options, UserHandle.getCallingUserId());
 }

@Override
public final int startActivityAsUser(IApplicationThread caller, String callingPackage,
         Intent intent, String resolvedType, IBinder resultTo,
         String resultWho, int requestCode, int startFlags,
         String profileFile, ParcelFileDescriptor profileFd, Bundle options, int userId) {
    enforceNotIsolatedCaller("startActivity");
    userId = handleIncomingUser(Binder.getCallingPid(), Binder.getCallingUid(), userId,
             false, true, "startActivity", null);
     // TODO: Switch to user app stacks here.
    return mStackSupervisor.startActivityMayWait(caller, -1, callingPackage, intent, resolvedType,
            resultTo, resultWho, requestCode, startFlags, profileFile, profileFd,
             null, null, options, userId);
}
类ActivityStackSupervisor是用来辅助ActivityManagerService对Activity和Task的管理的。其中用ActivityStackSupervisor类型来进行对Task的操作,用ActivityStack对Acitivity进行操作。
4. 调用mStackSupervisor.startActivityMayWait()函数后,会执行下面几个函数,调用关系参照时序图,函数里涉及很多细节,这里只简单描述下它们的主要功能:
调用9. ActivityStackSupervisor.startActivityLocked(): 检查启动权限,创建新的ActivityRecord。
调用10. ActivityStackSupervisor.startActivityUncheckedLocked():处理intent携带的launch flags, launchMode。(后面再研究launch相关的flag和mode)
调用11. ActivityStack.startActivityLocked():将activity放到所属task的顶部,重置Task(resetTaskIfNeededLocked),调用WindowManager.setAppStartingWindow()。
调用13. ActivityStackSupervisor.resumeTopActivitiesLocked():判断ActivityStack数组中是否存在target ActivityStack。
调用14. ActivityStack.resumeTopActivityLocked(): 从当前activity切换到要启动的activity。
调用15. ActivityStackSupervisor.startSpecificActivityLocked():获取ProcessRecord(若要启动的activity的应用已经在运行),若获取ProcessRecord存在则调用realStartActivityLocked(),否则调用 ActivityManagerServices.startProcessLocked()创建新的ProcessRecord,最后调用Process.start()启动新的进程(最终调用Zygote启动新的进程,为了避免混淆,这部分在时序图中没有体现,后面再研究)。
调用16. ActivityStackSupervisor.realStartActivityLocked(): 调用mWindowManager.setAppVisibility()设置app可见。
调用19. ActivityThread.scheduleLauncherActivity(): 发送Message LAUNCH_ACTIVITY给Handler.
5. Handler接收到message后,执行ActivityThread.handleLaunchActivity()。
handleLaunchActivity()@ActivityThread.java
private void handleLaunchActivity(ActivityClientRecord r, Intent customIntent) {
    ......
    Activity a = performLaunchActivity(r, customIntent);  // 返回一个activity.
    if (a != null) {
        r.createdConfig = new Configuration(mConfiguration);
        Bundle oldState = r.state;
        handleResumeActivity(r.token, false, r.isForward, !r.activity.mFinished && !r.startsNotResumed);

        if (!r.activity.mFinished && r.startsNotResumed) {
            // 当这个activity没有finished而且没有处于resumed状态时,Acivity Manager实际上想要这个activity以paused状态开始,因为它需要可见,但是又不在前台。
            // 为此,需要经过正常启动(因为activity希望在它们的window被显示前,它们第一次运行时通过onResume),然后暂停它。The activity manager actually wants this one to start out
            //然而,在这种情况下,不需要走完整的暂停周期(比如freezing等),因为activity假定它可以刚好保留它当前的所有状态。
            try {
               r.activity.mCalled = false;
               mInstrumentation.callActivityOnPause(r.activity);
               ......
             } catch (SuperNotCalledException e) {
                 ......
             } catch (Exception e) {
                 ......
             }
            r.paused = true;
        }
    } else {
        ......
    }
}
6.进一步看performLaunchActivity(),这个函数做了几件重要的事情:创建activity实例,调用Activity.attach()设置参数,触发Activity.onCreate()。
performLaunchActivity()@ActivityThread.java
private Activity performLaunchActivity(ActivityClientRecord r, Intent customIntent) {

    ActivityInfo aInfo = r.activityInfo;
    if (r.packageInfo == null) {        // 填充package info
        r.packageInfo = getPackageInfo(aInfo.applicationInfo, r.compatInfo,
                                       Context.CONTEXT_INCLUDE_CODE);
    }

    ComponentName component = r.intent.getComponent();
    if (component == null) {
        component = r.intent.resolveActivity(mInitialApplication.getPackageManager());
        r.intent.setComponent(component);      //设置Component
    }
    if (r.activityInfo.targetActivity != null) {
        component = new ComponentName(r.activityInfo.packageName,
        r.activityInfo.targetActivity);
    }

    Activity activity = null;
    try {
        java.lang.ClassLoader cl = r.packageInfo.getClassLoader();
        activity = mInstrumentation.newActivity(cl, component.getClassName(), r.intent);    // 根据Activity的类名,通过Java反射机制创建对应的Activity.
        StrictMode.incrementExpectedActivityCount(activity.getClass());
        r.intent.setExtrasClassLoader(cl);
        if (r.state != null) {
            r.state.setClassLoader(cl);
        }
    } catch (Exception e) {
        ......
    }

    try {
        Application app = r.packageInfo.makeApplication(false, mInstrumentation);

        if (activity != null) {
            Context appContext = createBaseContextForActivity(r, activity);      // Activity中getContext()函数返回的就是这个对象。
            CharSequence title = r.activityInfo.loadLabel(appContext.getPackageManager());
            Configuration config = new Configuration(mCompatConfiguration);
            ......
            // 将Context,ActivityThread,Instrumentation,Application等设置给新建的Activity,供activity使用。
            activity.attach(appContext, this, getInstrumentation(), r.token,
                            r.ident, app, r.intent, r.activityInfo, title, r.parent,
                            r.embeddedID, r.lastNonConfigurationInstances, config);

            if (customIntent != null) {
                 activity.mIntent = customIntent;
            }
            r.lastNonConfigurationInstances = null;
            activity.mStartedActivity = false;
            int theme = r.activityInfo.getThemeResource();
            if (theme != 0) {
                activity.setTheme(theme);                                             // 设置theme
            }

            activity.mCalled = false;
            mInstrumentation.callActivityOnCreate(activity, r.state);                  // 这个函数会使Activity的onCreate()函数被调用
            if (!activity.mCalled) {
                throw new SuperNotCalledException(
                        "Activity " + r.intent.getComponent().toShortString() +
                        " did not call through to super.onCreate()");
            }
            r.activity = activity;
            r.stopped = true;
            if (!r.activity.mFinished) {
                activity.performStart();                                            // 这个函数会使Activity的onStart()函数被调用
                r.stopped = false;
            }
            if (!r.activity.mFinished) {
                if (r.state != null) {
                    mInstrumentation.callActivityOnRestoreInstanceState(activity, r.state);
                }
            }
            if (!r.activity.mFinished) {
                activity.mCalled = false;
                mInstrumentation.callActivityOnPostCreate(activity, r.state);
                if (!activity.mCalled) {
                    throw new SuperNotCalledException(
                            "Activity " + r.intent.getComponent().toShortString() +
                            " did not call through to super.onPostCreate()");
                }
            }
        }
        r.paused = true;
        mActivities.put(r.token, r);
    } catch (SuperNotCalledException e) {
        ......
    } catch (Exception e) {
        ......
    }
    return activity;
}
7.下面分析下Activity.attach()函数,它创建window对象,设置window manager。
attach()@Activity.java
final void attach(Context context, ActivityThread aThread,
                  Instrumentation instr, IBinder token, int ident,
                  Application application, Intent intent, ActivityInfo info,
                  CharSequence title, Activity parent, String id,
                  NonConfigurationInstances lastNonConfigurationInstances,
                  Configuration config) {
    attachBaseContext(context);            // 把context赋值给父类的mBase成员

    mFragments.attachActivity(this, mContainer, null);

    mWindow = PolicyManager.makeNewWindow(this);            // 调用PolicyManager的函数创建Window对象。
    mWindow.setCallback(this);
    mWindow.getLayoutInflater().setPrivateFactory(this);
    if (info.softInputMode != WindowManager.LayoutParams.SOFT_INPUT_STATE_UNSPECIFIED) {
        mWindow.setSoftInputMode(info.softInputMode);          //设置输入法mode
    }
    if (info.uiOptions != 0) {
        mWindow.setUiOptions(info.uiOptions);
    }
    mUiThread = Thread.currentThread();
    // 赋值给Acitivity的各个成员
    mMainThread = aThread;                            //mMainThread实际上为ActivityThread。
    mInstrumentation = instr;
    mToken = token;
    mIdent = ident;
    mApplication = application;
    mIntent = intent;
    mComponent = intent.getComponent();
    mActivityInfo = info;
    mTitle = title;
    mParent = parent;
    mEmbeddedID = id;
    mLastNonConfigurationInstances = lastNonConfigurationInstances;

    // 创建WindowManager对象并设置给window,供window使用.
    mWindow.setWindowManager((WindowManager)context.getSystemService(Context.WINDOW_SERVICE),
                             mToken, mComponent.flattenToString(),
                             (info.flags & ActivityInfo.FLAG_HARDWARE_ACCELERATED) != 0);
    if (mParent != null) {
        mWindow.setContainer(mParent.getWindow());
    }
    mWindowManager = mWindow.getWindowManager();   // 保存WindowManager对象.
    mCurrentConfig = config;
}
8. 其中一个关键的函数PolicyManager.makeNewWindow()返回的Window对象,实际上是一个PhoneWindow对象。
具体创建过程参考下面代码:
class [email protected]
public final class PolicyManager {
    private static final String POLICY_IMPL_CLASS_NAME =
        "com.android.internal.policy.impl.Policy";

    private static final IPolicy sPolicy;      // sPolicy为单例的IPolicy对象。
    static {
        // Pull in the actual implementation of the policy at run-time
        try {
            Class policyClass = Class.forName(POLICY_IMPL_CLASS_NAME);
            sPolicy = (IPolicy)policyClass.newInstance();   // 创建Policy对象。
        } catch (ClassNotFoundException ex) {
            ......
        }
    }
    // Cannot instantiate this class
    private PolicyManager() {}

    // The static methods to spawn new policy-specific objects
    public static Window makeNewWindow(Context context) {
        return sPolicy.makeNewWindow(context);    //通过Policy对象的makeNewWindow创建一个Window。
    }
    ......
}
class [email protected]
public class Policy implements IPolicy {
    private static final String TAG = "PhonePolicy";

    private static final String[] preload_classes = {
        "com.android.internal.policy.impl.PhoneLayoutInflater",
        "com.android.internal.policy.impl.PhoneWindow",
        "com.android.internal.policy.impl.PhoneWindow$1",
        "com.android.internal.policy.impl.PhoneWindow$DialogMenuCallback",
        "com.android.internal.policy.impl.PhoneWindow$DecorView",
        "com.android.internal.policy.impl.PhoneWindow$PanelFeatureState",
        "com.android.internal.policy.impl.PhoneWindow$PanelFeatureState$SavedState",
    };

    static {
        // For performance reasons, preload some policy specific classes when
        // the policy gets loaded.
        for (String s : preload_classes) {        // 加载所有的类
            try {
                Class.forName(s);
            } catch (ClassNotFoundException ex) {
                ......
            }
        }
    }
    public Window makeNewWindow(Context context) {
        return new PhoneWindow(context);                // 实际返回的PhoneWindow对象。
    }
    ......
}
9. setWindowManager()@Window.java
public void setWindowManager(WindowManager wm, IBinder appToken, String appName,
            boolean hardwareAccelerated) {
    mAppToken = appToken;
    mAppName = appName;
    mHardwareAccelerated = hardwareAccelerated || SystemProperties.getBoolean(PROPERTY_HARDWARE_UI, false);
    if (wm == null) {
        wm = (WindowManager)mContext.getSystemService(Context.WINDOW_SERVICE);
    }
    mWindowManager = ((WindowManagerImpl)wm).createLocalWindowManager(this);             // 创建一个WindowManagerImpl对象
}
到这里可以看到,Activity成员变量mWindow实际上是PhoneWindow类型, 变量mWindowManager实际上是WindowManagerImpl。这
10. Acitivity.attach()函数被调用之后,performLaunchActivity还会触发Activity.onCreate()函数被调用,在这个函数中会调用setContentView()函数设置Activity的UI内容。
setContentView()有三种实现,它们的功能基本一致,都是将view添加到mContentParent中:
setContentView()@Activity.java
// 通过一个布局资源设置activity的内容。
public void setContentView(int layoutResID) {
    getWindow().setContentView(layoutResID);
    initActionBar();
}

// 直接将View作为内容直接设置到activity的视图层次中。这种方式设置给view的layoutparams将不起作用,默认为MATCH_PARENT.
public void setContentView(View view) {
    getWindow().setContentView(view);
    initActionBar();
}

// 设置activity的内容为view, 并设置view的LayoutParams.
public void setContentView(View view, ViewGroup.LayoutParams params) {
    getWindow().setContentView(view, params);
    initActionBar();
}
下面给出其中一种实现:
setContentView()@PhoneWindow.java
public void setContentView(View view, ViewGroup.LayoutParams params) {
    if (mContentParent == null) {
        installDecor();                // 初始化DecorView和mContentParent.
    } else {
        mContentParent.removeAllViews();
    }
    mContentParent.addView(view, params);
    final Callback cb = getCallback();
    if (cb != null && !isDestroyed()) {
        cb.onContentChanged();
    }
}
installDecor()@PhoneWindow.java
private void installDecor() {
    if (mDecor == null) {
        mDecor = generateDecor();
                ......
    }
    if (mContentParent == null) {
        mContentParent = generateLayout(mDecor);
        mTitleView = (TextView)findViewById(com.android.internal.R.id.title);  // 创建标题栏
        ......
    }
}
generateDecor()@PhoneWindow.java
protected DecorView generateDecor() {
    return new DecorView(getContext(), -1);      // DecorView从FrameLayout派生,同时实现RootViewSurfaceTaker接口。
}
generateLayout()@PhoneWindow.java
protected ViewGroup generateLayout(DecorView decor) {
    ......
    // Inflate the window decor.
    int layoutResource;      // 根据情况获取相应的标题栏资源ID。
    int features = getLocalFeatures();
    if ((features & ((1 << FEATURE_LEFT_ICON) | (1 << FEATURE_RIGHT_ICON))) != 0) {
        if (mIsFloating) {
            ......
            layoutResource = res.resourceId;
        }
        ......
    }

    mDecor.startChanging();

    View in = mLayoutInflater.inflate(layoutResource, null);        //inflate 标题栏
    decor.addView(in, new ViewGroup.LayoutParams(MATCH_PARENT, MATCH_PARENT));      // 加入标题栏

    ViewGroup contentParent = (ViewGroup)findViewById(ID_ANDROID_CONTENT);  // ID_ANDROID_CONTENT:xml布局文件中main layout的ID, 实际上是mDecorView的一部分。
    ......
    mDecor.finishChanging();
    return contentParent;
}
findViewById()@Window.java
public View findViewById(int id) {
    return getDecorView().findViewById(id);
}
通过上面的代码可以看到,在Activity.onCreate()函数里调用setContentView设置的View,实际上会作为DecorView的子view。DecorView还处理了标题栏显示等工作。
addView()@ViewGroup.java
public void addView(View child, int index, LayoutParams params) {
    // addViewInner()函数中设置LayoutParams时会调用child.requestLayout(),在这里调用,为了在这里阻塞child的request.
    requestLayout();
    invalidate(true);     //在下一篇文章中会介绍这个函数
    addViewInner(child, index, params, false);
}
11. 我们接着看handleLaunchActivity()中的handleResumeActivity()函数,
handleResumeActivity()@ActivityThread.java
final void handleResumeActivity(IBinder token, boolean clearHide, boolean isForward, boolean reallyResume) {
    ......
    ActivityClientRecord r = performResumeActivity(token, clearHide);          //会调用到Activity.onResume().

    if (r != null) {
        final Activity a = r.activity;
        final int forwardBit = isForward ? WindowManager.LayoutParams.SOFT_INPUT_IS_FORWARD_NAVIGATION : 0;

        // If the window hasn't yet been added to the window manager,
        // and this guy didn't finish itself or start another activity,
        // then go ahead and add the window.
        // 若这个activity的window没有加到window manager中,而且它没有自己finish或者启动另外一个acitivity,那就继续,添加这个window.
        boolean willBeVisible = !a.mStartedActivity;
        if (!willBeVisible) {
            try {
                willBeVisible = ActivityManagerNative.getDefault().willActivityBeVisible(a.getActivityToken());
            } catch (RemoteException e) {
            }
        }
        if (r.window == null && !a.mFinished && willBeVisible) {
            r.window = r.activity.getWindow();                 // 获得在attach()函数中创建出来的window对象。
            View decor = r.window.getDecorView();             // 获得一个View对象
            decor.setVisibility(View.INVISIBLE);
            ViewManager wm = a.getWindowManager();            // 获得ViewManager对象
            WindowManager.LayoutParams l = r.window.getAttributes();
            a.mDecor = decor;
            l.type = WindowManager.LayoutParams.TYPE_BASE_APPLICATION;
            l.softInputMode |= forwardBit;
            if (a.mVisibleFromClient) {
                a.mWindowAdded = true;
                wm.addView(decor, l);                          // 添加View对象到WindowManager中。
            }
        } else if (!willBeVisible) { // 如果window已经被添加了,但在resume时启动另外的activity,这个window将隐藏。
           r.hideForNow = true;
        }

        // Get rid of anything left hanging around.
        cleanUpPendingRemoveWindows(r);
// 如果window添加了,执行到这的时候就可见了。
        if (!r.activity.mFinished && willBeVisible && r.activity.mDecor != null && !r.hideForNow) {
            if (r.newConfig != null) {
                 performConfigurationChanged(r.activity, r.newConfig);
                 freeTextLayoutCachesIfNeeded(r.activity.mCurrentConfig.diff(r.newConfig));
                 r.newConfig = null;
             }
             WindowManager.LayoutParams l = r.window.getAttributes();
             if ((l.softInputMode & WindowManager.LayoutParams.SOFT_INPUT_IS_FORWARD_NAVIGATION) != forwardBit) {
                 l.softInputMode = (l.softInputMode
                                    & (~WindowManager.LayoutParams.SOFT_INPUT_IS_FORWARD_NAVIGATION))
                                    | forwardBit;
                 if (r.activity.mVisibleFromClient) {
                     ViewManager wm = a.getWindowManager();
                     View decor = r.window.getDecorView();
                     wm.updateViewLayout(decor, l);      // 根据输入法显示模式调整winddow layout。
                 }
             }
             r.activity.mVisibleFromServer = true;
             mNumVisibleActivities++;
             if (r.activity.mVisibleFromClient) {
                    r.activity.makeVisible();
             }
        }

        if (!r.onlyLocalRequest) {
             r.nextIdle = mNewActivities;
             mNewActivities = r;
             Looper.myQueue().addIdleHandler(new Idler());
        }
        r.onlyLocalRequest = false;

        // Tell the activity manager we have resumed.
        if (reallyResume) {
            try {
                ActivityManagerNative.getDefault().activityResumed(token);
            } catch (RemoteException ex) {
         }
     }
   } else {
         // If an exception was thrown when trying to resume, then just end this activity.
         // 如果resume过程出现异常,就finish这个activity.
         try {
                ActivityManagerNative.getDefault().finishActivity(token, Activity.RESULT_CANCELED, null);
         } catch (RemoteException ex) {
         }
    }
}
addView()@WindowManagerGlobal.java
public void addView(View view, ViewGroup.LayoutParams params,
    Display display, Window parentWindow) {
    ......
    ViewRootImpl root;
    View panelParentView = null;

    synchronized (mLock) {
        ......
        root = new ViewRootImpl(view.getContext(), display);    // 创建ViewRootImpl对象

        view.setLayoutParams(wparams);

        mViews.add(view);
        mRoots.add(root);
        mParams.add(wparams);
    }
    // do this last because it fires off messages to start doing things
    try {
        root.setView(view, wparams, panelParentView);          // setView()内调用requestLayout(). 在被加到WindowManager之前调度第一次layout,确保收到系统事件之前重新进行了布局。
    } catch (RuntimeException e) {
              ......
    }
}
ViewRootImpl及setView()涉及到了UI绘制。启动相关更多的细节在下一篇中进行分析。

