Spring/SpringBoot系列之SpringBoot自定义starter实战【十一】
阅读本文前,推荐阅读:Spring/SpringBoot系列之SpringBoot 自动配置原理【十】
SpringBoot的核心就是自动配置,而支持自动配置的是一个个starter项目。除了官方已有的starter,也可以根据规则自定义自己的starter项目。而 Starter项目的核心就是条件注解 @Conditional,当 classpath 下存在某一个 Class 时,某个配置才会生效。下面来进行实战:
1. 创建starter项目
该操作共分为7步:
- 创建一个maven项目;
- 导入依赖spring-boot-autoconfigure依赖;
- 创建MyStarterProperties类用来注入属性;
- 创建MyStarterService类来实现属性调用;
- 创建自动配置类MyStarterAutoConfiguration;
- 创建META-INF/spring.factories文件并把自动配置类配置进去;
- 安装到本地仓库或公司私服仓库
1.1 创建一个maven项目
starter项目其实就是普通的maven项目,所以先使用idea创建一个maven项目(当然也可以使用mvn命令行来创建):

然后下一步下一步根据提示操作就好了,没什么说的。
1.2 导入自动配置依赖
<dependency>
	<groupId>org.springframework.boot</groupId>
    <artifactId>spring-boot-autoconfigure</artifactId>
    <version>2.1.7.RELEASE</version>
</dependency>
1.3 创建MyStarterProperties类
package com.linyf.config;

import org.springframework.boot.context.properties.ConfigurationProperties;

@ConfigurationProperties(prefix = "my-starter")
public class MyStarterProperties {
    private static final String DEFAULT_NAME = "linyf";
    private static final String DEFAULT_MSG = "love-java";
    private String name = DEFAULT_NAME;
    private String msg = DEFAULT_MSG;
    public String getName() {
        return name;
    }
    public void setName(String name) {
        this.name = name;
    }
    public String getMsg() {
        return msg;
    }
    public void setMsg(String msg) {
        this.msg = msg;
    }
}
有两点需要说明:
-
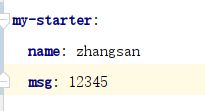
@ConfigurationProperties注解作用是属性注入,意思是将 application.properties或applocation.yml 文件中前缀为 my-starter 的属性注入到这个类对应的属性上, applocation.yml配置文件大概如下:
  my-starter:
	name: zhangsan
	msg: java
关于属性注入注解等核心注解,推荐阅读:Spring/SpringBoot系列之SpringBoot 源码常用注解【九】
-
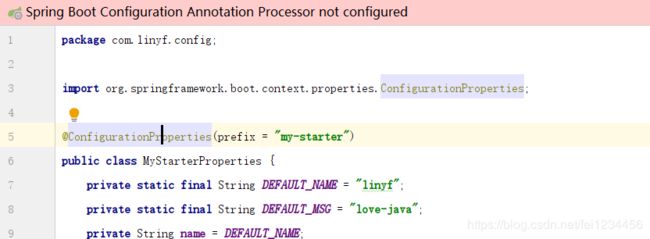
idea编辑区上面会出现Spring Boot Configuration Annotation Processor not configured警告,意思是确实spring-boot-configuration-processor依赖,虽然不影响,但是有强迫症的人看着总会不爽。
导入依赖前:
导入依赖后:<dependency> <groupId>org.springframework.boot</groupId> <artifactId>spring-boot-configuration-processor</artifactId> <optional>true</optional> <version>2.1.7.RELEASE</version> </dependency>
1.4 创建MyStarterService类
package com.linyf.service;

public class MyStarterService {
    private String msg;
    private String name;
    public String sayHello() {
        return name + " say " + msg + " !";
    }
    public String getMsg() {
        return msg;
    }
    public void setMsg(String msg) {
        this.msg = msg;
    }
    public String getName() {
        return name;
    }
    public void setName(String name) {
        this.name = name;
    }
}
1.5 创建自动配置类MyStarterAutoConfiguration
package com.linyf.config;

import com.linyf.service.MyStarterService;
import org.springframework.beans.factory.annotation.Autowired;
import org.springframework.boot.autoconfigure.condition.ConditionalOnClass;
import org.springframework.boot.context.properties.EnableConfigurationProperties;
import org.springframework.context.annotation.Bean;
import org.springframework.context.annotation.Configuration;

@Configuration
@EnableConfigurationProperties(MyStarterProperties.class)
@ConditionalOnClass(MyStarterService.class)
public class MyStarterAutoConfiguration {
    @Autowired
    MyStarterProperties myStarterProperties;

    @Bean
    MyStarterService myStarterService() {
        MyStarterService myStarterService = new MyStarterService();
        myStarterService.setName(myStarterProperties.getName());
        myStarterService.setMsg(myStarterProperties.getMsg());
        return myStarterService;
    }
}
注解说明:
- @Configuration:表明这是一个配置类;
- @EnableConfigurationProperties:使之前 被@ConfigurationProperties标记的MyStarterProperties类 生效,并且让配置文件中的属性成功的注入进 MyStarterProperties 中;
- @ConditionalOnClass:当classpath下 存在 MyStarterService类 时,该配置类才生效。
代码说明:
自动配置类中首先注入 MyStarterProperties ,这个实例中含有配置文件 中配置的相关数据。提供一个 MyStarterService 的实例,将 MyStarterProperties 中的值注入进去。
1.6 注册自动配置类
在(Spring/SpringBoot系列之SpringBoot 自动配置原理【十】)中分析过starter的结构,自定义 Starter 当然也要符合这样的结构。
首先在 resources 目录下创建一个名为 META-INF 的文件夹,然后在文件夹中创建一个名为 spring.factories 的文件,文件内容如下:
org.springframework.boot.autoconfigure.EnableAutoConfiguration=\
com.linyf.config.MyStarterAutoConfiguration
如果有多个自动配置类,用逗号分隔换行即可。到这里,一个基于Spring Boot的自动配置starter便完成了。
1.7 安装到maven仓库
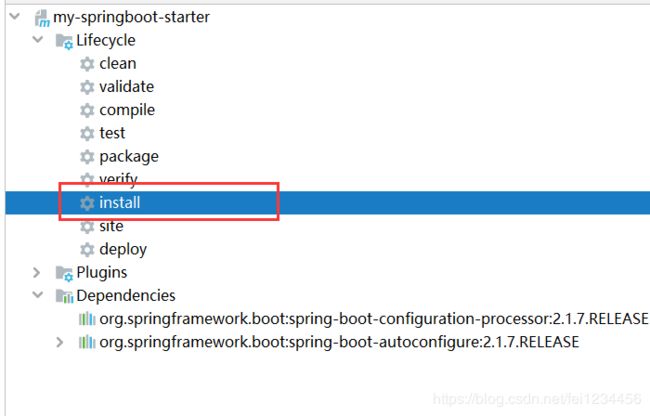
如果在公司里,需要将刚刚写好的自动化配置类打包,然后上传到 Maven 私服上;我这里就不需要了,只需要安装到本地maven仓库就行,在 IntelliJ IDEA 中,点击右边窗口 Maven Project ,然后选择 Lifecycle 中的 install ,双击即可:
2. 使用Starter
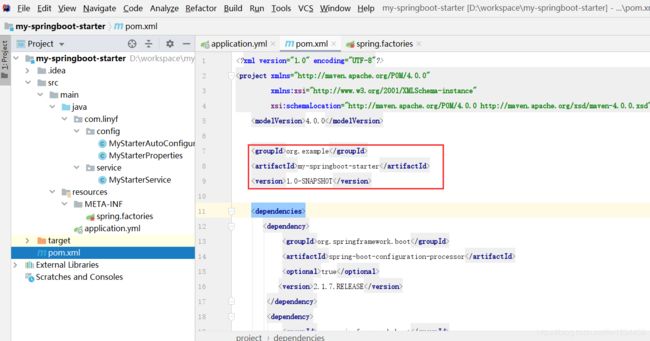
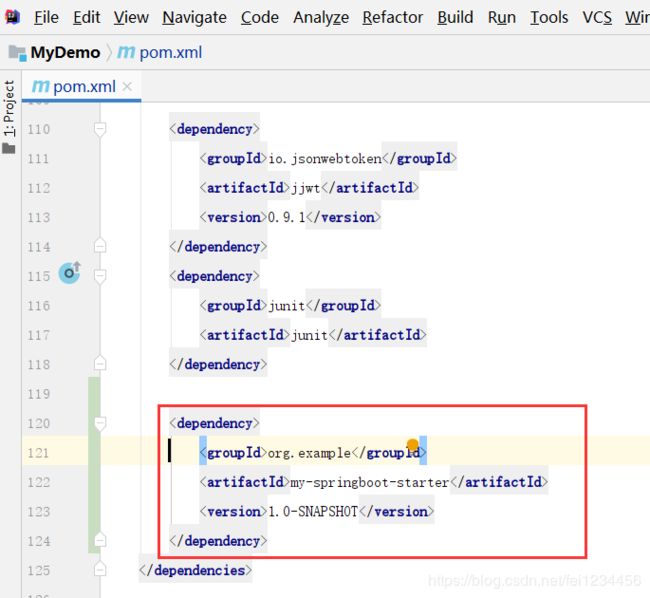
2.1 复制starter项目中的gav坐标到测试的springboot项目中:
2.2 编写测试类
package com.linyf.demo;
import com.linyf.service.MyStarterService;
import org.junit.Test;
import org.junit.runner.RunWith;
import org.springframework.beans.factory.annotation.Autowired;
import org.springframework.boot.test.context.SpringBootTest;
import org.springframework.test.context.junit4.SpringRunner;
@RunWith(SpringRunner.class)
@SpringBootTest
public class MyStarterTest {
@Autowired
private MyStarterService myStarterService;
@Test
public void contextLoads() {
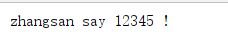
System.out.println(myStarterService.sayHello());
}
}
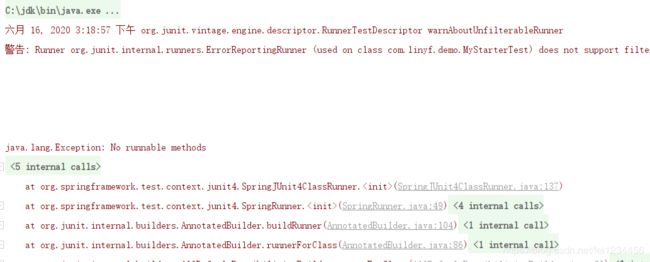
测试如下:
![]()
在配置文件中添加如下配置:
再进行测试:
注意:@Test有两个包,此处应该使用org.junit.Test,另一个是org.junit.jupiter.api.Test,如果将org.junit.Test导错成了org.junit.jupiter.api.Test就会报报错: