Mybatis 源码分析:数据源与连接池
1. mybatis 数据源原理分析
mybatis 数据源 DataSource 的创建是在解析配置文件
<dataSource type="POOLED">
	<property name="url" value="" />
	<property name="driver" value="" />
	<property name="user" value="" />
	<property name="password" value="" />
dataSource>
可以看到

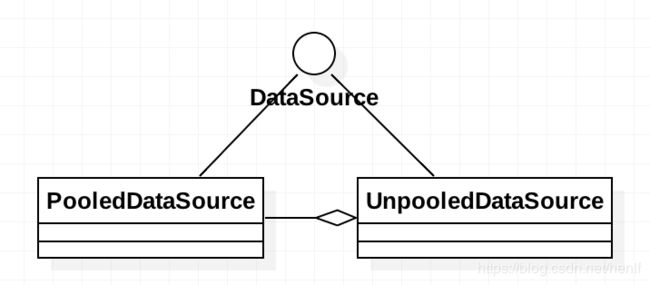
DataSource 是有了,那么 mybatis 是在什么时候获取 Connection 对象的呢?PooledDataSource 和 UnpooledDataSource 在获取 Connection 时又有什么区别?
2. Connection 获取原理分析
我们都知道获取 Connection 对象肯定是在要执行 sql 语句之前获取到的,即获取 PreparedStatement 对象时。因此我们看看 SimpleExecutor 的 prepareStatement() 方法做了什么事情。
private Statement prepareStatement(StatementHandler handler, Log statementLog) throws SQLException {
    Statement stmt;
    Connection connection = getConnection(statementLog);
    stmt = handler.prepare(connection, transaction.getTimeout());
    handler.parameterize(stmt);
    return stmt;
}
可以看到其中有一行代码调用了 getConnection() 方法,可以不用管传递的参数是什么,不影响分析获取 Connection 对象流程。
protected Connection getConnection(Log statementLog) throws SQLException {
    Connection connection = transaction.getConnection();
    if (statementLog.isDebugEnabled()) {
      return ConnectionLogger.newInstance(connection, statementLog, queryStack);
    } else {
      return connection;
    }
}
在这里可以看到它又去调用了 Transaction(抽象事物对象) 接口的 getConnection() 方法,在上一篇文章有说过 mybatis 的事物管理机制,在这里就不多说了。我们就以 JdbcTransaction 实现来讲解这个方法做了啥。
@Override
public Connection getConnection() throws SQLException {
	if (connection == null) {
	  openConnection();
	}
	return connection;
}
终于看到了获取 Connection 对象的曙光了,这里又调用了 openConnection() 方法:
protected void openConnection() throws SQLException {
    connection = dataSource.getConnection();
    if (level != null) {
      connection.setTransactionIsolation(level.getLevel());
    }
    setDesiredAutoCommit(autoCommmit);
}
此时,真正从数据源获取 Connection 对象了,在了解 mybatis 怎么实现缓存数据库连接之前,我们先从简单的开始了解,了解下通过 mybatis 提供的 UnpooledDataSource 获取 Connection 的过程。然后再说 PooledDataSource 获取 Connection 的过程。
3. UnpooledDataSource 获取 Connection 原理分析
@Override
public Connection getConnection() throws SQLException {
    return doGetConnection(username, password);
}

private Connection doGetConnection(String username, String password) throws SQLException {
	// 连接必要信息
    Properties props = new Properties();
    if (driverProperties != null) {
      props.putAll(driverProperties);
    }
    if (username != null) {
      props.setProperty("user", username);
    }
    if (password != null) {
      props.setProperty("password", password);
    }

    return doGetConnection(props);
}
private Connection doGetConnection(Properties properties) throws SQLException {
	// 加载驱动
    initializeDriver();
    // 从 DriverManager 获取 Connection 对象
    Connection connection = DriverManager.getConnection(url, properties);
    // 配置是否自动提交和事物隔离级别
    configureConnection(connection);
    return connection;
}
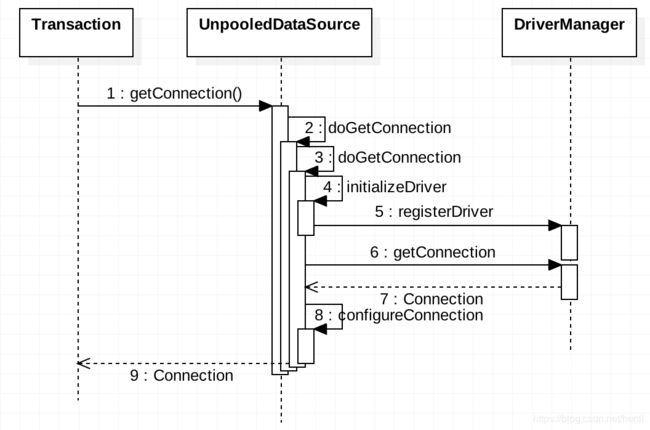
可以看到,doGetConnection() 方法 主要做三件事:
-
初始化 Driver:
判断 Driver 驱动是否已经加载到内存中,如果还没有加载,则会动态地加载 Driver 类,并实例化一个 Driver 对象,使用 DriverManager.registerDriver() 方法将其注册到内存中,以供后续使用,并缓存。
-
创建 Connection 对象:
使用 DriverManager.getConnection() 方法创建连接。
-
配置 Connection 对象:
设置是否自动提交和隔离级别。
那么问题来了,为什么需要对数据库连接 Connection 进行池化呢?我们可以想象一下,应用程序连接数据库,底层肯定用的是 TCP 网络通信,我们都知道,建立 TCP 连接需要进行三次握手,执行完一条 SQL 语句就释放 TCP 连接(释放需要四次握手),那么这是一个比较耗时耗资源的操作,如果当对数据库请求量比较大的话,那么每一次请求就建立一次 TCP 连接,这用户肯定受不了响应时间。我们也可以简单测试一下获取 Connection 对象一般需要多长时间:
long start = System.currentTimeMillis();
Connectionn conn =DriverManager.getConnection("url");
long end = System.currentTimeMillis();
System.out.println("consumed time is " + (end - start));
所以,我们需要对 Connection 对象进行池化,而 mybatis 刚好也为我们提供了池化的数据源:PooledDataSource,那我们就来看看它是怎么对 Connection 进行池化的。
4. PooledDataSource 获取 Connection 原理分析
先不管三七二十一,查看下 PooledDataSource 下的 getConnection() 方法做了什么:
@Override
public Connection getConnection() throws SQLException {
    return popConnection(dataSource.getUsername(), dataSource.getPassword()).getProxyConnection();
}
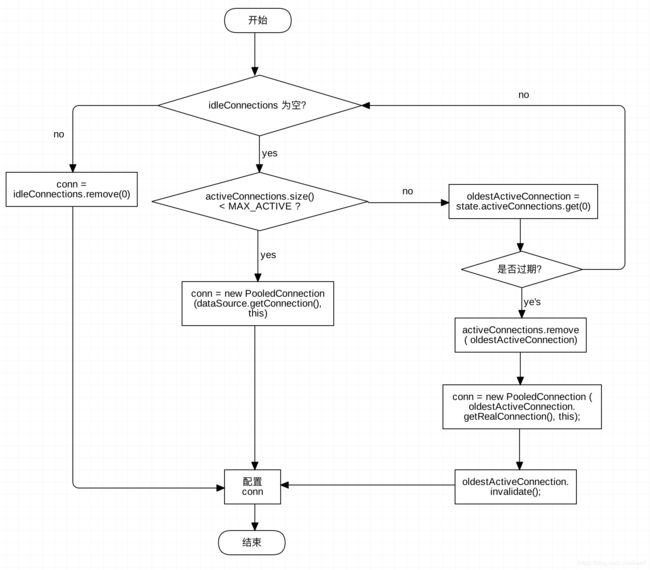
可以看到它去调用了 popConnection() 方法,从方法名翻译过来就是“弹出连接”,那么这个方法肯定会从集合里获取连接,我们来看看是否如猜测一样:
private PooledConnection popConnection(String username, String password) throws SQLException {
    boolean countedWait = false;
    PooledConnection conn = null;
    long t = System.currentTimeMillis();
    int localBadConnectionCount = 0;

    while (conn == null) {
      synchronized (state) {
      	// 是否有空闲连接
        if (!state.idleConnections.isEmpty()) {
          // 取出第一个空闲连接
          conn = state.idleConnections.remove(0);
          if (log.isDebugEnabled()) {
            log.debug("Checked out connection " + conn.getRealHashCode() + " from pool.");
          }
        } else {
          // 活跃连接数是否达到最大限定数
          if (state.activeConnections.size() < poolMaximumActiveConnections) {
            // 创建新连接
            conn = new PooledConnection(dataSource.getConnection(), this);
            if (log.isDebugEnabled()) {
              log.debug("Created connection " + conn.getRealHashCode() + ".");
            }
          } else {
            // 不能创建新连接
            PooledConnection oldestActiveConnection = state.activeConnections.get(0);
            long longestCheckoutTime = oldestActiveConnection.getCheckoutTime();
            if (longestCheckoutTime > poolMaximumCheckoutTime) {
              // Can claim overdue connection
              state.claimedOverdueConnectionCount++;
              state.accumulatedCheckoutTimeOfOverdueConnections += longestCheckoutTime;
              state.accumulatedCheckoutTime += longestCheckoutTime;
              state.activeConnections.remove(oldestActiveConnection);
              if (!oldestActiveConnection.getRealConnection().getAutoCommit()) {
                try {
                  oldestActiveConnection.getRealConnection().rollback();
                } catch (SQLException e) {
                  log.debug("Bad connection. Could not roll back");
                }
              }
              conn = new PooledConnection(oldestActiveConnection.getRealConnection(), this);
              conn.setCreatedTimestamp(oldestActiveConnection.getCreatedTimestamp());
              conn.setLastUsedTimestamp(oldestActiveConnection.getLastUsedTimestamp());
              oldestActiveConnection.invalidate();
              if (log.isDebugEnabled()) {
                log.debug("Claimed overdue connection " + conn.getRealHashCode() + ".");
              }
            } else {
              // 如果不能释放,必须等待
              try {
                if (!countedWait) {
                  state.hadToWaitCount++;
                  countedWait = true;
                }
                if (log.isDebugEnabled()) {
                  log.debug("Waiting as long as " + poolTimeToWait + " milliseconds for connection.");
                }
                long wt = System.currentTimeMillis();
                state.wait(poolTimeToWait);
                state.accumulatedWaitTime += System.currentTimeMillis() - wt;
              } catch (InterruptedException e) {
                break;
              }
            }
          }
        }
        // 获取 PooledConnection 成功,更新信息
        if (conn != null) {
          if (conn.isValid()) {
            if (!conn.getRealConnection().getAutoCommit()) {
              conn.getRealConnection().rollback();
            }
            conn.setConnectionTypeCode(assembleConnectionTypeCode(dataSource.getUrl(), username, password));
            conn.setCheckoutTimestamp(System.currentTimeMillis());
            conn.setLastUsedTimestamp(System.currentTimeMillis());
            state.activeConnections.add(conn);
            state.requestCount++;
            state.accumulatedRequestTime += System.currentTimeMillis() - t;
          } else {
            if (log.isDebugEnabled()) {
              log.debug("A bad connection (" + conn.getRealHashCode() + ") was returned from the pool, getting another connection.");
            }
            state.badConnectionCount++;
            localBadConnectionCount++;
            conn = null;
            if (localBadConnectionCount > (poolMaximumIdleConnections + 3)) {
              if (log.isDebugEnabled()) {
                log.debug("PooledDataSource: Could not get a good connection to the database.");
              }
              throw new SQLException("PooledDataSource: Could not get a good connection to the database.");
            }
          }
        }
      }

    }

    if (conn == null) {
      if (log.isDebugEnabled()) {
        log.debug("PooledDataSource: Unknown severe error condition.  The connection pool returned a null connection.");
      }
      throw new SQLException("PooledDataSource: Unknown severe error condition.  The connection pool returned a null connection.");
    }

    return conn;
  }

不知道大家有没有留意到,在调用 PooledDataSource 类的 getConnection() 方法返回的是 javax.sql.Connection 类型,而 popConnection() 方法返回的是 mybatis 本身提供的 PooledConnection,而看 PooledConnection 继承体系,发现它并没有实现 Connection 接口,而是实现了 java.lang.reflect.InvocationHandler 接口,这个接口是为 jdk 动态代理功能提供的,确实也在调用 popConnection() 方法之后,调用了 PooledConnection 类的 getProxyConnection() 方法,获取 Connection 对象的代理实例。那么问题来了,为什么 mybatis 在这里要提供一个 Connection 对象的代理呢?
个人觉得有如下原因:
保持正常的代码模板。因为在平常我们使用完 Connection 后,需要关闭资源,会调用 Connection 的 close() 方法,那么现在使用连接池后,不是真的去关闭资源,而是把 Connection 重新放入池子里,供下次使用。那么如果使用如下代码:
PoolConnction.push(Connection);这样显示放入池子里不优雅,也不符合正常写 jdbc 代码。因此就有在调用 Connection 的 close() 方法时,实际上并不是真的去关闭资源,那么我们就得需要一种机制知道调用的是什么方法,而动态代理机制刚好可以做到。
我们可以看看 PooledConnection 类的 invoke() 方法:
@Override
public Object invoke(Object proxy, Method method, Object[] args) throws Throwable {
    String methodName = method.getName();
    if (CLOSE.hashCode() == methodName.hashCode() && CLOSE.equals(methodName)) {
      dataSource.pushConnection(this);
      return null;
    } else {
      try {
        if (!Object.class.equals(method.getDeclaringClass())) {
          checkConnection();
        }

        return method.invoke(realConnection, args);
      } catch (Throwable t) {
        throw ExceptionUtil.unwrapThrowable(t);
      }
    }
}
所有对 javax.sql.Connection 类的方法都会进入此方法中,可以看到,首先会判断是否调用了 close 方法,如果是的话,会执行 dataSource.pushConnection(this) 这行代码,做到了对用户无感知。
