Ubuntu18.0.4 ROS安装教程和实测问题解决ros init 和rosdep update
本文主要介绍安装过程以及两个常见问题的解决,教程在前面,如果你遇到安装问题,请看后面两个问题的解决(实测问题解决ros init 和rosdep update)(主要是国外软件源安装太慢换到国内源然后导致的问题)
一安装教程
二问题解决
安装
1.前期准备
在application里找到软件和更新,把下面的都勾上,修改下软件源
2.设置软件源:
设置清华的软件源:
sudo sh -c '. /etc/lsb-release && echo "deb http://mirrors.tuna.tsinghua.edu.cn/ros/ubuntu/ $DISTRIB_CODENAME main" > /etc/apt/sources.list.d
3.设置最新的密钥:
sudo apt-key adv --keyserver keyserver.ubuntu.com --recv-keys F42ED6FBAB17C6544.安装:
sudo apt-get update
sudo apt-get install ros-melodic-desktop-full
sudo apt-get install ros-melodic-rqt*
5.初始化rosdep:
sudo rosdep init
rosdep update
6.安装rosinstall
sudo apt-get install python-rosinstall
7.加载环境设置文件
source /opt/ros/melodic/setup.bash
8.加载环境设置文件
source /opt/ros/melodic/setup.bash
9.创建并初始化工作目录
ROS使用一个名为catkin的ROS专用构建系统。为了使用它,用户需要创建并初始化
catkin工作目录,如下所示。除非用户创建新的工作目录,否则此设置只需设置一次。
mkdir -p ~/catkin_ws/src
cd ~/catkin_ws/src
catkin_init_workspace
目前,只有src目录和CMakeLists.txt文件在catkin工作目录中,使用catkin_make命令来构建
cd ~/catkin_ws/
catkin_make
10.设置环境变量:
sudo apt install net-tools
gedit ~/.bashrc
把下面这个复制到bashrc文件了并保存,
# Set ROS melodic
source /opt/ros/melodic/setup.bash
source ~/catkin_ws/devel/setup.bash
# Set ROS Network
#ifconfig查看你的电脑ip地址
export ROS_HOSTNAME=192.168.89.135
export ROS_MASTER_URI=http://${ROS_HOSTNAME}:11311
# Set ROS alias command 快捷指令
alias cw='cd ~/catkin_ws'
alias cs='cd ~/catkin_ws/src'
alias cm='cd ~/catkin_ws && catkin_make'
注意:
这里面主要是电脑网络地址的设定,要是出现问题你可以修改下ip地址,还有就是切换网络要修改上面的ip 才可以不然会出现error
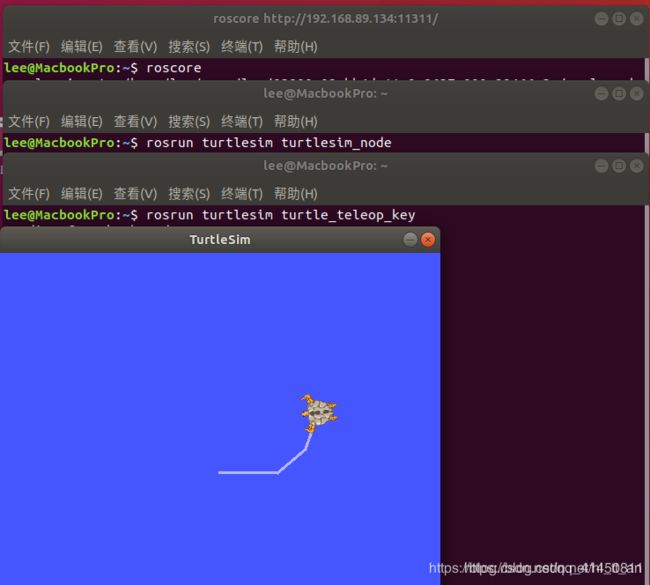
finaly小海龟测试,打开三个终端:
-
roscore -
rosrun turtlesim turtlesim_node -
rosrun turtlesim turtle_teleop_key -
出现下面的界面那么恭喜你装成功了
1:rosdep init出错返回ERROR:cannot download default sources list from:
首先出现了这个问题的时候,使用浏览器浏览这个页面:
https://raw.githubusercontent.com/ros/rosdistro/master/rosdep/sources.list.d/20-default.list
发现是进不去的,所以自然没办法download。
解决办法
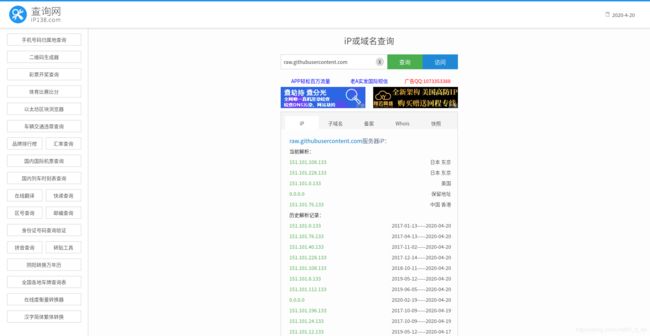
打开https://site.ip138.com/raw.Githubusercontent.com/
输入raw.githubusercontent.com
查询IP地址,一般选择中国香港的地址
修改hosts Ubuntu,直接在终端输入
sudo vi /etc/hosts
添加以下内容保存即可 (IP地址查询后相应修改,可以ping不同IP的延时 选择最佳IP地址,一般选择中国香港的地址,那个修改ip地址就是我加粗的地方)
# GitHub Start
52.74.223.119 github.com
192.30.253.119 gist.github.com
54.169.195.247 api.github.com
185.199.111.153 assets-cdn.github.com
151.101.76.133 raw.githubusercontent.com
151.101.108.133 user-images.githubusercontent.com
151.101.76.133 gist.githubusercontent.com
151.101.76.133 cloud.githubusercontent.com
151.101.76.133 camo.githubusercontent.com
151.101.76.133 avatars0.githubusercontent.com
151.101.76.133 avatars1.githubusercontent.com
151.101.76.133 avatars2.githubusercontent.com
151.101.76.133 avatars3.githubusercontent.com
151.101.76.133 avatars4.githubusercontent.com
151.101.76.133 avatars5.githubusercontent.com
151.101.76.133 avatars6.githubusercontent.com
151.101.76.133 avatars7.githubusercontent.com
151.101.76.133 avatars8.githubusercontent.com
# GitHub End
修改保存退出之后再rosdep init然后继续按照教程安装
可能还会出现错误,这个问题有很多方面,如该上述方法不行请点击这个链接排查https://zhuanlan.zhihu.com/p/77483614
2:ming@ming:~$ rosdep update
reading in sources list data from /etc/ros/rosdep/sources.list.d
ERROR: unable to process source [https://raw.githubusercontent.com/ros/rosdistro/master/rosdep/osx-homebrew.yaml]:
ERROR: unable to process source [https://raw.githubusercontent.com/ros/rosdistro/master/rosdep/base.yaml]:
ERROR: unable to process source [https://raw.githubusercontent.com/ros/rosdistro/master/rosdep/python.yaml]:
解决办法:
步骤1:在更换下载源时,点击Select Best Server,等待几分钟,弹出推荐的下载源,选择它.
步骤2:再次输入命令sudo apt-get update
步骤3:再次输入命令rosdep update, 成功.


