Spring Boot2.x 自定义Starter实例讲解
文章目录
- 1、创建工程,并引入自定配置依赖
- 2、创建配置文件XxxProperties
- 3、核心服务类UserService
- 4、自动配置类
- 5、创建spring.factories 配置文件
- 6. 打包
- 7. 使用此starter
- 8、测试:
1、创建工程,并引入自定配置依赖
<?xml version="1.0" encoding="UTF-8"?>
<project xmlns="http://maven.apache.org/POM/4.0.0" xmlns:xsi="http://www.w3.org/2001/XMLSchema-instance"
         xsi:schemaLocation="http://maven.apache.org/POM/4.0.0 https://maven.apache.org/xsd/maven-4.0.0.xsd">
    <modelVersion>4.0.0</modelVersion>

    <groupId>com.mytest/groupId>
    <artifactId>hello-starer</artifactId>
    <version>1.0</version>
    <name>hello-starer</name>

    <properties>
        <java.version>1.8</java.version>
    </properties>

    <dependencies>
        <dependency>
            <groupId>org.springframework.boot</groupId>
            <artifactId>spring-boot-autoconfigure</artifactId>
            <version>2.2.5.RELEASE</version>
        </dependency>
        <dependency>
            <groupId>org.springframework.boot</groupId>
            <artifactId>spring-boot-configuration-processor</artifactId>
            <version>2.2.5.RELEASE</version>
            <optional>true</optional>
        </dependency>
    </dependencies>

    <build>
        <plugins>
            <plugin>
                <groupId>org.springframework.boot</groupId>
                <artifactId>spring-boot-maven-plugin</artifactId>
            </plugin>
        </plugins>
    </build>

</project>
2、创建配置文件XxxProperties
我们来定义自己的Properties类 UserProperties
**package com.example.demo;

import org.springframework.boot.context.properties.ConfigurationProperties;
import org.springframework.stereotype.Component;

@Component
@ConfigurationProperties(prefix = "spring.user")
public class UserProperties {
    private String name;  // 姓名
    private int age;   // 年龄
    private String sex = "男";  // 性别

    public String getName() {
        return name;
    }

    public void setName(String name) {
        this.name = name;
    }

    public int getAge() {
        return age;
    }

    public void setAge(int age) {
        this.age = age;
    }

    public String getSex() {
        return sex;
    }

    public void setSex(String sex) {
        this.sex = sex;
    }
}
**
3、核心服务类UserService
package com.example.demo;

import org.springframework.stereotype.Service;

@Service
public class UserService {
    private UserProperties properties;

    public UserService() {
    }

    public UserService(UserProperties properties) {
        this.properties = properties;
    }

    public void sayHello(){
        System.out.println("hello: " + properties.getName() + ", " + properties.getAge() + "yeas old "
                + ", sex: " + properties.getSex());
    }
}
4、自动配置类
我们定义自己的自动配置UserAutoConfiguration,并将核心功能类PersonService放入到Spring Context容器中
package com.example.demo;

import org.springframework.beans.factory.annotation.Autowired;
import org.springframework.boot.autoconfigure.condition.ConditionalOnClass;
import org.springframework.boot.autoconfigure.condition.ConditionalOnMissingBean;
import org.springframework.boot.autoconfigure.condition.ConditionalOnProperty;
import org.springframework.boot.context.properties.EnableConfigurationProperties;
import org.springframework.context.annotation.Bean;
import org.springframework.context.annotation.Configuration;

@Configuration
@EnableConfigurationProperties(UserProperties.class)
@ConditionalOnClass(UserService.class)
@ConditionalOnProperty(prefix = "spring.user", value = "enabled", matchIfMissing = true)
public class UserAutoConfiguration {
    @Autowired
    private UserProperties properties;

    @Bean
    @ConditionalOnMissingBean(UserService.class)  // 当容器中没有指定Bean的情况下,自动配置UserService类
    public UserService userService(){
        UserService userService = new UserService(properties);
        return userService;
    }
}
@ConditionalOnClass:当类路径classpath下有指定的类的情况下进行自动配置
@ConditionalOnMissingBean:当容器(Spring Context)中没有指定Bean的情况下进行自动配置
@ConditionalOnProperty(prefix = “example.service”, value = “enabled”,
matchIfMissing =
true),当配置文件中example.service.enabled=true时进行自动配置,如果没有设置此值就默认使用matchIfMissing对应的值@ConditionalOnMissingBean,当Spring Context中不存在该Bean时。
@ConditionalOnBean:当容器(Spring Context)中有指定的Bean的条件下
@ConditionalOnMissingClass:当类路径下没有指定的类的条件下
@ConditionalOnExpression:基于SpEL表达式作为判断条件
@ConditionalOnJava:基于JVM版本作为判断条件
@ConditionalOnJndi:在JNDI存在的条件下查找指定的位置
@ConditionalOnNotWebApplication:当前项目不是Web项目的条件下
@ConditionalOnWebApplication:当前项目是Web项目的条件下
@ConditionalOnResource:类路径下是否有指定的资源
@ConditionalOnSingleCandidate:当指定的Bean在容器中只有一个,或者在有多个Bean的情况下,用来指定首选的Bean
5、创建spring.factories 配置文件
src/main/resources/META-INF/spring.factories:注意:META-INF是自己手动创建的目录,spring.factories也是手动创建的文件,在该文件中配置自己的自动配置类
org.springframework.boot.autoconfigure.EnableAutoConfiguration=com.example.demo.UserAutoConfiguration
6. 打包
mvn clean install
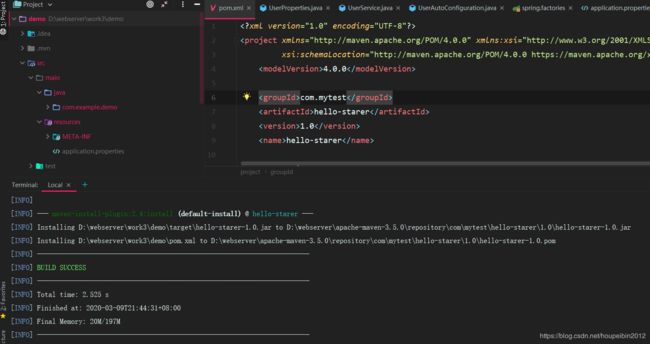
出现如下图所示,说明打包成功,包名为:hello-starer-1.0.jar

7. 使用此starter
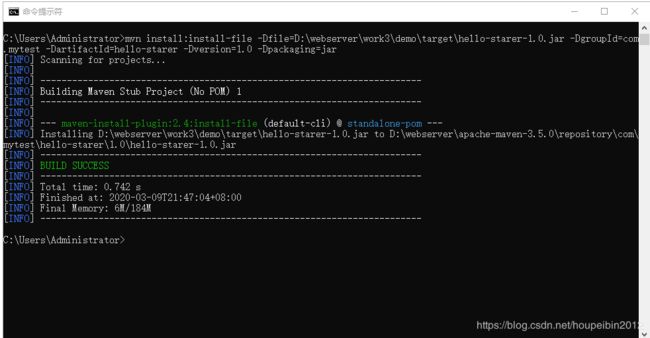
使用之前,先把hello-starer-1.0.jar入本地maven库,便于下面使用测试:
mvn install:install-file -Dfile=D:\webserver\work3\demo\target\hello-starer-1.0.1.jar -DgroupId=com.mytest -DartifactId=hello-starer -Dversion=1.0.1 -Dpackaging=jar
创建一个Spring Boot工程并引入依赖
 <dependency>
   <groupId>com.mytest</groupId>
    <artifactId>hello-starer</artifactId>
    <version>1.0.1</version>
</dependency>
在application.properties增加配置:
spring.user.name=binge
spring.user.age=101
spring.user.sex=man
8、测试:
@SpringBootTest
class DemoStarterTestApplicationTests {
    @Autowired
    private UserService userService;

    @Test
    public void testHelloWorld() {
        userService.sayHello();
    }

}
运行测试代码:
会打印:hello: binge, 101yeas old , sex: man 日志说明启动器设置成功。
