这个看官网https://www.hasor.net/介绍,来自:新东方教育集团内部软件部门开源的项目。
本文内容参考:https://blog.csdn.net/supingemail/article/details/105746521
Dataway介绍
Dataway 是基于 DataQL 服务聚合能力,为应用提供的一个接口配置工具。使得使用者无需开发任何代码就配置一个满足需求的接口。 整个接口配置、测试、冒烟、发布。一站式都通过 Dataway 提供的 UI 界面完成。UI 会以 Jar 包方式提供并集成到应用中并和应用共享同一个 http 端口,应用无需单独为 Dataway 开辟新的管理端口。
这种内嵌集成方式模式的优点是,可以使得大部分老项目都可以在无侵入的情况下直接应用 Dataway。进而改进老项目的迭代效率,大大减少企业项目研发成本。
Dataway 工具化的提供 DataQL 配置能力。这种研发模式的变革使得,相当多的需求开发场景只需要配置即可完成交付。 从而避免了从数据存取到前端接口之间的一系列开发任务,例如:Mapper、BO、VO、DO、DAO、Service、Controller 统统不在需要。
Dataway 是 Hasor 生态中的一员,因此在 Spring 中使用 Dataway 首先要做的就是打通两个生态。根据官方文档中推荐的方式我们将 Hasor 和 Spring Boot 整合起来。这里是原文:https://www.hasor.net/web/extends/spring/for_boot.html
第一步:引入相关依赖,直接贴POM.xml
此处应注意这个项目需要依赖web容器,所以需要引入springboot的web-starter组件
xml version="1.0" encoding="UTF-8"?>
<project xmlns="http://maven.apache.org/POM/4.0.0" xmlns:xsi="http://www.w3.org/2001/XMLSchema-instance"
         xsi:schemaLocation="http://maven.apache.org/POM/4.0.0 https://maven.apache.org/xsd/maven-4.0.0.xsd">
    <modelVersion>4.0.0modelVersion>
    <parent>
        <groupId>org.springframework.bootgroupId>
        <artifactId>spring-boot-starter-parentartifactId>
        <version>2.2.6.RELEASEversion>
        <relativePath/>
    parent>
    <groupId>com.testgroupId>
    <artifactId>api-hasor-testartifactId>
    <version>0.0.1-SNAPSHOTversion>
    <name>api-hasor-testname>
    <description>Demo project for Spring Bootdescription>

    <properties>
        <java.version>1.8java.version>
    properties>

    <dependencies>
        <dependency>
            <groupId>mysqlgroupId>
            <artifactId>mysql-connector-javaartifactId>
            <version>5.1.30version>
        dependency>
        <dependency>
            <groupId>com.alibabagroupId>
            <artifactId>druidartifactId>
            <version>1.1.21version>
        dependency>
        <dependency>
            <groupId>org.springframework.bootgroupId>
            <artifactId>spring-boot-starter-jdbcartifactId>
        dependency>
        <dependency>
            <groupId>org.springframework.bootgroupId>
            <artifactId>spring-boot-starter-webartifactId>
        dependency>
        <dependency>
            <groupId>com.alibabagroupId>
            <artifactId>druid-spring-boot-starterartifactId>
            <version>1.1.10version>
        dependency>

        <dependency>
            <groupId>org.springframework.bootgroupId>
            <artifactId>spring-boot-starter-testartifactId>
            <scope>testscope>
            <exclusions>
                <exclusion>
                    <groupId>org.junit.vintagegroupId>
                    <artifactId>junit-vintage-engineartifactId>
                exclusion>
            exclusions>
        dependency>

        <dependency>
            <groupId>net.hasorgroupId>
            <artifactId>hasor-springartifactId>
            <version>4.1.3version>
        dependency>
        <dependency>
            <groupId>net.hasorgroupId>
            <artifactId>hasor-datawayartifactId>
            <version>4.1.3-fix20200414version>
        dependency>

    dependencies>

    <build>
        <plugins>
            <plugin>
                <groupId>org.springframework.bootgroupId>
                <artifactId>spring-boot-maven-pluginartifactId>
            plugin>
        plugins>
    build>

project>
hasor-spring 负责 Spring 和 Hasor 框架之间的整合。
hasor-dataway 是工作在 Hasor 之上,利用 hasor-spring 我们就可以使用 dataway了。
第二步:配置 Dataway,并初始化数据表
dataway 会提供一个界面让我们配置接口,这一点类似 Swagger 只要jar包集成就可以实现接口配置。找到我们 springboot 项目的配置文件 application.properties
直接贴代码:
# 是否启用 Dataway 功能(必选:默认false)
HASOR_DATAQL_DATAWAY=true

# 是否开启 Dataway 后台管理界面(必选:默认false)
HASOR_DATAQL_DATAWAY_ADMIN=true

# dataway  API工作路径(可选,默认:/api/)
HASOR_DATAQL_DATAWAY_API_URL=/api/

# dataway-ui 的工作路径(可选,默认:/interface-ui/)
HASOR_DATAQL_DATAWAY_UI_URL=/interface-ui/

# SQL执行器方言设置(可选,建议设置)
HASOR_DATAQL_FX_PAGE_DIALECT=mysql

# db
spring.datasource.url=jdbc:mysql://192.168.16.5:3306/testdb
spring.datasource.username=root
spring.datasource.password=root
spring.datasource.driver-class-name=com.mysql.jdbc.Driver
spring.datasource.type=com.alibaba.druid.pool.DruidDataSource
# druid
spring.datasource.druid.initial-size=3
spring.datasource.druid.min-idle=3
spring.datasource.druid.max-active=10
spring.datasource.druid.max-wait=60000
spring.datasource.druid.stat-view-servlet.login-username=admin
spring.datasource.druid.stat-view-servlet.login-password=admin
spring.datasource.druid.filter.stat.log-slow-sql=true
spring.datasource.druid.filter.stat.slow-sql-millis=1
Dataway 一共涉及到 5个可以配置的配置项,但不是所有配置都是必须的。
其中 HASOR_DATAQL_DATAWAY、HASOR_DATAQL_DATAWAY_ADMIN 两个配置是必须要打开的,默认情况下 Datawaty 是不启用的。
Dataway 需要两个数据表才能工作,下面是这两个数据表的简表语句。下面这个 SQL 可以在 dataway的依赖 jar 包中 “META-INF/hasor-framework/mysql” 目录下面找到,建表语句是用 mysql 语法写的。
CREATE TABLE `interface_info` (
    `api_id`          int(11)      NOT NULL AUTO_INCREMENT   COMMENT 'ID',
    `api_method`      varchar(12)  NOT NULL                  COMMENT 'HttpMethod:GET、PUT、POST',
    `api_path`        varchar(512) NOT NULL                  COMMENT '拦截路径',
    `api_status`      int(2)       NOT NULL                  COMMENT '状态:0草稿,1发布,2有变更,3禁用',
    `api_comment`     varchar(255)     NULL                  COMMENT '注释',
    `api_type`        varchar(24)  NOT NULL                  COMMENT '脚本类型:SQL、DataQL',
    `api_script`      mediumtext   NOT NULL                  COMMENT '查询脚本:xxxxxxx',
    `api_schema`      mediumtext       NULL                  COMMENT '接口的请求/响应数据结构',
    `api_sample`      mediumtext       NULL                  COMMENT '请求/响应/请求头样本数据',
    `api_create_time` datetime     DEFAULT CURRENT_TIMESTAMP COMMENT '创建时间',
    `api_gmt_time`    datetime     DEFAULT CURRENT_TIMESTAMP COMMENT '修改时间',
    PRIMARY KEY (`api_id`)
) ENGINE=InnoDB AUTO_INCREMENT=0 DEFAULT CHARSET=utf8mb4 COMMENT='Dataway 中的API';

CREATE TABLE `interface_release` (
    `pub_id`          int(11)      NOT NULL AUTO_INCREMENT   COMMENT 'Publish ID',
    `pub_api_id`      int(11)      NOT NULL                  COMMENT '所属API ID',
    `pub_method`      varchar(12)  NOT NULL                  COMMENT 'HttpMethod:GET、PUT、POST',
    `pub_path`        varchar(512) NOT NULL                  COMMENT '拦截路径',
    `pub_status`      int(2)       NOT NULL                  COMMENT '状态:0有效,1无效(可能被下线)',
    `pub_type`        varchar(24)  NOT NULL                  COMMENT '脚本类型:SQL、DataQL',
    `pub_script`      mediumtext   NOT NULL                  COMMENT '查询脚本:xxxxxxx',
    `pub_script_ori`  mediumtext   NOT NULL                  COMMENT '原始查询脚本,仅当类型为SQL时不同',
    `pub_schema`      mediumtext       NULL                  COMMENT '接口的请求/响应数据结构',
    `pub_sample`      mediumtext       NULL                  COMMENT '请求/响应/请求头样本数据',
    `pub_release_time`datetime     DEFAULT CURRENT_TIMESTAMP COMMENT '发布时间(下线不更新)',
    PRIMARY KEY (`pub_id`)
) ENGINE=InnoDB AUTO_INCREMENT=0 DEFAULT CHARSET=utf8mb4 COMMENT='Dataway API 发布历史。';

create index idx_interface_release on interface_release (pub_api_id);
第三步:配置数据源
作为 Spring Boot 项目有着自己完善的数据库方面工具支持。我们这次采用 druid + mysql + spring-boot-starter-jdbc 的方式。如上面的pom.xml, 和 properties配置文件
第四步:把数据源设置到 Hasor 容器中
Spring Boot 和 Hasor 本是两个独立的容器框架,我们做整合之后为了使用 Dataway 的能力需要把 Spring 中的数据源设置到 Hasor 中。
首先新建一个 Hasor 的 模块,并且将其交给 Spring 管理。然后把数据源通过 Spring 注入进来
@DimModule
@Component
public class ExampleModule implements SpringModule {
    @Autowired
    private DataSource dataSource = null;

    @Override
    public void loadModule(ApiBinder apiBinder) throws Throwable {
        // .DataSource form Spring boot into Hasor
        apiBinder.installModule(new JdbcModule(Level.Full, this.dataSource));
    }
}
Hasor 启动的时候会调用 loadModule 方法,在这里再把 DataSource 设置到 Hasor 中。
第五步:在SprintBoot 中启用 Hasor
@EnableHasor()
@EnableHasorWeb()
@SpringBootApplication(scanBasePackages = { "net.example.hasor" })
public class ExampleApplication {
    public static void main(String[] args) {
        SpringApplication.run(ExampleApplication.class, args);
    }
}
这一步非常简单,只需要在 Spring 启动类上增加两个注解即可。
第六步:启动应用
应用在启动过程中会看到 Hasor Boot 的欢迎信息'
 _    _                        ____              _
| |  | |                      |  _ \            | |
| |__| | __ _ ___  ___  _ __  | |_) | ___   ___ | |_
|  __  |/ _` / __|/ _ \| '__| |  _ < / _ \ / _ \| __|
| |  | | (_| \__ \ (_) | |    | |_) | (_) | (_) | |_
|_|  |_|\__,_|___/\___/|_|    |____/ \___/ \___/ \__|
在后面的日志中还可以看到类似下面这些日志。


2020-04-14 13:52:59.696 [main] INFO  n.h.core.context.TemplateAppContext - loadModule class net.hasor.dataway.config.DatawayModule
2020-04-14 13:52:59.697 [main] INFO  n.hasor.dataway.config.DatawayModule - dataway api workAt /api/
2020-04-14 13:52:59.697 [main] INFO  n.h.c.e.AbstractEnvironment - var -> HASOR_DATAQL_DATAWAY_API_URL = /api/.
2020-04-14 13:52:59.704 [main] INFO  n.hasor.dataway.config.DatawayModule - dataway admin workAt /interface-ui/
2020-04-14 13:52:59.716 [main] INFO  net.hasor.core.binder.ApiBinderWrap - mapingTo[901d38f22faa419a8593bb349905ed0e] -> bindType ‘class net.hasor.dataway.web.ApiDetailController’ mappingTo: ‘[/interface-ui/api/api-detail]’.
2020-04-14 13:52:59.716 [main] INFO  net.hasor.core.binder.ApiBinderWrap - mapingTo[c6eb9f3b3d4c4c8d8a4f807435538172] -> bindType ‘class net.hasor.dataway.web.ApiHistoryListController’ mappingTo: ‘[/interface-ui/api/api-history]’.
2020-04-14 13:52:59.717 [main] INFO  net.hasor.core.binder.ApiBinderWrap - mapingTo[eb841dc72ad54023957233ef602c4327] -> bindType ‘class net.hasor.dataway.web.ApiInfoController’ mappingTo: ‘[/interface-ui/api/api-info]’.
2020-04-14 13:52:59.717 [main] INFO  net.hasor.core.binder.ApiBinderWrap - mapingTo[96aebb46265245459ae21d558e530921] -> bindType ‘class net.hasor.dataway.web.ApiListController’ mappingTo: ‘[/interface-ui/api/api-list]’.
2020-04-14 13:52:59.718 [main] INFO  net.hasor.core.binder.ApiBinderWrap - mapingTo[7467c07f160244df8f228321f6262d3d] -> bindType ‘class net.hasor.dataway.web.ApiHistoryGetController’ mappingTo: ‘[/interface-ui/api/get-history]’.
2020-04-14 13:52:59.719 [main] INFO  net.hasor.core.binder.ApiBinderWrap - mapingTo[97d8da5363c741ba99d87c073a344412] -> bindType ‘class net.hasor.dataway.web.DisableController’ mappingTo: ‘[/interface-ui/api/disable]’.
2020-04-14 13:52:59.720 [main] INFO  net.hasor.core.binder.ApiBinderWrap - mapingTo[8ddc3316ef2642dfa4395ca8ac0fff04] -> bindType ‘class net.hasor.dataway.web.SmokeController’ mappingTo: ‘[/interface-ui/api/smoke]’.
2020-04-14 13:52:59.720 [main] INFO  net.hasor.core.binder.ApiBinderWrap - mapingTo[cc06c5fb343b471aacedc58fb2fe7bf8] -> bindType ‘class net.hasor.dataway.web.SaveApiController’ mappingTo: ‘[/interface-ui/api/save-api]’.
2020-04-14 13:52:59.720 [main] INFO  net.hasor.core.binder.ApiBinderWrap - mapingTo[7915b2b1f89a4e73891edab0264c9bd4] -> bindType ‘class net.hasor.dataway.web.PublishController’ mappingTo: ‘[/interface-ui/api/publish]’.
2020-04-14 13:52:59.721 [main] INFO  net.hasor.core.binder.ApiBinderWrap - mapingTo[0cfa34586455414591bdc389bff23ccb] -> bindType ‘class net.hasor.dataway.web.PerformController’ mappingTo: ‘[/interface-ui/api/perform]’.
2020-04-14 13:52:59.721 [main] INFO  net.hasor.core.binder.ApiBinderWrap - mapingTo[37fe4af3e2994acb8deb72d21f02217c] -> bindType ‘class net.hasor.dataway.web.DeleteController’ mappingTo: ‘[/interface-ui/api/delete]’.
当看到 “dataway api workAt /api/” 、 dataway admin workAt /interface-ui/ 信息时,就可以确定 Dataway 的配置已经生效了。
第七步:访问接口管理页面进行接口配置
在浏览器中输入 “http://127.0.0.1:8080/interface-ui/” 就可以看到期待已久的界面了。

第八步:新建一个接口
Dataway 提供了2中语言模式,我们可以使用强大的 DataQL 查询语言,也可以直接使用 SQL 语言(在 Dataway 内部 SQL 语言也会被转换为 DataQL 的形式执行。)

首先我们在 SQL 模式下尝试执行一条 select 查询,立刻就可以看到这条 SQL 的查询结果。
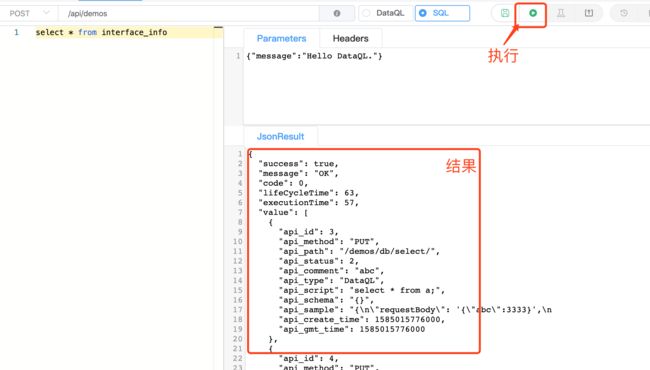
同样的方式我们使用 DataQL 的方式需要这样写:
var query = @@sql()<%
    select * from interface_info
%>
return query()
其中 var query = @@sql()<% ... %> 是用来定义SQL外部代码块,并将这个定义存入 query 变量名中。 <% %> 中间的就是 SQL 语句。
最后在 DataQL 中调用这个代码块,并返回查询结果。
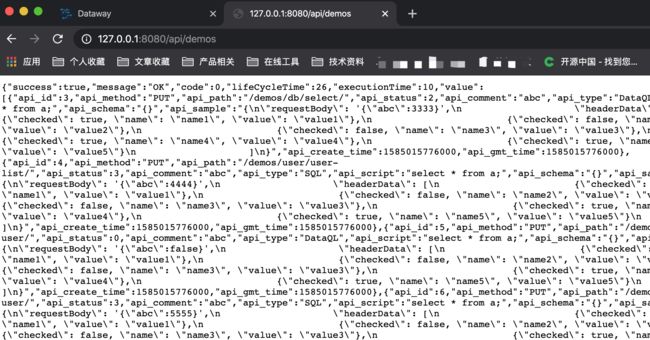
当接口写好之后就可以保存发布了,为了测试方便,我选用 GET 方式。

接口发布之后我们直接请求:http://127.0.0.1:8080/api/demos,就看到期待已久的接口返回值了。
使用总结
经过上面的几个步骤我们介绍了如何基于 Spring Boot 项目使用 Dataway 来简单的配置接口。Dataway 的方式确实给人耳目一新,一个接口竟然可以如此简单的配置出来无需开发任何一行代码,也不需要做任何 Mapping 实体映射绑定。
通常前后端连调时,都要对接一下接口。在这个过程中前后端会确定 请求参数的个数和格式,以及数据响应的个数和格式。
比如根据用户名称模糊查询相关用户列表。在这个场景中设定一个请求参数,姑且叫它 userName把。然后返回一个列表,列表中是符合条件的用户信息。
为了这个场景我们首先需要定义前后端交互数据接口:
请求:
userName : String
响应:
rootData:Array[UserInfo]
UserInfo:{
user_id : Integer,
user_name : String,
user_sex : String
}
在 Dataway 中首先我们新建一个接口,并且给接口取好名字和备注。

紧接着我们在 Dataway 的页面中定义前端请求参数。

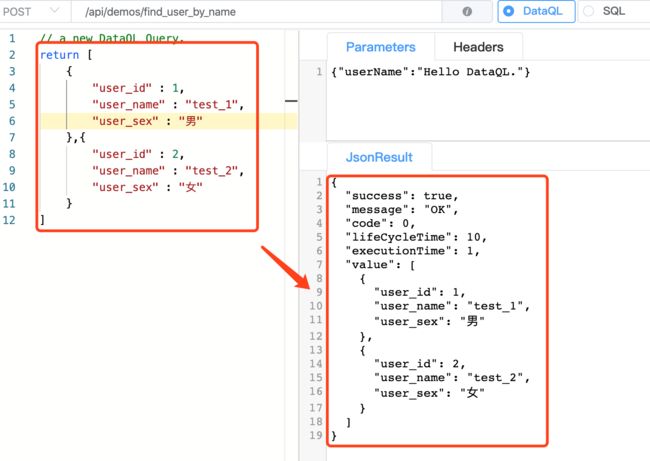
在编写SQL 之前我们先在 DataQL 上编写一段 JSON 通过这个 JSON 来模拟数据输出的结果。
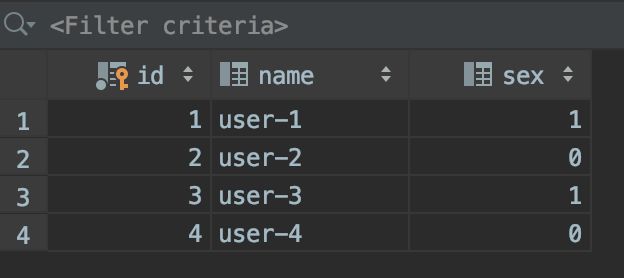
接下来我们编写数据库查询然后返回我们在数据库中的数据,为了演示这个功能我在数据库中先创建了一张表并且初始化了一些数据。它们看上去是这个样子的:
CREATE TABLE `user_info` (
  `id` int(11) NOT NULL AUTO_INCREMENT,
  `name` varchar(128) DEFAULT NULL,
  `sex` int(11) DEFAULT NULL,
  PRIMARY KEY (`id`)
) ENGINE=InnoDB AUTO_INCREMENT=5 DEFAULT CHARSET=utf8mb4
接下来我编写一段 SQL 查询这个表,并且在返回 mock 的数据的前面先尝试执行SQL返回数据。
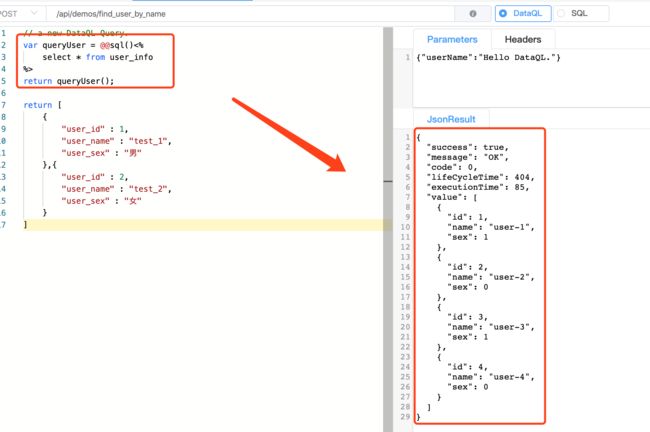
可以看到数据已经如我们预期的输出了出来,在这里 DataQL 的执行是按照顺序进行的。当遇到 return 指令的时,后续的查询将不会被执行。
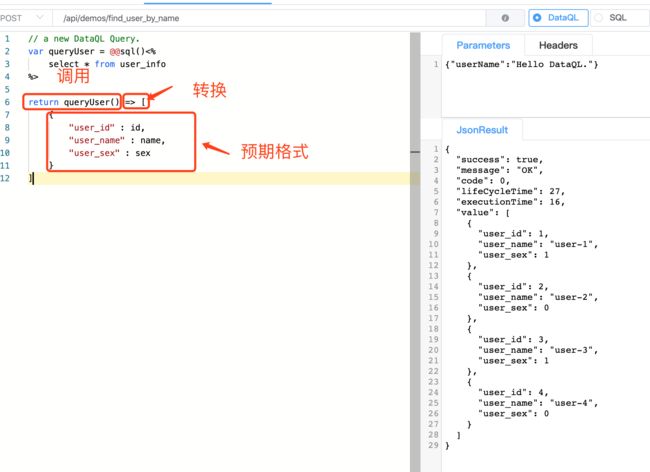
接着把数据库返回的结果做一下格式转换,让其按照我们要求的格式返回数据。官方手册这一部分的内容在这里:https://www.hasor.net/web/dataql/grammar/convert.html#
我们这里需要做的是把一个 List 结果格式进行一次变换。最起码我们需要的列名都要变化一下。在执行一下就得到我们要的预期结果了。
最后一部分,在 SQL 查询中使用我们预先定义好的 userName 来进行 模糊匹配。首先 SQL 语句需要有所改写:
-
select * from user_info
-
=>
-
select * from user_info where like `name` like #{userName} <- 类似 Mybatis 的写法,带参数的SQL 用 #{...}
SQL 中参数名已经确定好了,接下来改写一下 定义 SQL 查询这一部分声明一个参数。这就好比定义方法的参数一样。
-
var queryUser = @@sql(userName)<% <-- 增加参数定义
-
select * from user_info where `name` like
-
%>
最后将前端传入的请求参数,在执行用户查询的时候将其传进去即可。在 DataQL 查询中要想获得 Paramerers 面板中定义的参数需要通过 ${ ... } 形式获取。这部分内容在官方手册上也有介绍在这里:https://www.hasor.net/web/dataql/grammar/params.html
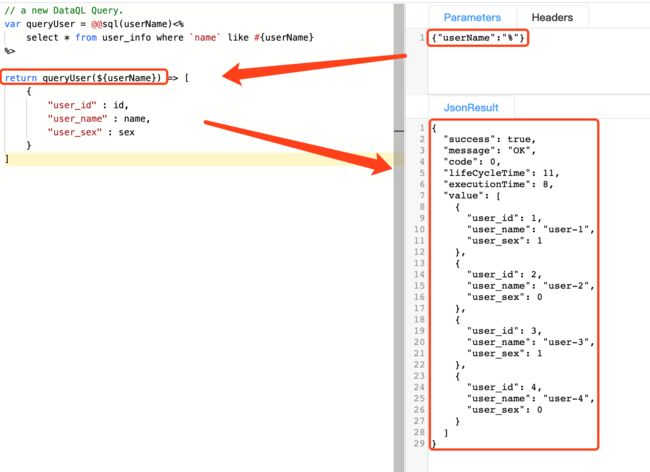
这样一来我们就可以通过前端传入 '%xxxx%' 这样的形式的参数就可以完成模糊匹配查询了。
有心的同学可能想问如何能让前端避免传 % 这样的字符? 如果传了就默认加上,不传就默认查询全部。
实现这个需求其实有很多办法,这篇文章主要讲解的是前后端传参数传递,因此我们选用 数据库拼接字符串的方式来实现。
- 我们可以利用 数据库的字符串连接功能把 % 拼接的事情交给数据库 : concat('%',#{userName},'%')
- 另外还可以通过 DataQL 的方式。
然后我们在请求参数上输入模糊匹配的信息执行查询就可以得到结果了。

这一次我们采用 Post 方式来请求接口。为了模拟 Post 我们需要请出 PostMan 这个神器。
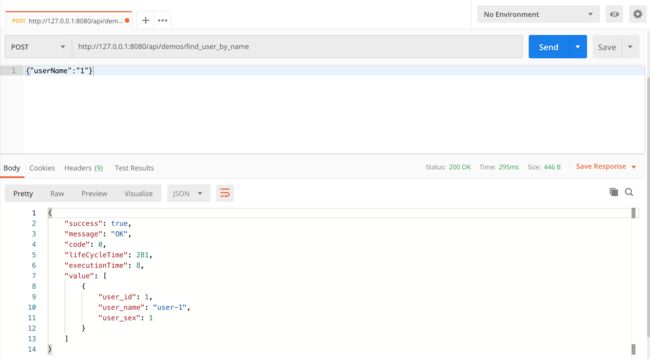
填写 POST、URL 点击执行就可以看到结果了。
最后总结
好了,在本文中我们通过一个简单的例子介绍了如何使用 Dataway 配置一个接口。并且给接口增加一个请求参数,并确定了接口的返回结构。最后我们编写 SQL 查询数据然后通过 DataQL 格式转换的能力满足响应结果的要求。在最后我们通过 Postman 来模拟请求看到接口可以正常工作。
后面会有更多 Dataway 的文章推出也欢迎大家继续关注,大家在使用过程中遇到什么问题可以在评论区留言,或者加入 Hasor 线下交流群一起讨论(群号请到 Hasor 官网上查阅)
最后放几个有用的连接:
- Dataway 官方手册:https://www.hasor.net/web/dataway/about.html
- Dataway 在 OSC 上的项目地址,欢迎收藏:https://www.oschina.net/p/dataway
- DataQL 手册地址:https://www.hasor.net/web/dataql/what_is_dataql.html
- Hasor 项目的首页:https://www.hasor.net/web/index.html