JAVAWEB开发之Spring详解之——Spring的入门以及IOC容器装配Bean(xml和注解的方式)、Spring整合web开发、整合Junit4测试...
Spring框架学习路线
- Spring的IOC
- Spring的AOP,AspectJ
- Spring的事务管理,三大框架的整合
Spring框架概述
什么是Spring?
Spring是分层的JavaSE/EE full-stack(一站式)轻量级开源框架。
所谓分层:
- SUN提供的EE的三层结构:web层、业务层、数据访问层(也称持久层,集成层)。
- Struts2是web层基于MVC设计模式框架。
- Hibernate是持久的一个ORM的框架。
所谓一站式:Spring框架有对三层的每层解决方案。
- web层:Spring MVC
- 持久层:JDBC Template
- 业务层:Spring的Bean管理
以IoC(Inverse of Control 反转控制)和AOP(Aspect Oriented Programming 面向切面编程为内核)
官网:http://www.springsource.org/
Spring的出现是为了取代EJB的臃肿、低效、脱离现实
官网:http://www.springsource.org/
Spring的出现是为了取代EJB的臃肿、低效、脱离现实
Spring的核心
- IOC:(Inverse of Control 反转控制) 所谓的控制反转就是将对象的创建权交给Spring完成。
- AOP:Aspect Oriented Programming 面向切面编程 是面向对象的延伸,不是替换面向对象,是用来解决OO中的一些问题。
- DI:依赖注入(即在Spring创建对象的时候 注入对象的属性)
Spring的版本:Spring3.x和Spring4.x Spring4需要整合hibernate4. 所以一般使用Spring3.
EJB:企业级JavaBean
- 2002 : Expert One-to-One J2EE Design and Development
- 2004 : Expert One-to-One J2EE Development without EJB (EE开发真正需要使用的内容.)
使用Spring的好处:
(1) 方便耦合,简化开发
Spring就是一个大工厂,可以将所有对象创建和依赖关系维护,交给Spring管理。
(2) AOP编程的支持
Spring提供面向切面编程,可以方便的实现对程序进行权限拦截、运行监控等功能。
(3)声明式事务的支持
只需要通过配置就可以完成对事务的管理,而无需手动编程。
(4)方便程序的测试
Spring对Junit支持,可以通过注解方便的测试Spring程序。
(5)方便集成各种优秀框架
Spring不排斥各种优秀的开源框架,其内部提供了对各种优秀框架(如Struts、Hibernate、MyBatis、Quartz等)的直接支持
(6) 降低JavaEE API的使用难度
Spring对JavaEE开发中非常难用的一些API(JDBC、JavaMail、远程调用等),都提供了封装,使这些API应用难度大大降低。
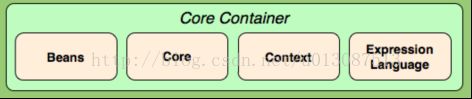
Spring体系结构
Spring框架是一个分层框架,它包含一系列的功能要素并被分为大约20个模块。这些模块分为Core Container、Data Access/Integration、Web、AOP(Aspect Oriented Programming)、Instrumentation和测试部分,如下图所示:

Spring IOC控制反转快速入门示例
大致流程:
- 下载Spring最新开发包。
- 复制Spring开发jar包到工程。
- 理解IOC控制反转和DI依赖注入。
- 编写Spring核心配置文件。
- 在程序中读取Spring配置文件,通过Spring框架获得Bean,完成相应的操作。
(1) 下载Spring开发包
官方下载Spring3.x最新开发版本
网址:http://www.springsource.org/download/community
需要开发包和开发依赖包:
spring-framework-3.2.0.RELEASE-dist.zip — Spring开发包
* docs :spring框架api和规范
* libs :spring开发的jar包
* schema :XML的约束文档.
spring-framework-3.0.2.RELEASE-dependencies.zip — Spring开发中的依赖包
* docs :spring框架api和规范
* libs :spring开发的jar包
* schema :XML的约束文档.
spring-framework-3.0.2.RELEASE-dependencies.zip — Spring开发中的依赖包
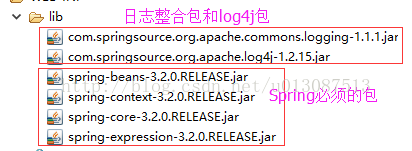
(2) 创建web工程引入相应jar包
包括核心包和日志有关的包
核心包:
- spring-beans-3.2.0.RELEASE.jar
- spring-Context-3.3.0.RELEASE.jar
- spring-core-3.2.0.RELEASE.jar
- spring-expression-3.2.0.RELEASE.jar
日志有关的包:
- com.springsource.org.apache.commons.logging-1.1.1.jar用于整合其他的日志的包(类似Hibernate中slf4j)
- com.springsource.org.apache.log4j-1.2.15.jar log4j的包
注意:commons-logging日志整合包以及log4j的包在Spring的依赖包中
提示:spring3.0.X 版本 asm jar包 已经被合并到 spring core包中
(3) 创建测试类。
在HelloTest类中使用He'llService类对象
传统方式:HelloService helloService=new HelloService();

IOC Inverse of Control 反转控制概念,就是将原本在程序中手动创建HelloService对象的创建权,交由Spring框架管理,简单说,就是创建HelloService对象控制权被反转到了Spring框架。
(4)创建Spring配置文件
在src下创建Spring的核心配置文件applicationContext.xml,将HelloService的创建交由容器管理。
引入XML约束:在解压后的开发包中搜索xsd-config.xml引入beans约束

配置如下图所示:
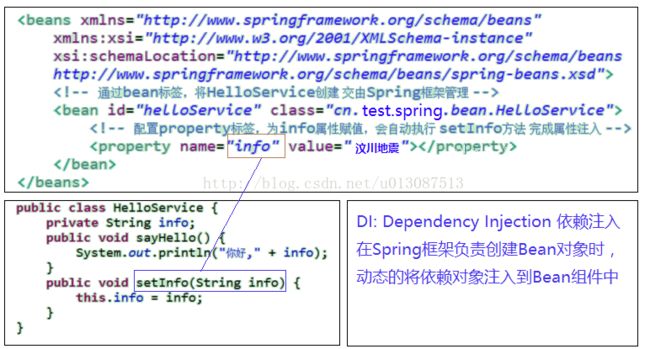
注意:DI与IOC的区别
IOC:控制反转,将对象的创建权交给Spring管理。
DI:依赖注入,在Spring创建对象的过程中,把对象依赖的属性注入到类中。
(5) 加载Spring框架配置文件
ApplicationContext应用上下文,加载Spring框架配置文件(两种方式):
加载classpath下:
new ClassPathXmlApplicationContext("applicationContext.xml");
加载磁盘路径下:
new FileSystemXmlApplicationContext("applicationContext.xml");
通过getBean方法获得Spring容器管理Bean对象

BeanFactory和ApplicationContext区别:

区别大致如下:
ApplicationContext类继承了BeanFactory。
BeanFactory采取延迟加载,第一次getBean时才会加载这个类。
ApplicationContext类加载配置文件的时候,创建所有的类。
ApplicationContext对BeanFactory进行了扩展,提供了更多的功能。如下:
- 国际化处理。
- 事件传递。
- Bean自动装配。
- 各种不同应用层的Context实现。
BeanFactory的使用方法如下:
BeanFactory factory = new XmlBeanFactory(new ClassPathResource("applicationContext.xml"));
HelloService helloService = (HelloService) factory.getBean("helloService");
helloService.sayHello();
HelloService helloService = (HelloService) factory.getBean("helloService");
helloService.sayHello();
注意:在BeanFactory加载配置文件时也分为classpath路径和磁盘路径(即ClassPathResource和FileSystemResource)
MyEclipse解决Spring配置文件无法提示的问题
方案一: 联网下载
- http://www.springframework.org/schema/beans/spring-beans.xsd
- Myeclipse window-preferences- 搜索xml catalog
- 选中User Specified Entries -- Add 操作
- location 浏览选中 解压spring 包中 schema\beans\spring-beans-3.2.xsd
- 修改Key type 为 Schema location
- key 修改为 http://www.springframework.org/schema/beans/spring-beans.xsd
- 点击OK
如下图所示:

Spring底层IOC的原理
在开发中一般由web层调用业务层业务层调用持久层
- 面向对象:最传统的web层调用业务层代码:UserService userService=newUserService(); 这种最原始的方式不具备扩展性。
- 面向接口:按照面向对象的面向接口的方式编程 将UserService提取为一个接口,可以实现接口提供各种真实实现类Impl 即第二个阶段:UserService userService=newUserServiceImpl(); 将程序具体的实现编写到程序中,根据需求切换底层的实现,虽然使程序具备了扩展性。但是在切换底层实现时需要修改源代码,造成程序紧密耦合。
- OCP原则—工厂模式:按照Java的OCP原则,即open-close原则:扩展功能尽量不要修改源程序,提供新的方法属性的形式扩展其功能,意思就是对扩展是开放的对修改是关闭的。可以使用工厂模式进行扩展。
public class BeanFactory{
public UserService getUserService(){
return new UserServiceImpl();
}
}
即把程序与实现类的耦合转成与工厂的耦合。与实现类完成解耦合的形式:
BeanFactory factory= ......;
UserService service=factory.getUserService();
为了解除与工厂的耦合,在利用反射在工厂内部动态的生成对象。
public class BeanFactory{
public UserService getUserService(){
// 反射+配置文件
return Class.forName(类名).newInStance();
}
}
xml、properties:className=cn.test.service.UserServiceImpl
Spring快速入门程序示例:
在web项目中导入jar包,并在src下新建log4j.properties日志配置文件和ApplicationContext.xml
log4j.properties
### direct log messages to stdout ###
log4j.appender.stdout=org.apache.log4j.ConsoleAppender
log4j.appender.stdout.Target=System.err
log4j.appender.stdout.layout=org.apache.log4j.PatternLayout
log4j.appender.stdout.layout.ConversionPattern=%d{ABSOLUTE} %5p %c{1}:%L - %m%n

### direct messages to file mylog.log ###
log4j.appender.file=org.apache.log4j.FileAppender
log4j.appender.file.File=c\:mylog.log
log4j.appender.file.layout=org.apache.log4j.PatternLayout
log4j.appender.file.layout.ConversionPattern=%d{ABSOLUTE} %5p %c{1}:%L - %m%n

### set log levels - for more verbose logging change 'info' to 'debug' ###

log4j.rootLogger=off, stdout
为了方便测试,暂时将日志关闭
src下的applicationContext.properties
package lx.test.spring.demo1;

/**
 * 入门案例
 *
 *
 */
public interface HelloService {
	public void sayHello();
}
package lx.test.spring.demo1;

/**
 * 入门案例的实现类
 */
public class HelloServiceImpl implements HelloService {
	private String info;

	public void setInfo(String info) {
		this.info = info;
	}

	public void sayHello() {
		System.out.println("Hello Spring..." + info);
	}

} package lx.test.spring.demo1;
import java.io.IOException;
import org.junit.Test;
import org.springframework.beans.factory.BeanFactory;
import org.springframework.beans.factory.xml.XmlBeanFactory;
import org.springframework.context.ApplicationContext;
import org.springframework.context.support.ClassPathXmlApplicationContext;
import org.springframework.context.support.FileSystemXmlApplicationContext;
import org.springframework.core.io.ClassPathResource;
import org.springframework.core.io.FileSystemResource;
import org.springframework.core.io.Resource;
public class SpringTest1 {
@Test
// 传统方式
public void demo1() {
// 造成程序紧密耦合
HelloService helloService = new HelloServiceImpl();
helloService.sayHello();
}
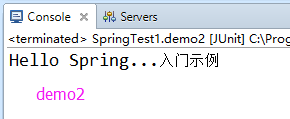
@Test
// Spring开发
public void demo2() {
// 创建一个工厂类
ApplicationContext applicationContext = new ClassPathXmlApplicationContext(
"applicationContext.xml");
HelloService helloService = (HelloService) applicationContext
.getBean("userService");
helloService.sayHello();
}
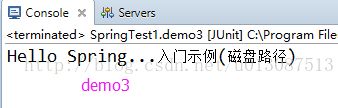
@Test
// 加载磁盘路径下的配置文件
public void demo3() {
ApplicationContext applicationContext = new FileSystemXmlApplicationContext(
"applicationContext.xml");
HelloService helloService = (HelloService) applicationContext
.getBean("userService");
helloService.sayHello();
}
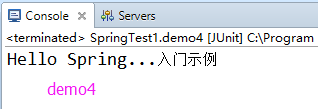
@Test
// 使用BeanFactory加载
public void demo4() throws IOException {
// ClassPathResource FileSystemResource 两种方式
// BeanFactory beanFactory = new XmlBeanFactory(new FileSystemResource("applicationContext.xml"));
// Resource resource= new FileSystemResource("applicationContext.xml");
// F:\myEclipse_project\myspring3_day01\applicationContext.xml
// System.out.println(resource.getFile().getAbsolutePath());
BeanFactory beanFactory = new XmlBeanFactory(new ClassPathResource(
"applicationContext.xml"));
HelloService helloService = (HelloService) beanFactory
.getBean("userService");
helloService.sayHello();
}
}
IOC容器装配Bean(XML配置方式)
Spring框架实例化Bean的方式
有三种实例化Bean的方式:构造方法实例化(默认无参数)、静态工厂实例化、实例工厂实例化
方式一:使用类构造器实例化(默认无参数)
方式二:使用静态工厂实例化(简单工厂模式)
public class PersonServiceFactory {
public static PersonService createPersonService(){
return new PersonServiceImpl();
}
}
方式三:使用实例工厂方法实例化(工厂方法模式)
public class PersonServiceFactory {
public PersonService createPersonService(){
return new PersonServiceImpl();
}
}
public PersonService createPersonService(){
return new PersonServiceImpl();
}
}
示例代码如下:
applicationContext.xml
package lx.test.spring.demo2;

/**
 * 使用无参数的构造方法实例化
 */
public class Bean1 {
	public Bean1() {
		System.out.println("Bean1默认的无参构造...");
	}
}
package lx.test.spring.demo2;

/**
 * 使用静态工厂方法实例化
 *
 */
public class Bean2 {

}
package lx.test.spring.demo2;

/**
 * Bean2的静态工厂
 */
public class Bean2Factory {
	public static Bean2 getBean2() {
		System.out.println("静态工厂获得Bean2的方法...");
		return new Bean2();
	}
}
package lx.test.spring.demo2;

/**
 * 使用实例工厂实例化
 */
public class Bean3 {

}
package lx.test.spring.demo2;

/**
 * 使用实例工厂
 */
public class Bean3Factory {
	public Bean3 getBean3() {
		System.out.println("Bean3实例工厂的getBean3()方法...");
		return new Bean3();
	}
}
package lx.test.spring.demo2;

import org.junit.Test;
import org.springframework.context.ApplicationContext;
import org.springframework.context.support.ClassPathXmlApplicationContext;

/**
 * Bean的实例化测试
 */
public class SpringTest2 {

	@Test
	// 无参数的构造方法实例化
	public void demo1() {
		ApplicationContext applicationContext = new ClassPathXmlApplicationContext(
				"applicationContext.xml");
		Bean1 bean1 = (Bean1) applicationContext.getBean("bean1");
		System.out.println(bean1);
	}


	@Test
	// 无参数的构造方法实例化
	public void demo2() {
		ApplicationContext applicationContext = new ClassPathXmlApplicationContext(
				"applicationContext.xml");
		Bean2 bean2 = (Bean2) applicationContext.getBean("bean2");
		System.out.println(bean2);
	}


	@Test
	// 无参数的构造方法实例化
	public void demo3() {
		ApplicationContext applicationContext = new ClassPathXmlApplicationContext(
				"applicationContext.xml");
		Bean3 bean3 = (Bean3) applicationContext.getBean("bean3");
		System.out.println(bean3);
	}

}
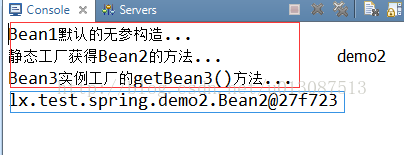

发现每次调用获取ApplicationContext对象时都会重新全部加载配置中所有的Bean类
Bean的其他配置
id和name的区别
Bean的命名id属性和name属性:
- 一般情况下,装配一个Bean时,通过指定一个id属性作为Bean的名称。
- id属性在IOC容器中必须是唯一的。
- id的命名要满足XML对ID属性的命名规范:必须以字母开头,可以使用字母、数字、连字符、下划线、句号、冒号。
- 如果Bean的名称中含有特殊字符,就需要使用name属性:例如
- 因为name属性可以相同,所以后出现Bean会覆盖之前出现的同名的Bean。
Bean的作用域
在标签上的scope属性指对象的范围 取值可以有以下几种:
- singleton: 单例的。在Spring IOC容器中仅存在一个Bean实例,Bean以单例方式存在。
- prototype: 多例的。 每次从容器中调用Bean时,都会返回一个新的实例,即每次调用getBean()时,相当于执行new XxxBean()。
- request: 每次HTTP请求都会创建一个新的Bean,该作用域仅适用于WebApplicationContext环境。相当于在web开发中创建了一个对象,并将这个对象存入request域范围,request.setAttribute();
- session: 同一个HTTP Session共享一个Bean,不同Session使用不同Bean,仅适用于WebApplicationContext环境。相当于在web开发中,创建了一个对象,将这个对象存入session范围,即session.setAttribute();
- globalSession: 一般用于Porlet应用环境,该作用域仅适用于WebApplicationContext环境。Porlet指的是分布式开发,如果不是Porlet环境,globalSession等同于session。
实际开发中主要使用singleton,prototype。
程序示例如下:
ApplicationContext.xml
package lx.test.spring.demo3;

public class Customer {
	public Customer() {
		System.out.println("Customer类被实例化...");
	}
}package lx.test.spring.demo3;
public class Product {
private String name;
public void setName(String name) {
this.name = name;
}
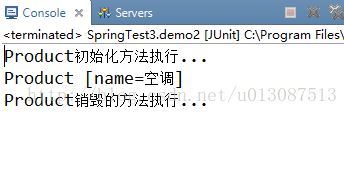
public void setup() {
System.out.println("Product初始化方法执行...");
}
public void teardown() {
System.out.println("Product销毁的方法执行...");
}
@Override
public String toString() {
return "Product [name=" + name + "]";
}
}package lx.test.spring.demo3;
import org.junit.Test;
import org.springframework.context.ApplicationContext;
import org.springframework.context.support.ClassPathXmlApplicationContext;
/**
* Bean的作用范围
*/
public class SpringTest3 {
@Test
// 测试scope
public void demo1() {
ApplicationContext applicationContext = new ClassPathXmlApplicationContext(
"applicationContext.xml");
Customer c1 = (Customer) applicationContext.getBean("customer");
System.out.println(c1);
Customer c2 = (Customer) applicationContext.getBean("customer");
System.out.println(c2);
}
@Test
// 测试初始化和销毁方法
public void demo2() {
ClassPathXmlApplicationContext applicationContext = new ClassPathXmlApplicationContext(
"applicationContext.xml");
Product p1 = (Product) applicationContext.getBean("product");
System.out.println(p1);
applicationContext.close();
}
}
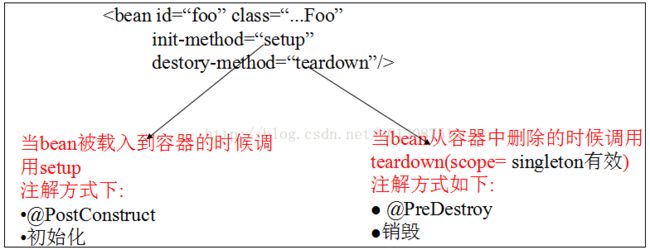
Spring容器中Bean的生命周期
配置Bean的初始化和销毁的方法:Spring初始化或销毁bean时,有时需要做一些处理工作,因此Spring可以在创建和拆卸bean的时候调用bean的两个生命周期中的方法

注意:
销毁方法只对单例范围的bean有效,即只有单例范围的bean在销毁时调用配置到销毁方法。
web容器中会自动调用销毁方法,但是main()函数或测试用例需要手动调用,必须关闭工厂才能销毁bean。
Spring容器中Bean生命周期图解:

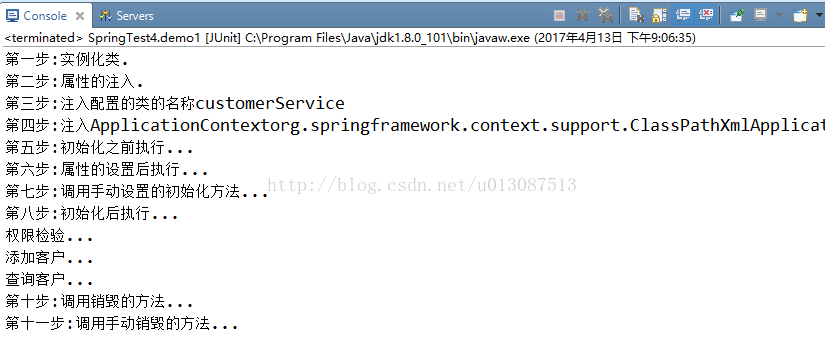
bean的生命周期大致分为11个步骤:
1. instantiate bean 对象实例化。
2. populate properties 封装属性。
3. 如果Bean实现BeanNameAware接口 执行setBeanName。
4. 如果Bean实现BeanFactoryAware 或者ApplicationContextAware接口设置工厂setBeanFactory或者上下文对象setApplicationContext。
5.
如果存在类实现BeanPostProcessor(后处理Bean),执行PostProcessBeforeInitialization。
6. 如果Bean实现InitializingBean 执行afterPropertiesSet。
7. 调用 指定初始化方法init。
8.
如果存在类实现BeanPostProcessor(处理Bean),执行postProcessAfterInitialization。
9. 执行业务逻辑处理。
10. 如果Bean实现DisposableBean接口 则执行destroy方法。
11. 调用 指定销毁方法customerDestroy。
程序示例如下:
applicationContext.xml
package lx.test.spring.demo4;

public interface CustomerService {
	public void add();
	public void find();
}
package lx.test.spring.demo4;

import org.springframework.beans.BeansException;
import org.springframework.beans.factory.BeanNameAware;
import org.springframework.beans.factory.DisposableBean;
import org.springframework.beans.factory.InitializingBean;
import org.springframework.context.ApplicationContext;
import org.springframework.context.ApplicationContextAware;

public class CustomerServiceImpl implements CustomerService, BeanNameAware,
		ApplicationContextAware, InitializingBean, DisposableBean {
	private String name;

	public void setName(String name) {
		System.out.println("第二步:属性的注入.");
		this.name = name;
	}

	public CustomerServiceImpl() {
		super();
		System.out.println("第一步:实例化类.");
	}

	public void add() {
		System.out.println("添加客户...");
	}

	public void find() {
		System.out.println("查询客户...");
	}

	public void setBeanName(String name) {
		System.out.println("第三步:注入配置的类的名称" + name);
	}

	public void setApplicationContext(ApplicationContext applicationContext)
			throws BeansException {
		System.out.println("第四步:注入ApplicationContext" + applicationContext);
	}

	public void afterPropertiesSet() throws Exception {
		System.out.println("第六步:属性的设置后执行...");
	}

	public void setup() {
		System.out.println("第七步:调用手动设置的初始化方法...");
	}

	public void destroy() throws Exception {
		System.out.println("第十步:调用销毁的方法...");
	}

	public void teardown() {
		System.out.println("第十一步:调用手动销毁的方法...");
	}
}
package lx.test.spring.demo4;

import java.lang.reflect.InvocationHandler;
import java.lang.reflect.Method;
import java.lang.reflect.Proxy;

import org.springframework.beans.BeansException;
import org.springframework.beans.factory.config.BeanPostProcessor;

public class MyBeanPostProcessor implements BeanPostProcessor {
	/**
	 * bean: 实例对象 beanName:在配置文件中配置的类的标识
	 */
	public Object postProcessBeforeInitialization(Object bean, String beanName)
			throws BeansException {
		System.out.println("第五步:初始化之前执行...");
		return bean;
	}

	public Object postProcessAfterInitialization(final Object bean,
			String beanName) throws BeansException {
		System.out.println("第八步:初始化后执行...");
		// 动态代理
		if (beanName.equals("customerService")) {
			Object proxy = Proxy.newProxyInstance(bean.getClass()
					.getClassLoader(), bean.getClass().getInterfaces(),
					new InvocationHandler() {
						// 调用目标方法的时候,调用invoke方法
						public Object invoke(Object proxy, Method method,
								Object[] args) throws Throwable {
							if ("add".equals(method.getName())) {
								System.out.println("权限检验...");
								Object result = method.invoke(bean, args);
								return result;
							}
							return method.invoke(bean, args);
						}
					});
			return proxy;
		}
		return bean;
	}

}
package lx.test.spring.demo4;

import org.junit.Test;
import org.springframework.context.support.ClassPathXmlApplicationContext;

public class SpringTest4 {

	@Test
	// Bean完整的生命周期
	public void demo1() {
		ClassPathXmlApplicationContext applicationContext = new ClassPathXmlApplicationContext(
				"applicationContext.xml");
		CustomerService customerService = (CustomerService) applicationContext
				.getBean("customerService");
		customerService.add();
		customerService.find();

		applicationContext.close();
	}
}
Bean中属性的注入
依赖注入Bean的属性
对于类成员变量,注入方式有三种:
- 构造方法(构造器)注入。
- 属性setter方法注入。
- 接口注入。
如下所示:

Spring只支持构造器和Setter方法注入。
依赖注入Bean属性—构造方法注入
使用构造方法注入,在Spring配置文件中,通过设置注入的属性(可以通过index或者type注入)

注意:也可以使用 普通属性时value 对象属性为ref
依赖注入Bean属性—setter方法注入
使用setter方法注入,在Spring配置文件中,通过设置注入的属性
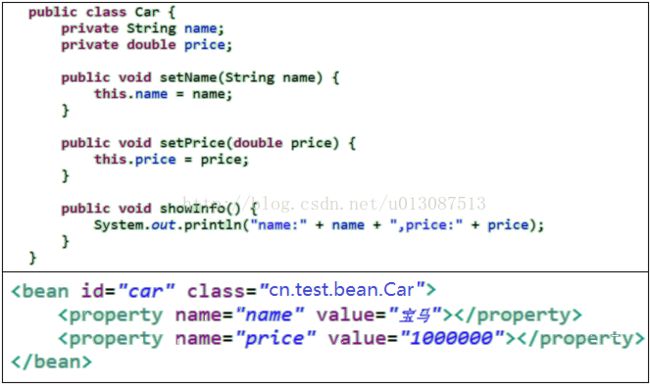
以上设置的只是普通属性,还可以使用引入其他Bean
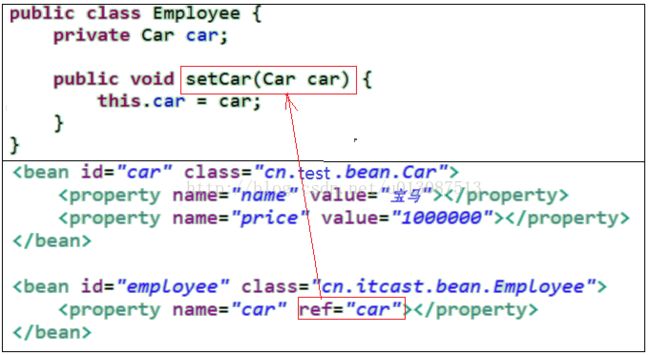
如果bean对应的类中有与对象相关的成员变量时,可以使用ref替代value属性。
名称空间p: 注入属性(属于setter注入)
- 使用p命名空间。
- 为了简化XML文件配置,Spring2.5开始引入一个新的p名称空间。
- p:<属性名>="xxx" 引入常量值。
- p:<属性名>-ref="xxx" 引用其他Bean对象。

SpEL注入
Spring3.0 创建了一种新的方式用以配置对象的注入(set注入或者构造参数注入),便是SpEL(Spring Expression Language ) Spring表达式语言,对依赖注入进行简化。
语法:#{ 表达式 } 例如:
基础特性:SpEL 使用#{ ... }作为定界符,所有大括号中的字符都将被认为是SpEL。
(1) 字面量的表示
1>整数: count " value="#{5}">
2>小数: frequency " value="#{89.7}">
3>科学计数法:capacity " value="#{1e4}">
4>String可以使用单引号或者双引号作为字符串的定界符号。
5>Boolean: enabled " value="#{false}"/>
(2) 引用Bean,属性和方法
1> 引用其他对象
通过id:"saxophone" 将对象注入到instrument属性中,这与下面的配置是一样的:
2> 引用其他对象的属性
kenny 是 Bean Id 而 song 是属性的名称,这样配置就等同于写了如下一段代码:
Instrumentalist carl = new Instrumentalist();
carl.setSong(kenny.getSong());
carl.setSong(kenny.getSong());
3> 调用别的对象的其它方法,并取得返回值。
调用了BeanId为"songSelector"的对象的selectSong()方法,并将返回值注入到song属性中。或者还可以进行链式操作。如:song " value="songSelector.selectSong().toUpperase()" />
在链式操作中,如果songSelector.selectSong()返回null的还会抛出异常,为了避免异常。我们要使用 ?. 表达式。这样如果songSelector.selectSong()为null就不会再调用后面的方法了。如下所示:
4>调用静态方法
我们已经知道如何通过一个对象调用它的方法了,但是如何调用一个静态方法呢? 用T{}。它将返回一个Class Object,然后我们再调用相应的方法即可:
(3) SPEL支持的运算符号
1> 算数运算符: +,-,*,/,%,^
加号还可以用作连接字符串
2>比较运算符:<,>,==,<=,>=,lt,gt,eq,le,ge
注意:不可以使用<和>号,因为在xml中它有特殊的含义,可以使用lt和gt代替
3> 逻辑运算符:and,or,not,|
4> If-else 运算符:?: (ternary), ?: (Elvis)
〇最基本的 ?:(这如同我们在使用 EL 表达式语言):
〇最基本的 ?:(这如同我们在使用 EL 表达式语言):
〇变体的 ?:
song " value="#{kenny.song != null ? kenny.song : 'Greensleeves'}"/>
上下两种是同一语义,但下面的明显简洁
song " value="#{kenny.song ?: 'Greensleeves'}"/>
上下两种是同一语义,但下面的明显简洁
5> 正则表达式
表达式返回逻辑值,如果匹配返回true,否则返回false
SPEL对集合的支持:
——环境
有实体City定义如下:
package com.habuma.spel.cities;
public class City {
private String name;
privateString state;
privateint population;
public class City {
private String name;
privateString state;
privateint population;
}
XML中有如下定义:
——1、获取Collection中的某个对象
1> 通过下标访问,如:chosenCity " value="#{cities[2]}"/>
我们就会获得 population 为"1279910"的 city(记住下标从 0 开始),对象下标可以通过变量指定,如下:
2> 如果对象是从Map集合中获得,可以指定key值,如下所示:
3> Bean对象也可以通过key访问properties的值,如下所示:
4> 对象可以通过下标获取String串中的某个字符
'This is a test'[3]
——2、获取 Collection 中的子集-通过条件筛选(注意新对象是一个新的 Collection)
1>筛选子集(.?[])
1>筛选子集(.?[])
2>获取第一个(.^[])
aBigCity " value="#{cities.^[population gt 100000]}"/>
3>获取最后一个(.$[])
aBigCity " value="#{cities.$[population gt 100000]}"/>
——3、集合的投影(.![])
如果想获得所有城市的名称组成的列表,可用如下操作
cityNames " value="#{cities.![name]}"/>
将返回"Chicago", "Atlanta", "Dallas"
也可以组合两个列,如下:
cityNames " value="#{cities.![name + ', ' + state]}"/>
将返回"Chicago, IL", "Atlanta, GA", and "Dallas, TX".
—— 4、将投影和筛选结合
cityNames " value="#{cities.?[population gt 100000].![name +', ' + state]}"/>
3>获取最后一个(.$[])
——3、集合的投影(.![])
如果想获得所有城市的名称组成的列表,可用如下操作
将返回"Chicago", "Atlanta", "Dallas"
也可以组合两个列,如下:
将返回"Chicago, IL", "Atlanta, GA", and "Dallas, TX".
—— 4、将投影和筛选结合
实例代码如下:
Car
package lx.test.spring.demo5;

public class Car {
	private String name;
	private Double price;

	public Car() {
		super();
	}

	public Car(String name, Double price) {
		super();
		this.name = name;
		this.price = price;
	}

	@Override
	public String toString() {
		return "Car [name=" + name + ", price=" + price + "]";
	}

}
package lx.test.spring.demo5;

public class Car2 {
	private String name;
	private Double price;

	public void setName(String name) {
		this.name = name;
	}

	public void setPrice(Double price) {
		this.price = price;
	}

	@Override
	public String toString() {
		return "Car2 [name=" + name + ", price=" + price + "]";
	}

}
package lx.test.spring.demo5;

public class Person {
	private String name;
	private Car2 car2;
	public void setName(String name) {
		this.name = name;
	}
	public void setCar2(Car2 car2) {
		this.car2 = car2;
	}
	@Override
	public String toString() {
		return "Person [name=" + name + ", car2=" + car2 + "]";
	}
}
package lx.test.spring.demo5;

public class PersonInfo {
	private String name;

	public String getName() {
		return name;
	}

	public void setName(String name) {
		this.name = name;
	}

	public String showName() {
		return name;
	}
}
package lx.test.spring.demo5;
import org.junit.Test;
import org.springframework.context.ApplicationContext;
import org.springframework.context.support.ClassPathXmlApplicationContext;
public class SpringTest5 {
@Test
public void demo1() {
ApplicationContext applicationContext = new ClassPathXmlApplicationContext(
"applicationContext.xml");
Car car = (Car) applicationContext.getBean("car1_01");
Car car1_02 = (Car) applicationContext.getBean("car1_02");
System.out.println(car);
System.out.println(car1_02);
}
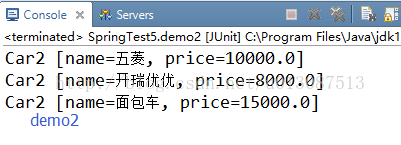
@Test
public void demo2() {
ApplicationContext applicationContext = new ClassPathXmlApplicationContext(
"applicationContext.xml");
Car2 car2_01 = (Car2) applicationContext.getBean("car2_01");
Car2 car2_02 = (Car2) applicationContext.getBean("car2_02");
Car2 car2_03 = (Car2) applicationContext.getBean("car2_03");
System.out.println(car2_01);
System.out.println(car2_02);
System.out.println(car2_03);
}
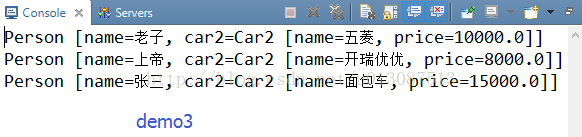
@Test
public void demo3() {
ApplicationContext applicationContext = new ClassPathXmlApplicationContext(
"applicationContext.xml");
Person person_01 = (Person) applicationContext.getBean("person_01");
Person person_02 = (Person) applicationContext.getBean("person_02");
Person person_03 = (Person) applicationContext.getBean("person_03");
System.out.println(person_01);
System.out.println(person_02);
System.out.println(person_03);
}
}

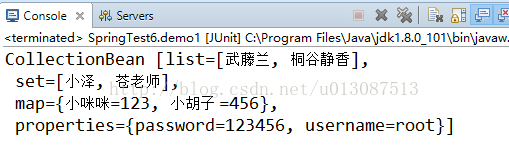
集合类型的属性注入
(1) List 数组
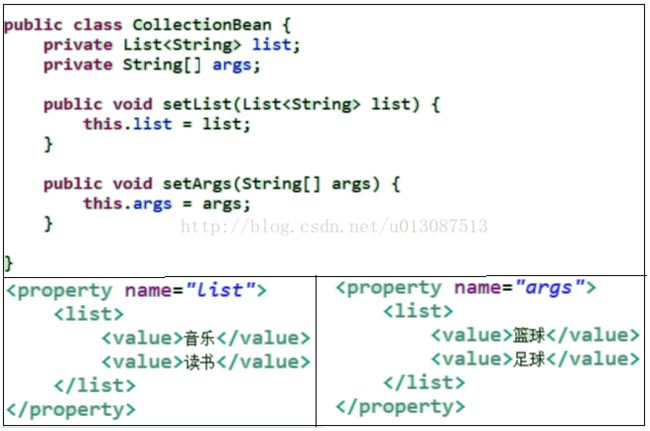
(2)Set 集合

(3) Map

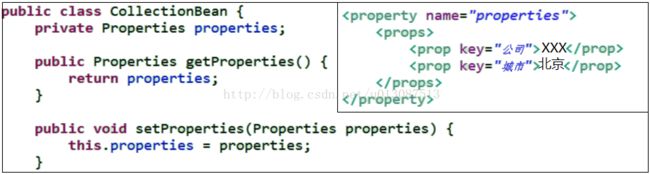
(3)Properties
使用多个XML配置文件
方式一:可以在创建ApplicationContext对象时传入多个配置文件。
ApplicationContext applicationContext = newClassPathXmlApplicationContext("beans1.xml", "beans2.xml");
方式二:可以在配置文件中通过引入其他配置文件
实例代码如下:
在src下新建两个Spring的配置文件
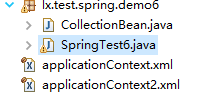
package lx.test.spring.demo6;

import java.util.List;
import java.util.Map;
import java.util.Properties;
import java.util.Set;

public class CollectionBean {
	private List list;
	private Set set;
	private Map map;
	private Properties properties;

	public void setList(List list) {
		this.list = list;
	}

	public void setSet(Set set) {
		this.set = set;
	}

	public void setMap(Map map) {
		this.map = map;
	}

	public void setProperties(Properties properties) {
		this.properties = properties;
	}

	@Override
	public String toString() {
		return "CollectionBean [list=" + list + ",\n set=" + set + ",\n map=" + map
				+ ",\n properties=" + properties + "]";
	}

}
package lx.test.spring.demo6;

import org.junit.Test;
import org.springframework.context.ApplicationContext;
import org.springframework.context.support.ClassPathXmlApplicationContext;


public class SpringTest6 {
	@Test
	public void demo1(){
		ApplicationContext applicationContext = new ClassPathXmlApplicationContext(
				"applicationContext.xml");
		CollectionBean collectionBean = (CollectionBean) applicationContext.getBean("collectionBean");
		System.out.println(collectionBean);
	}
}
				武藤兰
				桐谷静香


				小泽
				苍老师


				root
				123456
IOC容器装配Bean(注解方式)
Spring注解装配Bean
Spring2.5引入使用注解去定义Bean:
@Component描述Spring框架中Bean

需要在配置文件中引用Context的Schema名称空间,在解压后的dist包中搜索 xsd-config.html文件,打开后找到context的名称空间约束如下所示:

配置如下所示:
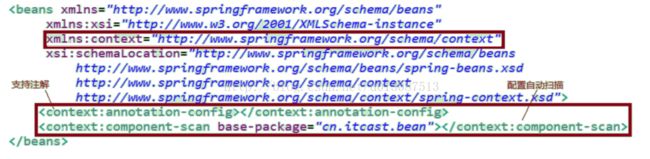
如果不使用XML注册Bean 单纯使用注解声明Bean的话,不需要使用标签,只需要配置自动扫描即可。标签仅仅适用于XML和注解混搭使用时才需要的。
除了@Component外,Spring提供了3个功能和@Component等效的注解,如下所示:
- @Repository用于对DAO实现类进行标注。
- @Service用于对Service实现类进行标注。
- @Controller用于对Controller实现类进行标注。
以上三个注解是为了让标注类本身的用途清晰,Spring在后续的版本会对其增强。
自动装配Bean
使用@Autowired进行自动注入,使用@Service标注业务类,@Repository标注DAO。@Autowired默认按照类型进行注入,如果存在两个相同的Bean类型相同,则按照名称注入。@Autowired注入时可以针对成员变量或者setter方法。

注意:如果在使用注解标识Bean的情况下,如果没有显式的指定Bean的name名称,那么在使用applicationContext获取Bean对象时,它的name默认是这个Bean类名称的驼峰式写法,并且需要指定是哪个类,如下所示:

通过@Autowired的required属性,设置一定要找到匹配的Bean,如果设置为true,一旦找不到所匹配的Bean类型就会抛出异常,默认是true。如果设置成false的话,即使搜索不到所匹配的Bean类也不会报错。
使用@Qualifier指定注入Bean的名称,必须注意的是使用@Qualifier指定Bean名称后,注解Bean必须指定相同的名称,如下图所示:

对于普通属性使用@Value,另外Spring提供对JSR-250中定义@Resource标准注解的支持,@Resource和@Autowired注解功能类似,@Autowired和@Qualifier结合使用等价于@Resource。@Qualifier意思是按照名称进行注入。

指定Bean的初始化和销毁方法
Spring初始化Bean或销毁Bean时,有时需要作一些处理工作,因此Spring可以在创建和拆卸Bean的时候调用Bean的两个生命周期方法。如下图所示:
Bean的作用范围@Scope
使用注解配置的Bean和的配置一样,默认作用范围都是singleton,@Scope注解用于指定Bean的作用范围。
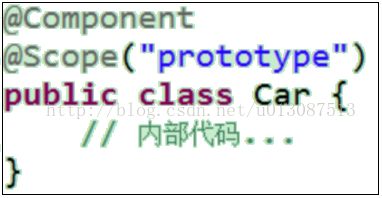
示例代码如下:
UserDao
package spring3.annotation.demo1;

import org.springframework.stereotype.Repository;

@Repository("userDao")
public class UserDao {

}
package spring3.annotation.demo1;
import javax.annotation.PostConstruct;
import javax.annotation.PreDestroy;
import javax.annotation.Resource;
import org.springframework.beans.factory.annotation.Autowired;
import org.springframework.beans.factory.annotation.Qualifier;
import org.springframework.beans.factory.annotation.Value;
import org.springframework.context.annotation.Scope;
import org.springframework.stereotype.Component;
import org.springframework.stereotype.Service;
/**
* 注解的方式装配Bean
*/
// @Component、@Service以及@Repository的功能就是注册Bean类
// 相当于XML中的如下配置
//
@Value(value = "annotationInfo")
private String info;
// @Autowired(required=true)
// @Qualifier("userDao")
// 注意:@Autowired和@Qualifier结合相当于@Resource
@Resource(name = "userDao")
private UserDao userDao;
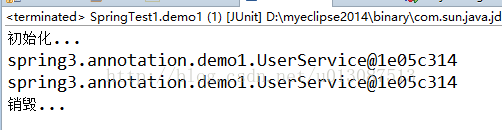
public void sayHello() {
System.out.println("Hello Spring Annotation..." + info);
}
@PostConstruct
// @PostConstruct相当于 XML中 的属性 init-method=""
public void setup() {
System.out.println("初始化...");
}
@PreDestroy
// @PreDestroy相当于XML中的属性 destroy-method=""
public void teardown() {
System.out.println("销毁...");
}
}
package spring3.annotation.demo1;

import org.junit.Test;
import org.springframework.context.support.ClassPathXmlApplicationContext;

// 注解的方式
public class SpringTest1 {
	@Test
	public void demo1() {
		ClassPathXmlApplicationContext applicationContext = new ClassPathXmlApplicationContext(
				"applicationContext.xml");

		UserService userService = (UserService) applicationContext
				.getBean("userService",UserService.class);
		System.out.println(userService);
		UserService userService2 = (UserService) applicationContext
				.getBean("userService",UserService.class);
		System.out.println(userService2);
		applicationContext.close();
	}
}
运行结果如下:
Spring3.0提供使用Java类提供Bean定义信息
Spring3.0以JavaConfig为核心,提供使用Java类定义Bean信息的方法。
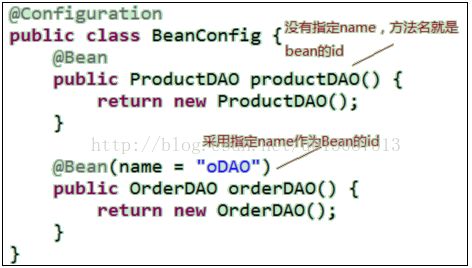
- @Configuration指定POJO类为Spring提供Bean定义信息
- @Bean提供一个Bean定义信息
如果在Spring的配置文件中配置了按照包进行注解扫描的属性标签,则无需再手动加载配置类。否则需要手动加载@Configuration配置类。手动加载配置类如下所示:
- Spring提供AnnotationConfigApplicationContext用于加载使用@Configuration配置注解工厂类。
- register方法用于向注解上下文对象添加一个配置类。
- refresh刷新容器以应用这些注册的配置类。

如果采用了手动加载@Configuration配置类的情况,即使没有Spring配置文件也能照常运行。
示例代码如下:
Car
package spring3.annotation.demo2;

public class Car {
	private String name;
	private Double price;

	public void setName(String name) {
		this.name = name;
	}

	public void setPrice(Double price) {
		this.price = price;
	}

	@Override
	public String toString() {
		return "Car [name=" + name + ", price=" + price + "]";
	}

}
package spring3.annotation.demo2;

public class Product {
	private String name;
	private Double price;

	public void setName(String name) {
		this.name = name;
	}

	public void setPrice(Double price) {
		this.price = price;
	}

	@Override
	public String toString() {
		return "Product [name=" + name + ", price=" + price + "]";
	}
}
package spring3.annotation.demo2;
import org.springframework.context.annotation.Bean;
import org.springframework.context.annotation.Configuration;
@Configuration
public class BeanConfig {
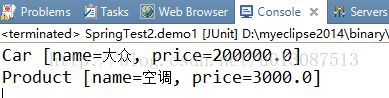
@Bean(name = "car")
public Car showCar() {
Car car = new Car();
car.setName("大众");
car.setPrice(200000d);
return car;
}
@Bean(name = "product")
public Product initProduct() {
Product product = new Product();
product.setName("空调");
product.setPrice(3000d);
return product;
}
}
package spring3.annotation.demo2;

import org.junit.Test;
import org.springframework.context.annotation.AnnotationConfigApplicationContext;
import org.springframework.context.support.ClassPathXmlApplicationContext;

public class SpringTest2 {
	@Test
	// 加载XML配置文件 (配置了进行自动扫描注解类)
	public void demo1() {
		ClassPathXmlApplicationContext applicationContext = new ClassPathXmlApplicationContext(
				"applicationContext.xml");
		Car car = (Car) applicationContext.getBean("car");
		Product product = (Product) applicationContext.getBean("product");
		System.out.println(car);
		System.out.println(product);
	}

	@Test
	// 不使用Spring的配置文件,手动注册config类
	public void demo2() {
		AnnotationConfigApplicationContext applicationContext = new AnnotationConfigApplicationContext();
		applicationContext.register(BeanConfig.class);
		applicationContext.refresh(); // 刷新容器以应用这些注册的配置类
		Car car = (Car) applicationContext.getBean("car");
		Product product = (Product) applicationContext.getBean("product");
		System.out.println(car);
		System.out.println(product);
	}
}
传统XML配置和注解配置混合使用
如果混合使用,一般使用XML注册Bean 进行Bean的管理,使用注解进行属性的注入。混合使用配置方法如下:
1、引入context命名空间
2、在配置文件中添加
注意:单独使用注解声明注册Bean的话只需要配置扫描的标签,混合使用时只需要使用
示例代码如下:
CustomerDao
package spring3.annotation.demo3;

public class CustomerDao {

}
package spring3.annotation.demo3;

public class OrderDao {

}
package spring3.annotation.demo3;

import org.springframework.beans.factory.annotation.Autowired;
import org.springframework.beans.factory.annotation.Qualifier;

public class CustomerService {
	private CustomerDao customerDao;
	@Autowired
	@Qualifier("orderDao")
	private OrderDao orderDao;

	public void setCustomerDao(CustomerDao customerDao) {
		this.customerDao = customerDao;
	}
	@Override
	public String toString() {
		return "CustomerService [customerDao=" + customerDao + ", orderDao="
				+ orderDao + "]";
	}


}
package spring3.annotation.demo3;

import org.junit.Test;
import org.springframework.context.ApplicationContext;
import org.springframework.context.support.ClassPathXmlApplicationContext;


public class SpringTest3 {
	@Test
	public void demo1() {
		ApplicationContext applicationContext = new ClassPathXmlApplicationContext(
				"applicationContext2.xml");
		CustomerService customerService = (CustomerService) applicationContext
				.getBean("customerService");
		System.out.println(customerService);
	}
}

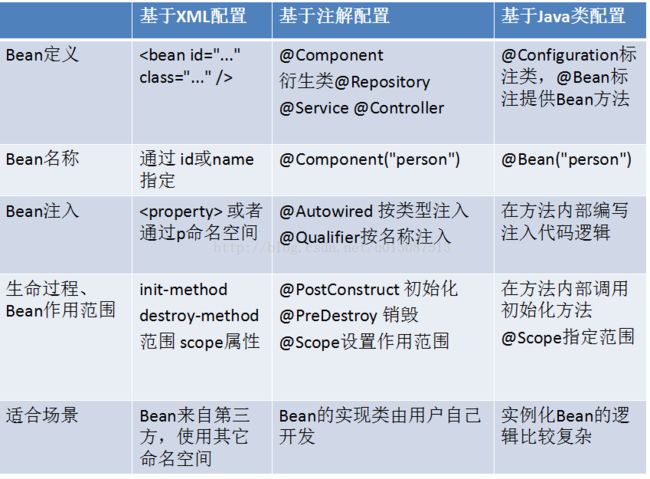
多种装配Bean方式比较
Spring整合web开发
正常整合Servlet和Spring是没有问题的,但是每次执行Servlet的时候都会加载Spring配置,加载Spring环境。
解决方法:在Servlet的init方法中加载Spring配置文件,这种方法虽然可以解决每次请求都会加载Spring配置的问题,但是只能应用于当前的Servlet,其他的Servlet无法使用。所以最好的方法是将加载的信息内容放到ServletContext中。ServletContext对象是全局对象,在服务器启动的时候创建的,在创建ServletContext的时候就加载Spring环境。
ServletContextListener:用于监听ServletContext对象的创建和销毁的。
web应用中使用Spring的步骤如下:
1、导入响应的jar包
导入Spring开发基本的jar包:spring-beans-3.2.0.RELEASE.jar、spring-context-3.2.0.RELEASE.jar、spring-core-3.2.0.RELEASE.jar、spring-expression-3.2.0.RELEASE.jar;
导入日志相关jar包:commons-logging-1.1.1.jar、com.springsource.org.apache.log4j-1.2.15.jar
导入Spring web开发的jar包:spring-web-3.2.0.RELEASE.jar
2、配置web.xml
将Spring容器初始化,交由web容器负责。
配置核心监听器ContextLoaderListener(ContextLoaderListener实现了ServletContextListener接口)。
配置全局参数contextConfigLocation,用于指定Spring框架的配置文件的位置。

3、获得WebApplicationContext对象
因为Spring容器已经交由web容器初始化和管理。
获得WebApplicationContext对象,需要依赖ServletContext对象。通常在Servlet中完成。
WebApplicationContext applicationContext=WebApplicationContextUtils.getWebApplicationContext(getServletContext());
还可以用另外一种方式进行获取
WebApplicationContext applicationContext=(WebApplicationContext)getServletContext().getAttribute(WebApplicationContext.ROOT_WEB_APPLICATION_CONTEXT_ATTRIBUTE);
示例代码如下:
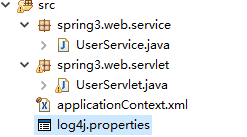

UserService
package spring3.web.service;

public class UserService {
	public void sayHello() {
     System.out.println("Hello Spring web...");
	}
}
package spring3.web.servlet;

import java.io.IOException;

import javax.servlet.ServletException;
import javax.servlet.http.HttpServlet;
import javax.servlet.http.HttpServletRequest;
import javax.servlet.http.HttpServletResponse;

import org.springframework.web.context.WebApplicationContext;
import org.springframework.web.context.support.WebApplicationContextUtils;

import spring3.web.service.UserService;

public class UserServlet extends HttpServlet {

	public void doGet(HttpServletRequest request, HttpServletResponse response)
			throws ServletException, IOException {
		/*ApplicationContext applicationContext = new ClassPathXmlApplicationContext(
		"applicationContext.xml");*/
		WebApplicationContext applicationContext=WebApplicationContextUtils.getWebApplicationContext(getServletContext());

		UserService userService=(UserService) applicationContext.getBean("userService");
		userService.sayHello();
	}

	public void doPost(HttpServletRequest request, HttpServletResponse response)
			throws ServletException, IOException {

		doGet(request, response);
	}

}
web.xml
	org.springframework.web.context.ContextLoaderListener


      UserServlet
      spring3.web.servlet.UserServlet


    UserServlet
    /user


	contextConfigLocation
	classpath:applicationContext.xml


	index.jsp
### direct log messages to stdout ###
log4j.appender.stdout=org.apache.log4j.ConsoleAppender
log4j.appender.stdout.Target=System.err
log4j.appender.stdout.layout=org.apache.log4j.PatternLayout
log4j.appender.stdout.layout.ConversionPattern=%d{ABSOLUTE} %5p %c{1}:%L - %m%n

### direct messages to file mylog.log ###
log4j.appender.file=org.apache.log4j.FileAppender
log4j.appender.file.File=c\:mylog.log
log4j.appender.file.layout=org.apache.log4j.PatternLayout
log4j.appender.file.layout.ConversionPattern=%d{ABSOLUTE} %5p %c{1}:%L - %m%n

### set log levels - for more verbose logging change 'info' to 'debug' ###

log4j.rootLogger=info, stdout 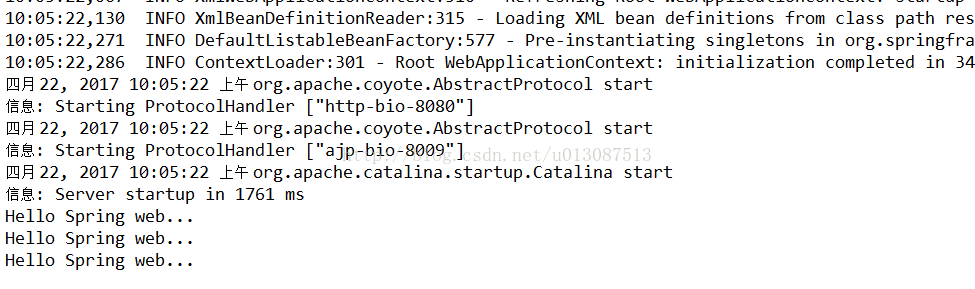
使用Junit测试Spring程序
导入Spring test测试jar包,需要导入spring-test-3.2.0.RELEASE.jar
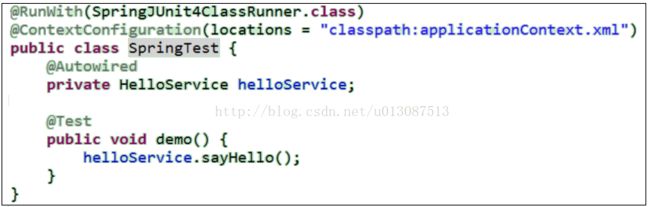
示例代码如下:将applicationContext.xml中的命名空间改为Context的命名空间。导入整合Junit的jar包
package spring3.web.test;

import org.junit.Test;
import org.junit.runner.RunWith;
import org.springframework.beans.factory.annotation.Autowired;
import org.springframework.test.context.ContextConfiguration;
import org.springframework.test.context.junit4.SpringJUnit4ClassRunner;

import spring3.web.service.UserService;

@RunWith(SpringJUnit4ClassRunner.class)
@ContextConfiguration(locations = "classpath:applicationContext.xml")
public class SpringTest {
	@Autowired
	private UserService userService;

	@Test
	public void demo1() {
		userService.sayHello();
	}
}
