SpringBoot源码阅读--自定义Starter
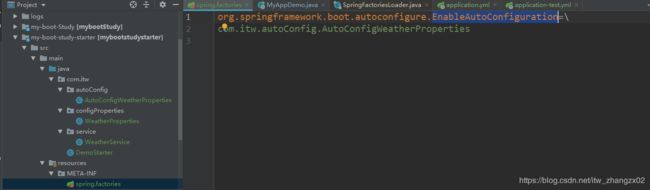
新建一个maven项目,引入相关依赖。然后在META-INF文件夹下新建文件 spring.factories。配置我们的自动配置类
		org.springframework.boot
		spring-boot-starter-parent
		2.1.5.RELEASE

	4.0.0
	com.itw.boot
	my-boot-study-starter


			 org.springframework.boot
			 spring-boot-starter-web


			 org.springframework.boot
			 spring-boot-starter-test


			org.projectlombok
			lombok


			com.alibaba
			fastjson
			1.2.45
org.springframework.boot.autoconfigure.EnableAutoConfiguration=\
com.itw.autoConfig.AutoConfigWeatherProperties
package com.itw.autoConfig;
import com.itw.configProperties.WeatherProperties;
import com.itw.service.WeatherService;
import org.springframework.boot.context.properties.EnableConfigurationProperties;
import org.springframework.context.annotation.Bean;
import org.springframework.context.annotation.Configuration;
import org.springframework.web.client.RestTemplate;
//我们的注解@Configuration,表明这是个配置类
//EnableConfigurationProperties注解配合注解@ConfigurationProperties使用,自动注入
@Configuration
@EnableConfigurationProperties(WeatherProperties.class)
public class AutoConfigWeatherProperties {
@Bean
public RestTemplate getRestTemplate (){
return new RestTemplate();
}
@Bean
public WeatherService getWeatherService(WeatherProperties weatherProperties){
return new WeatherService(weatherProperties);
}
}
package com.itw.configProperties;

import lombok.Data;
import org.springframework.boot.context.properties.ConfigurationProperties;
import org.springframework.validation.annotation.Validated;

import javax.validation.constraints.NotNull;

@Data
@ConfigurationProperties(prefix = "myapp.weather")
@Validated
public class WeatherProperties {
	@NotNull
	String urlStr;
	@NotNull
    String appKey;
}
package com.itw.service;

import com.itw.configProperties.WeatherProperties;
import net.minidev.json.JSONObject;
import org.springframework.beans.factory.annotation.Autowired;
import org.springframework.http.HttpEntity;
import org.springframework.http.HttpHeaders;
import org.springframework.http.MediaType;
import org.springframework.web.client.RestTemplate;

public class WeatherService {
	@Autowired
	private RestTemplate restTemplate;

	public WeatherService(WeatherProperties weatherProperties) {
		this.appKey = weatherProperties.getAppKey();
		this.urlStr = weatherProperties.getUrlStr();
	}

	private String urlStr;

	private String appKey;

	public String getWeatherInfo(String  city){
		JSONObject jsonObject = new JSONObject();
		jsonObject.put("appkey", appKey);
		jsonObject.put("city", city);
		String json = JSONObject.toJSONString(jsonObject);
		//使用restTemplate进行访问远程Http服务
		HttpHeaders headers = new HttpHeaders();
		headers.setContentType(MediaType.APPLICATION_JSON_UTF8);
		HttpEntity httpEntity = new HttpEntity(json, headers);
		//这个接口的appkey不能放到请求体中,所以需要修改逻辑
		String result = restTemplate.postForObject(urlStr, httpEntity, String.class);
		return result;
	}

}
然后,打包之后就可以,供其他模块或项目引用了。
package com.itwzhangzx.boot.controller;

import com.itw.service.WeatherService;
import org.springframework.beans.factory.annotation.Autowired;
import org.springframework.web.bind.annotation.RequestMapping;
import org.springframework.web.bind.annotation.RestController;
import javax.servlet.http.HttpServletRequest;

@RestController
public class WeatherController {
       //别的项目中直接使用我们之前的starter中的对象
	@Autowired
	private WeatherService weatherService;

	@RequestMapping("/getWeatherByCity")
	public  String getWeatherByCity(HttpServletRequest request){
		return weatherService.getWeatherInfo(request.getParameter("city"));
	}


}
为啥我们的项目中能直接用jar包中的对象,关键就在于注解:
@EnableAutoConfigurationpackage org.springframework.boot.autoconfigure;
import java.lang.annotation.Documented;
import java.lang.annotation.ElementType;
import java.lang.annotation.Inherited;
@Target(ElementType.TYPE)
@Retention(RetentionPolicy.RUNTIME)
@Documented
@Inherited
@AutoConfigurationPackage
@Import(AutoConfigurationImportSelector.class)
public @interface EnableAutoConfiguration {
//省略。。。
}
我们先看new我们的实例SpringApplication对象的步骤:
public SpringApplication(ResourceLoader resourceLoader, Class... primarySources) {
this.resourceLoader = resourceLoader;
Assert.notNull(primarySources, "PrimarySources must not be null");
this.primarySources = new LinkedHashSet<>(Arrays.asList(primarySources));
//判断我们的应用类型,这儿我们时web服务 SERVLET
this.webApplicationType = WebApplicationType.deduceFromClasspath();
//加载ApplicationContextInitializer 容器初始化器()
//从类路径下找到META-INF/spring.factories配置的所有ApplicationContextInitializer
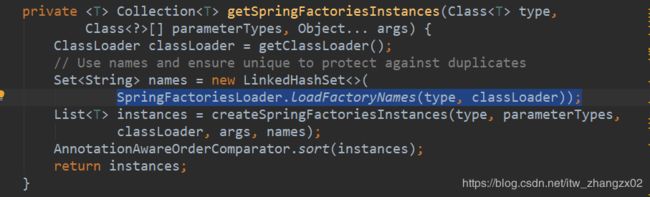
setInitializers((Collection) getSpringFactoriesInstances(
ApplicationContextInitializer.class));
//从类路径下找到META-INF/spring.factories配置的所有ApplicationContextInitializer
setListeners((Collection) getSpringFactoriesInstances(ApplicationListener.class));
//就是找到我们的启动类,比我 MyAppDemo
this.mainApplicationClass = deduceMainApplicationClass();
}然后看我们的run方法:
public ConfigurableApplicationContext run(String... args) {
    //一个计时器。用于统计初始化容器时间
		StopWatch stopWatch = new StopWatch();
		stopWatch.start();
		ConfigurableApplicationContext context = null;
		Collection exceptionReporters = new ArrayList<>();
//配置模式 java.awt.headless 系统配置,自行百度
		configureHeadlessProperty();
//配置我们的监听器 SpringApplicationRunListener
//从类路径下找到META-INF/spring.factories配置的所有SpringApplicationRunListener
		SpringApplicationRunListeners listeners = getRunListeners(args);
//回调监听器的starting方法,监听器是排好序的,这儿按序执行starting方法
		listeners.starting();
		try {    //main方法的参数,封装
			ApplicationArguments applicationArguments = new DefaultApplicationArguments(
					args);
//环境中存储我们的所有的配置信息,比如我们的yml文件中的配置参数
			ConfigurableEnvironment environment = prepareEnvironment(listeners,
					applicationArguments);
//spring.beaninfo.ignore属性的配置
			configureIgnoreBeanInfo(environment);
//打印banner
			Banner printedBanner = printBanner(environment);
//创建IOC容器
			context = createApplicationContext();
			exceptionReporters = getSpringFactoriesInstances(
					SpringBootExceptionReporter.class,
					new Class[] { ConfigurableApplicationContext.class }, context);
			prepareContext(context, environment, listeners, applicationArguments,
					printedBanner);
//容器中放入我们的bean,configuration,组件,bean的装配
			refreshContext(context);
			afterRefresh(context, applicationArguments);
			stopWatch.stop();
			if (this.logStartupInfo) {
				new StartupInfoLogger(this.mainApplicationClass)
						.logStarted(getApplicationLog(), stopWatch);
			}
			listeners.started(context);
			callRunners(context, applicationArguments);
		}
		catch (Throwable ex) {
			handleRunFailure(context, ex, exceptionReporters, listeners);
			throw new IllegalStateException(ex);
		}

		try {
			listeners.running(context);
		}
		catch (Throwable ex) {
			handleRunFailure(context, ex, exceptionReporters, null);
			throw new IllegalStateException(ex);
		}
		return context;
	}
我们的配置类,也就是注解@Configuration标识了的类会在刷新容器的时候,初始化,然后放入容器中。