【安卓学习之第三方库】 消息推送之阿里云推送
█ 【安卓学习之第三方库】 消息推送之极光推送
█ 相关文章:
-
● 【安卓学习之第三方库】库的使用2-jar类库的使用(以dom4j为例)和升级(以极光推送为例)
● 【安卓学习之第三方库】 消息推送之极光推送
● 【安卓学习之第三方库】 消息推送之阿里云推送
█ 读前说明:
-
● 本文通过学习别人写demo,学习一些课件,参考一些博客,’学习相关知识,如果涉及侵权请告知
● 本文只简单罗列相关的代码实现过程
● 涉及到的逻辑以及说明也只是简单介绍,主要当做笔记,了解过程而已
传送门:alicloud-android_阿里云推送3.1.9.1版(Maven库快速集成)_20200612.zip
█ 阿里云后台:
-
● 产品特性
阿里移动推送(Alibaba Cloud Mobile Push)是基于大数据的移动智能推送服务,帮助App快速集成移动推送的功能,在实现高效、精确、实时的移动推送的同时,极大地降低了开发成本。让开发者最有效地与用户保持连接,从而提高用户活跃度、提高应用的留存率。
高效稳定——与手机淘宝使用相同架构,基于阿里集团高可用通道。该通道日均消息发送量可达30亿,目前活跃使用的用户达1.8亿。
高到达率——Android 智能通道保活,多通道支持保证推送高到达率。
精确推送——基于阿里大数据处理技术,实现精确推送。
应用内消息推送——支持 Android 与 iOS 应用内私有通道,保证透传消息高速抵达。
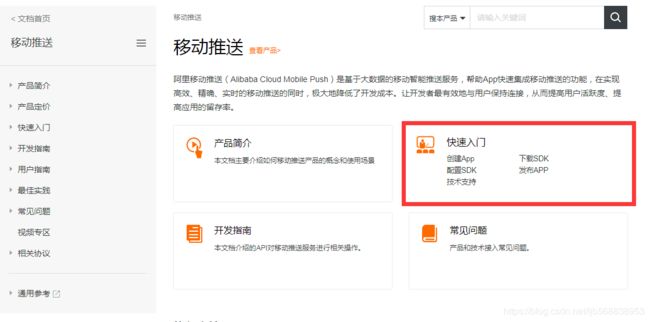
● 进入阿里云移动研发平台EMAS控制台,点击【登录】按钮,进入控制台

● 后台创建应用


PS:同一个产品下的多个应用的AppKey是不同的

● 推送设置,Maven库快速集成(远程同步)的方式很简单,其他在创建的时候就已经给开发者做了引导
Android SDK 3.0配置集成开发文档(PS:Maven库快速集成 测试成功)
Android EMAS统一接入(PS:一直没有接入成功)
EMAS Android SDK快速集成手册(PS:内容太长了,没试)
com.alibaba.app.appkey和com.alibaba.app.appsecret为您App的对应信息,在推送控制台APP列表页的应用证书中获取。appkey和appsecret请务必写在application标签下,否则sdk会报找不到appkey错误。如果您是百川云推送用户,不能直接使用百川平台的appKey和appSecret,需要登录阿里云移动推送控制台,登录账号为您的百川平台账号,并使用阿里云平台的appKey,appSecret。
自V3.1.2版本开始,push支持EMAS统一接入功能,接入该功能无需再在AndoridManifest文件中设置appkey, appsecret
● 推送测试,下载demo或者集成sdk后,在没有后台配合的情况下,就可以直接通过该界面进行推送测试,正常主要都是用【推送消息】(一般都是json字符串,再转换成对象),当然也可以用【推送通知】。

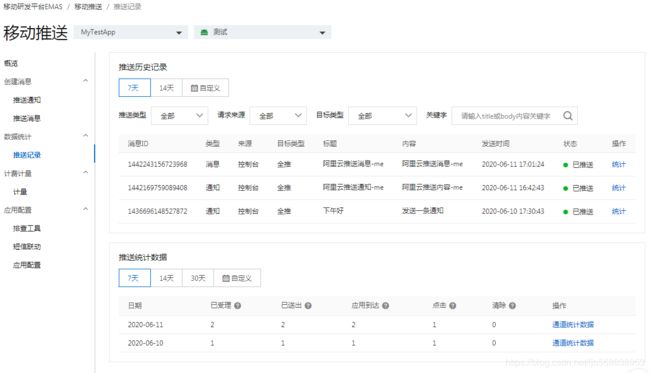
● 推送历史查看:

● app测试,进入跟着Demo快速体验移动推送,下载阿里云移动推送Demo APP Android版,界面如下:


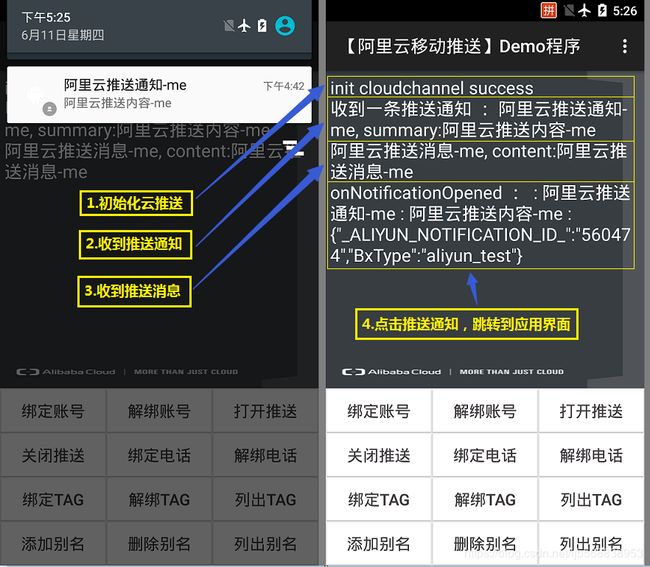
● app测试,收到消息推送,含【推送通知】和【推送消息】:
█ demo结构:
-
● demo下载后,工程名为:mpush_android_demo,打开工程,代码目录如下:

● 在Project根目录下build.gradle文件如下:
buildscript {
    repositories {
        mavenCentral()
        google()
    }
    dependencies {
        classpath 'com.android.tools.build:gradle:3.2.0'
//        classpath 'com.aliyun.ams:emas-services:1.0.1'
    }
}

allprojects {
    repositories {
        maven { url 'http://maven.aliyun.com/nexus/content/repositories/releases/' }
        google()
    }
}
● 在module下应用级build.gradle文件如下:
apply plugin: 'com.android.application'

android {
    compileSdkVersion 28
    defaultConfig {
        applicationId "com.test.test2020"
        minSdkVersion 16
        targetSdkVersion 28
        versionCode 1
        versionName "1.0"
    }

    buildTypes {
        release {
            minifyEnabled false
            proguardFiles getDefaultProguardFile('proguard-android.txt'), 'proguard-rules.pro'
        }
    }
}


dependencies {
    //implementation fileTree(dir: 'libs', include: ['*.jar'])
    implementation 'com.android.support:appcompat-v7:28.0.0'
    implementation ('com.aliyun.ams:alicloud-android-push:3.1.6@aar') {
        transitive true
    }
}
● AndroidManifest.xml文件如下:
<?xml version="1.0" encoding="utf-8"?>
<manifest xmlns:android="http://schemas.android.com/apk/res/android"
    xmlns:tools="http://schemas.android.com/tools"
    package="com.alibaba.cloudpushdemo"// 注意,这个包名可以和平台设置的【应用包名】不一样,是假包名
    android:installLocation="auto">

    <!-- Application Settings -->
    <application
        android:name=".application.MainApplication"
        android:allowBackup="true"
        android:icon="@mipmap/ic_launcher"
        tools:replace="android:allowBackup"
        tools:overrideLibrary="com.huawei.android.hms.push"
        android:label="@string/app_name"
        tools:ignore="GoogleAppIndexingWarning">
        <activity
            android:name=".bizactivity.MainActivity"
            android:label="@string/app_name"
            android:screenOrientation="portrait">
            <intent-filter>
                <action android:name="android.intent.action.MAIN" />

                <category android:name="android.intent.category.LAUNCHER" />
            </intent-filter>
        </activity>
        <!-- ************************************TODO 阿里推送***************************************** -->
        <meta-data
            android:name="com.alibaba.app.appkey"
            android:value="30169527" /> <!-- 请填写你自己的- appKey -->
        <meta-data
            android:name="com.alibaba.app.appsecret"
            android:value="036e***************8ad154" /> <!-- 请填写你自己的appSecret -->
        <!-- 消息接收监听器 (用户可自主扩展) -->
        <receiver
            android:name=".component.MyMessageReceiver"
            android:exported="false">
            <intent-filter>
                <action android:name="com.alibaba.push2.action.NOTIFICATION_OPENED" />
            </intent-filter>
            <intent-filter>
                <action android:name="com.alibaba.push2.action.NOTIFICATION_REMOVED" />
            </intent-filter>
            <intent-filter>
                <action android:name="com.alibaba.sdk.android.push.RECEIVE" />
            </intent-filter>
        </receiver>
        <!-- ************************************阿里推送***************************************** -->
    </application>
</manifest>
█ demo讲解:
-
● 首页需要在Application(本demo中的MainApplication.java文件)中进行初始化云推送通道(在应用中注册和启动移动推送):
    private void initCloudChannel(final Context applicationContext) {
    	Log.e("TAG", "*************云推送初始化(自己添加)*************");
        this.createNotificationChannel();// 创建notificaiton channel, 解决Android 8.0 以上设备接收不到通知
        PushServiceFactory.init(applicationContext);
        final CloudPushService pushService = PushServiceFactory.getCloudPushService();
        pushService.register(applicationContext, new CommonCallback() {
            @Override
            public void onSuccess(String response) {
                Log.e(TAG, "init cloudchannel success");
                 Log.e("TAG", "*************云推送初始化完毕(自己添加)*************");
            }

            @Override
            public void onFailed(String errorCode, String errorMessage) {
                Log.e(TAG, "init cloudchannel failed -- errorcode:" + errorCode + " -- errorMessage:" + errorMessage);
            }
        });
    }
● 初始化后,就可以开始接收推送消息,这边我们注意到MyMessageReceiver.java:
这边重点关注3个方法:【推送消息/自定义消息】推送处理、【推送通知/发送通知】推送处理、【推送通知/发送通知】通知打开处理。
注 : **阿里云里面的【推送消息】等价于极光里面的【自定义消息】(也称为透传消息),阿里云里面的【推送通知】等价于极光里面的【发送通知】
public class MyMessageReceiver extends MessageReceiver {
    // 消息接收部分的LOG_TAG
    public static final String REC_TAG = "receiver";

    // ######################【推送通知/发送通知】推送处理######################
    @Override
    public void onNotification(Context context, String title, String summary, Map<String, String> extraMap) {
        // TODO 处理推送通知
        if ( null != extraMap ) {
            for (Map.Entry<String, String> entry : extraMap.entrySet()) {
                Log.i(REC_TAG,"@Get diy param : Key=" + entry.getKey() + " , Value=" + entry.getValue());
            }
        } else {
            Log.i(REC_TAG,"@收到通知 && 自定义消息为空");
        }
        Log.i(REC_TAG,"收到一条推送通知 : " + title + ", summary:" + summary);
    }
    // ######################【推送消息/自定义消息】推送处理######################
    @Override
    public void onMessage(Context context, CPushMessage cPushMessage) {
        Log.i(REC_TAG,"收到一条推送消息 : " + cPushMessage.getTitle() + ", content:" + cPushMessage.getContent());
    }
    // ######################【推送通知/发送通知】通知打开处理######################
    @Override
    public void onNotificationOpened(Context context, String title, String summary, String extraMap) {
        Log.i(REC_TAG,"onNotificationOpened : " + " : " + title + " : " + summary + " : " + extraMap);
    }
}
█ demo运行:
-
● 我们运行下,看看执行的过程:
● 接下来初始化云推送通道:
首页可以看到一共后台启动了两条线程:分别是主线程com.test.test2020和后台服务com.test.test2020:channel

其中channel是通过Maven库快速集成的多个service,如:
<service android:name="com.taobao.accs.ChannelService"
    android:exported="true" android:process=":channel">
    <intent-filter>
        <action android:name="com.taobao.accs.intent.action.SERVICE"/>
    </intent-filter>
</service>
● 接下来初始化云推送通道:
initCloudChannel(this);// 初始化云推送通道
06-11 11:56:42.555 7818-7818/com.test.test2020 E/TAG: *************云推送初始化(自己添加)*************
06-11 11:56:42.558 7818-7818/com.test.test2020 I/SecurityBoxService: Aliyun
06-11 11:56:42.673 7818-7818/com.test.test2020 I/MPS:CloudPushService: [AMS]Initialize Mobile Push service...
06-11 11:56:42.864 7818-7818/com.test.test2020 I/UtilsSDK: NO SDK restore
06-11 11:56:42.886 7818-7818/com.test.test2020 I/UtilsSDK: START:push --- limit:10  count:0  restore:0  startSerialNumber:34  registerSerialNumber:34
06-11 11:56:42.924 7818-7818/com.test.test2020 D/MPS:CloudPushService: load utdid: Xfb7X5VskBUDAOakgtQkTI7u
06-11 11:56:42.924 7818-7818/com.test.test2020 D/MPS:AppRegister: AmsEnv:online
06-11 11:56:42.925 7818-7818/com.test.test2020 I/MPS:AppRegister: [AMS]appkey:30169527
06-11 11:56:42.926 7818-7818/com.test.test2020 E/anet.NetworkSdkSetting:  NetworkSdkSetting init
06-11 11:56:42.927 7818-7818/com.test.test2020 E/awcn.GlobalAppRuntimeInfo:   CurrentProcess:com.test.test2020 TargetProcess:com.test.test2020

06-11 11:56:43.062 7818-7818/com.test.test2020 I/NAccs.AccsClientConfig:  init config from xml configtags:
06-11 11:56:43.070 7818-7818/com.test.test2020 D/NAccs.ACCSClassLoader:  getClassLoader
06-11 11:56:43.071 7818-7818/com.test.test2020 D/NAccs.Config:  setAgooAppKey appkey:30169527
06-11 11:56:43.071 7818-7818/com.test.test2020 I/NAccs.Utils:  setSpValue key:defaultAppkey value:30169527
06-11 11:56:43.071 7818-7818/com.test.test2020 D/NAccs.AccsClientConfig:  build config:AccsClientConfig{Tag=default, ConfigEnv=0, AppKey=30169527, AppSecret=036ea01530************5818ad154, InappHost=acs4public.m.taobao.com, ChannelHost=accscdn4public.m.taobao.com, Security=2, AuthCode=null, InappPubKey=-1, ChannelPubKey=-1, Keepalive=true, AutoUnit=true, DisableChannel=false, QuickReconnect=false}

06-11 11:56:43.075 7818-7818/com.test.test2020 I/NAccs.ACCSMgrImpl_default:  bindApp appKey:30169527
06-11 11:56:43.078 7818-7818/com.test.test2020 D/NAccs.UtilityImpl:  enableService comptName:ComponentInfo{com.test.test2020/com.taobao.accs.ChannelService}

06-11 11:56:43.101 7818-7894/com.test.test2020 D/MPS:AppRegister: init aliyun accs. context:com.test.test2020 -- appkey:30169527

06-11 11:56:43.115 7818-7894/com.test.test2020 I/NAccs.TaobaoRegister:  register appKey:30169527 configTag:default

06-11 11:56:43.179 7818-7898/com.test.test2020 E/awcn.TnetSpdySession: |[seq:30169527.AWCN1_1] connect host:https://acs4public.m.taobao.com ip:203.119.216.50 port:443 sessionId:1591847803179 SpdyProtocol,:http2_0rtt_acs proxyIp,: proxyPort,:0

06-11 11:56:43.407 7818-7818/com.test.test2020 I/NAccs.MsgDistributeService:  onStartCommand action:com.taobao.accs.intent.action.RECEIVE

06-11 11:56:48.391 7905-7961/com.test.test2020:channel D/MPS:CheckService: notify main process
06-11 11:56:48.391 7905-7961/com.test.test2020:channel D/MPS:CheckService: isChannelInitialized:true
06-11 11:56:48.394 7818-7894/com.test.test2020 D/MPS:AppRegister: isChannelInitialized:1
06-11 11:56:48.395 7818-7894/com.test.test2020 I/MPS:AppRegister: connState=2;estimatedTime=5297;response=2:200;network=G2
06-11 11:56:48.395 7818-7894/com.test.test2020 D/MPS:AppRegister: Looping handleMessage: 1
06-11 11:56:48.395 7818-7818/com.test.test2020 I/MPS:AppRegister: [AMS]work call back: -- code:200 -- message:Ard5NXGwdNJ-KocxS-YuzhhmYOg9NDOo1MMGW2gtROmj
06-11 11:56:48.396 7818-7818/com.test.test2020 I/MPS:CallbackConvert: [AMS]errorCode:00000 -- process:true -- message:成功
06-11 11:56:48.396 7818-7818/com.test.test2020 E/TAG: init cloudchannel success
06-11 11:56:48.396 7818-7818/com.test.test2020 E/TAG: *************云推送初始化完毕(自己添加)*************
● 发送一条【推送通知】:

MyMessageReceiver收到消息,如下:
06-11 16:42:45.170 12718-13057/com.test.test2020 D/NAccs.MsgDistribute:  handleControlMsg configTag:default dataId:f__-jV10Suzu4h0m serviceId:agooSend command:101 errorCode:0 appReceiver:com.alibaba.sdk.android.push.vip.a
06-11 16:42:45.396 12718-12718/com.test.test2020 D/MPS:AgooMessageReceiver: AgooMessageReceiver onReceive begin...intent=Intent { act=com.alibaba.sdk.android.push.RECEIVE flg=0x10 pkg=com.test.test2020 cmp=com.test.test2020/com.alibaba.cloudpushdemo.component.MyMessageReceiver (has extras) }
06-11 16:42:45.396 12718-12718/com.test.test2020 D/MPS:MessageReceiver: handle message
06-11 16:42:45.396 12718-12718/com.test.test2020 D/MPS:MessageReceiver: messageId:f__-jV10Suzu4h0m&&5ee1ee8441ed394407&&Ard5NXGwdNJ-KocxS-YuzhhmYOg9NDOo1MMGW2gtROmj&&11&&
06-11 16:42:45.396 12718-12718/com.test.test2020 I/MPS:MessageReceiver: [AMS]msg receive:{"ext":{"BxType":"aliyun_test"},"title":"阿里云推送通知-me","msg_id":1442169759089408,"type":1,"content":"阿里云推送内容-me","open":1,"remind":3}
06-11 16:42:45.553 12718-12718/com.test.test2020 I/receiver: @Get diy param : Key=_ALIYUN_NOTIFICATION_ID_ , Value=560474
06-11 16:42:45.553 12718-12718/com.test.test2020 I/receiver: @Get diy param : Key=BxType , Value=aliyun_test
06-11 16:42:45.553 12718-12718/com.test.test2020 I/receiver: 收到一条推送通知 : 阿里云推送通知-me, summary:阿里云推送内容-me
06-11 16:42:45.748 12718-13057/com.test.test2020 D/NAccs.MsgDistribute:  handleControlMsg configTag:default dataId:2 serviceId:agooAck command:100 errorCode:200 appReceiver:com.alibaba.sdk.android.push.vip.a

● 发送一条【推送消息】:

MyMessageReceiver收到消息,如下:
06-11 17:01:25.246 12718-13149/com.test.test2020 D/NAccs.MsgDistribute:  handleControlMsg configTag:default dataId:f__-jV1jM67vHu3B serviceId:agooSend command:101 errorCode:0 appReceiver:com.alibaba.sdk.android.push.vip.a
06-11 17:01:25.284 12718-12718/com.test.test2020 D/MPS:AgooMessageReceiver: AgooMessageReceiver onReceive begin...intent=Intent { act=com.alibaba.sdk.android.push.RECEIVE flg=0x10 pkg=com.test.test2020 cmp=com.test.test2020/com.alibaba.cloudpushdemo.component.MyMessageReceiver (has extras) }
06-11 17:01:25.284 12718-12718/com.test.test2020 D/MPS:MessageReceiver: handle message
06-11 17:01:25.284 12718-12718/com.test.test2020 D/MPS:MessageReceiver: messageId:f__-jV1jM67vHu3B&&5ee1f2e4c4f3ba85ff&&Ard5NXGwdNJ-KocxS-YuzhhmYOg9NDOo1MMGW2gtROmj&&11&&
06-11 17:01:25.284 12718-12718/com.test.test2020 I/MPS:MessageReceiver: [AMS]msg receive:{"title":"阿里云推送消息-me","msg_id":1442243156723968,"type":2,"content":"阿里云推送消息-me"}
06-11 17:01:25.299 12718-12718/com.test.test2020 I/MPS:MessageReceiver: messageId=f__-jV1jM67vHu3B&&5ee1f2e4c4f3ba85ff&&Ard5NXGwdNJ-KocxS-YuzhhmYOg9NDOo1MMGW2gtROmj&&11&&;appId=30169527;deviceId=699a7770c6284c5eba882ebea23997ba;messageType=msg
06-11 17:01:25.299 12718-12718/com.test.test2020 I/receiver: 收到一条推送消息 : 阿里云推送消息-me, content:阿里云推送消息-me
06-11 17:01:25.332 12718-13149/com.test.test2020 D/NAccs.MsgDistribute:  handleControlMsg configTag:default dataId:3 serviceId:agooAck command:100 errorCode:200 appReceiver:com.alibaba.sdk.android.push.vip.a
● 点击【通知消息】-自动跳转到应用界面:
MyMessageReceiver收到消息,如下:
06-11 17:26:03.935 12718-13285/com.test.test2020 D/NAccs.Msg_default:  	oriData:{"utdid":"Xfb7X5VskBUDAOakgtQkTI7u","isStartProc":"false","status":"8","appkey":"30169527","id":"f__-jV10Suzu4h0m&&5ee1ee8441ed394407&&Ard5NXGwdNJ-KocxS-YuzhhmYOg9NDOo1MMGW2gtROmj&&11&&@accs","ext":"{\"biz\":\"{\\\"taskId\\\":\\\"1442169759089408\\\"}\"}","api":"agooReport"}

06-11 17:26:03.937 12718-12718/com.test.test2020 E/NAccs.NotifManager:  reportNotifyMessage dataId:4 status:8

06-11 17:26:03.938 12718-12718/com.test.test2020 D/MPS:AgooMessageReceiver: AgooMessageReceiver onReceive begin...intent=Intent { act=com.alibaba.push2.action.NOTIFICATION_OPENED flg=0x30 pkg=com.test.test2020 cmp=com.test.test2020/com.alibaba.cloudpushdemo.component.MyMessageReceiver (has extras) }
06-11 17:26:03.939 12718-12718/com.test.test2020 D/MPS:AgooMessageReceiver: notification opened
06-11 17:26:03.948 12718-12718/com.test.test2020 I/receiver: onNotificationOpened :  : 阿里云推送通知-me : 阿里云推送内容-me : {"_ALIYUN_NOTIFICATION_ID_":"560474","BxType":"aliyun_test"}
█ 推送的Maven库快速集成(远程同步)方法:
-
● Maven库快速集成的注意事项:
1.不需要在manifest中添加uses-permission;
2.不需要在manifest中添加除了 MyMessageReceiver 外的其他service 、receiver 、activity等组件配置;
3.不需要添加so、jar等文件4.需要在Project根目录下build.gradle文件中配置maven库URL:
5.需要在manifest中添加appKey,appSecre 配置(该配置也可以通过 【EMAS统一接入】 方式自动配置,不过我测试未成功)。具体配置可参考:Emas统一接入文档(Android);
6.需要在manifest中添加MyMessageReceiver 配置;
7.Android 8.0 以上设备通知接收不到 ? 点击查看如何处理
8.在Android 9+系统报错 errorCode:10109 ? 需要设置允许 http 请求, 点击查看如何处理
9.移动推送辅助通道配置(小米/华为/FCM/OPPO/VIVO/魅族 系统推送支持), 点击查看如何处理
10.需要留意iOS证书(APNs推送证书)是否到期,否则将导致无法接收到推送对于每个App,月推送去重设备数小于5万的情况免费。
● 此时使用的版本:
implementation ‘com.aliyun.ams:alicloud-android-push:3.1.9.1’// 此处以3.1.9.1版本为例。
以下几种其他方式,测试也都可以:
● demo使用Maven库快速集成(远程同步),不过demo里面包含其他的项目,因此将其他的项目删除后,只剩下推送的部分:
传送门:alicloud-android_阿里云推送3.1.9.1版(Maven库快速集成)_20200612.zip,

用户只需要修改下应用级build.gradle中的包名以及applicationId和AppKey,亲测
█ 推送的消息解析(待修改):
-
● 服务器推消息给Android设备:
通常手机端设备添加别名后,服务端按别名alias(比如注册的账号、手机号)进行推送
单个设备最多添加128个别名,且同一别名最多添加到128个设备;别名支持128字节。
别名绑定后,在OpenAPI中按alias推送:setTarget(“alias”),调用setTargetValue()指定别名即可;
		PushRequest pushRequest = new PushRequest();
        // 推送目标
        pushRequest.setAppKey(appKey);
        pushRequest.setTarget("DEVICE"); //推送目标: DEVICE:按设备推送 ALIAS : 按别名推送 ACCOUNT:按帐号推送  TAG:按标签推送; ALL: 广播推送/推送给全部
        pushRequest.setTargetValue(deviceIds); //根据Target来设定,如Target=DEVICE, 则对应的值为 设备id1,设备id2. 多个值使用逗号分隔.(帐号与设备有一次最多100个的限制), "ALL" 表示全部
        pushRequest.setPushType("NOTICE"); // 消息类型 NOTICE-通知消息/发送通知  MESSAGE-推送消息/自定义消息/透传消息
        pushRequest.setDeviceType("ALL"); // 设备类型 ANDROID iOS ALL.
        // 推送配置
        pushRequest.setTitle("ALi Push Title"); // 消息的标题
        pushRequest.setBody("Ali Push Body"); // 消息的内容
        // 推送配置: Android
        pushRequest.setAndroidNotifyType("NONE");//通知的提醒方式 "VIBRATE" : 震动 "SOUND" : 声音 "BOTH" : 声音和震动 NONE : 静音
        pushRequest.setAndroidNotificationBarType(1);//通知栏自定义样式0-100
        pushRequest.setAndroidNotificationBarPriority(1);//通知栏自定义样式0-100
        pushRequest.setAndroidOpenType("URL"); //点击通知后动作 "APPLICATION" : 打开应用 "ACTIVITY" : 打开AndroidActivity "URL" : 打开URL "NONE" : 无跳转
        pushRequest.setAndroidOpenUrl("http://www.aliyun.com"); //Android收到推送后打开对应的url,仅当AndroidOpenType="URL"有效
        pushRequest.setAndroidActivity("com.alibaba.push2.demo.XiaoMiPushActivity"); // 设定通知打开的activity,仅当AndroidOpenType="Activity"有效
        pushRequest.setAndroidMusic("default"); // Android通知音乐
        pushRequest.setAndroidPopupActivity("com.ali.demo.PopupActivity");//设置该参数后启动辅助弹窗功能, 此处指定通知点击后跳转的Activity(辅助弹窗的前提条件:1. 集成第三方辅助通道;2. StoreOffline参数设为true)
        pushRequest.setAndroidPopupTitle("Popup Title");
        pushRequest.setAndroidPopupBody("Popup Body");
        pushRequest.setAndroidExtParameters("{\"k1\":\"android\",\"k2\":\"v2\"}"); //设定通知的扩展属性。(注意 : 该参数要以 json map 的格式传入,否则会解析出错)

● 自定义 key/value 说明:
在Android端重写通知相关的方法,获取extraMap参数(【通知消息/发送通知 】专用的)
protected void onNotification(Context context, String title, String summary, Map<String, String> extraMap) {}
protected void onNotificationOpened(Context context, String title, String summary, String extraMap) {}
【推送消息/自定义消息/透传消息】,没有extraMap参数
public void onMessage(Context context, CPushMessage cPushMessage){}
● notification:通知
{
    "notification" : {
        "android" : {
             "alert" : "hello, JPush!", // 通知内容
             "title" : "JPush test", // 通知标题
             "builder_id" : 3, // 通知栏样式 ID
             "style":1  // 1,2,3 // 通知栏样式类型
             "alert_type":1 // -1 ~ 7 // 通知提醒方式
             "big_text":"big text content",// 大文本通知栏样式
             "inbox":JSONObject,// 文本条目通知栏样式
             "big_pic_path":"picture url",// 大图片通知栏样式
             "priority":0, // -2~2 // 	通知栏展示优先级
             "category":"category str", // 通知栏条目过滤或排序
             "large_icon": "http://www.jiguang.cn/largeIcon.jpg",// 通知栏大图标
           "intent": {// 指定跳转页面
                "url": "intent:#Intent;component=com.jiguang.push/com.example.jpushdemo.SettingActivity;end",
            },
             "extras" : {// 扩展字段
                  "news_id" : 134,
                  "my_key" : "a value"
             }
        }
    }
}
● message:自定义消息
 "message": {
        "msg_content": "Hi,JPush",// 消息内容本身
        "content_type": "text",// 	消息内容类型
        "title": "msg",// 消息标题
        "extras": {// JSON 格式的可选参数
            "key": "value"
        }
    },
● MyReceiver接收的方式(以下部分没有经过验证,仅供参考):
 	@Override
    public void onReceive(Context context, Intent intent) {
        Bundle bundle = intent.getExtras();
        if (JPushInterface.ACTION_MESSAGE_RECEIVED.equals(intent.getAction())) {
            Log.e(TAG, "[MyReceiver] 接收到推送下来的自定义消息: " + bundle.getString(JPushInterface.EXTRA_MESSAGE));
            // ######################【自定义消息】推送处理######################
            String title= bundle.getString(JPushInterface.EXTRA_TITLE);//消息的标题
            String message= bundle.getString(JPushInterface.EXTRA_MESSAGE);// 消息内容本身
            String extras= bundle.getString(JPushInterface.EXTRA_EXTRA);// 扩展字段
           if (!TextUtils.isEmpty(extras)) {
                try {
	                Msg msg = new Gson().fromJson(extras, Msg.class);
	                .......
	                .......
                } catch (Exception e) {
                	e.printStackTrace();
            	}
           }
        }else if (JPushInterface.ACTION_NOTIFICATION_OPENED.equals(intent.getAction())) {
            Log.e(TAG, "[MyReceiver] 用户点击打开了通知");
            // ######################【发送通知】通知打开处理######################
            String title= bundle.getString(JPushInterface.EXTRA_NOTIFICATION_TITLE);// 通知标题
            String alert= bundle.getString(JPushInterface.EXTRA_ALERT);// 通知内容
            String extras= bundle.getString(JPushInterface.EXTRA_EXTRA);// 扩展字段
           if (!TextUtils.isEmpty(extras)) {
                try {
	                Msg msg = new Gson().fromJson(extras, Msg.class);
	                .......
	                .......
                } catch (Exception e) {
                	e.printStackTrace();
            	}
           }
        }
    }
● JPushMessageReceiver接收的方式(以下部分没有经过验证,仅供参考):
public class PushMessageReceiver extends JPushMessageReceiver {
    private static final String TAG = "PushMessageReceiver";

    // ######################【自定义消息】推送处理######################
    @Override
    public void onMessage(Context context, CustomMessage customMessage) {
        Log.e(TAG, "[onMessage] " + customMessage);
        String title= customMessage.title;//消息的标题
        String message= customMessage.message;// 消息内容本身
        String extras= customMessage.extra;// 扩展字段
       if (!TextUtils.isEmpty(extras)) {
            try {
             Msg msg = new Gson().fromJson(extras, Msg.class);
             .......
             .......
            } catch (Exception e) {
            	e.printStackTrace();
        	}
       }
    }

    // ######################【发送通知】通知打开处理######################
    @Override
    public void onNotifyMessageOpened(Context context, NotificationMessage message) {
        Log.e(TAG, "[onNotifyMessageOpened] " + message);
 		String title= message.notificationTitle;// 通知标题
        String alert= message.notificationContent;// 通知内容
        String extras= message.notificationExtras;// 扩展字段
        if (!TextUtils.isEmpty(extras)) {
            try {
             Msg msg = new Gson().fromJson(extras, Msg.class);
             .......
             .......
            } catch (Exception e) {
            	e.printStackTrace();
        	}
       }
    }

    // ######################【发送通知】推送处理######################
    @Override
    public void onNotifyMessageArrived(Context context, NotificationMessage message) {
        Log.e(TAG, "[onNotifyMessageArrived] " + message);
    }
}
█ 一些异常问题:
-
● 如果是这样集成的:
    implementation('com.aliyun.ams:alicloud-android-push:3.1.4') {
        exclude group: 'com.aliyun.ams'
    }
    implementation('com.aliyun.ams:alicloud-android-utils:1.1.3') {
        exclude group: 'com.aliyun.ams'
    }
    implementation('com.aliyun.ams:alicloud-android-beacon:1.0.1') {
        exclude group: 'com.aliyun.ams'
    }
    implementation('com.aliyun.ams:alicloud-android-ut:5.4.0') {
        exclude group: 'com.aliyun.ams'
    }
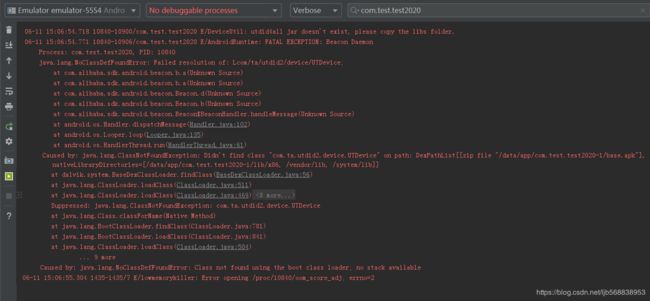
那么会报错:
06-11 15:06:54.718 10840-10900/com.test.test2020 E/DeviceUtil: utdid4all jar doesn't exist, please copy the libs folder.
06-11 15:06:54.771 10840-10906/com.test.test2020 E/AndroidRuntime: FATAL EXCEPTION: Beacon Daemon
    Process: com.test.test2020, PID: 10840
    java.lang.NoClassDefFoundError: Failed resolution of: Lcom/ta/utdid2/device/UTDevice;
    implementation 'com.aliyun.ams:alicloud-android-push:3.1.4'
    implementation('com.aliyun.ams:alicloud-android-utils:1.1.3') {
        exclude group: 'com.aliyun.ams'
    }
    implementation('com.aliyun.ams:alicloud-android-beacon:1.0.1') {
        exclude group: 'com.aliyun.ams'
    }
    implementation('com.aliyun.ams:alicloud-android-ut:5.4.0') {
        exclude group: 'com.aliyun.ams'
    }
● 如果是这样集成的:
    configurations {
        all*.exclude group: 'com.aliyun.ams', module: 'alicloud-android-ut'
    }
    configurations {
        all*.exclude group: 'com.aliyun.ams', module: 'alicloud-android-beacon'
    }
    configurations {
        all*.exclude group: 'com.aliyun.ams', module: 'alicloud-android-utils'
    }

    implementation 'com.aliyun.ams:alicloud-android-push:3.1.4'
    implementation('com.aliyun.ams:alicloud-android-utils:1.1.3') {
        exclude group: 'com.aliyun.ams'
    }
    implementation('com.aliyun.ams:alicloud-android-beacon:1.0.1') {
        exclude group: 'com.aliyun.ams'
    }
    implementation('com.aliyun.ams:alicloud-android-ut:5.4.0') {
        exclude group: 'com.aliyun.ams'
    }
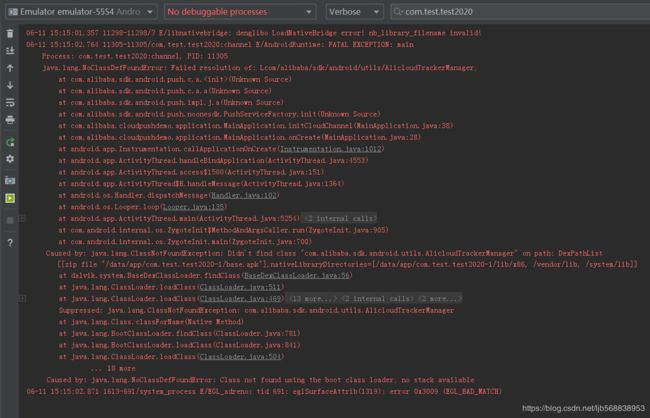
那么会报错:
06-11 15:15:01.357 11298-11298/? E/libnativebridge: denglibo LoadNativeBridge error! nb_library_filename invalid!
06-11 15:15:02.764 11305-11305/com.test.test2020:channel E/AndroidRuntime: FATAL EXCEPTION: main
    Process: com.test.test2020:channel, PID: 11305
    java.lang.NoClassDefFoundError: Failed resolution of: Lcom/alibaba/sdk/android/utils/AlicloudTrackerManager;

 Caused by: java.lang.ClassNotFoundException: Didn't find class "com.alibaba.sdk.android.utils.AlicloudTrackerManager" on path: DexPathList[[zip file "/data/app/com.test.test2020-1/base.apk"],nativeLibraryDirectories=[/data/app/com.test.test2020-1/lib/x86, /vendor/lib, /system/lib]]

 Caused by: java.lang.NoClassDefFoundError: Class not found using the boot class loader; no stack available
█ 相关资料:
-
● 1.阿里云移动研发平台EMAS控制台、开发文档、跟着Demo快速体验移动推送
● 2. 2018-05-17 Gradle依赖项之transitive/exclude/force/(+)_果冻豆人的博客-CSDN博客
● 3.2018-09-13 阿里热修复之Sophix——专有云发布版集成步骤_Dota_wy的博客-CSDN博客
● 4.2017-08-01 极光推送api_移动开发_fishmai的专栏-CSDN博客
转载请注明出处:
https://blog.csdn.net/ljb568838953/article/details/106396266
