Apache Flume 入门教程
Apache Flume 入门教程
Apache Flume is a distributed, reliable, and available system for efficiently collecting, aggregating and moving large amounts of log data from many different sources to a centralized data store.
Flume是分布式的日志收集系统,它将各个服务器中的数据收集起来并送到指定的地方去,比如说送到HDFS,简单来说flume就是收集日志。
一、Flume架构介绍
Flume之所以这么神奇,是源于它自身的一个设计,这个设计就是agent。Agent本身是一个Java进程,运行在日志收集节点——所谓日志收集节点就是服务器节点。
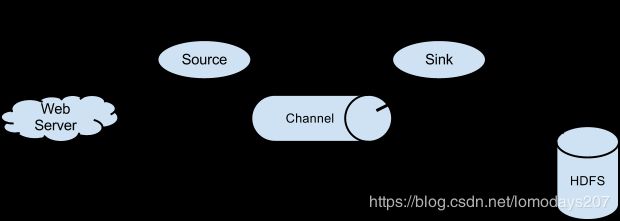
Agent里面包含3个核心的组件:source、channel和sink,类似生产者、仓库、消费者的架构。
- Source:source组件是专门用来收集数据的,可以处理各种类型、各种格式的日志数据,包括 avro、thrift、exec、jms、spooling directory、netcat、sequence generator、syslog、http、legacy、自定义。
- Channel:source组件把数据收集来以后,临时存放在channel中,即channel组件在agent中是专门用来存放临时数据的——对采集到的数据进行简单的缓存,可以存放在memory、jdbc、file等等。
- Sink:sink 组件是用于把数据发送到目的地的组件,目的地包括hdfs、logger、avro、thrift、ipc、file、null、Hbase、solr、自定义。
Flume的核心就是一个agent,这个agent对外有两个进行交互的地方,一个是接受数据输入的source,一个是数据输出的sink,sink负责将数据发送到外部指定的目的地。
source接收到数据之后,将数据发送给channel,chanel 作为一个数据缓冲区会临时存放这些数据,随后sink会将channel中的数据发送到指定的地方,例如HDFS等。
只有在sink将channel中的数据成功发送出去之后,channel才会将临时数据进行删除,这种机制保证了数据传输的可靠性与安全性。

Flume比较看重数据的传输,因此几乎没有数据的解析预处理。仅仅是数据的产生,封装成event然后传输。
传输的时候flume比logstash多考虑了一些可靠性。因为数据会持久化在channel中(一般有两种可以选择,memoryChannel就是存在内存中,另一个就是FileChannel存储在文件种),数据只有存储在下一个存储位置(可能是最终的存储位置,如HDFS;也可能是下一个Flume节点的channel),数据才会从当前的channel中删除。这个过程是通过事务来控制的,这样就保证了数据的可靠性。
二、安装步骤
- 在官网下载 apache-flume-1.9.0-bin.tar.gz 解压到本地盘;
    F:\2019All\Elasticsearch\apache-flume-1.9.0 的目录

   2019/08/29  09:43              .
   2019/08/29  09:43              ..
   2019/08/29  10:16              bin
   2018/11/29  22:31            85,602 CHANGELOG
   2019/08/29  10:40              conf
   2017/11/16  19:54             5,681 DEVNOTES
   2017/11/16  19:54             2,873 doap_Flume.rdf
   2018/12/18  03:43              docs
   2019/08/29  09:43              lib
   2018/12/10  11:23            43,405 LICENSE
   2018/11/29  00:41               249 NOTICE
   2017/11/16  19:54             2,483 README.md
   2018/12/10  11:23             1,958 RELEASE-NOTES
   2019/08/29  09:43              tools
- 修改conf 下面的配置文件:
-
flume-env.ps1.template 改为 flume-env.ps1,改下 FLUME_CLASSPATH :
$FLUME_CLASSPATH="F:\2019All\Elasticsearch\apache-flume-1.9.0" -
flume-env.sh.template 改为 flume-env.sh , 设置FLUME_CLASSPATH变量和JAVA_HOME变量,配置文件内容修改如下:
     # Enviroment variables can be set here.

     export JAVA_HOME=E:\pmtools\java

     # Give Flume more memory and pre-allocate, enable remote monitoring via JMX
     # export JAVA_OPTS="-Xms100m -Xmx2000m -Dcom.sun.management.jmxremote"

     # Let Flume write raw event data and configuration information to its log files for debugging
     # purposes. Enabling these flags is not recommended in production,
     # as it may result in logging sensitive user information or encryption secrets.
     # export JAVA_OPTS="$JAVA_OPTS -Dorg.apache.flume.log.rawdata=true -Dorg.apache.flume.log.printconfig=true "

     # Note that the Flume conf directory is always included in the classpath.
     #FLUME_CLASSPATH=""
     $FLUME_CLASSPATH="F:\2019All\Elasticsearch\apache-flume-1.9.0"
-
运行 flume agent默认的案例(Sequence Generator Source):
一个简单的序列发生器,不断的产生事件,值是从0开始每次递增1,主要用来进行测试。
不加 -Dflume.root.logger=INFO,console时可正常运行,但看不到输出的序列号,加后报错:
找不到与参数名称“Dflume.root.logger=INFO,console”匹配的参数。
在Windows上不能使用 -Dflume这种设置,需要改为如下形式:
F:\2019All\Elasticsearch\apache-flume-1.9.0\bin>flume-ng.cmd agent -c ../conf -f ../conf/flume-conf.properties -n agent -property "flume.root.logger=INFO,console"
ps : -c/–conf 后跟配置目录,-f/–conf-file 后跟具体的配置文件,-n/–name 指定agent的名称。
运行后,可看到不断的序列号输出:

三、一个简单的例子(NetCat Source)
Here, we give an example configuration file, describing a single-node Flume deployment. This configuration lets a user generate events and subsequently logs them to the console.
一个NetCat Source用来监听一个指定端口,并将接收到的数据的通过memory channels传输到sink,这里的sink使用的是logger,可以把source传输过来的数据直接打印出来。
创建flume启动配置文件,指定 source,channel,sink 3个组件内容。
# example.conf: A single-node Flume configuration

#defines a single agent named a1
a1.sources = r1
a1.sinks = k1
a1.channels = c1

# Describe/configure the source,a1 has a source that listens for data on port 44444
a1.sources.r1.type = netcat
a1.sources.r1.bind = localhost
a1.sources.r1.port = 44444

# Describe the sink , a sink that logs event data to the console
a1.sinks.k1.type = logger

# Use a channel which buffers events in memory
a1.channels.c1.type = memory
a1.channels.c1.capacity = 1000
a1.channels.c1.transactionCapacity = 100

# Bind the source and sink to the channel
a1.sources.r1.channels = c1
a1.sinks.k1.channel = c1
1、netcat 的使用
-
数据源是来源netcat,需要先使用netcat开启一个监听端口,然后向此端口发送数据;
在windows环境中需要下载netcat, 并配置好环境变量
-
通过nc 建立一台服务器用于监听端口:
nc -l -p 44444
- nc 开启一台客户端来访问对应接口
   C:\Users\lomodays>nc 127.0.0.1 44444
   hello , flume!
   OK
   this is quibo!
   OK

可以在服务器端看到,服务器会直接输出这些信息到控制台。
2、启动flume agent
F:\2019All\Elasticsearch\apache-flume-1.9.0\bin>flume-ng.cmd agent -c ../conf -f ../conf/netcat-flume-logger.properties -n a1 -property "flume.root.logger=INFO,console"

启动后,flume agent会监听本机的 44444 端口的数据,有数据传输过来就直接回通过日志打印到控制台。
3、发送数据
在cmd 命令行中使用nc 连接到本机的 44444 端口,发送测试数据,Flume 终端窗口此时会打印出如下信息,就表示成功了:

四、 Flume Sources
1、Avro Source
监听AVRO端口来接受来自外部AVRO客户端的事件流,可以接受通过flume提供的Avro客户端发送的日志信息。

type – 类型名称,“arvo”
bind – 需要监听的主机名或IP
port – 要监听的端口
更多详细参数见,官网文档:
http://flume.apache.org/releases/content/1.9.0/FlumeUserGuide.html#avro-source
编写avro-flume-logger.properties 配置文件:
#defines a single agent named a1
a1.sources = r1
a1.sinks = k1
a1.channels = c1

# Describe/configure the source,a1 has a source that listens for data on port 44444
a1.sources.r1.type = avro
a1.sources.r1.bind = 0.0.0.0
a1.sources.r1.port = 33333

# Describe the sink , a sink that logs event data to the console
a1.sinks.k1.type = logger

# Use a channel which buffers events in memory
a1.channels.c1.type = memory
a1.channels.c1.capacity = 1000
a1.channels.c1.transactionCapacity = 100

# 为Channle绑定Source和Sink
a1.sources.r1.channels = c1
a1.sinks.k1.channel = c1
启动flume agent:
F:\2019All\Elasticsearch\apache-flume-1.9.0\bin>flume-ng.cmd agent -c ../conf -f ../conf/avro-flume-logger.properties -n a1 -property "flume.root.logger=INFO,console"
通过flume提供的avro客户端向指定机器指定端口发送日志信息,发送 logs/11.log 下面的日志文件:
F:\2019All\Elasticsearch\apache-flume-1.9.0\bin>flume-ng.cmd avro-client -c ../conf --host 0.0.0.0 -port 33333 --filename logs/11.log
在flume agent 命令行确实收集到了日志。
2、Exec Source
可以将命令产生的输出结果作为flume的数据源。
Exec源在启动时运行给定的Unix命令,并期望该进程在标准输出上连续生成数据。
启动配置文件如下:
# example.conf: A single-node Flume configuration

#defines a single agent named a1
a1.sources = r1
a1.sinks = k1
a1.channels = c1

# Describe/configure the source
a1.sources.r1.type = exec
a1.sources.r1.command = tail -F /home/xdf/exec.txt
# Describe the sink , a sink that logs event data to the console
a1.sinks.k1.type = logger

# Use a channel which buffers events in memory
a1.channels.c1.type = memory
a1.channels.c1.capacity = 1000
a1.channels.c1.transactionCapacity = 100

# 为Channle绑定Source和Sink
a1.sources.r1.channels = c1
a1.sinks.k1.channel = c1
执行的是Unix命令,在window上暂时没发测试。
3、Spooling Directory Source
这个Source允许你将文件将要收集的数据放置到"自动搜集"目录中。这个Source将监视该目录,并将解析新文件的出现。
Unlike the Exec source, this source is reliable and will not miss data, even if Flume is restarted or killed. In exchange for this reliability, only immutable, uniquely-named files must be dropped into the spooling directory. Flume tries to detect these problem conditions and will fail loudly if they are violated:
- If a file is written to after being placed into the spooling directory, Flume will print an error to its log file and stop processing.(同步后文件内容不能修改)
- 要同步的日志文件不能重名。Flume will print an error to its log file and stop processing.
To avoid the above issues, it may be useful to add a unique identifier (such as a timestamp) to log file names when they are moved into the spooling directory.
启动配置文件如下:
#defines a single agent named a1
a1.sources = r1
a1.sinks = k1
a1.channels = c1

# Describe/configure the source
a1.sources.r1.type = spooldir
a1.sources.r1.spoolDir = F:/2019All/Elasticsearch/apache-flume-1.9.0/bin/spoolDir

# Describe the sink , a sink that logs event data to the console
a1.sinks.k1.type = logger

# Use a channel which buffers events in memory
a1.channels.c1.type = memory
a1.channels.c1.capacity = 1000
a1.channels.c1.transactionCapacity = 100

# 为Channle绑定Source和Sink
a1.sources.r1.channels = c1
a1.sinks.k1.channel = c1
4、HTTP Sources
可接受GET或者PSOT请求的数据,默认接收json格式。
A source which accepts Flume Events by HTTP POST and GET. GET should be used for experimentation only.
HTTP requests are converted into flume events by a pluggable “handler” which must implement the HTTPSourceHandler interface.

#defines a single agent named a1
a1.sources = r1
a1.sinks = k1
a1.channels = c1

# Describe/configure the source
a1.sources.r1.type = http
a1.sources.r1.bind = localhost
a1.sources.r1.port = 5140

# Describe the sink , a sink that logs event data to the console
a1.sinks.k1.type = logger

# Use a channel which buffers events in memory
a1.channels.c1.type = memory
a1.channels.c1.capacity = 1000
a1.channels.c1.transactionCapacity = 100

# 为Channle绑定Source和Sink
a1.sources.r1.channels = c1
a1.sinks.k1.channel = c1

启动命令:
flume-ng.cmd agent -c ../conf -f ../conf/http-flume-logger.properties -n a1 -property "flume.root.logger=INFO,console"
A handler is provided out of the box which can handle events represented in JSON format, and supports UTF-8, UTF-16 and UTF-32 character sets. The handler accepts an array of events (even if there is only one event, the event has to be sent in an array) and converts them to a Flume event based on the encoding specified in the request. If no encoding is specified, UTF-8 is assumed.
默认的json(JSONHandler)数据格式如下:
[{
  "headers" : {
             "timestamp" : "434324343",
             "host" : "random_host.example.com"
             },
  "body" : "random_body"
  },
  {
  "headers" : {
             "namenode" : "namenode.example.com",
             "datanode" : "random_datanode.example.com"
             },
  "body" : "really_random_body"
  }]

headers 里面的内容对应到Event的headers里,body表示真正传输的信息。
注意:该类(
JSONHandler)处理的是 JSON 格式的 Flume Events(可以一次传输多个Flume Events,即多组数据记录),接收的 JSON 数据必须是 array of events,即使只发送一个Flume Event,也得按照 JSON Array 的格式发送。
传给 flume HTTP Source 的 JSON 数据:
- 必须是 Array 形式(用方括号括起来),即使 Array 里只有 1 个元素(每个元素到了 Flume 那儿就代表一个 Event),在 Python 里就要用
dict外面嵌套list或者tuple生成 JSON Array; - JSON Array 里每个元素必须由
headers和body两个 field 构成; - JSON Array 中元素的
headers的值是JSON Object(具体可以自定义),body的值必须是字串(JSON String),而不能是其他形式(JSONObject/JSON Array等,对应 Python 中的dict/list/tuple等)。
五、 Flume Sink
1、Logger Sink
Logs event at INFO level.
Typically useful for testing/debugging purpose. 此sink一般用来测试。

2、Kafka Sink
从netcat中发送数据保存到kafka的topic中:
#defines a single agent named a1
a1.sources = r1
a1.sinks = k1
a1.channels = c1

# Describe/configure the source,a1 has a source that listens for data on port 44444
a1.sources.r1.type = netcat
a1.sources.r1.bind = localhost
a1.sources.r1.port = 44444

# Describe the sink
a1.sinks.k1.type = org.apache.flume.sink.kafka.KafkaSink
a1.sinks.k1.kafka.topic = hello_test
a1.sinks.k1.kafka.bootstrap.servers = localhost:9092
a1.sinks.k1.kafka.producer.acks = 1

# Use a channel which buffers events in memory
a1.channels.c1.type = memory
a1.channels.c1.capacity = 1000
a1.channels.c1.transactionCapacity = 100

# Bind the source and sink to the channel
a1.sources.r1.channels = c1
a1.sinks.k1.channel = c1
3、HTTP Sink
HTTP Flume sink从Channel中获取事件消息,并使用HTTP POST请求将这些事件消息发送到远程服务器。事件内容作为POST主体发送。

# 指定Flume sink
a1.channels = c1
a1.sinks = k1
a1.sinks.k1.type = http
a1.sinks.k1.channel = c1
a1.sinks.k1.endpoint = http://localhost:8080/someuri
a1.sinks.k1.connectTimeout = 2000
a1.sinks.k1.requestTimeout = 2000
a1.sinks.k1.acceptHeader = application/json
a1.sinks.k1.contentTypeHeader = application/json
a1.sinks.k1.defaultBackoff = true
a1.sinks.k1.defaultRollback = true
a1.sinks.k1.defaultIncrementMetrics = false
a1.sinks.k1.backoff.4XX = false
a1.sinks.k1.rollback.4XX = false
a1.sinks.k1.incrementMetrics.4XX = true
a1.sinks.k1.backoff.200 = false
a1.sinks.k1.rollback.200 = false
a1.sinks.k1.incrementMetrics.200 = true
六、通过flume抽取MySQL 数据
Flume是最初只是一个日志收集器,但随着flume-ng-sql-source插件的出现,使得Flume从关系数据库采集数据成为可能。下面简单介绍Flume,并详细说明如何配置Flume将MySQL表数据准实时抽取到屏幕显示。
使用 https://github.com/keedio/flume-ng-sql-source 开源sources
1、下载编译flume-ng-sql-source
下载地址:https://github.com/keedio/flume-ng-sql-source.git ,安装说明文档编译jar包。
使用 mvn package 打包此源码,会生成 flume-ng-sql-source-1.5.3-SNAPSHOT.jar , 放到flume的lib目录下,把把mysql的驱动包放到flume的lib目录下。
2、准备mysql数据
mysql -uroot -p 登录mysql   # 123456 密码

use test;

create table  flume_ng_sql_source
(id         int not null,
 date1      date,
 msg        varchar(40),
 primary key ( id )
);

insert into flume_ng_sql_source(id,msg,date1) values('1','Test increment Data',str_to_date('2017-08-01 07:06:20','%Y-%m-%d %H:%M:%S'));
insert into flume_ng_sql_source(id,msg,date1) values('2','Test increment Data',str_to_date('2018-08-02 07:06:20','%Y-%m-%d %H:%I:%S'));
insert into flume_ng_sql_source(id,msg,date1) values('3','Test increment Data',str_to_date('2016-08-03 07:06:20','%Y-%m-%d %H:%I:%S'));
insert into flume_ng_sql_source(id,msg,date1) values('4','Test increment Data',str_to_date('2015-03-04 07:06:20','%Y-%m-%d %H:%I:%S'));
insert into flume_ng_sql_source(id,msg,date1) values('15','Test increment Data',str_to_date('2019-07-04 07:06:20','%Y-%m-%d %H:%I:%S'));
commit;

#select * from flume_ng_sql_source where date1>str_to_date('2016-01-02', '%Y-%m-%d %H');
3、新建 flume-sql.properties
agentOne.channels = channelOne
agentOne.sources = sourceOne
agentOne.sinks = sinkOne
###########sql source########################################################
# For each one of the sources, the type is defined
agentOne.sources.sourceOne.type = org.keedio.flume.source.SQLSource
#agentOne.sources.sourceOne.hibernate.connection.url = jdbc:oracle:thin:@192.168.168.100:1521/orcl
agentOne.sources.sourceOne.hibernate.connection.url = jdbc:mysql://127.0.0.1:3306/test
# Hibernate Database connection properties
agentOne.sources.sourceOne.hibernate.connection.user = root
agentOne.sources.sourceOne.hibernate.connection.password = 123456
agentOne.sources.sourceOne.hibernate.connection.autocommit = true
agentOne.sources.sourceOne.hibernate.dialect = org.hibernate.dialect.MySQLDialect
agentOne.sources.sourceOne.hibernate.connection.driver_class = com.mysql.jdbc.Driver
#发起查询的时间间隔,单位是毫秒 10s
agentOne.sources.sourceOne.run.query.delay=10000
#状态文件路径
agentOne.sources.sourceOne.status.file.path = ../temp
#Flume状态文件会在启动Flume的时候自动创建,里面保存了查询语句、最后一次查询的最大索引号以及数据库链接等信息
agentOne.sources.sourceOne.status.file.name = sql-source.status
#################################################################################
# Custom query
#a1.sources.r1.start.from = '2017-07-31 07:06:20'
#a1.sources.r1.custom.query = SELECT CHR(39)||TO_CHAR(CREATETIME,'YYYY-MM-DD HH24:MI:SS')||CHR(39),MSG FROM FLUME_NG_SQL_SOURCE WHERE CREATETIME > TO_DATE($@$,'YYYY-MM-DD HH24:MI:SS') ORDER BY CREATETIME ASC
#设置查询的SQL语句
agentOne.sources.sourceOne.start.from = 0
agentOne.sources.sourceOne.custom.query = select id,date1,msg from flume_ng_sql_source where date1>str_to_date('2017-07-31','%Y-%m-%d %H') and id>$@$ order by id desc
agentOne.sources.sourceOne.batch.size = 1000
agentOne.sources.sourceOne.max.rows = 1000
#c3p0连接池
agentOne.sources.sourceOne.hibernate.connection.provider_class = org.hibernate.connection.C3P0ConnectionProvider
agentOne.sources.sourceOne.hibernate.c3p0.min_size=1
agentOne.sources.sourceOne.hibernate.c3p0.max_size=10

#####################################################################################
agentOne.channels.channelOne.type = memory
agentOne.channels.channelOne.capacity = 10000
agentOne.channels.channelOne.transactionCapacity = 10000
agentOne.channels.channelOne.byteCapacityBufferPercentage = 20
agentOne.channels.channelOne.byteCapacity = 800000

# Describe the sink , a sink that logs event data to the console
agentOne.sinks.sinkOne.type = logger

##为Channle绑定Source和Sink
agentOne.sources.sourceOne.channels = channelOne
agentOne.sinks.sinkOne.channel = channelOne
4、启动测试
F:\2019All\Elasticsearch\apache-flume-1.9.0\bin>flume-ng.cmd agent -c ../conf -f ../conf/flume-sql.properties -n agentOne -property "flume.root.logger=INFO,console"

可以看到数据已经从mysql把数据传输到了logger上面,在 temp目录下面会生成一个状态文件sql-source.status,里面内容如下:
{"SourceName":"sourceOne","URL":"jdbc:mysql:\/\/127.0.0.1:3306\/test","LastIndex":"15","Query":"select id,date1,msg from flume_ng_sql_source where date1>str_to_date('2017-07-31','%Y-%m-%d %H') and id>$@$ order by id desc"}
其中 @ @ @ 的取值就是 LastIndex 的值。
七、flume 读取数据存入mysql
https://github.com/527515025/bigdata/tree/master/flume
八、参考文档
MySQL数据实时增量同步到Kafka - Flume
Flume 踩坑排雷记
Flume 官方文档