鸟哥私房菜-基础篇小笔记
最近看了一下鸟哥私房菜基础篇第四版,收获多多,下边是自己的一些简单笔记,方便后期使用时快速回忆,其中图片大多来自鸟哥私房菜文档截图,如有权限版权问题,立马删除!
cat 查看文件
tac 倒序查看文件
nl 查看文件同时显示文件行号
chmod
chgrp
chown
touch
mkdir
umask:
umask 查看系统在创建文件或文件夹的权限
[root@localhost ~]# umask
0022

但是这里查看到的是0022,首先去掉第一位, 后三位022的权限显然不对, 其实这里使用减法做的
对于文件:系统默认的最大权限基数是666,减轻umask给出的022,所以默认创建的文件全是都是【666-022 = 644】

对于文件夹:系统默认给出的最大权限基数是777,减轻umask给出的022,所以默认创建的文件全是都是【777-022 = 754】

验证:
[root@localhost test]# mkdir test
[root@localhost test]# ll
总用量 0
drwxr-xr-x. 2 root root 6 2月  28 17:49 test

[root@localhost test]# touch test_1
[root@localhost test]# ll
总用量 0
drwxr-xr-x. 2 root root 6 2月  28 17:49 test
-rw-r--r--. 1 root root 0 2月  28 17:51 test_1
查看文件创建是权限减法 如umask为022 则创建的文件权限是为【666 - -022】
lsattr 显示文件隐藏属性
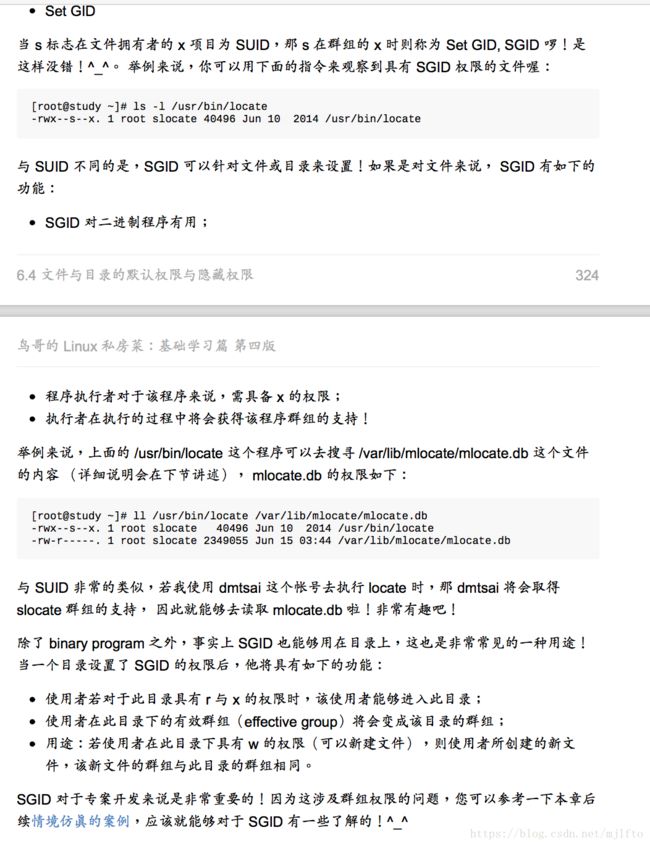
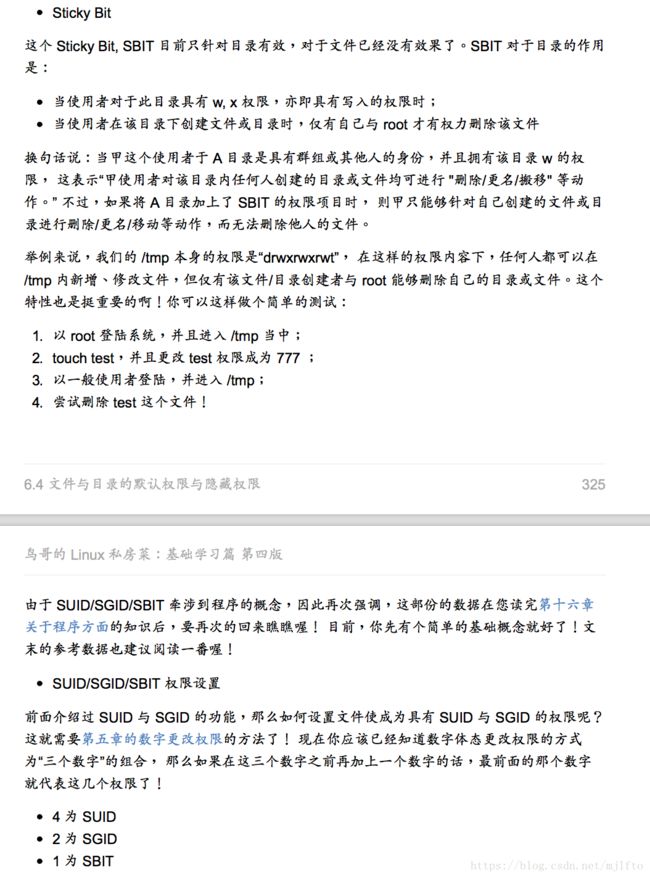
文件权限:
更改方式:chmod 4775 4表示代用SUID权限
用户组:
groupadd test
//添加用户组
groupmod -n test2 test
//将test改名为test2
groups
//查看当前用户所在组
cat /etc/group
//查看所有用户组
gropdel test
//删除组
用户操作
[root@localhost ~]# useradd -help
用法:useradd [选项] 登录
      useradd -D
      useradd -D [选项]

选项:
  -b, --base-dir BASE_DIR	新账户的主目录的基目录
  -c, --comment COMMENT         新账户的 GECOS 字段
  -d, --home-dir HOME_DIR       新账户的主目录
  -D, --defaults		显示或更改默认的 useradd 配置
 -e, --expiredate EXPIRE_DATE  新账户的过期日期
  -f, --inactive INACTIVE       新账户的密码不活动期
  -g, --gid GROUP		新账户主组的名称或 ID
  -G, --groups GROUPS	新账户的附加组列表
  -h, --help                    显示此帮助信息并推出
  -k, --skel SKEL_DIR	使用此目录作为骨架目录
  -K, --key KEY=VALUE           不使用 /etc/login.defs 中的默认值
  -l, --no-log-init	不要将此用户添加到最近登录和登录失败数据库
  -m, --create-home	创建用户的主目录
  -M, --no-create-home		不创建用户的主目录
  -N, --no-user-group	不创建同名的组
  -o, --non-unique		允许使用重复的 UID 创建用户
  -p, --password PASSWORD		加密后的新账户密码
  -r, --system                  创建一个系统账户
  -R, --root CHROOT_DIR         chroot 到的目录
  -s, --shell SHELL		新账户的登录 shell
  -u, --uid UID			新账户的用户 ID
  -U, --user-group		创建与用户同名的组
  -Z, --selinux-user SEUSER		为 SELinux 用户映射使用指定 SEUSER

  useradd -g test -m utest
  //添加utset新用户,同时加到test组中

[root@localhost ~]# gpasswd -help
用法:gpasswd [选项] 组

选项:
  -a, --add USER                向组 GROUP 中添加用户 USER
  -d, --delete USER             从组 GROUP 中添加或删除用户
  -h, --help                    显示此帮助信息并推出
  -Q, --root CHROOT_DIR         要 chroot 进的目录
  -r, --delete-password         remove the GROUP's password
  -R, --restrict                向其成员限制访问组 GROUP
  -M, --members USER,...        设置组 GROUP 的成员列表
  -A, --administrators ADMIN,...	设置组的管理员列表
除非使用 -A 或 -M 选项,不能结合使用这些选项。

[root@localhost ~]# gpasswd -a utest root
正在将用户“utest”加入到“root”组中
用户调整:
[root@localhost ~]# usermod -help
用法:usermod [选项] 登录

选项:
  -c, --comment 注释            GECOS 字段的新值
  -d, --home HOME_DIR           用户的新主目录
  -e, --expiredate EXPIRE_DATE  设定帐户过期的日期为 EXPIRE_DATE
  -f, --inactive INACTIVE       过期 INACTIVE 天数后,设定密码为失效状态
  -g, --gid GROUP               强制使用 GROUP 为新主组
  -G, --groups GROUPS           新的附加组列表 GROUPS
  -a, --append GROUP            将用户追加至上边 -G 中提到的附加组中,
                                并不从其它组中删除此用户
  -h, --help                    显示此帮助信息并推出
  -l, --login LOGIN             新的登录名称
  -L, --lock                    锁定用户帐号
  -m, --move-home               将家目录内容移至新位置 (仅于 -d 一起使用)
  -o, --non-unique              允许使用重复的(非唯一的) UID
  -p, --password PASSWORD       将加密过的密码 (PASSWORD) 设为新密码
  -R, --root CHROOT_DIR         chroot 到的目录
  -s, --shell SHELL             该用户帐号的新登录 shell
  -u, --uid UID                 用户帐号的新 UID
  -U, --unlock                  解锁用户帐号
  -Z, --selinux-user  SEUSER       用户账户的新 SELinux 用户映射
查看文件类型 file
file /etc/profile
[root@localhost ~]# file /etc/profile
/etc/profile: ASCII text
命令查找
[root@localhost network-scripts]# which ip
/usr/sbin/ip
//这个命令是更加环境变量PATH进行查找的

[root@localhost network-scripts]# type ip
ip 是 /usr/sbin/ip
文件查找
[root@localhost network-scripts]# whereis ls
ls: /usr/bin/ls /usr/share/man/man1/ls.1.gz

whereis查询比findm命令快,原因是它只到指定的目录查查询是否存在文件,查询它查找的目录命令如下:
[root@localhost network-scripts]# whereis -l
bin: /usr/bin
bin: /usr/sbin
bin: /usr/lib
bin: /usr/lib64
bin: /etc
bin: /usr/etc
bin: /usr/games
bin: /usr/local/bin
bin: /usr/local/sbin
bin: /usr/local/etc
bin: /usr/local/lib
bin: /usr/local/games
bin: /usr/include
bin: /usr/local
bin: /usr/libexec
bin: /usr/share
man: /usr/share/man/man0p
man: /usr/share/man/man1
man: /usr/share/man/man1p
man: /usr/share/man/man1x
man: /usr/share/man/man2
man: /usr/share/man/man2x
man: /usr/share/man/man3
man: /usr/share/man/man3p
man: /usr/share/man/man3x
man: /usr/share/man/man4
man: /usr/share/man/man4x
man: /usr/share/man/man5
man: /usr/share/man/man5x
man: /usr/share/man/man6
man: /usr/share/man/man6x
man: /usr/share/man/man7
man: /usr/share/man/man7x
man: /usr/share/man/man8
man: /usr/share/man/man8x
man: /usr/share/man/man9
man: /usr/share/man/man9x
man: /usr/share/man/mann
man: /usr/share/man/cs
man: /usr/share/man/da
man: /usr/share/man/de
man: /usr/share/man/fr
man: /usr/share/man/hu
man: /usr/share/man/id
man: /usr/share/man/it
man: /usr/share/man/ja
man: /usr/share/man/ko
man: /usr/share/man/pl
man: /usr/share/man/pt_BR
man: /usr/share/man/ru
man: /usr/share/man/sv
man: /usr/share/man/tr
man: /usr/share/man/zh_CN
man: /usr/share/man/zh_TW
man: /usr/share/man/sk
man: /usr/share/man/es
src: /usr/src/debug
src: /usr/src/kernels

locate命令
安装:yum install mlocate
find命令:
ext分区使用情况查看
[a123@localhost ~]$ sudo dumpe2fs /dev/sda1
[sudo] password for a123:
dumpe2fs 1.42.9 (28-Dec-2013)
Filesystem volume name:
Last mounted on:          /boot
Filesystem UUID:          0fb7dbcc-6ef9-4190-929d-ec9ad22b9ae0
Filesystem magic number:  0xEF53
Filesystem revision #:    1 (dynamic)
Filesystem features:      has_journal ext_attr resize_inode dir_index filetype needs_recovery extent 64bit flex_bg sparse_super huge_file uninit_bg dir_nlink extra_isize
Filesystem flags:         signed_directory_hash
Default mount options:    user_xattr acl
Filesystem state:         clean
Errors behavior:          Continue
Filesystem OS type:       Linux
Inode count:              128016
Block count:              512000
Reserved block count:     25600
Free blocks:              374397
Free inodes:              127680
First block:              1
Block size:               1024
Fragment size:            1024
Group descriptor size:    64
Reserved GDT blocks:      256
Blocks per group:         8192
Fragments per group:      8192
Inodes per group:         2032
Inode blocks per group:   254
RAID stride:              4
RAID stripe width:        4
Flex block group size:    16
Filesystem created:       Wed Nov  1 14:42:32 2017
Last mount time:          Thu May 10 20:10:10 2018
Last write time:          Thu May 10 20:10:10 2018
Mount count:              22
Maximum mount count:      -1
Last checked:             Wed Nov  1 14:42:32 2017
Check interval:           0 ()
Lifetime writes:          191 MB
Reserved blocks uid:      0 (user root)
Reserved blocks gid:      0 (group root)
First inode:              11
Inode size:	          128
Journal inode:            8
Default directory hash:   half_md4
Directory Hash Seed:      47316edd-79f8-40eb-845a-0b1f883083b2
Journal backup:           inode blocks
Journal features:         journal_64bit
Journal size:             8M
Journal length:           8192
Journal sequence:         0x000001a0
Journal start:            1
...
xfs文件系统查看分区信息:
[root@localhost ~]# df -T /boot
文件系统       类型   1K-块   已用   可用 已用% 挂载点
/dev/sda2      xfs  1038336 144960 893376   14% /boot
//使用df -T 文件目录查看文件目录挂载点,同时查看文件系统类型

使用blkid 查看分区类型
[root@localhost data]# blkid
/dev/sda2: UUID="b6805a83-52b0-4877-9010-3763e8de15ea" TYPE="xfs"
/dev/sda3: UUID="MxzAo8-9TBY-JSI1-YeAS-NCOg-ppTT-3ShcrX" TYPE="LVM2_member"
/dev/sda5: UUID="7cb488ef-6784-4ebf-b7e3-e08e68e82249" TYPE="swap"
/dev/mapper/centos-root: UUID="a66d088e-35b0-4e71-b273-a06f7a2d2760" TYPE="xfs"
/dev/mapper/centos-home: UUID="cc3df57b-a599-4f22-8459-e06a3a96b804" TYPE="xfs"
/dev/sda6: UUID="1bbc8c68-7841-4c52-9203-cb18958c2d0d" TYPE="xfs"
[root@localhost data]# mount UUID="1bbc8c68-7841-4c52-9203-cb18958c2d0d" /data

[root@localhost ~]# xfs_info /dev/sda2 查看挂载信息
1meta-data=/dev/sda2              isize=512    agcount=4, agsize=65536 blks
2         =                       sectsz=4096  attr=2, projid32bit=1
3         =                       crc=1        finobt=0 spinodes=0
4data     =                       bsize=4096   blocks=262144, imaxpct=25
5         =                       sunit=0      swidth=0 blks
6naming   =version 2              bsize=4096   ascii-ci=0 ftype=1
7log      =internal               bsize=4096   blocks=2560, version=2
8         =                       sectsz=4096  sunit=1 blks, lazy-count=1
9realtime =none                   extsz=4096   blocks=0, rtextents=0

isize表示inode容量,每个有512Bytes,agcount表示存储去群组个数,agsize表示每个存储群组有65536个block,
sectsz表示逻辑扇区(sector)的容量设置,为4096Bytes
bsize表示每个block容量,blocks表示由多少个block在文件系统中
sunit与swidth与磁盘阵列的strip相关性较高
internal表示登录区的位置,容量为4096*2560Bytes
磁盘查看:
[root@localhost ~]# lsblk
NAME            MAJ:MIN RM  SIZE RO TYPE MOUNTPOINT
sda               8:0    0   64G  0 disk
├─sda1            8:1    0    2M  0 part
├─sda2            8:2    0    1G  0 part /boot
├─sda3            8:3    0   15G  0 part
│ ├─centos-root 253:0    0   10G  0 lvm  /
│ └─centos-home 253:1    0    5G  0 lvm  /home
├─sda4            8:4    0    1K  0 part
└─sda5            8:5    0    1G  0 part [SWAP]
NAME 表示磁盘名称,
RM表示是否可以拆卸,如usb,光盘等是可以被拆卸的
SIZE:磁盘容量大小
RO:表示是否是指定设备
TYPE:类型,disk表示磁盘,part表示主分区,rom表示只读,lvm逻辑分区
MOUNTPOINT:挂载点
文件系统与设备的uuid查看
方法一:
lsblk -f
[root@localhost ~]# lsblk -f
NAME            FSTYPE      LABEL UUID                                   MOUNTPOINT
sda
├─sda1
├─sda2          xfs               b6805a83-52b0-4877-9010-3763e8de15ea   /boot
├─sda3          LVM2_member       MxzAo8-9TBY-JSI1-YeAS-NCOg-ppTT-3ShcrX
│ ├─centos-root xfs               a66d088e-35b0-4e71-b273-a06f7a2d2760   /
│ └─centos-home xfs               cc3df57b-a599-4f22-8459-e06a3a96b804   /home
├─sda4
└─sda5          swap              7cb488ef-6784-4ebf-b7e3-e08e68e82249

方法二:
[root@localhost ~]# blkid
/dev/sda2: UUID="b6805a83-52b0-4877-9010-3763e8de15ea" TYPE="xfs"
/dev/sda3: UUID="MxzAo8-9TBY-JSI1-YeAS-NCOg-ppTT-3ShcrX" TYPE="LVM2_member"
/dev/sda5: UUID="7cb488ef-6784-4ebf-b7e3-e08e68e82249" TYPE="swap"
/dev/mapper/centos-root: UUID="a66d088e-35b0-4e71-b273-a06f7a2d2760" TYPE="xfs"
/dev/mapper/centos-home: UUID="cc3df57b-a599-4f22-8459-e06a3a96b804" TYPE="xfs"
查看设备详情:
[root@localhost ~]# parted /dev/sda print
Model: ATA centOS_5-0 SSD (scsi)
Disk /dev/sda: 68.7GB
Sector size (logical/physical): 512B/4096B
Partition Table: msdos
Disk Flags:

Number  Start   End     Size    Type      File system     标志
 1      1049kB  3146kB  2097kB  primary
 2      3146kB  1077MB  1074MB  primary   xfs             启动
 3      1077MB  17.2GB  16.1GB  primary                   lvm
 4      17.2GB  68.7GB  51.5GB  extended
 5      17.2GB  18.3GB  1074MB  logical   linux-swap(v1)
新添加分区:
fdisk|gdisk
注意:msdos(MBR)用fdisk, GPT格式用gdis,不能混用,否则可能出现磁盘数据不能使用的情况
查看格式使用命令:blkid查看磁盘信息,再用'parted 设备 print'查看详细信息

在使用fdisk 命名时 ? 可以列出命令提示,q表示退出不保存,w表示保存立即生效,使用w命令一定要慎重

partprobe
//分区生效命令
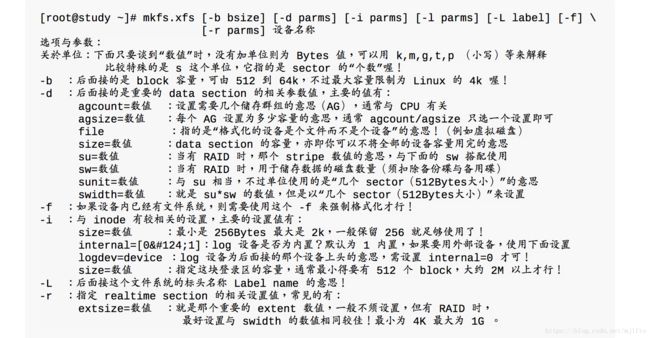
分区格式化:
mkfs.xfs /dev/sda6
[root@localhost ~]# mkfs.xfs /dev/sda6
meta-data=/dev/sda6              isize=512    agcount=4, agsize=65536 blks
         =                       sectsz=4096  attr=2, projid32bit=1
         =                       crc=1        finobt=0, sparse=0
data     =                       bsize=4096   blocks=262144, imaxpct=25
         =                       sunit=0      swidth=0 blks
naming   =version 2              bsize=4096   ascii-ci=0 ftype=1
log      =internal log           bsize=4096   blocks=2560, version=2
         =                       sectsz=4096  sunit=1 blks, lazy-count=1
realtime =none                   extsz=4096   blocks=0, rtextents=0

//不同的分区有不同的格式化命令, xfs类型使用mkfs.xfs
etx->mkfs.etx
etx1->mkfs.etx1
查看cpu核数
grep 'processor' /proc/cpuinfo
processor	: 0
processor	: 1

表示两核
挂载:
首先确定挂载到什么目录下,例如挂载到/home下,但是注意:如果已经存在/home,新挂载会隐藏原来的挂载,在新挂载被取消后,原来的挂载才会显示
挂载方法:mount
步骤:1.确定挂载路径,/data 如果没有该路径,先创建:makdir /data
	 2.确定挂载到什么分区下:查看分区命令:lsblk
	 3.获取分区UUID:blkid 分区名称:如 blkid /dev/sda6
	 4.执行挂载:mount UUID="1bbc8c68-7841-4c52-9203-cb18958c2d0d" /data
	 5.验证挂载:df /data, 查看该目录挂载的分区是否是在sda6上
卸载
umount /data
//卸载/data目录挂载
创建内存swap
步骤:
1.划分一个分区:fdisk
2.分区生效:partprobe
3.格式化分区为swap格式:mkswap /dev/sda{x}
4.投入使用:swapon /dev/sda{x}
5.验证:free
强大的parted命令:
使用man parted 可以查看该命令使用详情,它可以支持MBR,GPT两个格式分区,也支持格式转换,信息查看等,

范例三:创建一个约为 512MB 容量的分区
 [root@study ~]# parted /dev/sda print
 Model: ATA QEMU HARDDISK (scsi)
 Disk /dev/sda: 2148MB
 Sector size (logical/physical): 512B/512B
 Partition Table: msdos # 确实显示的是 MBR 的 msdos 格式喔!
 [root@study ~]# parted /dev/sda mklabel gpt
 Warning: The existing disk label on /dev/sda will be destroyed and all data on
 this disk will be lost. Do you want to continue?
 Yes/No? y

   [root@study ~]# parted /dev/vda print
 .....(前面省略).....
 Number  Start   End     Size    File system     Name                  Flags
 .....(中间省略).....
 6 35.4GB 36.0GB 537MB linux-swap(v1) Linux swap # 要先找出来下一个分区的起始点!
 [root@study ~]# parted /dev/vda mkpart primary fat32 36.0GB 36.5GB
 # 由于新的分区的起始点在前一个分区的后面,所以当然要先找出前面那个分区的 End 位置!
 # 然后再请参考 mkpart 的指令功能,就能够处理好相关的动作!
 [root@study ~]# parted /dev/vda print
 .....(前面省略).....
 Number  Start   End     Size    File system     Name                  Flags
 7      36.0GB  36.5GB  522MB                   primary
 [root@study ~]# partprobe
 [root@study ~]# lsblk /dev/vda7
 NAME MAJ:MIN RM  SIZE RO TYPE MOUNTPOINT
 vda7 252:7 0 498M 0 part
系统允许打开的文件数量,内存等限制
ulimit -a
//查看现有配置
[a123@localhost ~]$ ulimit -a
core file size          (blocks, -c) 0
data seg size           (kbytes, -d) unlimited
scheduling priority             (-e) 0
file size               (blocks, -f) unlimited
pending signals                 (-i) 7256
max locked memory       (kbytes, -l) 64
max memory size         (kbytes, -m) unlimited
open files                      (-n) 1024
pipe size            (512 bytes, -p) 8
POSIX message queues     (bytes, -q) 819200
real-time priority              (-r) 0
stack size              (kbytes, -s) 8192
cpu time               (seconds, -t) unlimited
max user processes              (-u) 4096
virtual memory          (kbytes, -v) unlimited
file locks                      (-x) unlimited

 选项与参数:
-H :hard limit ,严格的设置,必定不能超过这个设置的数值;
-S :soft limit ,警告的设置,可以超过这个设置值,但是若超过则有警告讯息。
在设置上,通常 soft 会比 hard 小,举例来说,soft 可设置为 80 而 hard
设置为 100,那么你可以使用到 90 (因为没有超过 100),但介于 80~100 之间时,
系统会有警告讯息通知你!
-a :后面不接任何选项与参数,可列出所有的限制额度;
-c :当某些程序发生错误时,系统可能会将该程序在内存中的信息写成文件(除错用),
这种文件就被称为核心文件(core file)。此为限制每个核心文件的最大容量。
-f :此 shell 可以创建的最大文件大小(一般可能设置为 2GB)单位为 KBytes
-d :程序可使用的最大断裂内存(segment)容量;
-l :可用于锁定 (lock) 的内存量
-t :可使用的最大 CPU 时间 (单位为秒)
-u :单一使用者可以使用的最大程序(process)数量。
shell中更换变量的值
path=$PATH
[a123@localhost ~]$ echo ${path/bin/all}
/usr/local/all:/usr/bin:/usr/local/sbin:/usr/sbin:/home/a123/.local/bin:/home/a123/bin
[a123@localhost ~]$ echo ${path/all/bin}
/usr/local/bin:/usr/bin:/usr/local/sbin:/usr/sbin:/home/a123/.local/bin:/home/a123/bin
[a123@localhost ~]$ echo ${path//bin/sbin}
/usr/local/sbin:/usr/sbin:/usr/local/ssbin:/usr/ssbin:/home/a123/.local/sbin:/home/a123/sbin
history命令查看最近执行的命令
!number	//!number表示执行代号为number的命令
!command//表示执行最近执行过命令中以command开头的命令
!!//执行上一条命令
系统登录显示动画配置:
cat /etc/issue | cat /etc/issue.net
如:
[a123@localhost etc]$ cat /etc/issue
\S
Kernel \r on an \m
issue 内的各代码意义
\d 本地端时间的日期;
\l 显示第几个终端机接口;
\m 显示硬件的等级 (i386/i486/i586/i686...);
\n 显示主机的网络名称;
\O 显示 domain name;
\r 操作系统的版本 (相当于 uname -r)
\t 显示本地端时间的时间;
\S 操作系统的名称;
\v 操作系统的版本。
cut 字符截取命令
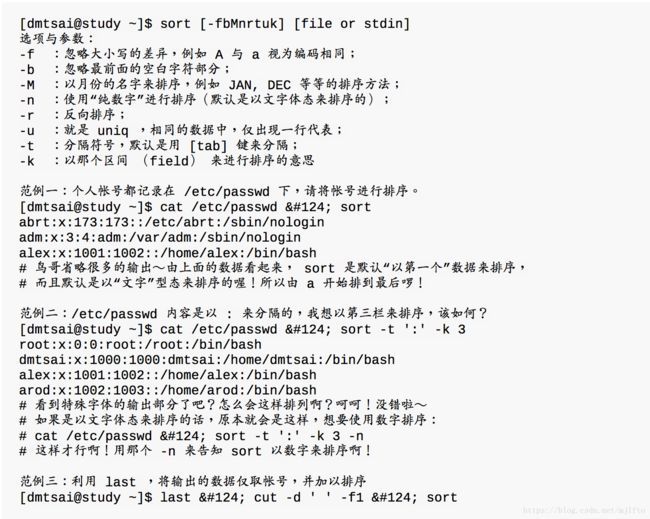
sort排序命令:
wc命令
可以列出有多少行,多少字符,多少字节
/etc/motd
登录动画欢迎语
grep ‘PATH’ /etc/* &>> /tmp/path.txt
在/etc下的文件中查找‘PATH’关键字,同时将所有的输出信息(包括正确,错误)全都输出到/tmp/path.txt文件中
如果只需要输出正确可以使用 ‘>’
如果只需要输出错误可以使用 '2>'
diff 对比两个文件的不同
查看当前系统的加密算法
authconfig --test | grep hashing
用户有效群组切换:newgrp
用户所属群组查看:groups, 其中第一个为有效群组
/etc/passwd文件结构解析
root:x:0:0:root:/root:/bin/bash
以:作为分割
1.账号
2.账号密码
3.账号id UID
4.账号初始化组id,GID
5.账号描述
6.账号主目录
7.账号使用的shell
/etc/shadow文件结构解析
bin:*:17110:0:99999:7:::
1.账号
2.密码
3.账号最后一个更改日期,1990.1.1开始计算,每天加1
4.账号多少天内不能更改密码
5.账号有效期
6.账号密码过期前多少天提示
7.账号密码过期后多少天可以继续使用
8.账号多少天后自动失效
9.预留
查看用户创建初始化参数设置
cat /etc/login.defs
账号信息微调
[root@localhost tmp]# usermod --help
用法:usermod [选项] 登录

选项:
  -c, --comment 注释            GECOS 字段的新值
  -d, --home HOME_DIR           用户的新主目录
  -e, --expiredate EXPIRE_DATE  设定帐户过期的日期为 EXPIRE_DATE
  -f, --inactive INACTIVE       过期 INACTIVE 天数后,设定密码为失效状态
  -g, --gid GROUP               强制使用 GROUP 为新主组
  -G, --groups GROUPS           新的附加组列表 GROUPS
  -a, --append GROUP            将用户追加至上边 -G 中提到的附加组中,
                                并不从其它组中删除此用户
  -h, --help                    显示此帮助信息并推出
  -l, --login LOGIN             新的登录名称
  -L, --lock                    锁定用户帐号
  -m, --move-home               将家目录内容移至新位置 (仅于 -d 一起使用)
  -o, --non-unique              允许使用重复的(非唯一的) UID
  -p, --password PASSWORD       将加密过的密码 (PASSWORD) 设为新密码
  -R, --root CHROOT_DIR         chroot 到的目录
  -s, --shell SHELL             该用户帐号的新登录 shell
  -u, --uid UID                 用户帐号的新 UID
  -U, --unlock                  解锁用户帐号
  -Z, --selinux-user  SEUSER       用户账户的新 SELinux 用户映射
账号密码信息调整:
[root@localhost tmp]# chage --help
用法:chage [选项] 登录

选项:
  -d, --lastday 最近日期        将最近一次密码设置时间设为“最近日期”
  -E, --expiredate 过期日期     将帐户过期时间设为“过期日期”
  -h, --help                    显示此帮助信息并推出
  -I, --inactive INACITVE       过期 INACTIVE 天数后,设定密码为失效状态
  -l, --list                    显示帐户年龄信息
  -m, --mindays 最小天数        将两次改变密码之间相距的最小天数设为“最小天数”
  -M, --maxdays 最大天数        将两次改变密码之间相距的最大天数设为“最大天数”
  -R, --root CHROOT_DIR         chroot 到的目录
  -W, --warndays 警告天数       将过期警告天数设为“警告天数”

  //结合/etc/shadow学习
账号删除:
[root@localhost tmp]# userdel --help
用法:userdel [选项] 登录

选项:
  -f, --force                   force some actions that would fail otherwise
                                e.g. removal of user still logged in
                                or files, even if not owned by the user
  -h, --help                    显示此帮助信息并推出
  -r, --remove                  删除主目录和邮件池
  -R, --root CHROOT_DIR         chroot 到的目录
  -Z, --selinux-user            为用户删除所有的 SELinux 用户映射
账号id查询
id [username]
查看当前登录用户
finger [username]
更改用户finger信息
[a123@localhost ~]$ chfn
Changing finger information for a123.
名称 []: a123
办公 []: a123
办公电话 []: 193202834832
住宅电话 []: 382831

密码:
Finger information changed.
[a123@localhost ~]$ finger
Login     Name       Tty      Idle  Login Time   Office     Office Phone   Host
a123      a123       pts/0          May 11 11:44 a123       193202834832   (10.220.109.108)
root      root       tty1     2:33  May  9 22:41
[a123@localhost ~]$
更改用户shell
chsh -l //查看可用的shell
chsh -s /bin/sh; grep a123 /etc/passwd 更改/bin/sh为a123使用的shell
用户组操作:
[root@localhost a123]# groupadd --help
用法:groupadd [选项] 组

选项:
  -f, --force		如果组已经存在则成功退出
			并且如果 GID 已经存在则取消 -g
  -g, --gid GID                 为新组使用 GID
  -h, --help                    显示此帮助信息并推出
  -K, --key KEY=VALUE           不使用 /etc/login.defs 中的默认值
  -o, --non-unique              允许创建有重复 GID 的组
  -p, --password PASSWORD       为新组使用此加密过的密码
  -r, --system                  创建一个系统账户
  -R, --root CHROOT_DIR         chroot 到的目录

[root@localhost a123]# groupmod --help
用法:groupmod [选项] 组

选项:
  -g, --gid GID                 将组 ID 改为 GID
  -h, --help                    显示此帮助信息并推出
  -n, --new-name NEW_GROUP      改名为 NEW_GROUP
  -o, --non-unique              允许使用重复的 GID
  -p, --password PASSWORD	将密码更改为(加密过的) PASSWORD
  -R, --root CHROOT_DIR         chroot 到的目录

[root@localhost a123]# groupdel --help
用法:groupdel [选项] 组

选项:
  -h, --help                    显示此帮助信息并推出
判断用户是否可以使用sudo
visudo
然后加入: a123	ALL=(ALL)	ALL
这样a123用户就有sudo权限了
这个命令还可以指定部分权限, 如:
a123 ALL=(root) !/etc/passwd
这样就没有更改密码权限了
用户切换
su -l a123
使用login-shell的方式切换到a123用户
查看当前登录用户
who,w
root     tty1         2018-05-09 22:41
a123     pts/0        2018-05-11 16:26 (192.168.199.108)
utest    pts/1        2018-05-11 17:18 (192.168.199.108)
root     pts/2        2018-05-11 17:23 (192.168.199.108)
用户间发生信息
 write a123 pts/0
 a123为用名称
 pts/0用户终端
 可以使用who查看

 [utest@localhost ~]$ write a123 pts/0
asdf
asdf
用ctrl+d结束发送
msge n//拒绝接受消息,如果是root用户传来的消息,无法拒绝接受
msge y //重新开启接受消息
mail 邮件发送
pwck用户检测,检测存在文档用户
[root@localhost ~]# pwck
用户“ftp”:目录 /var/ftp 不存在
用户“vManager1”:目录 /home/vManager1 不存在
pwck:无改变
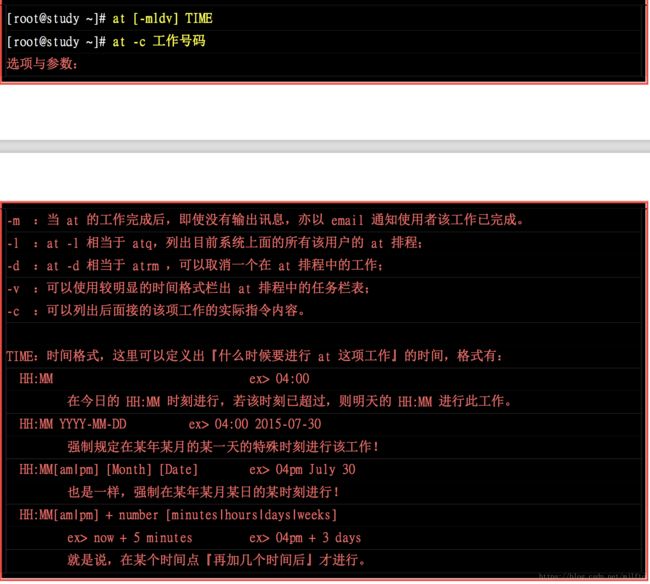
定时任务执行
1,at
安装:yum install at
启动:service atd start
系统自启动:systemctl enable atd
查看状态:systemctl status atd
查看允许使用的用户:cat /etc/at.allow,一行一个
查看禁止使用的用户:cat /etc/at.deny

添加任务:
定时任务:[root@localhost ~]# at 05:40 2018-05-12
at> write a123 pts/1
at> hello a123, I'm comming
at>
指定多少时间后的任务:
[root@localhost ~]# at now + 5minutes
at> write a123 pts/1
at> hello a123, I'm comming
at>
查看当前尚未执行的任务:atq
取消尚未执行的任务:atrm [id]
其他时间格式见下图

batch 可以让系统在负载<0.8的时候执行任务
查看cpu负载
uptime
05:58:08 up 2 days,  7:14,  3 users,  load average: 0.00, 0.01, 0.05
05:58:08 系统当前时间
up 2 days 系统运行时间
3 users 系统当前登录用户
load average: 0.00, 0.01, 0.05 系统负载,分别是1分钟,5分钟, 15分钟
循环任务:
crontab,使用这个命令可以定时执行任务
同时可以编辑/etc/crontb配置文件,添加或更新循环定时任务
任务背景化
ctrl + z//将正在进行的任务暂停,放到背景

jobs 查看背景中暂停的任务
[a123@localhost ~]$ jobs
[1]-  已停止               vim
[2]+  已停止               vim

fg 唤醒背景任务, 默认唤醒带有+号的任务

fg %jobnumber 唤醒指定任务
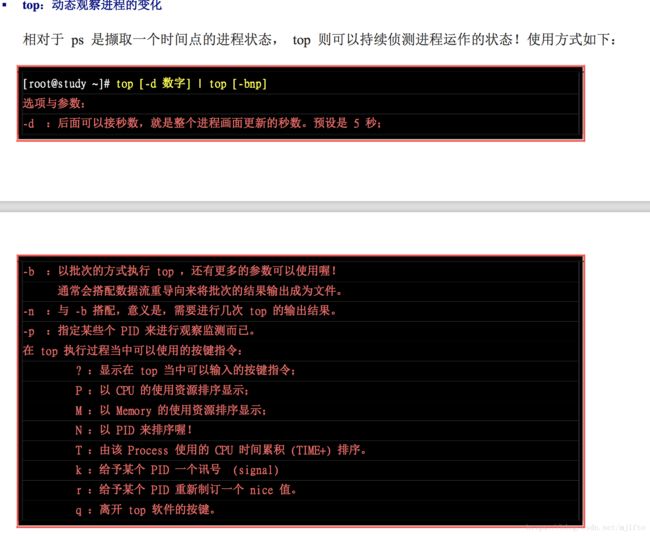
进程查看:
ps:
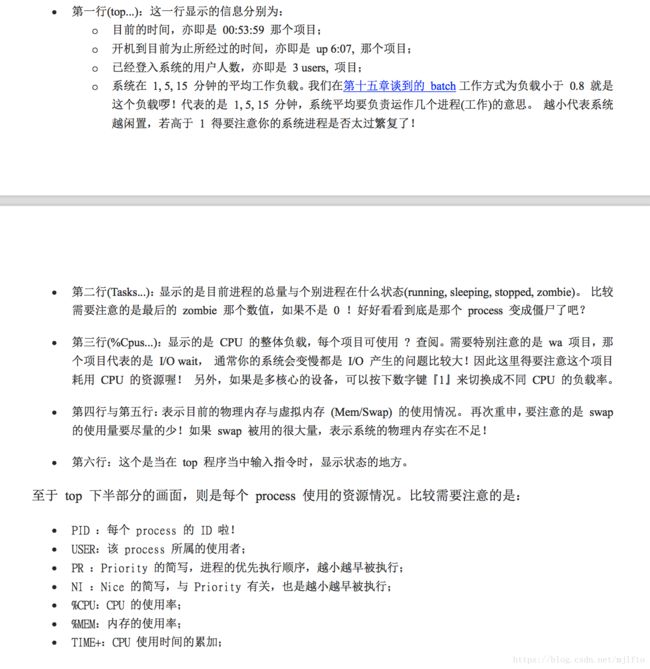
top:
pstree:
renice:更改进程的NI
在执行命令前定义NI:nice -n number command
改变一个已有进程的NI:renice -n number PID
top:
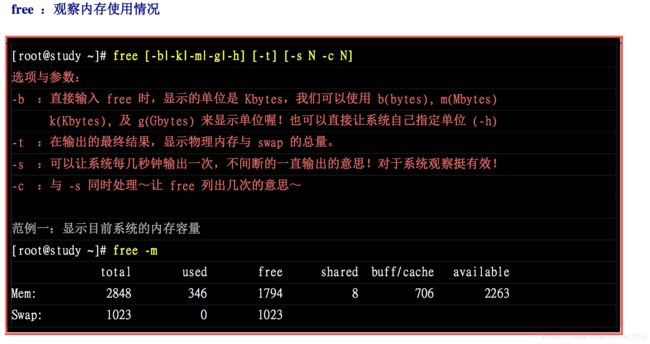
查看内存使用情况free:
查看系统运行情况:
[a123@localhost tmp]$ uptime
 13:11:23 up 2 days, 14:28,  3 users,  load average: 0.00, 0.01, 0.05
 启动时间,运行时间,在线用户,系统负载:1分钟, 5分钟, 15分钟
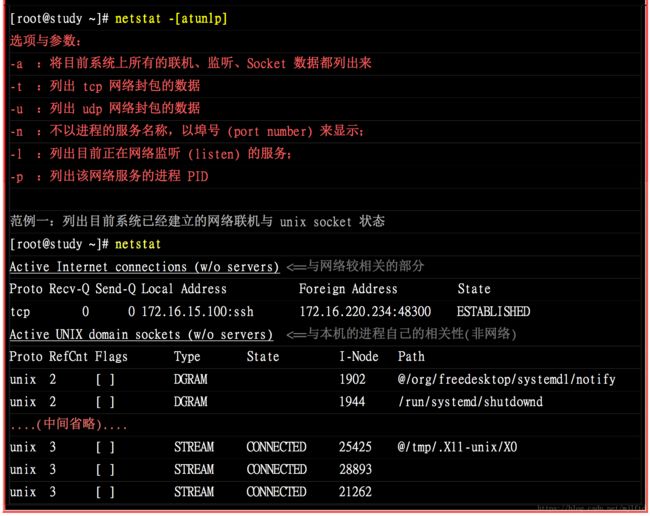
网络进程监听:
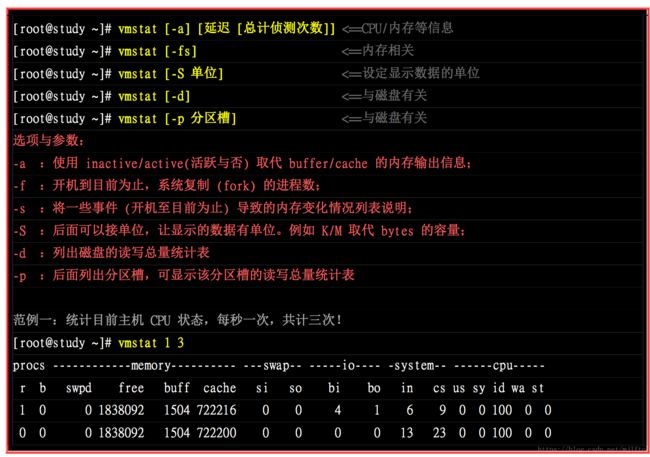
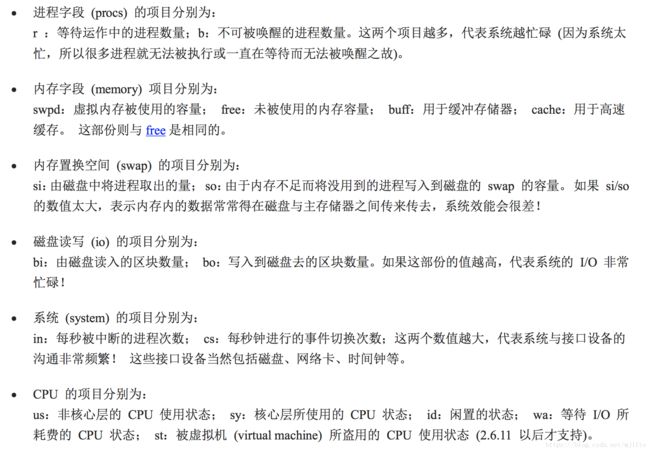
监听系统资源变化:vmstat
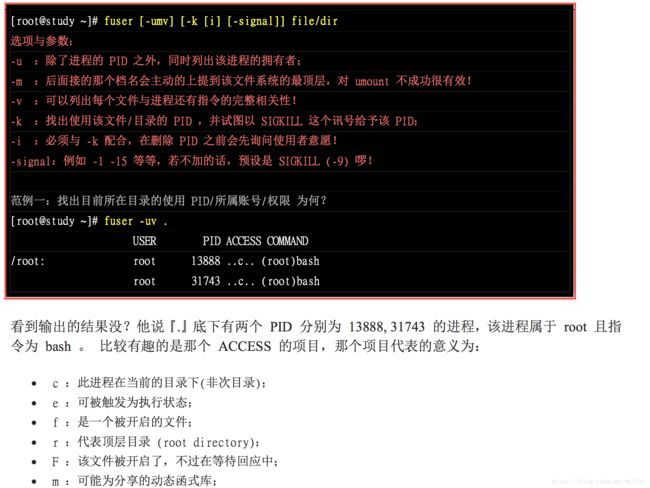
查看文件被进程使用的情况:fuser
通过lsof查看文件被引用的情况:
安全策略:
selinux:
查看:ps -eZ
查看安全策略模式:Enforcing:强制,permissive:宽容模式, disable关闭模式
[a123@localhost ~]$ getenforce
Enforcing
查看完全策略类型:
[a123@localhost ~]$ sestatus
SELinux status:                 enabled
SELinuxfs mount:                /sys/fs/selinux
SELinux root directory:         /etc/selinux
Loaded policy name:             targeted
Current mode:                   enforcing
Mode from config file:          enforcing
Policy MLS status:              enabled
Policy deny_unknown status:     allowed
Max kernel policy version:      28
配置文件位置:
[a123@localhost ~]$ cat /etc/selinux/config

# This file controls the state of SELinux on the system.
# SELINUX= can take one of these three values:
#     enforcing - SELinux security policy is enforced.
#     permissive - SELinux prints warnings instead of enforcing.
#     disabled - No SELinux policy is loaded.
SELINUX=enforcing
# SELINUXTYPE= can take one of three two values:
#     targeted - Targeted processes are protected,
#     minimum - Modification of targeted policy. Only selected processes are protected.
#     mls - Multi Level Security protection.
SELINUXTYPE=targeted

模式设置:
[a123@localhost ~]$ setenforce --help
usage:  setenforce [ Enforcing | Permissive | 1 | 0 ]

查看安全策略规则:
[root@localhost ~]# getsebool
usage:  getsebool -a or getsebool boolean...
[root@localhost ~]# getsebool -a
abrt_anon_write --> off
abrt_handle_event --> off
abrt_upload_watch_anon_write --> on
antivirus_can_scan_system --> off
antivirus_use_jit --> off
auditadm_exec_content --> on
authlogin_nsswitch_use_ldap --> off
authlogin_radius --> off
authlogin_yubikey --> off
awstats_purge_apache_log_files --> off
boinc_execmem --> on
cdrecord_read_content --> off
cluster_can_network_connect --> off
...

安装工具:
yum install setools*
查看每个规则的限制:
[root@localhost ~]# seinfo

Statistics for policy file: /sys/fs/selinux/policy
Policy Version & Type: v.28 (binary, mls)

   Classes:            94    Permissions:       262
   Sensitivities:       1    Categories:       1024
   Types:            4748    Attributes:        256
   Users:               8    Roles:              14
   Booleans:          307    Cond. Expr.:       356
   Allow:          101791    Neverallow:          0
   Auditallow:        155    Dontaudit:        8906
   Type_trans:      17760    Type_change:        74
   Type_member:        35    Role allow:         39
   Role_trans:        416    Range_trans:      5697
   Constraints:       109    Validatetrans:       0
   Initial SIDs:       27    Fs_use:             29
   Genfscon:          105    Portcon:           602
   Netifcon:            0    Nodecon:             0
   Permissives:         6    Polcap:              2

判断一个程序是否能读取文件路程:
ps -eZ
1.[root@localhost ~]# ps -eZ
LABEL                             PID TTY          TIME CMD
system_u:system_r:init_t:s0         1 ?        00:00:55 systemd
system_u:system_r:kernel_t:s0       2 ?        00:00:00 kthreadd
system_u:system_r:kernel_t:s0       3 ?        00:00:00 ksoftirqd/0
system_u:system_r:kernel_t:s0       5 ?        00:00:00 kworker/0:0H
system_u:system_r:kernel_t:s0       7 ?        00:00:00 migration/0

2. [root@localhost ~]# ls -Z
-rw-------. root root system_u:object_r:admin_home_t:s0 anaconda-ks.cfg
drwxr-xr-x. root root unconfined_u:object_r:user_tmp_t:s0 shell

3.分别取到type
[root@localhost ~]# sesearch -A -s kernel_t | grep  admin_home_t
   allow domain admin_home_t : lnk_file { read getattr } ;
   allow userdom_filetrans_type admin_home_t : lnk_file { read getattr } ;
   allow userdom_filetrans_type admin_home_t : dir { ioctl read write getattr lock add_name remove_name search open } ;
   allow domain admin_home_t : dir { getattr search open } ;
更改安全策略配置:
[root@localhost cron.d]# chcon --help
用法: chcon [选项]... 环境 文件...
或: chcon [选项]... [-u 用户] [-r 角色] [-l 范围] [-t 类型] 文件...
或: chcon [选项]... --reference=参考文件 文件...
Change the SELinux security context of each FILE to CONTEXT.
With --reference, change the security context of each FILE to that of RFILE.
Mandatory arguments to long options are mandatory for short options too.
--dereference affect the referent of each symbolic link (this is
the default), rather than the symbolic link itself
-h, --no-dereference affect symbolic links instead of any referenced file
-u, --user=USER set user USER in the target security context
-r, --role=ROLE set role ROLE in the target security context
-t, --type=TYPE set type TYPE in the target security context
-l, --range=RANGE set range RANGE in the target security context
--no-preserve-root do not treat '/' specially (the default)
--preserve-root fail to operate recursively on '/'
--reference=RFILE use RFILE's security context rather than specifying
a CONTEXT value
-R, --recursive operate on files and directories recursively
-v, --verbose output a diagnostic for every file processed
The following options modify how a hierarchy is traversed when the -R
option is also specified. If more than one is specified, only the final
one takes effect.
-H if a command line argument is a symbolic link
to a directory, traverse it
-L traverse every symbolic link to a directory
encountered
-P do not traverse any symbolic links (default)
--help 显示此帮助信息并退出
--version 显示版本信息并退出
GNU coreutils online help: 报告chcon 的翻译错误
要获取完整文档,请运行:info coreutils 'chcon invocation'
restorecon:修改安全策略与父目录相同
服务默认启动命令:
chkconfig daemon on
默认系统启动开启服务
chkconfig daemon off
系统启动不开启服务

查看当前服务默认启动配置
[root@localhost init.d]# chkconfig --list

注:该输出结果只显示 SysV 服务,并不包含
原生 systemd 服务。SysV 配置数据
可能被原生 systemd 配置覆盖。

      要列出 systemd 服务,请执行 'systemctl list-unit-files'。
      查看在具体 target 启用的服务请执行
      'systemctl list-dependencies [target]'。

netconsole     	0:关	1:关	2:关	3:关	4:关	5:关	6:关
network        	0:关	1:关	2:开	3:开	4:开	5:开	6:关
系统自定义服务:
在/usr/lib/systemd/system/下创建service
如nginx.service
[root@localhost system]# cat nginx.service
[Unit]
Description=nginx - high performance web server
Documentation=http://nginx.org/en/docs/
After=network-online.target remote-fs.target nss-lookup.target
Wants=network-online.target

[Service]
Type=forking
PIDFile=/var/run/nginx.pid
ExecStart=/usr/sbin/nginx -c /etc/nginx/nginx.conf
ExecReload=/bin/kill -s HUP $MAINPID
ExecStop=/bin/kill -s TERM $MAINPID

[Install]
WantedBy=multi-user.target

添加完新服务后需要重新加载daemon:systemctl daemon-reload

要求见鸟哥私房菜第四版17章

systemctl 常用命名:
  914  systemctl enable atd
  915  systemctl status atd
  992  pidof systemctl
  998  systemctl restart network
  999  systemctl status  network
 1012  systemctl
 1014  systemctl list-units
 1015  systemctl list-units --type=service --all
 1016  systemctl list-dependens
 1017  systemctl list-dependencies
 1018  systemctl list-dependencies --type target
 1043  systemctl daemon-reload
 1044  systemctl list-units
 1045  systemctl list-units | grep test
 1046  systemctl list-units-files --all | grep test
 1047  systemctl list-unit-files --all | grep test
 1048  systemctl start test.service
 1058  systemctl daemon-reload
 1059  systemctl list-unit-files | grep nginx
 1060  systemctl start nginx-test
 1063  systemctl start nginx-test.service
 1067  systemctl start nginx
 1069  systemctl stop nginx
 1072  systemctl stop nginx-test
 1076  systemctl start nginx-test.service
 1079  systemctl stop nginx-test.service
 1096  systemctl status rsyslog.service
系统日志查询:
last:用户登录系统认真查看
lastlog:每个用户最后一次登录系统的日志查看
dmesg:查询系统调用硬件的日志
[root@localhost system]# lastlog
用户名           端口     来自             最后登陆时间
root             pts/0    macbook-pro.lan  六 5月 26 13:59:09 +0800 2018
bin                                        **从未登录过**
daemon                                     **从未登录过**
adm                                        **从未登录过**
lp                                         **从未登录过**
sync                                       **从未登录过**
shutdown                                   **从未登录过**
halt                                       **从未登录过**
mail                                       **从未登录过**
operator                                   **从未登录过**
games                                      **从未登录过**
ftp                                        **从未登录过**
nobody                                     **从未登录过**
systemd-network                            **从未登录过**
dbus                                       **从未登录过**
polkitd                                    **从未登录过**
postfix                                    **从未登录过**
chrony                                     **从未登录过**
sshd                                       **从未登录过**
utest            pts/1    192.168.199.108  五 5月 11 17:18:38 +0800 2018
a123             pts/1    192.168.199.108  六 5月 12 19:24:31 +0800 2018
vbird2                                     **从未登录过**
vManager1                                  **从未登录过**
utest1           pts/0                     五 5月 11 16:38:12 +0800 2018
mjlf1                                      **从未登录过**
mjlf2                                      **从未登录过**
mjlf3                                      **从未登录过**
mjlf4                                      **从未登录过**
mjlf_1                                     **从未登录过**
mjlf_2                                     **从未登录过**
mjlf_3                                     **从未登录过**
mjlf_4                                     **从未登录过**
mjlf_5                                     **从未登录过**
mjlf_6                                     **从未登录过**
mjlf_7                                     **从未登录过**
mjlf_8                                     **从未登录过**
tss                                        **从未登录过**
setroubleshoot                             **从未登录过**
nginx                                      **从未登录过**

日志主要记录在/var/log/下

journalctl:本性系统启动后的所以日志记录

日志文件满足指定条件后自动切换文件:
更改配置文件:/etc/logrotate.conf
但是一般不建议在这个文件中更改,可以在/etc/logrotate.d/下为每个服务添加一个自己的配置服务,然后让/etc/logrotate.conf/引用该文件,如果nginx的自动日志文件处理:
[root@localhost logrotate.d]# cat nginx
/var/log/nginx/*.log {
        daily
        missingok
        rotate 52
        compress
        delaycompress
        notifempty
        create 640 nginx adm
        sharedscripts
        postrotate
                if [ -f /var/run/nginx.pid ]; then
                        kill -USR1 `cat /var/run/nginx.pid`
                fi
        endscript
}
daily表示执行每天执行,还可以有weekly,month
missingok表示可以运行日志丢失
rotate 52表示保存52个日志文件
compress压缩
create 640 nginx adm 创建新的文件的权限及所属用户和组
在sharedscripts 与endscript之间执行切换所需要执行的命令
pretotate表示在执行logrotate之前执行命令
postrotate表示在执行完logrotate执行的命令
如nginx则是在执行完文件切换后执行重加载nginx服务命令
系统不同级别切换:

centOS 忘记密码:
1. systemctl reboot
2. 开机过程中按 e 进入编辑过程
3. 在第一个linux16 最后加上 elevator=deadline rd.break
4. ctrl + x 重启
5. mount | grep sysroot 查看是否挂载这个目录
6. mount -o remount,rw /sysroot
7. chroot /sysroot
8. echo "new_passwd" | passwd --stdin root
9. touch /.autorelabel
10. exit
11. reboot
网络信息查看:
[root@localhost ~]# nmcli connection show
名称   UUID                                  类型            设备
ens33  bee2c570-ffb4-43b2-9969-bdfa2cc1dfc0  802-3-ethernet  ens33

网卡信息查看
[root@localhost ~]# nmcli connection show ens33
connection.id:                          ens33
connection.uuid:                        bee2c570-ffb4-43b2-9969-bdfa2cc1dfc0
connection.stable-id:                   --
connection.interface-name:              ens33
connection.type:                        802-3-ethernet
connection.autoconnect:                 yes
connection.autoconnect-priority:        0
connection.autoconnect-retries:         -1 (默认)
connection.timestamp:                   1527593398
connection.read-only:                   no
connection.permissions:                 --
connection.zone:                        --
connection.master:                      --
connection.slave-type:                  --
connection.autoconnect-slaves:          -1 (默认)
connection.secondaries:                 --
connection.gateway-ping-timeout:        0
connection.metered:                     未知
connection.lldp:                        -1 (default)
802-3-ethernet.port:                    --
802-3-ethernet.speed:                   0
802-3-ethernet.duplex:                  --
802-3-ethernet.auto-negotiate:          no
802-3-ethernet.mac-address:             00:50:56:37:00:D9
802-3-ethernet.cloned-mac-address:      --
802-3-ethernet.generate-mac-address-mask:--
802-3-ethernet.mac-address-blacklist:   --
802-3-ethernet.mtu:                     自动
802-3-ethernet.s390-subchannels:        --
802-3-ethernet.s390-nettype:            --
802-3-ethernet.s390-options:            --
802-3-ethernet.wake-on-lan:             1 (default)
802-3-ethernet.wake-on-lan-password:    --
ipv4.method:                            manual
ipv4.dns:                               8.8.8.8
ipv4.dns-search:                        --
ipv4.dns-options:                       (默认)
ipv4.dns-priority:                      0
ipv4.addresses:                         10.0.0.77/24
ipv4.gateway:                           10.0.0.1
ipv4.routes:                            --
ipv4.route-metric:                      -1
ipv4.ignore-auto-routes:                no
ipv4.ignore-auto-dns:                   no
ipv4.dhcp-client-id:                    --
ipv4.dhcp-timeout:                      0
ipv4.dhcp-send-hostname:                yes
ipv4.dhcp-hostname:                     --
ipv4.dhcp-fqdn:                         --
ipv4.never-default:                     no
ipv4.may-fail:                          yes
ipv4.dad-timeout:                       -1 (默认)
ipv6.method:                            auto
ipv6.dns:                               --
ipv6.dns-search:                        --
ipv6.dns-options:                       (默认)
ipv6.dns-priority:                      0
ipv6.addresses:                         --
ipv6.gateway:                           --
ipv6.routes:                            --
ipv6.route-metric:                      -1
ipv6.ignore-auto-routes:                no
ipv6.ignore-auto-dns:                   no
ipv6.never-default:                     no
ipv6.may-fail:                          yes
ipv6.ip6-privacy:                       -1 (未知)
ipv6.addr-gen-mode:                     stable-privacy
ipv6.dhcp-send-hostname:                yes
ipv6.dhcp-hostname:                     --
ipv6.token:                             --
proxy.method:                           none
proxy.browser-only:                     no
proxy.pac-url:                          --
proxy.pac-script:                       --
GENERAL.名称:                           ens33
GENERAL.UUID:                           bee2c570-ffb4-43b2-9969-bdfa2cc1dfc0
GENERAL.设备:                           ens33
GENERAL.状态:                           已激活
GENERAL.默认:                           是
GENERAL.默认6:                          否
GENERAL.VPN 参数:                       否
GENERAL.区:                             --
GENERAL.DBUS路径:                       /org/freedesktop/NetworkManager/ActiveConnection/1
GENERAL.连接路径:                       /org/freedesktop/NetworkManager/Settings/1
GENERAL.指定对象:                       --
GENERAL.主路径:                         --
IP4.地址[1]:                            10.0.0.77/24
IP4.网关:                               10.0.0.1
IP4.DNS[1]:                             8.8.8.8
IP6.地址[1]:                            fe80::1156:67b4:4acb:a7eb/64
IP6.地址[2]:                            fe80::e2af:4798:fd58:2475/64
IP6.地址[3]:                            fe80::fd18:9f20:21ee:54c4/64
IP6.网关:                               --

参数调整;
nmcli connection modified eth0 \
ipv4.method manual \
ipv4.address 192.168.1.101

生效参数:
nmcli connection up eth0
查看主机信息:
[root@localhost ~]# hostnamectl
   Static hostname: localhost.localdomain
         Icon name: computer-vm
           Chassis: vm
        Machine ID: 1812dada698544a8b8cd93697d6c758f
           Boot ID: 4f73631df47047bf92ffb03ab9c6ea21
    Virtualization: vmware
  Operating System: CentOS Linux 7 (Core)
       CPE OS Name: cpe:/o:centos:centos:7
            Kernel: Linux 3.10.0-693.el7.x86_64
      Architecture: x86-64
查看系统信息:
[root@localhost ~]# uname -a
Linux localhost.localdomain 3.10.0-693.el7.x86_64 #1 SMP Tue Aug 22 21:09:27 UTC 2017 x86_64 x86_64 x86_64 GNU/Linux
时间设定
查看时间
[root@localhost ~]# timedatectl
      Local time: 二 2018-05-29 19:59:29 CST
  Universal time: 二 2018-05-29 11:59:29 UTC
        RTC time: 二 2018-05-29 11:59:29
       Time zone: Asia/Shanghai (CST, +0800)
     NTP enabled: yes
NTP synchronized: yes
 RTC in local TZ: no
      DST active: n/a

查看时区支持: timedatectl list-timezones

设置时区:timedatectl set-timezone Asia/Shanghai

设置时间:timedatectl set-time "2018-05-29 19:09"

网络时间同步:
ntpdate tock.stdtime.gov.tw
hwlock -w
系统语言设定
查看语言设定
[root@localhost ~]# locale
LANG=zh_CN.UTF-8
LC_CTYPE="zh_CN.UTF-8"
LC_NUMERIC="zh_CN.UTF-8"
LC_TIME="zh_CN.UTF-8"
LC_COLLATE="zh_CN.UTF-8"
LC_MONETARY="zh_CN.UTF-8"
LC_MESSAGES="zh_CN.UTF-8"
LC_PAPER="zh_CN.UTF-8"
LC_NAME="zh_CN.UTF-8"
LC_ADDRESS="zh_CN.UTF-8"
LC_TELEPHONE="zh_CN.UTF-8"
LC_MEASUREMENT="zh_CN.UTF-8"
LC_IDENTIFICATION="zh_CN.UTF-8"
LC_ALL=

[root@localhost ~]# localectl
   System Locale: LANG=zh_CN.UTF-8
       VC Keymap: cn
      X11 Layout: cn

语言设定
[root@localhost ~]# localectl set-locale LANG=zh_CN.UTF8
系统硬件信息查看
dmidecode -t 1//查看系统信息
num:
   ────────────────────────────────────────────
          0   BIOS
          1   System
          2   Baseboard
          3   Chassis
          4   Processor
          5   Memory Controller
          6   Memory Module
          7   Cache
          8   Port Connector
          9   System Slots
         10   On Board Devices
         11   OEM Strings
         12   System Configuration Options
         13   BIOS Language
         14   Group Associations
         15   System Event Log
         16   Physical Memory Array
         17   Memory Device
         18   32-bit Memory Error
         19   Memory Array Mapped Address
         20   Memory Device Mapped Address
         21   Built-in Pointing Device
         22   Portable Battery
         23   System Reset
         24   Hardware Security
         25   System Power Controls
         26   Voltage Probe
         27   Cooling Device
         28   Temperature Probe
         29   Electrical Current Probe
         30   Out-of-band Remote Access
         31   Boot Integrity Services
         32   System Boot
         33   64-bit Memory Error
         34   Management Device
         35   Management Device Component
         36   Management Device Threshold Data
         37   Memory Channel
         38   IPMI Device
         39   Power Supply
         40   Additional Information
         41   Onboard Devices Extended Information
         42   Management Controller Host Interface
cpu信息查看
[root@localhost ~]# lscpu
Architecture:          x86_64
CPU op-mode(s):        32-bit, 64-bit
Byte Order:            Little Endian
CPU(s):                2
On-line CPU(s) list:   0,1
Thread(s) per core:    1
Core(s) per socket:    2
座:                 1
NUMA 节点:         1
厂商 ID:           GenuineIntel
CPU 系列:          6
型号:              142
型号名称:        Intel(R) Core(TM) i5-7360U CPU @ 2.30GHz
步进:              9
CPU MHz:             2304.000
BogoMIPS:            4608.00
超管理器厂商:  KVM
虚拟化类型:     完全
L1d 缓存:          32K
L1i 缓存:          32K
L2 缓存:           256K
L3 缓存:           4096K
磁盘信息查看:
[root@localhost ~]# smartctl -a /dev/sda
smartctl 6.5 2016-05-07 r4318 [x86_64-linux-3.10.0-862.3.2.el7.x86_64] (local build)
Copyright (C) 2002-16, Bruce Allen, Christian Franke, www.smartmontools.org

=== START OF INFORMATION SECTION ===
Device Model:     centOS_5-0 SSD
Serial Number:    2D0NGTNW5QT4X95XC1A0
Firmware Version: F.HB4WA4
User Capacity:    68,719,476,736 bytes [68.7 GB]
Sector Sizes:     512 bytes logical, 4096 bytes physical
Rotation Rate:    Solid State Device
Device is:        Not in smartctl database [for details use: -P showall]
ATA Version is:   ATA8-ACS, ATA/ATAPI-5 T13/1321D revision 1
SATA Version is:  SATA 2.6, 3.0 Gb/s
Local Time is:    Tue May 29 20:54:38 2018 CST
SMART support is: Unavailable - device lacks SMART capability.

A mandatory SMART command failed: exiting. To continue, add one or more '-T permissive' options.


