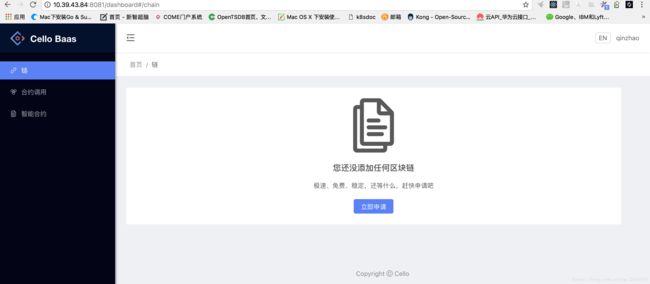
部署 Hyperledger Cello 文档
概述
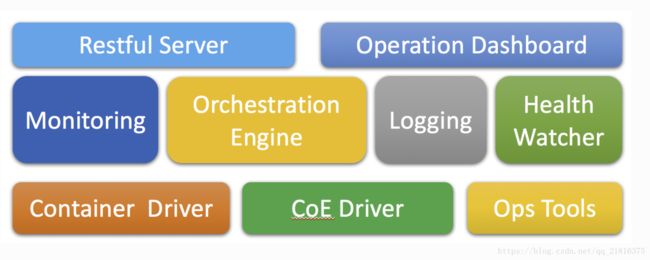
Hyperledger Cello是Hyperledger下的一个子项目,其主要功能如下:
 1. 管理区块链的生命周期,例如自动创建/启动/停止/删除/保持健康状态。
 2. 支持定制(例如,大小,一致)区块链请求,目前主要支持Hyperledger架构。
 3. 支持裸机,虚拟机,本地Docker主机,群集或Kubernetes作为工作节点。 更多的支持途中。
 4. 支持异构体系结构,例如X86,POWER和Z,从裸机服务器到虚拟机云。
 5. 通过采用附加组件,扩展监控,日志,运行状况和分析功能。
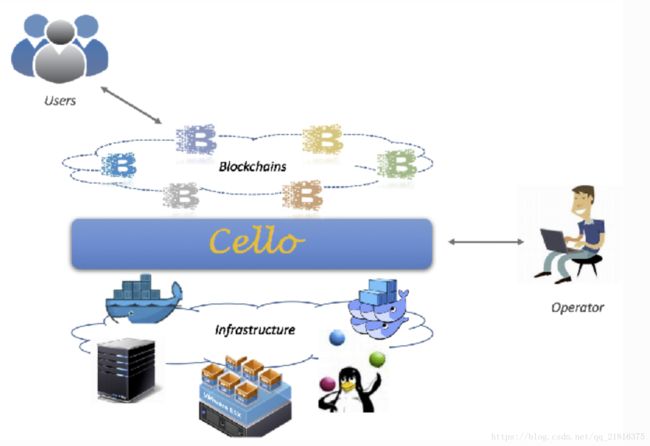
概览图
     1. 快速构建区块链即服务(BaaS)平台。
     2. 立即提供可定制的区块链,例如Hyperledger结构网络v1.0。
     3. 在裸机,虚拟云(例如,虚拟机,云数据云),容器集群(例如,Docker,Swarm,Kubernetes)之上维持一个运行区块链网络池。
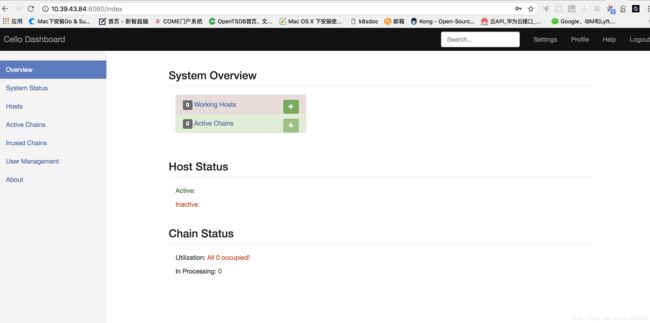
     4. 通过仪表板检查系统状态,调整连锁数量,扩展资源......
安装系统环境
[root@hyperledger-cello-master cello]# cat /etc/redhat-release
CentOS Linux release 7.4.1708 (Core)
安装过程
系统要求
无论是master节点还是node节点系统要求都是一样的
Hardware: 8c16g100g
Docker engine: 1.10.0~1.13.0 (Docker 17.0+ support is experimental)
docker-compose: 1.8.0~1.12.0
安装Master Node
安装git docker docker-compose 安装docker-compose时需要安装epel-release源
yum install git docker -y
yum install python-pip -y
pip install --upgrade pip
pip install docker-compose
启动docker
systemctl enable docker
systemctl start docker
systemctl status docker
获取源码
git clone http://gerrit.hyperledger.org/r/cello && cd cello安装
第一次安装官方建议执行setup.sh脚本,以后就可以执行make setup-master启动
cd cello/scripts/master_node/
sh setup.sh
如果前面没有安装docker docker-compose等,将会安装
sudo yum install -y epel-release yum-utils
            sudo yum-config-manager --add-repo https://download.docker.com/linux/centos/docker-ce.repo
            sudo yum makecache fast
            sudo yum update && sudo yum install -y docker-ce python-pip
            sudo systemctl enable docker
            sudo systemctl start docker
出现以下日志表明安装成功
All Image downloaded
Checking local mounted database path /opt/cello/mongo...
Local database path /opt/cello/mongo not existed, creating one
Setup done, please logout and login again.
It's safe to run this script repeatedly.
这个过程将会下载相关的镜像
[root@hyperledger-cello-master cello]# docker images
REPOSITORY                                       TAG                 IMAGE ID            CREATED             SIZE
docker.io/hyperledger/cello-user-dashboard       x86_64-latest       386b4a865636        2 hours ago         1.11 GB
hyperledger/cello-user-dashboard                 latest              386b4a865636        2 hours ago         1.11 GB
docker.io/hyperledger/cello-operator-dashboard   x86_64-latest       37ad6c1e0473        2 hours ago         801 MB
hyperledger/cello-operator-dashboard             latest              37ad6c1e0473        2 hours ago         801 MB
docker.io/hyperledger/cello-mongo                x86_64-latest       99dec591054c        2 hours ago         801 MB
hyperledger/cello-mongo                          latest              99dec591054c        2 hours ago         801 MB
docker.io/hyperledger/cello-watchdog             x86_64-latest       54bf90282d88        2 hours ago         801 MB
hyperledger/cello-watchdog                       latest              54bf90282d88        2 hours ago         801 MB
docker.io/hyperledger/cello-engine               x86_64-latest       9e4c12d4ad08        2 hours ago         801 MB
hyperledger/cello-engine                         latest              9e4c12d4ad08        2 hours ago         801 MB
docker.io/hyperledger/cello-nginx                x86_64-latest       b8685f4c840c        2 hours ago         801 MB
hyperledger/cello-nginx                          latest              b8685f4c840c        2 hours ago         801 MB
docker.io/hyperledger/cello-baseimage            x86_64-latest       7ad34aad1efc        2 hours ago         801 MB
hyperledger/cello-baseimage                      latest              7ad34aad1efc        2 hours ago         801 MB
docker.io/node 9.2 cb4c45f7a9e3 4 months ago 676 MB通过make logs 查看日志 通过make log service=watchdog指定看哪个服务的日志
docker-compose logs -f --tail=200
WARNING: The WEBROOT variable is not set. Defaulting to a blank string.
WARNING: The STATIC_FOLDER variable is not set. Defaulting to a blank string.
WARNING: The TEMPLATE_FOLDER variable is not set. Defaulting to a blank string.
WARNING: Some services (mongo) use the 'deploy' key, which will be ignored. Compose does not support 'deploy' configuration - use `docker stack deploy` to deploy to a swarm.
Attaching to
启动服务
make start //或者直接DEV=True make start(这个是dev模式启动master)目前测试的时候普通用户登陆是有问题的启动了的容器
[root@hyperledger-cello-master cello]# docker ps
CONTAINER ID        IMAGE                                  COMMAND                  CREATED             STATUS              PORTS                                        NAMES
ee830fc35423        hyperledger/cello-user-dashboard       "bash -c 'cd /usr/..."   3 seconds ago       Up 2 seconds        0.0.0.0:8081->8080/tcp                       cello-user-dashboard
0fe6f30624b3        hyperledger/cello-watchdog             "python watchdog.py"     4 seconds ago       Up 3 seconds                                                     cello-watchdog
d081ef0bbcfd        hyperledger/cello-mongo                "docker-entrypoint..."   4 seconds ago       Up 3 seconds        27017/tcp                                    cello_dashboard_mongo_1
6d6965cc0a8b        hyperledger/cello-nginx                "/bin/bash /tmp/do..."   4 seconds ago       Up 3 seconds        0.0.0.0:80->80/tcp, 0.0.0.0:8080->8080/tcp   cello-nginx
28349b09a597        hyperledger/cello-operator-dashboard   "/bin/sh -c 'if [ ..."   4 seconds ago       Up 3 seconds        8080/tcp                                     cello-operator-dashboard
2e2cc63dfbbd        hyperledger/cello-engine               "python restserver.py"   4 seconds ago       Up 3 seconds        80/tcp                                       cello-engine
600d26e414a6        hyperledger/cello-mongo                "docker-entrypoint..."   4 seconds ago       Up 3 seconds        127.0.0.1:27017-27018->27017-27018/tcp       cello-mongo
启动成功后默认的数据存储目录就是/opt/cello/mongo
默认使用的配置文件config.py,可以通过这个环境变量CELLO_CONFIG_FILE修改
访问ip:8080
例如
http://10.39.43.84:8080/login
登录
用户名/密码:admin/pass 默认的
查看启动的端口
root@hyperledger-cello-master cello]# netstat -tlnp
Active Internet connections (only servers)
Proto Recv-Q Send-Q Local Address           Foreign Address         State       PID/Program name
tcp        0      0 127.0.0.1:27017         0.0.0.0:*               LISTEN      13043/docker-proxy-
tcp        0      0 127.0.0.1:27018         0.0.0.0:*               LISTEN      13026/docker-proxy-
tcp        0      0 0.0.0.0:22              0.0.0.0:*               LISTEN      4880/sshd
tcp6       0      0 :::80                   :::*                    LISTEN      13070/docker-proxy-
tcp6       0      0 :::8080                 :::*                    LISTEN      13057/docker-proxy-
tcp6       0      0 :::8081                 :::*                    LISTEN      13622/docker-proxy-
tcp6       0      0 :::22                   :::*                    LISTEN      4880/sshd
安装master节点成功
可以通过make restart重启服务以及make stop停止服务
也可以一个一个起服务
例如
make redeploy service=dashboard安装Worker Node
安装worker node主要是安装docker-compose docker git 工具
以及修改docker启动参数,让docker启动时监听2375端口,执行make setup-worker之后通过http://10.39.43.84:8080/login这个添加就可以
[root@hyperledger-cello-node cello]# cat /lib/systemd/system/docker.service
[Unit]
Description=Docker Application Container Engine
Documentation=http://docs.docker.com
After=network.target rhel-push-plugin.socket registries.service
Wants=docker-storage-setup.service
Requires=docker-cleanup.timer

[Service]
Type=notify
NotifyAccess=all
EnvironmentFile=-/run/containers/registries.conf
EnvironmentFile=-/etc/sysconfig/docker
EnvironmentFile=-/etc/sysconfig/docker-storage
EnvironmentFile=-/etc/sysconfig/docker-network
Environment=GOTRACEBACK=crash
Environment=DOCKER_HTTP_HOST_COMPAT=1
Environment=PATH=/usr/libexec/docker:/usr/bin:/usr/sbin
ExecStart=/usr/bin/dockerd-current \
          --add-runtime docker-runc=/usr/libexec/docker/docker-runc-current \
          --default-runtime=docker-runc \
          --exec-opt native.cgroupdriver=systemd \
          --userland-proxy-path=/usr/libexec/docker/docker-proxy-current \
          --seccomp-profile=/etc/docker/seccomp.json \
          --host=tcp://0.0.0.0:2375 \     --监听2375
          --host=unix:///var/run/docker.sock \
          $OPTIONS \
          $DOCKER_STORAGE_OPTIONS \
          $DOCKER_NETWORK_OPTIONS \
          $ADD_REGISTRY \
          $BLOCK_REGISTRY \
          $INSECURE_REGISTRY \
      $REGISTRIES
ExecReload=/bin/kill -s HUP $MAINPID
LimitNOFILE=1048576
LimitNPROC=1048576
LimitCORE=infinity
TimeoutStartSec=0
Restart=on-abnormal
MountFlags=slave
KillMode=process

[Install]
WantedBy=multi-user.target
或者执行
 sudo systemctl stop docker.service
$ sudo dockerd -H tcp://0.0.0.0:2375 -H unix:///var/run/docker.sock --api-cors-header='*' --default-ulimit=nofile=8192:16384 --default-ulimit=nproc=8192:16384 -D &
这个命令将会docker被重启之后才改变
在master节点上验证是否可以访问worker node 节点的docker监听的端口:2375端口
[root@hyperledger-cello-node cello]# netstat -tlnp
Active Internet connections (only servers)
Proto Recv-Q Send-Q Local Address           Foreign Address         State       PID/Program name
tcp        0      0 0.0.0.0:22              0.0.0.0:*               LISTEN      4896/sshd
tcp6       0      0 :::22                   :::*                    LISTEN      4896/sshd
tcp6       0      0 :::2375                 :::*                    LISTEN      14127/dockerd-curre
docker -H Worker_Node_IP:2375 info
例如:
docker -H 10.39.43.84:2375 info
Containers: 0
Running: 0
Paused: 0
Stopped: 0
Images: 0
Server Version: 1.13.1
...在worker node 节点上执行
 make setup-worker
 sysctl -w net.ipv4.ip_forward=1 //如果不执行这个也没有关系
执行成功将会看到以下信息
Status: Downloaded newer image for docker.io/hyperledger/fabric-zookeeper:x86_64-1.0.4
Done, now worker node should have all required images, use 'docker images' to check
Copy required fabric 1.0 artifacts
Checking local artifacts path /opt/cello...
Local artifacts path /opt/cello not existed, creating one
Setup ip forward rules
net.ipv4.ip_forward = 1
Setup done
同样也会拉取镜像,镜像list为
[root@hyperledger-cello-node cello]# docker images
REPOSITORY                               TAG                 IMAGE ID            CREATED             SIZE
docker.io/mysql                          5.7                 5195076672a7        5 weeks ago         371 MB
docker.io/yeasy/blockchain-explorer      0.1.0-preview       d3d781c8c96b        3 months ago        659 MB
docker.io/hyperledger/fabric-tools       x86_64-1.0.5        6a8993b718c8        4 months ago        1.33 GB
hyperledger/fabric-tools                 1.0.5               6a8993b718c8        4 months ago        1.33 GB
docker.io/hyperledger/fabric-orderer     x86_64-1.0.5        368c78b6f03b        4 months ago        151 MB
hyperledger/fabric-orderer               1.0.5               368c78b6f03b        4 months ago        151 MB
docker.io/hyperledger/fabric-peer        x86_64-1.0.5        c2ab022f0bdb        4 months ago        154 MB
hyperledger/fabric-peer                  1.0.5               c2ab022f0bdb        4 months ago        154 MB
docker.io/hyperledger/fabric-ccenv       x86_64-1.0.5        33feadb8f7a6        4 months ago        1.28 GB
docker.io/hyperledger/fabric-ca          x86_64-1.0.5        002c9089e464        4 months ago        238 MB
hyperledger/fabric-ca                    1.0.5               002c9089e464        4 months ago        238 MB
docker.io/hyperledger/fabric-kafka       x86_64-1.0.4        7a9d6f3c4a7c        5 months ago        1.29 GB
hyperledger/fabric-kafka                 1.0.5               7a9d6f3c4a7c        5 months ago        1.29 GB
docker.io/hyperledger/fabric-zookeeper   x86_64-1.0.4        53c4a0d95fd4        5 months ago        1.3 GB
hyperledger/fabric-zookeeper             1.0.5               53c4a0d95fd4        5 months ago        1.3 GB
docker.io/hyperledger/fabric-baseimage   x86_64-0.3.2        c92d9fdee998        7 months ago        1.26 GB
docker.io/hyperledger/fabric-baseos      x86_64-0.3.2        bbcbb9da2d83        7 months ago        129 MB
通过http://10.39.43.84:8080/login添加节点
请参考tutorial
如果没有创建Chains则没有起任何容器
在页面添加Chains 就会在node节点上执行起以下容器
[root@hyperledger-cello-node cello]# docker ps
CONTAINER ID        IMAGE                                     COMMAND                  CREATED             STATUS              PORTS                                            NAMES
0717e516142f        yeasy/blockchain-explorer:0.1.0-preview   "bash -c 'sleep 30..."   2 minutes ago       Up 2 minutes        0.0.0.0:8150->8080/tcp                           54b88e7d607d4fb49e79cd29ab3cba78_explorer
e5b43d173eeb        hyperledger/fabric-tools:1.0.5            "bash -c 'sleep 15..."   2 minutes ago       Up 2 minutes                                                         54b88e7d607d4fb49e79cd29ab3cba78_cli
6e18ce116af9        hyperledger/fabric-peer:1.0.5             "peer node start"        2 minutes ago       Up 2 minutes        0.0.0.0:7150->7051/tcp, 0.0.0.0:7050->7053/tcp   54b88e7d607d4fb49e79cd29ab3cba78_peer0_org1
c4f692139b45        hyperledger/fabric-peer:1.0.5             "peer node start"        2 minutes ago       Up 2 minutes        0.0.0.0:7350->7051/tcp, 0.0.0.0:7250->7053/tcp   54b88e7d607d4fb49e79cd29ab3cba78_peer1_org1
9c2b8910b09a        hyperledger/fabric-peer:1.0.5             "peer node start"        2 minutes ago       Up 2 minutes        0.0.0.0:7550->7051/tcp, 0.0.0.0:7450->7053/tcp   54b88e7d607d4fb49e79cd29ab3cba78_peer0_org2
4cfc92c65273        hyperledger/fabric-peer:1.0.5             "peer node start"        2 minutes ago       Up 2 minutes        0.0.0.0:7750->7051/tcp, 0.0.0.0:7650->7053/tcp   54b88e7d607d4fb49e79cd29ab3cba78_peer1_org2
88a1021c8b9e        hyperledger/fabric-orderer:1.0.5          "orderer"                2 minutes ago       Up 2 minutes        0.0.0.0:8050->7050/tcp                           54b88e7d607d4fb49e79cd29ab3cba78_orderer
0e542c318f18        mysql:5.7                                 "docker-entrypoint..."   2 minutes ago       Up 2 minutes        3306/tcp                                         54b88e7d607d4fb49e79cd29ab3cba78_mysql
6b428bd5783a        hyperledger/fabric-ca:1.0.5               "sh -c 'fabric-ca-..."   2 minutes ago       Up 2 minutes        0.0.0.0:7950->7054/tcp                           54b88e7d607d4fb49e79cd29ab3cba78_ca_org2
84e6aad97c83        hyperledger/fabric-ca:1.0.5               "sh -c 'fabric-ca-..."   2 minutes ago       Up 2 minutes        0.0.0.0:7850->7054/tcp                           54b88e7d607d4fb49e79cd29ab3cba78_ca_org1
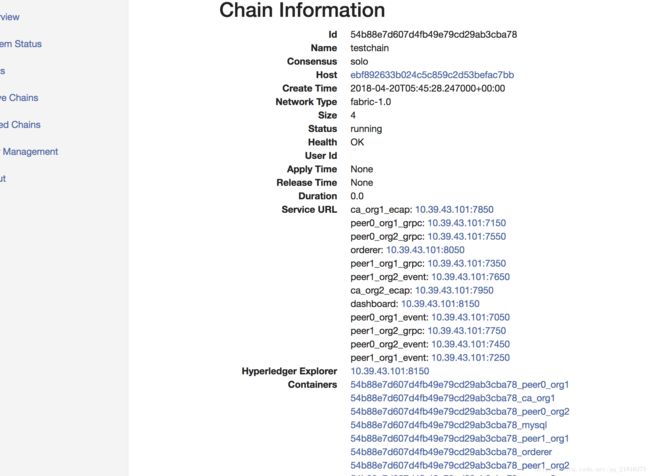
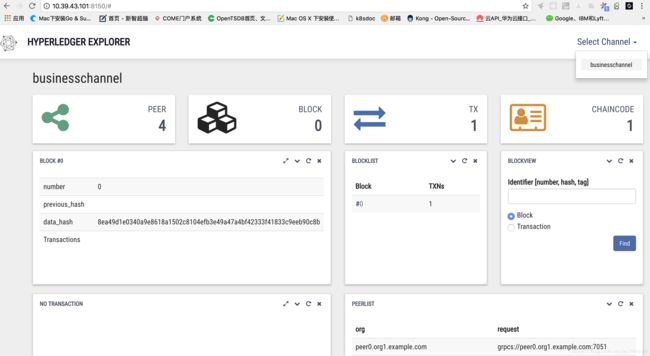
在worker node 上创建chain后,在页面可以看到

通过10.39.43.101:8150访问Hyperledger Explorer
普通用户登录的路径http://master_ip:8081
例如
http://10.39.43.84:8081安装完毕,还有更多功能,请自行摸索
参考:
Hyperledger Cello
installation
tutorial
setup
dashboard
