SpringCloud 配置中心自定义存储方式
扩展配置中心的EnvironmentRepository接口,即可完成自定义存储方式
SpringBoot 版本2.1.4.RELEASE、Spring Cloud版本Greenwich.RELEASE
注:以下将数据库存储、git存储、svn存储等称为环境库
1、接口EnvironmentRepository和Ordered
配置中心自定义存储有两个重要的接口,一个是EnvironmentRepository,该接口含有一个方法:
Environment findOne(String application, String profile, String label)
每次接口请求,均会调用该方法。如果查询较慢,可以考虑使用本地缓存的方式。
配置中心提供应用属性查询的接口为:
http://ip:port/application/profile/label(每次接口请求都会调用findOne方法)
而作为配置中心的客户端,每次启动,都会请求该接口。
另外还有一个接口Ordered,该接口是设置环境的顺序的。
Ordered的值越大,优先级越低。如果没有实现该接口,则优先级最低。
2、单个环境库和复合环境库
2.1 单个环境库
@Profile("redis")
@Configuration
public class RedisEnvironmentRepository implements EnvironmentRepository {

    @Override
    public Environment findOne(String application, String profile, String label) {
        Environment environment = new Environment(application, "default", label, (String)null, (String)null);
        Map next = new HashMap<>();
        next.put("custom", "1510");
        environment.add(new PropertySource(application + "-" + profile, next));
        return environment;
    }
}
配置文件只需要:spring.profiles.active=redis即可确定为自定义(redis)的存储方式
单个环境库无需实现Ordered接口,因为环境仅有一个,设置环境顺序没有任何意义。
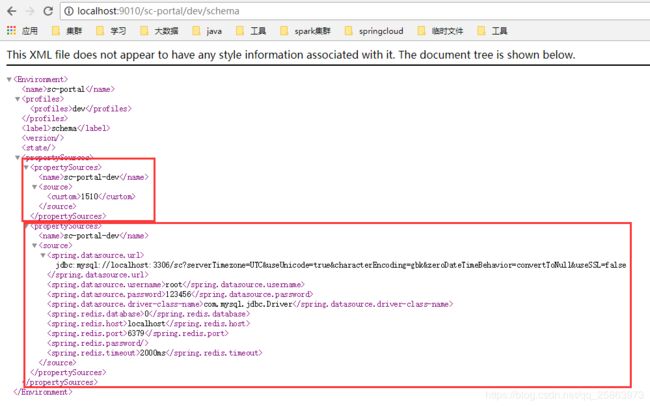
启动完成之后,请求配置中心的应用环境属性,应有以下类似页面:

注意:findOne中具体逻辑可以自实现,如以redis为例,使用hash存储,只需将application、profile、label的json字符串作为key,hash的value可以存储所有的属性和属性值,大致如下图所示:

如果不考虑环境变化,只需将应用名作为key即可。也可以使用其他的方式,如Http的方式。
2.2、复合环境库
2.2.1、配置中心自定义存储方式代码
@Profile("redis")
@Configuration
public class RedisEnvironmentRepository implements EnvironmentRepository,Ordered {
    @Override
    public Environment findOne(String application, String profile, String label) {
        Environment environment = new Environment(application, "default", label, (String)null, (String)null);
        Map next = new HashMap<>();
        next.put("custom", "1510");
        environment.add(new PropertySource(application + "-" + profile, next));
        return environment;
    }
    @Override
    public int getOrder() {
        return 0;
    }
}
配置文件的配置需修改:spring.profiles.active=redis,jdbc(顺序不影响)
jdbc的配置可以参考:https://blog.csdn.net/qq_25863973/article/details/98863408
因为jdbc方式的order默认为:2147483637,jdbc的order可以通过参数spring.cloud.config.server.jdbc.order进行修改。而redis的order为0,所以redis环境优先级更高

redis优先级更高可以从配置中心的页面中查看:

如果自定义的order大于或等于jdbc的order,均会将jdbc的优先级判为更高。因为存放环境的集合为List类型,所以上图中两个环境的名称都叫sc-portal-dev,且没有进行合并。在jdbc的order等于redis的order的时候,因为自定义的环境EnvironmentRepository在配置中心自带环境的EnvironmentRepository后加载,所以优先级更低(后放入到List中)。
优先级在此处看不出有何作用,但是看了配置中心客户端的源码,就会知道优先级的重要性。
2.3、配置中心客户端源码
spring-cloud-starter-netflix-eureka-client —> ConfigServiceBootstrapConfiguration —> configServicePropertySource —>
ConfigServicePropertySourceLocator —> locate
通过configServicePropertySource方法,创建了ConfigServicePropertySourceLocator对象。
ConfigServicePropertySourceLocator类实现了PropertySourceLocator接口。
而locate是该接口的唯一方法。
在locate方法中,有这样如下代码:
 if (StringUtils.hasText(result.getState()) || StringUtils.hasText(result.getVersion())) {
     HashMap map = new HashMap();
     this.putValue(map, "config.client.state", result.getState());
     this.putValue(map, "config.client.version", result.getVersion());
     composite.addFirstPropertySource(new MapPropertySource("configClient", map));
 }
组合环境库中的两个PropertySource(name相同),均是被加到composite变量中的MapPropertySource。但是composite变量存储PropertySource的集合类型为Set
这里体现了Order的重要性,所以不要设置相同名字的环境了。

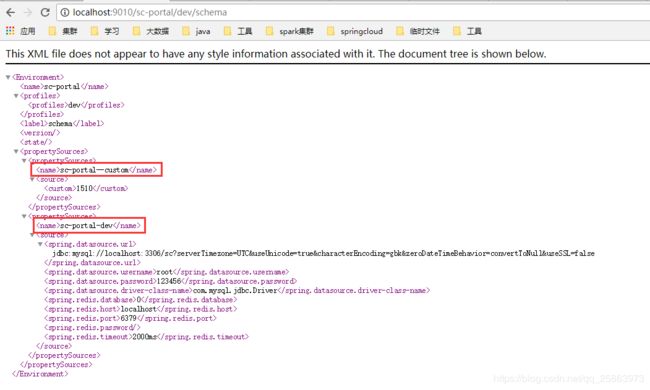
既然不能取相同名字的环境名,那将自定义的名字修改一下即可,如:
环境的名称可以修改:
environment.add(new PropertySource(application + "-" + "-custom", next));

此时这两个环境的变量均可以被客户端使用,客户端使用@Value("${custom:}")即可完成属性注入(已验证)。
配置中心服务端和客户端github代码