elasticsearch7主从集群部署以及filebeat实战
前提
为了保证部署成功,先关闭防火墙
[root@localhost ~]# iptables -F
[root@localhost ~]# systemctl stop firewalld
[root@localhost ~]# systemctl status elasticsearch.service
然后去官网把对应的rpm包下载下来,本文使用7.4.0版本,大家也可以使用其他版本。我们可以把ELFK技术栈所有的包全下载下来,如果网速慢可以私信我哈,beat采集器go语言写的,比较轻量,20多兆,不过其他都200多兆
elasticsearch-7.4.0-x86_64.rpm
cerebro-0.8.5-1.noarch.rpm
filebeat-7.4.0-x86_64.rpm
metricbeat-7.4.0-x86_64.rpm
packetbeat-7.4.0-x86_64.rpm
kibana-7.4.0-x86_64.rpm
logstash-7.4.0.rpm
packetbeat-7.4.0-x86_64.rpm
下载好相应的包后,使用rpm -ivh rpm包路径安装
常用配置项:
- cluster.name: 集群的名称
- path.data: es节点数据的存放目录
- path.logs: es节点日志存放目录,
- network.host: 一般设置为其他网络也可以访问
- discovery.seed_hosts: 集群节点,列表形式
- cluster.initial_master_nodes: 可以进行选举的节点,列表形式
实际生产环境里面path.data目录和path.logs目录都要修改为其他路径,这里是测试机,我没有改
集群配置
节点一配置:
[root@localhost ~]# grep -v '^#' /etc/elasticsearch/elasticsearch.yml
cluster.name: my-application
node.name: node-1
path.data: /var/lib/elasticsearch
path.logs: /var/log/elasticsearch
network.host: 0.0.0.0
http.port: 9200
discovery.seed_hosts: ["10.10.31.6", "10.10.31.5"]
cluster.initial_master_nodes: ["10.10.31.6", "10.10.31.5"]
节点二配置
[root@localhost ~]# grep -v '^#' /etc/elasticsearch/elasticsearch.yml
cluster.name: my-application
node.name: node-2
path.data: /var/lib/elasticsearch
path.logs: /var/log/elasticsearch
network.host: 0.0.0.0
http.port: 9200
discovery.seed_hosts: ["10.10.31.6", "10.10.31.5"]
然后分别更改 jvm,也就是最大堆内存,和最小堆内存,默认是1g,作为测试机,我改为128m,其实做实验已经够用了,如果你的内存小,1g可能起不来
-Xms128m
-Xmx128m
systemctl start elasticsearch启动,然后测试一下:
curl localhost:9200
cerebro安装
对于查看集群环境,cerebro是很好的工具,可以不用es-head插件,这个一般用ELK6的人用的多,ELK7我们就使用cerebro插件来检查整个集群的环境 默认监听9000端口
下载:rpm -ivh cerebro-0.8.5-1.noarch.rpm
修改数据目录
[root@es-node1 ~]# vim /etc/cerebro/application.conf
data.path = "/tmp/cerebro.db"
[root@es-node1 ~]# systemctl enable cerebro
kibana安装
把rpm包安装之后,配置一下kibana,把它配置成中文,并且把地址配置成0.0.0.0,这样才可以正常访问
[root@localhost elasticsearch]# grep -v '^#' /etc/kibana/kibana.yml | grep -v '^$'
server.host: "0.0.0.0"
i18n.locale: "zh-CN"
kibana默认监听在5601端口,使用浏览器打开,kibana中主要是拿来做可视化的,也可以对es进行操作,并且支持语法,关键字的自动补全。
使用kibana运行命令
filebeat安装
rpm安装
[root@localhost ~]# rpm -ivh filebeat-7.4.0-x86_64.rpm
warning: filebeat-7.4.0-x86_64.rpm: Header V4 RSA/SHA512 Signature, key ID d88e42b4: NOKEY
Preparing...                          ################################# [100%]
Updating / installing...
   1:filebeat-7.4.0-1                 ################################# [100%]
[root@localhost ~]# systemctl enable filebeat.service
Created symlink from /etc/systemd/system/multi-user.target.wants/filebeat.service to /usr/lib/systemd/system/filebeat.service.
[root@localhost ~]# systemctl start filebeat.service
默认配置文件是/etc/filebeat/filebeat.yml,我们可以自己写一个,然后启动的时候指定配置文件
聊聊filebeat
先看看官网的图,beat是轻量级的数据采集器,beat是go语言写的,之前使用logstash的时候,logstash有一些缺点,比如他启动的时候非常慢,非常占内存,他是用Java写的,要在每个生产环境下都要装一个Java环境,跑一个logstash,我之前测试过,在相同的环境下,跑logstash,占用600多兆,但是filebeat只占用了40多兆,有时候logstash如果占用过多系统资源的使用,可能会导致我们的业务机的性能下降,那采集个日志还影响了业务机的性能,这个是非常不划算的,所以后面增加了filebeat。
所以有同学说,这个logstash没用,实际上,它非常有用,我们后续介绍它
filebeat架构
input组件负责管理收割机从哪个路径去查找指定的数据。
收割机的作用是负责监控是否有新的数据输入,如果有新的数据输入,负责逐行读取数据,把它输出到指定的位置上,比如es,logstash,kafka等等
filebeat基本使用
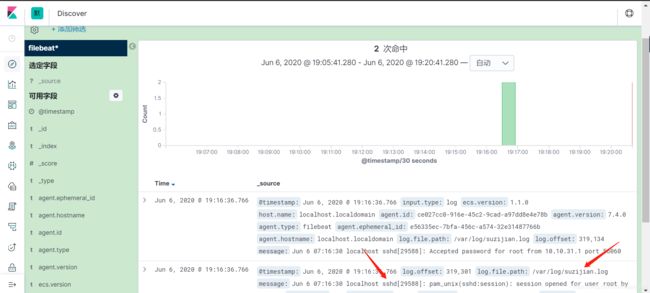
offset
filebeat读取文件内容到es集群
使用以下配置文件启动,收集nginx日志到es集群,这里是先测试一下,实际上,如果我们的索引名字直接写死了,那么这个索引以后就会越来越大,我们一般会按天或按月切割。
filebeat.inputs:
  - type: log
    paths: /var/log/nginx/access.log
    enabled: true
 output.elasticsearch:
   hosts:["10.10.31.5:9200","10.10.31.6:9200"]
   index: nginx-access.log
setup.template.name: nginx
setup.template.pattern: nginx-*
必须要设置template不然会报错的,并且我们的template.pattern要匹配到index
改索引名这里找了很久两三个小时,才在官网上找到说你要把这个关掉


