11 海思Hi3518E移植WIFI驱动(AP模式)
1 修改USB WIFI驱动
mt7601u驱动源码下载:https://www.mediatek.com/products/broadbandWifi/mt7610u
也可以到我的网盘下载:
链接:https://pan.baidu.com/s/1GRyqlmyxpgj7zLfvlVQKsQ
提取码:gqr0
(1)include/rtmp_def.h中1627行左右,修改网络名始终为:wlan
(2)修改Makefile
原来默认的平台是PC,然后添加平台
添加Linux内核源码路径,编译工具链,CPU
ifeq ($(PLATFORM),HISI_3518E)
LINUX_SRC = /home/aston/sambashare/Hi3518E_SDK_V1.0.3.0/osdrv/opensource/kernel/linux-3.4.y
CROSS_COMPILE = arm-hisiv300-linux-
export ARCH = arm
endif
在402行:修改为HISI_3518E
ifeq ($(PLATFORM),DM6446)
	$(MAKE)  ARCH=arm CROSS_COMPILE=arm_v5t_le- -C  $(LINUX_SRC) SUBDIRS=$(RT28xx_DIR)/os/linux modules
else
ifeq ($(PLATFORM),HISI_3518E)//《——————
	$(MAKE) ARCH=powerpc CROSS_COMPILE=$(CROSS_COMPILE) -C  $(LINUX_SRC) SUBDIRS=$(RT28xx_DIR)/os/linux modules
else
	$(MAKE) -C $(LINUX_SRC) SUBDIRS=$(RT28xx_DIR)/os/linux modules
endif
endif报错1:主要错误:arm-hisiv300-linux-gcc: error: unrecognized command line option ‘-mno-string’
make[1]: Entering directory '/home/aston/sambashare/5/ap/mt7601u/tools'
gcc -g bin2h.c -o bin2h
make[1]: Leaving directory '/home/aston/sambashare/5/ap/mt7601u/tools'
/home/aston/sambashare/5/ap/mt7601u/tools/bin2h
cp -f os/linux/Makefile.6 /home/aston/sambashare/5/ap/mt7601u/os/linux/Makefile
make ARCH=powerpc CROSS_COMPILE=arm-hisiv300-linux- -C
/home/aston/sambashare/Hi3518E_SDK_V1.0.3.0/osdrv/opensource/kernel/linux-3.4.y SUBDIRS=/home/aston/sambashare/5
/ap/mt7601u/os/linux modules
make[1]: Entering directory '/home/aston/sambashare/Hi3518E_SDK_V1.0.3.0/osdrv/
opensource/kernel
/linux-3.4.y'
  CC [M]  /home/aston/sambashare/5/ap/mt7601u/os/linux/../../os/linux/rt_profile.o
arm-hisiv300-linux-gcc: error: unrecognized command line option ‘-mno-string’
scripts/Makefile.build:307: recipe for target '/home/aston/sambashare/5/ap/mt7601u/os/linux/../../os/linux/rt_profile.o'
 failed
make[2]: *** [/home/aston/sambashare/5/ap/mt7601u/os/linux/../../os/linux/rt_profile.o] Error 1
Makefile:1365: recipe for target '_module_/home/aston/sambashare/5/ap/mt7601u/os/linux' failed
make[1]: *** [_module_/home/aston/sambashare/5/ap/mt7601u/os/linux] Error 2
make[1]: Leaving directory '/home/aston/sambashare/Hi3518E_SDK_V1.0.3.0/osdrv/opensource/kernel/linux-3.4.y'
Makefile:401: recipe for target 'LINUX' failed
make: *** [LINUX] Error 2
主要原因是上面的修改(在402行:修改为HISI_3518E)中有一个没有修改好,导致编译器和CPU不适配
就是:ARCH=powerpc 改为:ARCH=arm
错误2:
  CC [M]  /home/aston/sambashare/5/ap/mt7601u/os/linux/../../os/linux/rt_profile.o
/home/aston/sambashare/5/ap/mt7601u/os/linux/../../os/linux/rt_profile.c:26:23: fatal
error: rt_config.h: No such file or directory
 #include "rt_config.h"
主要原因是:在编译 ./os/linux/rt_profile.c 的时候找不到文件 rt_config.h 这是因为plags没有设置好
修改:在 ./os/linux/config.mk 中添加
最后编译成功:在 ./os/linux/ 下会生成KO文件 mt7601Uap.ko ,并且向 /tftp/ 下复制一份
为把KO文件复制到我们需要的目录下,因此修改Makefile
ifeq ($(RT28xx_MODE),AP)  //我们用的是 AP 模式
ifneq ($(findstring 7601,$(CHIPSET)),)  //我们用的是 7601
	cp -f $(RT28xx_DIR)/os/linux/mt$(MODULE)ap.ko /home/aston/rootfs  //指定路径
else
	cp -f $(RT28xx_DIR)/os/linux/rt$(MODULE)ap.ko /tftpboot
endif
2 部署驱动
(1)先lsusb,然后插入USB WIFI模块,再lsusb,确认模块被识别了
/mnt # lsusb
Bus 001 Device 003: ID 148f:7601  //我的开发板
Bus 001 Device 001: ID 1d6b:0002
Bus 002 Device 001: ID 1d6b:0001
(2)在开发板中创建 /etc/Wireless/RT2870AP 文件夹,把驱动源文件下的 RT2870AP.dat 复制到开发板的这个文件夹中
mkdir /etc/Wireless/RT2870AP/ -p修改:/etc/Wireless/RT2870AP/RT2870AP.dat
	SSID=MT7601AP_WPA  //这里的名字是在pc机上看到的连接ssid名
	AuthMode=WPA2PSK  //认证方式
	EncrypType=TKIP;AES  //加密方式
	WPAPSK=1234567890  //这个是密码
装载驱动:insmod mt7601Uap.ko
/mnt # insmod  mt7601Uap.ko
rtusb init rt2870 --->
=== pAd = c2f13000, size = 866712 ===
<-- RTMPAllocTxRxRingMemory, Status=0
<-- RTMPAllocAdapterBlock, Status=0
RTMP_COM_IoctlHandle():pAd->BulkOutEpAddr=0x8
RTMP_COM_IoctlHandle():pAd->BulkOutEpAddr=0x4
RTMP_COM_IoctlHandle():pAd->BulkOutEpAddr=0x5
RTMP_COM_IoctlHandle():pAd->BulkOutEpAddr=0x6
RTMP_COM_IoctlHandle():pAd->BulkOutEpAddr=0x7
RTMP_COM_IoctlHandle():pAd->BulkOutEpAddr=0x9
NVM is EFUSE
Endpoint(8) is for In-band Command
Endpoint(4) is for WMM0 AC0
Endpoint(5) is for WMM0 AC1
Endpoint(6) is for WMM0 AC2
Endpoint(7) is for WMM0 AC3
Endpoint(9) is for WMM1 AC0
Endpoint(84) is for Data-In
Endpoint(85) is for Command Rsp
usbcore: registered new interface driver rt2870
ifconfig -a
/mnt # ifconfig -a
wlan0     Link encap:Ethernet  HWaddr 00:00:00:00:00:00
          BROADCAST MULTICAST  MTU:1500  Metric:1
          RX packets:0 errors:0 dropped:0 overruns:0 frame:0
          TX packets:0 errors:0 dropped:0 overruns:0 carrier:0
          collisions:0 txqueuelen:1000
          RX bytes:0 (0.0 B)  TX bytes:0 (0.0 B)
先设置好IP地址:
无线:
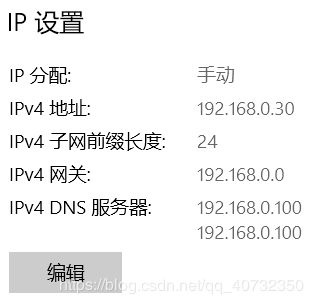
windows:	192.168.0.30
开发板AP:	192.168.0.100
ubuntu:	        192.168.0.50	(ubuntu的IP现在可以不管)

有线:
windows:	192.168.1.20
开发板:	        192.168.1.10
ubuntu:	        192.168.1.141
打开无线网卡和设置IP地址:
ifconfig wlan0 up
ifconfig wlan0 192.168.0.100
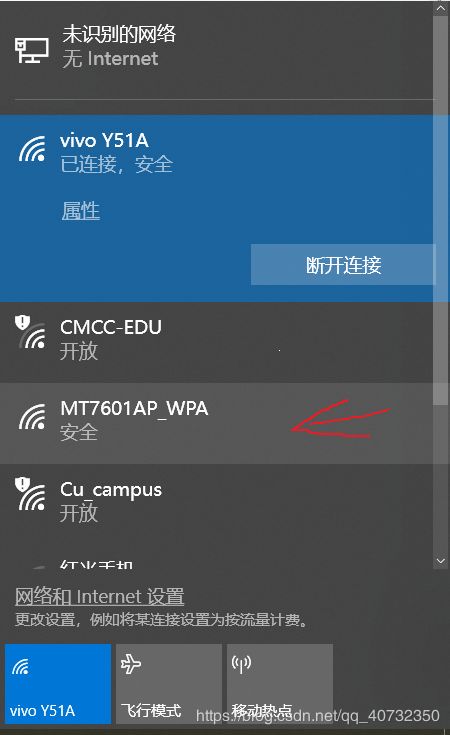
这样就可在windows上找到我们的热点:
然后去连接热点:只不过不能连接Internet
给PC强制分配静态IP
********* 然后关闭windows上面的防火墙 ***************
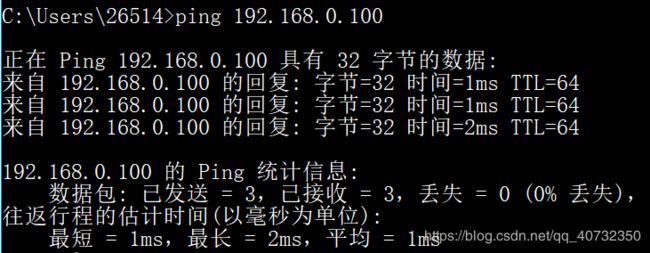
PC ping 开发板
开发板 ping PC
测试用例——————————————————————————————————————————
(1)ORTP版本的sample,common/sample_common_venc.c中,修改LOCAL_HOST_IP为192.168.0.30
(2)make clean,make
(3)将得到的sample_venc复制到开发板中
运行结果:
在/etc/profile 中添加下面命令,这样一开机就可以启动wifi
cd /tmp
insmod  mt7601Uap.ko
ifconfig wlan0 up
ifconfig wlan0 192.168.0.100


