c# 文件上传下载
1. 介绍
C#文件上传下载用WebClient类实现
微软官方使用Demo
https://docs.microsoft.com/en-us/dotnet/api/system.net.webclient.downloadfile?view=netframework-4.7.2
架构为B/S
模板
服务器: WebForm
客户端:ConsoleApplication
2. 代码
2.1 客户端
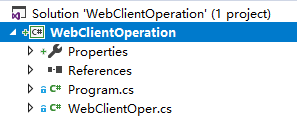
解决方案:
WebClientOper.cs
using System;
using System.Collections.Generic;
using System.ComponentModel;
using System.IO;
using System.Linq;
using System.Net;
using System.Text;

namespace WebClientOperation
{
    class WebClientOper
    {
        public bool UploadFile(string address, string fileName)
        {
            if (!File.Exists(fileName))
                return false;

            using (WebClient client = new WebClient())
            {
                client.UploadProgressChanged += Client_UploadProgressChanged; ;
                client.UploadFileCompleted += Client_UploadFileCompleted; ;
                client.UploadFileAsync(new Uri(address), fileName);

                Console.ReadKey();
            }

            return true;
        }

        private void Client_UploadFileCompleted(object sender, UploadFileCompletedEventArgs e)
        {
            Console.WriteLine("Upload Completed...");
        }

        private void Client_UploadProgressChanged(object sender, UploadProgressChangedEventArgs e)
        {
            Console.WriteLine($"{e.ProgressPercentage}:{e.BytesReceived}/{e.TotalBytesToReceive}");
        }

        public bool DownloadFile(string address, string fileName)
        {
            using (WebClient client = new WebClient())
            {
                client.DownloadProgressChanged += Client_DownloadProgressChanged; ;
                client.DownloadFileCompleted += Client_DownloadFileCompleted;
                client.DownloadFileAsync(new Uri(address), fileName);

                Console.ReadKey();
            }

            return true;
        }

        private void Client_DownloadFileCompleted(object sender, AsyncCompletedEventArgs e)
        {
            Console.WriteLine("Download Completed...");
        }

        private void Client_DownloadProgressChanged(object sender, DownloadProgressChangedEventArgs e)
        {
            Console.WriteLine($"{e.ProgressPercentage}:{e.BytesReceived}/{e.TotalBytesToReceive}");
        }

        public void DisplayImage()
        {

        }
    }
}
Program.cs
using System;
using System.Collections.Generic;
using System.Linq;
using System.Text;

namespace WebClientOperation
{
    class Program
    {
        static void Main(string[] args)
        {
            Test();
        }

        static void Test()
        {
            string filePath = @"E:\sky.jpg";


            // IIS Upload
            // string address = @"http://localhost:22903/WebServer.aspx";
            // IIS Download
            // pic path = "C:\Users\Irvin\source\repos\WebServer\WebServer\sky.jpg"
            string address = @"http://localhost:22903/WebServer.aspx/sky.jpg";

            WebClientOper webClientOper = new WebClientOper();
            // webClientOper.UploadFile(address, filePath);
            webClientOper.DownloadFile(address, filePath);
        }
    }
}
2.2 服务器:
创建空web项目
添加网站WebServer
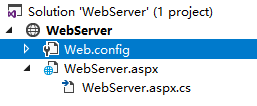
解决方案
WebServer.aspx
<%@ Page Language="C#" AutoEventWireup="true" CodeFile="WebServer.aspx.cs" Inherits="WebServer" %>
WebServer.aspx.cs
using System;
using System.Collections.Generic;
using System.Linq;
using System.Web;
using System.Web.UI;
using System.Web.UI.WebControls;

public partial class WebServer : System.Web.UI.Page
{
    protected void Page_Load(object sender, EventArgs e)
    {
        foreach (string f in Request.Files.AllKeys)
        {
            HttpPostedFile file = Request.Files[f];
            file.SaveAs("E:\\UploadedFiles\\" + file.FileName);
        }
    }
}
3. 测试
3.1 上传测试
修改上传URL为服务器主页URL, 启动服务器,拷贝并修改address
客户端修改
string address = @"http://localhost:22903/WebServer.aspx";
然后修改上传文件路径
string filePath = @"E:\sky.jpg";
服务器修改
file.SaveAs("E:\\UploadedFiles\\" + file.FileName); }
此处上传文件保存到E:\\UploadedFiles\\
先启动服务器, 然后执行客户端程序
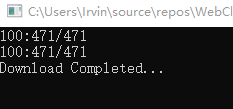
执行成功
上传成功
3.2 下载测试
这里用sky.jpg图片测试, 将文件放到WebServer项目文件WebServer中,作为下载资源
启动服务器, 拷贝网页URL, 这里是http://localhost:22903/WebServer.aspx
客户端控制台程序, 修改address为刚才拷贝URL+sky.jpg
string address = @"http://localhost:22903/WebServer.aspx/sky.jpg";
然后修改保存地址,这里是
string filePath = @"E:\sky.jpg";
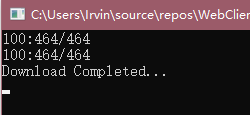
执行
下载成功
自己用了四天时间, 终于搞清楚c# B/S上传下载
希望对大家有帮助
代码并不难, 环境配置和架构才是关键


