浅谈缓存-注解驱动的缓存 Spring cache介绍
在我们平常的工作当中,有好多场景需要用到缓存技术,如redis,ehcache等来加速数据的访问。作为浅谈缓存的第一篇笔者不想谈论具体的缓存技术,我更想介绍一下Spring中每次阅读都会使我心中泛起波澜的一个东西,那就是基于注解的缓存技术。我们先看Spring参考文档中的一句话。
Since version 3.1, Spring Framework provides support for transparently adding caching into an existing Spring application. Similar to the transaction
support, the caching abstraction allows consistent use of various caching solutions with minimal impact on the code.
简单翻译一下,基于注解的缓存技术是Spring3.1版本引入的,其目的是为了给一个已有的Spring应用最小侵入的引入缓存。其原理与Spring的事务类似都是基于Spring的AOP技术。他本质上不是一个具体的缓存实现方案(例如redis EHCache等),而是一个对缓存使用的抽象,通过在既有代码中添加少量的annotation,即能达到缓存方法返回对象的效果。她支持开箱即用的缓存临时存储方案,也支持集成主流的专业缓存,如:redis,EHCache。好,废话少说,下面笔者通过几个简单例子来总结看看Spring Cache的优点,并通过源码对其原理做一个简单介绍。
注意:笔者的代码都是基于Spring boot 1.5.9.release版本,代码的风格也都是Spring boot式的。
先建一个基于Spring Boot 的web项目,本文的编程用例都会在此项目中完成。项目的pom.xml文件如下。
xml version
="1.0"
encoding
="UTF-8"
?>
xsi
:schemaLocation
=" http://maven.apache.org/POM/4.0.0 http://maven.apache.org/xsd/maven-4.0.0.xsd
"
>
partI.传统缓存的用法
在聊Spring Cache之前,我们先来看看我们以前是怎么使用缓存的。这里笔者不打算引入任何第三方缓存而是自己实现一个简易的缓存。
案例:电商的场景中,商品信息需要经常被用户浏览,不做缓存数据库肯定吃不消。我们就来对商品信息的查询做缓存,以商品信息的编号为key,商品信息对象为value,当以相同的编号查询商品时,若缓存中有,直接从缓存中返回结果,否则从数据库中查询,并将查询结果放入缓存。
先定义一个产品实体类代码如下:
package com.snow.cache
;
import java.io.Serializable
;
/**
*
*
@author
snowwolf-louis
*
@date
18/4/10
*/
public class Product
implements Serializable{
private Long
id
;
private String
name
;
private String
desc
;
public Long
getId() {
return
id
;
}
public void
setId(Long id) {
this.
id = id
;
}
public String
getName() {
return
name
;
}
public void
setName(String name) {
this.
name = name
;
}
public String
getDesc() {
return
desc
;
}
public void
setDesc(String desc) {
this.
desc = desc
;
}
@Override
public String
toString() {
return
"Product{" +
"id=" +
id +
", name='" +
name +
'
\'
' +
", desc='" +
desc +
'
\'
' +
'}'
;
}
}
在定义一个缓存管理器,负责缓存逻辑,支持对象的增加,修改和删除。代码如下:
package com.snow.cache.tradition
;
import java.util.Map
;
import java.util.concurrent.ConcurrentHashMap
;
/**
*
*
@author
snowwolf-louis
*
@date
18/4/10
*/
public class SimpleCacheManager<
T> {
/**
* 用ConcurrentHashMap做为缓存
*/
private Map,
T>
cache =
new ConcurrentHashMap,
T>()
;
/**
* 从缓存中获取给定key的值
*
@param
key
*
@return
返回缓存中指定key的值,若无则返回null
*/
public
T
get(String key){
return
cache.get(key)
;
}
/**
* 将数据(key,value)放入缓存
*
@param
key
*
@param
value
*/
public void
put(String key
,
T value){
cache.put(key
,value)
;
}
/**
* 清除缓存中指定key的的数据
*
@param
key
*/
public void
evict(String key){
if (
cache.containsKey(key)){
cache.remove(key)
;
}
}
/**
* 清空缓存
*/
public void
clearAll(){
cache.clear()
;
}
}
将我们自定义的缓存管理器交给Spring容器管理
package com.snow.cache.tradition.config
;
import com.snow.cache.Product
;
import com.snow.cache.tradition.SimpleCacheManager
;
import
org.springframework.context.annotation.Bean
;
import
org.springframework.context.annotation.Configuration
;
/**
* 传统缓存用法的配置类
*
@author
snowwolf-louis
*
@date
18/4/10
*/
@Configuration
public class SimpleCacheConfig {
@Bean
public SimpleCacheManager
cacheManager(){
return new SimpleCacheManager()
;
}
}
对商品的业务操作接口
package com.snow.cache.tradition.service
;
import com.snow.cache.Product
;
/**
* 对商品的业务操作接口
*
@author
snowwolf-louis
*
@date
18/4/10
*/
public interface ProductService {
/**
* 根据id查询商品信息
*
@param
id
*
@return
*/
public Product
getProductById(Long id)
;
}
对商品的业务操作实现
package com.snow.cache.tradition.service
;
import com.snow.cache.Product
;
import com.snow.cache.tradition.SimpleCacheManager
;
import
org.springframework.beans.factory.annotation.Autowired
;
import
org.springframework.stereotype.Service
;
import java.util.Objects
;
/**
*
@author
snowwolf-louis
*
@date
18/4/10
*/
@Service
public class ProductServiceImpl
implements ProductService {
@Autowired
private SimpleCacheManager
cacheManager
;
@Override
public Product
getProductById(Long id) {
if (Objects.
isNull(id)){
throw new NullPointerException(
"id不能为空")
;
}
Product product =
null;
//首先从缓存查询
product =
cacheManager.get(id.toString())
;
if (product !=
null) {
return product
;
}
//缓存中没有在从数据库中查找,我这里就不从数据库中查了,而是调用一个私有方法模拟从数据库中查
product = getproductFromDB(id)
;
//将数据库中查到数据装载进缓存
if (product !=
null && product.getId() !=
null){
cacheManager.put(product.getId().toString()
,product)
;
}
return product
;
}
private Product
getproductFromDB(Long id) {
try {
Thread.
sleep(
10L)
;
}
catch (InterruptedException e) {
e.printStackTrace()
;
}
System.
out.println(
"从数据库中查询商品信息")
;
Product product =
new Product()
;
product.setId(id)
;
product.setName(
"iphone 11")
;
product.setDesc(
"iphone 11,smartisan R1")
;
return product
;
}
}
好,缓存设计好了,我们编写一个测试类
package
com.snow.cache.tradition
;
import
com.snow.cache.Product
;
import
com.snow.cache.tradition.config.SimpleCacheConfig
;
import
com.snow.cache.tradition.service.ProductService
;
import
com.snow.cache.tradition.service.ProductServiceImpl
;
import
org.junit.Test
;
import
org.junit.runner.RunWith
;
import
org.springframework.beans.factory.annotation.Autowired
;
import
org.springframework.boot.test.context.SpringBootTest
;
import
org.springframework.test.context.junit4.SpringRunner
;
@RunWith
(SpringRunner.
class
)
@SpringBootTest
(
classes
= {Product.
class,
SimpleCacheConfig.
class,
ProductServiceImpl.
class
})
public class
SimpleCacheTests {
@Autowired
private
ProductService
productService
;
@Test
public void
getProductByIdTest
(){
long
start1 = System.
currentTimeMillis
()
;
System.
out
.println(
"第一次查询商品..."
)
;
Product product1 =
productService
.getProductById(
1L
)
;
long
end1 = System.
currentTimeMillis
()
;
System.
out
.println(
"第一次查询所需时间:"
+ (end1 - start1) +
"ms"
)
;
System.
out
.println(
"第一次查询的商品信息为:"
+ product1)
;
long
start2 = System.
currentTimeMillis
()
;
System.
out
.println(
"第二次查询商品..."
)
;
Product product2 =
productService
.getProductById(
1L
)
;
long
end2 = System.
currentTimeMillis
()
;
System.
out
.println(
"第二次查询所需时间:"
+ (end2 - start2) +
"ms"
)
;
System.
out
.println(
"第二次查询的商品信息为:"
+ product2)
;
}
}
测试类中,我们两次调用商品查询接口结果如下
第一次查询商品...
从数据库中查询商品信息
第一次查询所需时间:11ms
第一次查询的商品信息为:Product{id=1, name='iphone 11', desc='iphone 11,smartisan R1'}
第二次查询商品...
第二次查询所需时间:0ms
第二次查询的商品信息为:Product{id=1, name='iphone 11', desc='iphone 11,smartisan R1'}
从结果中可以看出第一次查询商品是从数据库中查询商品信息的耗时11ms,第二次查询是走的缓存耗时不足1ms,两次返回结果也一摸一样,足见我们的缓存生效了。但是我们也不难发现传统方式的问题。
1.缓存代码和业务代码耦合度太高,如上面的例子中,ProductServiceImpl中的getProductById()方法有太多关于缓存的逻辑,不便于维护和变更。
2.不灵活,这种缓存方案不支持按照某种条件的缓存,比如只有某类商品才需要缓存,这种需求会导致代码的变更。
3.缓存的存储这块写的比较死,不能灵活的切换为使用第三方的缓存模块。
partII.Spring Cache 示例 & 原理:
以上我们代码中常见的问题,Spring Cache都很好的解决了。下面我们来看下Spring Cache的例子。
我们的缓存管理器使用Spring Cache提供的org.springframework.cache.concurrent.ConcurrentMapCacheManager
其内部使用org.springframework.cache.concurrent.ConcurrentMapCache作为缓存的存储容器,底层实际上也是java.util.concurrent.ConcurrentHashMap
好下面我将此缓存管理器交给Spring管理
package com.snow.cache.spring.config
;
import org.springframework.cache.CacheManager
;
import org.springframework.cache.annotation.CachingConfigurerSupport
;
import
org.springframework.cache.annotation.EnableCaching
;
import org.springframework.cache.concurrent.ConcurrentMapCacheManager
;
import
org.springframework.context.annotation.Bean
;
import
org.springframework.context.annotation.Configuration
;
import java.util.concurrent.ConcurrentMap
;
/**
*Spring Cache提供的开箱即用的缓存方案(使用{
@link
ConcurrentMap }作为缓存的存储容器)
*
*
@author
snowwolf-louis
*
@date
18/4/12
*/
@Configuration
@EnableCaching
public class ConcurrentMapCacheConfig
extends CachingConfigurerSupport {
@Bean
@Override
public CacheManager
cacheManager() {
return new ConcurrentMapCacheManager()
;
}
}
对商品的业务操作接口:
package com.snow.cache.spring.service
;
import com.snow.cache.Product
;
/**
* 对商品的业务操作接口
*
@author
snowwolf-louis
*
@date
18/4/10
*/
public interface ProductService {
/**
* 根据id查询商品信息
*
@param
id
*
@return
*/
public Product
getProductById(Long id)
;
}
对商品的业务操作实现
package com.snow.cache.spring.service
;
import com.snow.cache.Product
;
import com.snow.cache.tradition.SimpleCacheManager
;
import
org.springframework.beans.factory.annotation.Autowired
;
import
org.springframework.cache.annotation.Cacheable
;
import
org.springframework.stereotype.Service
;
import java.util.Objects
;
/**
*
@author
snowwolf-louis
*
@date
18/4/10
*/
@Service
public class ProductServiceImpl
implements ProductService {
@Override
@Cacheable(
value =
"product"
,
key =
"#id")
public Product
getProductById(Long id) {
if (Objects.
isNull(id)) {
throw new NullPointerException(
"id不能为空")
;
}
//缓存中没有在从数据库中查找,我这里就不从数据库中查了,而是调用一个私有方法模拟从数据库中查
return getproductFromDB(id)
;
}
private Product
getproductFromDB(Long id) {
try {
Thread.
sleep(
10L)
;
}
catch (InterruptedException e) {
e.printStackTrace()
;
}
System.
out.println(
"从数据库中查询商品信息")
;
Product product =
new Product()
;
product.setId(id)
;
product.setName(
"iphone 11")
;
product.setDesc(
"iphone 11,smartisan R1")
;
return product
;
}
}
我们可以看到上述getProductById方法上面加了一行这个注解
@Cacheable(
value =
"product"
,
key =
"#id")
而原先对缓存的操作的一些代码在这里全都没有了,代码变得非常的干净仅仅和所需的业务相关。下面就测试一下这个缓存是否生效了。测试类如下:
package com.snow.cache.spring
;
import com.snow.cache.Product
;
import com.snow.cache.spring.config.ConcurrentMapCacheConfig
;
import com.snow.cache.spring.service.ProductService
;
import com.snow.cache.spring.service.ProductServiceImpl
;
import
org.junit.Test
;
import
org.junit.runner.RunWith
;
import
org.springframework.beans.factory.annotation.Autowired
;
import
org.springframework.boot.test.context.SpringBootTest
;
import org.springframework.test.context.junit4.SpringRunner
;
@RunWith(SpringRunner.
class)
@SpringBootTest(
classes = {ConcurrentMapCacheConfig.
class,
Product.
class, ProductServiceImpl.
class})
public class SpringCacheTests {
@Autowired
private ProductService
productService
;
@Test
public void
getProductByIdTest(){
long start1 = System.
currentTimeMillis()
;
System.
out.
println(
"第一次查询商品...")
;
Product product1 =
productService.getProductById(
1L)
;
long end1 = System.
currentTimeMillis()
;
System.
out.
println(
"第一次查询所需时间:" + (end1 - start1) +
"ms")
;
System.
out.
println(
"第一次查询的商品信息为:" + product1)
;
long start2 = System.
currentTimeMillis()
;
System.
out.
println(
"第二次查询商品...")
;
Product product2 =
productService.getProductById(
1L)
;
long end2 = System.
currentTimeMillis()
;
System.
out.
println(
"第二次查询所需时间:" + (end2 - start2) +
"ms")
;
System.
out.
println(
"第二次查询的商品信息为:" + product2)
;
}
}
执行结果:
第一次查询商品...
从数据库中查询商品信息
第一次查询所需时间:59ms
第一次查询的商品信息为:Product{id=1, name='iphone 11', desc='iphone 11,smartisan R1'}
第二次查询商品...
第二次查询所需时间:1ms
第二次查询的商品信息为:Product{id=1, name='iphone 11', desc='iphone 11,smartisan R1'}
从结果中可以看出第一次查询是走的数据库,执行时间为59ms(每次执行会有差异,不同的机器也会有所差异),
第二次查询商品没有走数据库,执行时间1ms。两次查询结果一样。证明我们使用的缓存起作用了,是不是很神奇?
好到这里我们传统方式面临的耦合性太高的问题就完美的解决了。
下面我们在来看第二个问题:如果我想要缓存商品的id>50的商品怎么办?其实很简单只要将注解
@Cacheable(
value =
"product"
,
key =
"#id"
,
condition =
"#id.
longValue
() > 50L
”)加在getProductById的方法上即可
condition =
"#id.
longValue
() > 50L
” 按条件缓存所加的条件。笔者就不测试该示例了,笔者会在本文的partIII部分介绍@Cacheable @CacheEvict @CachePut
的用法。
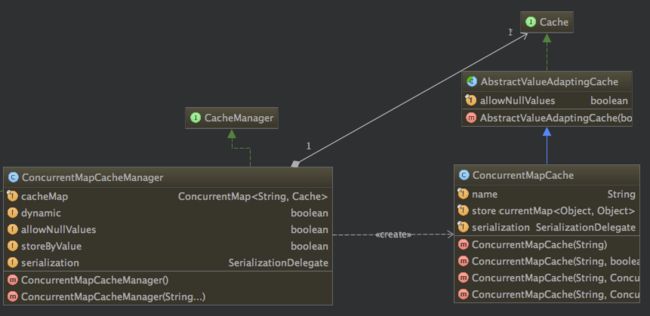
至于第三个问题(传统的缓存的存储这块写的比较死,不能灵活的切换为使用第三方的缓存模块)我们先来看下这个Spring Cache 内置的开箱即用的缓存的类图
从上图可以看出Spring Cache对缓存存储的顶层接口为Cache,缓存管理的顶层接口为CacheManager
Cache源码:
package org.springframework.cache
;
import java.util.concurrent.Callable
;
/**
* 定义缓存通用操作的接口
*
*
@author
Costin Leau
*
@author
Juergen Hoeller
*
@author
Stephane Nicoll
*
@since
3.1
*/
public interface Cache {
/**
* 返回缓存的名称
*/
String
getName()
;
/**
* 返回真实的缓存
*/
Object
getNativeCache()
;
/**
* 返回给定key在缓存中对应的value的包装类ValueWrapper的对象
*
如何缓存中不存在key的键值对则返回null
* 如果缓存中key的对应值为null,则返回一个ValueWrapper包装类的对象
*
@param
key
*
@return
*
@see
#get(Object, Class)
*/
ValueWrapper
get(Object key)
;
/**
* 返回缓存中key对应的value,并将其值强转为type
*
@param
key
*
@param
type
*
@return
*
@throws
如果缓存着找到key对应的值,但是将其转化为指定的类型失败将抛出IllegalStateException
*
@since
4.0
*
@see
#get(Object)
*/
<
T>
T
get(Object key
, Class<
T> type)
;
/**
* 如果缓存中存在key对应的value则return ,如果不存在则调用valueLoader生成一个并将其放入缓存
*
@param
key
*
@return
*
@throws
如果{
@code
valueLoader} 抛出异常则将其包装成ValueRetrievalException抛出
*
@since
4.3
*/
<
T>
T
get(Object key
, Callable<
T> valueLoader)
;
/**
*将数据对(key,value)放入缓存(如果缓存中存在这对数据,原来的数据会被覆盖)
*
@param
key
*
@param
value
*/
void
put(Object key
, Object value)
;
/**
* 如果缓存中不存在(key,value)映射对,则将其放入缓存
*
其等效于下面这段代码
* Object existingValue = cache.get(key);
* if (existingValue == null) {
* cache.put(key, value);
* return null;
* } else {
* return existingValue;
* }
*
*
@param
key
the key with which the specified value is to be associated
*
@param
value
the value to be associated with the specified key
*
@return
*
@since
4.1
*/
ValueWrapper
putIfAbsent(Object key
, Object value)
;
/**
* 如果缓存中存在key的映射存在则将其清除
*
@param
key
*/
void
evict(Object key)
;
/**
* 清空缓存
*/
void
clear()
;
/**
* 包装cache value的接口
*/
interface ValueWrapper {
/**
* 返回缓存中的真实value值
*/
Object
get()
;
}
/**
*用来包装 {@link #get(Object, Callable)}方法抛出的Exception异常
*
@since
4.3
*/
@SuppressWarnings(
"serial")
class ValueRetrievalException
extends RuntimeException {
private final Object
key
;
public
ValueRetrievalException(Object key
, Callable loader
, Throwable ex) {
super(String.
format(
"Value for key '%s' could not be loaded using '%s'"
, key
, loader)
, ex)
;
this.
key = key
;
}
public Object
getKey() {
return this.
key
;
}
}
}
CacheManager源码:
package org.springframework.cache
;
import java.util.Collection
;
/**
* Spring的核心缓存管理SPI(Service Provider Interface 服务提供接口).
*允许检索指定名称缓存区域
*
@author
Costin Leau
*
@since
3.1
*/
public interface CacheManager {
/**
* 返回指定名称的缓存
*
@param
name
缓存名称,不能为null
*
@return 没有找到返回null
*/
Cache
getCache(String name)
;
/**
* 返回管理器知道的缓存的名称的集合
*
@return
*/
Collection
getCacheNames()
;
}
在回过头来看切换到第三方缓存的问题,只要第三方缓存实现CacheManager接口就行了。好,现在我们就来引入redis
1.首先引入redis访问依赖,在pom.xml加入
2.application.properties中加入redis访问配置
# Redis数据库索引(默认为0)
spring.redis.database
=
0
# Redis服务器地址
spring.redis.host
=127.0.0.1
# Redis服务器连接端口
spring.redis.port
=
6379
# Redis服务器连接密码(默认为空)
spring.redis.password
=
******
# 连接池最大连接数(使用负值表示没有限制)
spring.redis.jedis.pool.max-idle
=
8
# 连接池最大阻塞等待时间(使用负值表示没有限制)
spring.redis.jedis.pool.max-wait
=
-1
# 连接池中的最小空闲连接
spring.redis.jedis.pool.min-idle
=
0
# 连接超时时间(毫秒)
spring.redis.timeout
=
0
3.加入redisConfig
package com.snow.cache.spring.config.redis
;
import
com.fasterxml.jackson.annotation.JsonAutoDetect
;
import com.fasterxml.jackson.annotation.PropertyAccessor
;
import com.fasterxml.jackson.databind.ObjectMapper
;
import org.springframework.cache.CacheManager
;
import org.springframework.cache.annotation.CachingConfigurerSupport
;
import
org.springframework.cache.annotation.EnableCaching
;
import org.springframework.cache.interceptor.KeyGenerator
;
import
org.springframework.context.annotation.Bean
;
import
org.springframework.context.annotation.Configuration
;
import org.springframework.data.redis.cache.RedisCacheManager
;
import org.springframework.data.redis.connection.RedisConnectionFactory
;
import org.springframework.data.redis.core.RedisTemplate
;
import org.springframework.data.redis.core.StringRedisTemplate
;
import org.springframework.data.redis.serializer.Jackson2JsonRedisSerializer
;
import java.lang.reflect.Method
;
/**
*
@author
snowwolf-louis
*
@date
18/4/2
*/
@Configuration
@EnableCaching
public class RedisConfig
extends CachingConfigurerSupport {
@SuppressWarnings(
"rawtypes")
@Bean
public CacheManager
cacheManager(RedisTemplate redisTemplate) {
RedisCacheManager rcm =
new RedisCacheManager(redisTemplate)
;
//设置缓存过期时间100s
//rcm.setDefaultExpiration(100L);
return rcm
;
}
@Bean
public RedisTemplate, String>
redisTemplate(RedisConnectionFactory factory) {
StringRedisTemplate template =
new StringRedisTemplate(factory)
;
Jackson2JsonRedisSerializer jackson2JsonRedisSerializer =
new Jackson2JsonRedisSerializer(Object.
class)
;
ObjectMapper om =
new ObjectMapper()
;
om.setVisibility(PropertyAccessor.
ALL
, JsonAutoDetect.Visibility.
ANY)
;
om.enableDefaultTyping(ObjectMapper.DefaultTyping.
NON_FINAL)
;
jackson2JsonRedisSerializer.setObjectMapper(om)
;
template.setValueSerializer(jackson2JsonRedisSerializer)
;
template.afterPropertiesSet()
;
return template
;
}
}
4.编写一个测试类RedisCacheTests
package com.snow.cache.spring
;
import com.snow.cache.Product
;
import com.snow.cache.spring.config.ConcurrentMapCacheConfig
;
import com.snow.cache.spring.config.redis.RedisConfig
;
import com.snow.cache.spring.service.ProductService
;
import com.snow.cache.spring.service.ProductServiceImpl
;
import
org.junit.Test
;
import
org.junit.runner.RunWith
;
import
org.springframework.beans.factory.annotation.Autowired
;
import
org.springframework.boot.test.context.SpringBootTest
;
import org.springframework.test.context.junit4.SpringRunner
;
@RunWith(SpringRunner.
class)
@SpringBootTest(
classes = {RedisConfig.
class,
Product.
class, ProductServiceImpl.
class})
public class redisCacheTests {
@Autowired
private ProductService
productService
;
@Test
public void
getProductByIdTest(){
long start1 = System.
currentTimeMillis()
;
System.
out.println(
"第一次查询商品...")
;
Product product1 =
productService.getProductById(
1L)
;
long end1 = System.
currentTimeMillis()
;
System.
out.println(
"第一次查询所需时间:" + (end1 - start1) +
"ms")
;
System.
out.println(
"第一次查询的商品信息为:" + product1)
;
long start2 = System.
currentTimeMillis()
;
System.
out.println(
"第二次查询商品...")
;
Product product2 =
productService.getProductById(
1L)
;
long end2 = System.
currentTimeMillis()
;
System.
out.println(
"第二次查询所需时间:" + (end2 - start2) +
"ms")
;
System.
out.println(
"第二次查询的商品信息为:" + product2)
;
}
}
执行结果如下
第一次查询商品...
从数据库中查询商品信息
第一次查询所需时间:69ms
第一次查询的商品信息为:Product{id=1, name='iphone 11', desc='iphone 11,smartisan R1'}
第二次查询商品...
第二次查询所需时间:1ms
第二次查询的商品信息为:Product{id=1, name='iphone 11', desc='iphone 11,smartisan R1'}
至此我们传统缓存的使用方法面临的三个问题已经完美解决了。爱思考的同学这时候肯定会问为
为什么在需要缓存结果的方法加上@Cacheable注解就可以完成对结果的缓存了?
下面我们就来看看Spring Cache的基本原理:
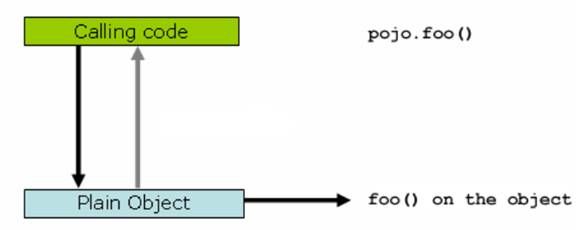
和 spring 的事务管理类似,spring cache 的关键原理就是 spring AOP,通过 spring AOP,其实现了在方法调用前、调用后获取方法的入参和返回值,进而实现了缓存的逻辑。我们来看一下下面这个图:
图 2. 原始方法调用图
上图显示,当客户端“Calling code”调用一个普通类 Plain Object 的 foo() 方法的时候,是直接作用在 pojo 类自身对象上的,客户端拥有的是被调用者的直接的引用。
而 Spring cache 利用了 Spring AOP 的动态代理技术,即当客户端尝试调用 pojo 的 foo()方法的时候,给他的不是 pojo 自身的引用,而是一个动态生成的代理类
图 3. 动态代理调用图
如上图所示,这个时候,实际客户端拥有的是一个代理的引用,那么在调用 foo() 方法的时候,会首先调用 proxy 的 foo() 方法,这个时候 proxy 可以整体控制实际的 pojo.foo() 方法的入参和返回值,比如缓存结果,比如直接略过执行实际的 foo() 方法等,都是可以轻松做到的。
下面我们再来看看源码到底事怎么实现的
1.首先看我们的配置类ConcurrentMapCacheConfig上有一个注解@EnableCaching,先来看看这个注解的源码
package org.springframework.cache.annotation
;
import
java.lang.annotation.Documented
;
import java.lang.annotation.ElementType
;
import
java.lang.annotation.Retention
;
import java.lang.annotation.RetentionPolicy
;
import
java.lang.annotation.Target
;
import org.springframework.context.annotation.
AdviceMode
;
import
org.springframework.context.annotation.Import
;
import org.springframework.core.Ordered
;
/**
* 该注解的作用是开启Spring 的注解驱动的缓存管理能力,类似于在
XML中配置*>
* 示例代码如下:
*
*
*
@
Configuration
*
@
EnableCaching
* public class AppConfig {
*
*
@
Bean
* public MyService myService() {
* // configure and return a class having
@
Cacheable methods
* return new MyService();
* }
*
*
@
Bean
* public CacheManager cacheManager() {
* // configure and return an implementation of Spring's CacheManager SPI
* SimpleCacheManager cacheManager = new SimpleCacheManager();
* cacheManager.setCaches(Arrays.asList(new ConcurrentMapCache("default")));
* return cacheManager;
* }
* }
*
*
For reference, the example above can be compared to the following Spring XML
* configuration:
*
*
* {
@code
*
*
*
*
*
*
*
*
*
*
*
*
*
*
*
*
*
* }
*
* In both of the scenarios above, {
@code
@EnableCaching} and {
@code
*
* components that power annotation-driven cache management, such as the
* {
@link
org.springframework.cache.interceptor.CacheInterceptor CacheInterceptor} and the
* proxy- or AspectJ-based advice that weaves the interceptor into the call stack when
* {
@link
org.springframework.cache.annotation.Cacheable
@Cacheable} methods are invoked.
*
*
If the JSR-107 API and Spring's JCache implementation are present, the necessary
* components to manage standard cache annotations are also registered. This creates the
* proxy- or AspectJ-based advice that weaves the interceptor into the call stack when
* methods annotated with {
@code
CacheResult}, {
@code
CachePut}, {
@code
CacheRemove} or
* {
@code
CacheRemoveAll} are invoked.
*
*
A bean of type { @link org.springframework.cache.CacheManager CacheManager}
* must be registered
, as there is no reasonable default that the framework can
* use as a convention. And whereas the {
@code
* a bean
named
"cacheManager", {
@code
@EnableCaching} searches for a cache
* manager bean
by type
. Therefore, naming of the cache manager bean method is
* not significant.
*
* @EnableCaching是根据类型来确定使用哪个cache manager 的,
*如果希望指定使用某个cache manager 让@EnableCaching所在的配置文件实现CachingConfigurer接口就行,代码如下
*
*
@
Configuration
*
@
EnableCaching
* public class AppConfig extends CachingConfigurerSupport {
*
*
@
Bean
* public MyService myService() {
* // configure and return a class having
@
Cacheable methods
* return new MyService();
* }
*
*
@
Bean
*
@
Override
* public CacheManager cacheManager() {
* // configure and return an implementation of Spring's CacheManager SPI
* SimpleCacheManager cacheManager = new SimpleCacheManager();
* cacheManager.setCaches(Arrays.asList(new ConcurrentMapCache("default")));
* return cacheManager;
* }
*
*
@
Bean
*
@
Override
* public KeyGenerator keyGenerator() {
* // configure and return an implementation of Spring's KeyGenerator SPI
* return new MyKeyGenerator();
* }
* }
*
* This approach may be desirable simply because it is more explicit, or it may be
* necessary in order to distinguish between two {
@code
CacheManager} beans present in the
* same container.
*
*
Notice also the {
@code
keyGenerator} method in the example above. This allows for
* customizing the strategy for cache key generation, per Spring's {
@link
* org.springframework.cache.interceptor.KeyGenerator KeyGenerator} SPI. Normally,
* {
@code
@EnableCaching} will configure Spring's
* {
@link
org.springframework.cache.interceptor.SimpleKeyGenerator SimpleKeyGenerator}
* for this purpose, but when implementing {
@code
CachingConfigurer}, a key generator
* must be provided explicitly. Return {
@code
null} or {
@code
new SimpleKeyGenerator()}
* from this method if no customization is necessary.
*
*
{
@link
CachingConfigurer} offers additional customization options: it is recommended
* to extend from {
@link
org.springframework.cache.annotation.CachingConfigurerSupport
* CachingConfigurerSupport} that provides a default implementation for all methods which
* can be useful if you do not need to customize everything. See {
@link
CachingConfigurer}
* Javadoc for further details.
*
*
The {
@link
#mode} attribute controls how advice is applied: If the mode is
* {
@link
AdviceMode
#PROXY} (the default), then the other attributes control the behavior
* of the proxying. Please note that proxy mode allows for interception of calls through
* the proxy only; local calls within the same class cannot get intercepted that way.
*
*
Note that if the {
@linkplain
#mode} is set to {
@link
AdviceMode
#ASPECTJ}, then the
* value of the {
@link
#proxyTargetClass} attribute will be ignored. Note also that in
* this case the {
@code
spring-aspects} module JAR must be present on the classpath, with
* compile-time weaving or load-time weaving applying the aspect to the affected classes.
* There is no proxy involved in such a scenario; local calls will be intercepted as well.
*
*
@author
Chris Beams
*
@author
Juergen Hoeller
*
@since
3.1
*
@see
CachingConfigurer
*
@see
CachingConfigurationSelector
*
@see
ProxyCachingConfiguration
*
@see
org.springframework.cache.aspectj.AspectJCachingConfiguration
*/
@Target(ElementType.
TYPE)
@Retention(RetentionPolicy.
RUNTIME)
@Documented
@Import(CachingConfigurationSelector.
class)
public @
interface
EnableCaching {
/**
*
确定是实用CGLIB的动态代理还是jdk的动态代理,默认为jdk的动态代理;只有在mode设为
AdviceMode
.
PROXY时
有效
* 注意:设置为true会影响spring的所有动态代理实现而不仅仅是@Cacheable注解作用的对象。
*/
boolean
proxyTargetClass()
default false;
/**
* 确定何种类型的增强被使用
*
AdviceMode
#PROXY} 或者 AdviceMode#ASPECTJ
* AdviceMode#PROXY}类型的增强,本地方法的调用缓存是不会生效的,必须是代理类中调用才生效
*/
AdviceMode
mode()
default
AdviceMode.
PROXY
;
/**
*当有多个advice作用在同一个连接点时,确定caching advisor 的顺序
*/
int
order()
default Ordered.
LOWEST_PRECEDENCE
;
}
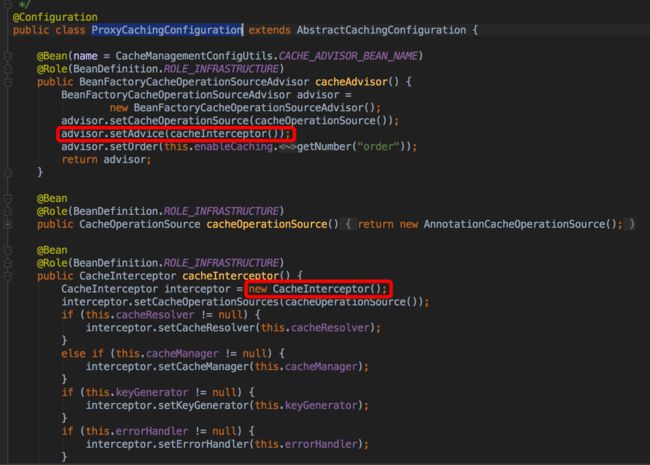
@EnableCaching开启spring的注解驱动的缓存能力,当mode设置为
AdviceMode
#PROXY}
时,CachingConfigurationSelector
会选择使用
ProxyCachingConfiguration
的配置,其会将CacheInterceptor编入cache 的 advisor。
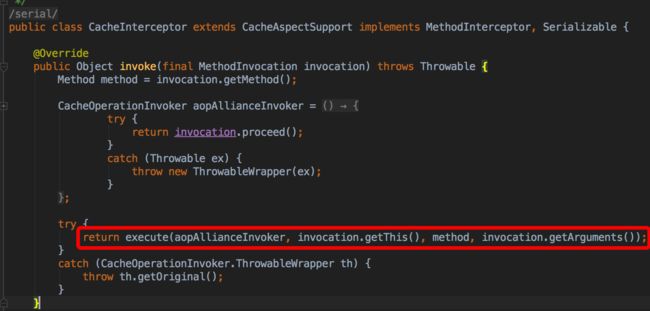
当我们的测试代码
productService.getProductById(
1L)执行时会调用编入的CacheInterceptor的invoke()方法
最终执行的是其父类CacheAspectSupport中的execute()方法
private Object
execute(
final CacheOperationInvoker invoker
, Method method
, CacheOperationContexts contexts) {
// Special handling of synchronized invocation
if (contexts.isSynchronized()) {
CacheOperationContext context = contexts.get(CacheableOperation.
class).iterator().next()
;
if (isConditionPassing(context
, CacheOperationExpressionEvaluator.
NO_RESULT)) {
Object key = generateKey(context
, CacheOperationExpressionEvaluator.
NO_RESULT)
;
Cache cache = context.getCaches().iterator().next()
;
try {
return wrapCacheValue(method
, cache.get(key
, new Callable
@Override
public Object
call()
throws Exception {
return unwrapReturnValue(invokeOperation(
invoker))
;
}
}))
;
}
catch (Cache.ValueRetrievalException ex) {
// The invoker wraps any Throwable in a ThrowableWrapper instance so we
// can just make sure that one bubbles up the stack.
throw (CacheOperationInvoker.ThrowableWrapper) ex.getCause()
;
}
}
else {
// No caching required, only call the underlying method
return invokeOperation(invoker)
;
}
}
// Process any early evictions
processCacheEvicts(contexts.get(CacheEvictOperation.
class)
, true,
CacheOperationExpressionEvaluator.
NO_RESULT)
;
// 查询缓存有没有满足条件的结果
Cache.ValueWrapper cacheHit = findCachedItem(contexts.get(CacheableOperation.class));
// Collect puts from any @Cacheable miss, if no cached item is found
List cachePutRequests =
new LinkedList()
;
if (cacheHit ==
null) {
collectPutRequests(contexts.get(CacheableOperation.
class)
,
CacheOperationExpressionEvaluator.
NO_RESULT
, cachePutRequests)
;
}
Object cacheValue
;
Object returnValue
;
//缓存命中
if (cacheHit !=
null && cachePutRequests.isEmpty() && !hasCachePut(contexts)) {
// If there are no put requests, just use the cache hit
cacheValue = cacheHit.get()
;
returnValue = wrapCacheValue(method
, cacheValue)
;
}
else {
//缓存没有命中调用原始方法获取结果
// Invoke the method if we don't have a cache hit
returnValue = invokeOperation(invoker)
;
cacheValue = unwrapReturnValue(returnValue)
;
}
// Collect any explicit @CachePuts
collectPutRequests(contexts.get(CachePutOperation.
class)
, cacheValue
, cachePutRequests)
;
//有@CachePut注解时 或者有 @Cacheable 注解且命中失败时,得到的结果存入缓存
for (CachePutRequest cachePutRequest : cachePutRequests) {
cachePutRequest.apply(cacheValue)
;
}
// Process any late evictions
processCacheEvicts(contexts.get(CacheEvictOperation.
class)
, false, cacheValue)
;
return returnValue
;
}
好到这里,Spring Cache的原理大致讲完了。下面来讲两个注意点和一个小技巧
注意点1.如果将@EnableCaching中mode设为AdviceMode.
PROXY即默认,也即采用基于Proxy的Spring AOP回带来内部调用增强失效的问题。即在被增强的内中通过this调用被@Cacheable @CacheEvict @CachePut标记的方法缓存失效。解决方法当然是采用Apectj的AOP机制。
注意点2.
和内部调用问题类似,非 public 方法如果想实现基于注释的缓存,必须采用基于 AspectJ 的 AOP 机制,这里限于篇幅不再细述。
小技巧.本地调试的时常常遇到缓存环境没布置好如项目中使用redis作为缓存,本地却没有redis环境,我们又急着调试代码,这时又不太建议注掉缓存的代码,怎么办?其实对于这个问题,Spring Cache已经为我们想好了,其给我们提供了一个
CompositeCacheManager ,这是一个组合的cacheManager 它允许我们配置一个CacheManger集合,集合中的最后一个元素可以配置成
NoOpCacheManager (没有任何操作的缓存管理器),当其他缓存管理器都不起作用时,会使用这个作为缓存实现。
partIII.@Cacheable @CacheEvict @CachePut的使用
1).@Cacheable、@CachePut、@CacheEvict 注释介绍
通过上面的源码,我们可以看到 spring cache 主要使用两个注释标签,即 @Cacheable、@CachePut 和 @CacheEvict,我们总结一下其作用和配置方法。
表 1. @Cacheable 作用和配置方法
| @Cacheable 的作用 | 主要针对方法配置,能够根据方法的请求参数对其结果进行缓存 | |
| @Cacheable 主要的参数 | ||
| value | 缓存的名称,在 spring 配置文件中定义,必须指定至少一个 |
例如:
@Cacheable(value=”mycache”) 或者
@Cacheable(value={”cache1”,”cache2”}
|
| key | 缓存的 key,可以为空,如果指定要按照 SpEL 表达式编写,如果不指定,则缺省按照方法的所有参数进行组合 |
例如:
@Cacheable(value=”testcache”,key=”#userName”)
|
| condition | 缓存的条件,可以为空,使用 SpEL 编写,返回 true 或者 false,只有为 true 才进行缓存 |
例如:
@Cacheable(value=”testcache”,condition=”#userName.length()>2”)
|
表 2. @CachePut 作用和配置方法
| @CachePut 的作用 | 主要针对方法配置,能够根据方法的请求参数对其结果进行缓存,和 @Cacheable 不同的是,它每次都会触发真实方法的调用 | |
| @CachePut 主要的参数 | ||
| value | 缓存的名称,在 spring 配置文件中定义,必须指定至少一个 |
例如:
@Cacheable(value=”mycache”) 或者
@Cacheable(value={”cache1”,”cache2”}
|
| key | 缓存的 key,可以为空,如果指定要按照 SpEL 表达式编写,如果不指定,则缺省按照方法的所有参数进行组合 |
例如:
@Cacheable(value=”testcache”,key=”#userName”)
|
| condition | 缓存的条件,可以为空,使用 SpEL 编写,返回 true 或者 false,只有为 true 才进行缓存 |
例如:
@Cacheable(value=”testcache”,condition=”#userName.length()>2”)
|
表 3. @CacheEvict 作用和配置方法
| @CachEvict 的作用 | 主要针对方法配置,能够根据一定的条件对缓存进行清空 | |
| @CacheEvict 主要的参数 | ||
| value | 缓存的名称,在 spring 配置文件中定义,必须指定至少一个 |
例如:
@CachEvict(value=”mycache”) 或者
@CachEvict(value={”cache1”,”cache2”}
|
| key | 缓存的 key,可以为空,如果指定要按照 SpEL 表达式编写,如果不指定,则缺省按照方法的所有参数进行组合 |
例如:
@CachEvict(value=”testcache”,key=”#userName”)
|
| condition | 缓存的条件,可以为空,使用 SpEL 编写,返回 true 或者 false,只有为 true 才清空缓存 |
例如:
@CachEvict(value=”testcache”,
condition=”#userName.length()>2”)
|
| allEntries | 是否清空所有缓存内容,缺省为 false,如果指定为 true,则方法调用后将立即清空所有缓存 |
例如:
@CachEvict(value=”testcache”,allEntries=true)
|
| beforeInvocation | 是否在方法执行前就清空,缺省为 false,如果指定为 true,则在方法还没有执行的时候就清空缓存,缺省情况下,如果方法执行抛出异常,则不会清空缓存 |
例如:
@CachEvict(value=”testcache”,beforeInvocation=true)
|
2)本文配套代码中有个对图书增删改查的使用缓存的例子,大家可以自行下载查看
本文代码示例: https://gitee.com/goodIsNotEnough/snow-cache
我可以接受失败,但不可以接受放弃!


