SpringBoot整合Netty搭建高性能Websocket服务器(实现聊天功能)
之前使用Springboot整合了websocket,实现了一个后端向前端推送信息的基本小案例,这篇文章主要是增加了一个新的框架就是Netty,实现一个高性能的websocket服务器,并结合前端代码,实现一个基本的聊天功能。你可以根据自己的业务需求进行更改。
这里假设你已经了解了Netty和websocket的相关知识,仅仅是想通过Springboot来整合他们。根据之前大家的需求,代码已经上传到了github上。在文末给出。
废话不多说,直接看步骤代码。
一、环境搭建
| 名称 | 版本 |
|---|---|
| Idea | 2018专业版(已破解) |
| Maven | 4.0.0 |
| SpringBoot | 2.2.2 |
| websocket | 2.1.3 |
| netty | 4.1.36 |
| jdk | 1.8 |
其实对于jar包版本的选择,不一定按照我的来,只需要接近即可,最好的办法就是直接去maven网站上去查看,哪一个版本的使用率最高,说明可靠性等等就是最好的。Idea我已经破解,需要的私聊我。
二、整合开发
建立一个项目,名字叫做SpringbootNettyWebSocket
1、添加依赖
<dependency>
     <groupId>org.springframework.bootgroupId>
     <artifactId>spring-boot-starter-webartifactId>
dependency>
<dependency>
     <groupId>org.springframework.bootgroupId>
     <artifactId>spring-boot-starter-testartifactId>
     <scope>testscope>
dependency>
<dependency>
     <groupId>io.nettygroupId>
     <artifactId>netty-allartifactId>
     <version>4.1.36.Finalversion>
dependency>
2、在application.properties文件修改端口号
一句话:server.port=8081
3、新建service包,创建NettyServer类
@Component
public class NettyServer {
    @Value("${server.port}")
    private int port;
    @PostConstruct
    public void start() throws Exception {
        EventLoopGroup bossGroup = new NioEventLoopGroup();
        EventLoopGroup group = new NioEventLoopGroup();
        try {
            ServerBootstrap sb = new ServerBootstrap();
            sb.option(ChannelOption.SO_BACKLOG, 1024);
            sb.group(group, bossGroup)
               .channel(NioServerSocketChannel.class)
               .localAddress(this.port)
               .childHandler(new ChannelInitializer<SocketChannel>() {
                  @Override
                  protected void initChannel(SocketChannel ch) throws Exception {
                     System.out.println("收到新连接:"+ch.localAddress());
                     ch.pipeline().addLast(new HttpServerCodec());
                     ch.pipeline().addLast(new ChunkedWriteHandler());
                     ch.pipeline().addLast(new HttpObjectAggregator(8192));
                     ch.pipeline().addLast(new WebSocketServerProtocolHandler("/ws", "WebSocket", true, 65536 * 10));
                     ch.pipeline().addLast(new MyWebSocketHandler());
                   }
                });
            ChannelFuture cf = sb.bind(port).sync(); // 服务器异步创建绑
            cf.channel().closeFuture().sync(); // 关闭服务器通道
        } finally {
            group.shutdownGracefully().sync(); // 释放线程池资源
            bossGroup.shutdownGracefully().sync();
        }
    }
}
这个类的代码是模板代码,最核心的就是ch.pipeline().addLast(new MyWebSocketHandler()),其他的如果你熟悉netty的话,可以根据自己的需求配置即可,如果不熟悉直接拿过来用。
4、在service包下创建MyWebSocketHandler核心处理类
public class MyWebSocketHandler extends
    			SimpleChannelInboundHandler<TextWebSocketFrame> {
    public static ChannelGroup channelGroup;
    static {
        channelGroup = new DefaultChannelGroup(GlobalEventExecutor.INSTANCE);
    }
    //客户端与服务器建立连接的时候触发,
    @Override
    public void channelActive(ChannelHandlerContext ctx) throws Exception {
        System.out.println("与客户端建立连接,通道开启!");
        //添加到channelGroup通道组
        channelGroup.add(ctx.channel());
    }
    //客户端与服务器关闭连接的时候触发,
    @Override
    public void channelInactive(ChannelHandlerContext ctx) throws Exception {
        System.out.println("与客户端断开连接,通道关闭!");
        channelGroup.remove(ctx.channel());
    }
    //服务器接受客户端的数据信息,
    @Override
    protected void channelRead0(ChannelHandlerContext ctx, TextWebSocketFrame msg){
        System.out.println("服务器收到的数据:" + msg.text());
        //sendMessage(ctx);
        sendAllMessage();
    }
    //给固定的人发消息
    private void sendMessage(ChannelHandlerContext ctx) {
        String message = "你好,"+ctx.channel().localAddress()+" 给固定的人发消息";
        ctx.channel().writeAndFlush(new TextWebSocketFrame(message));
    }
    //发送群消息,此时其他客户端也能收到群消息
    private void sendAllMessage(){
        String message = "我是服务器,这里发送的是群消息";
        channelGroup.writeAndFlush( new TextWebSocketFrame(message));
    }
}
在这个类里面我们首先建立了一个channelGroup,每当有客户端连接的时候,就添加到channelGroup里面,我们可以发送消息给固定的人,也可以群发消息。
注意:有人说这个功能没有实现后台主动推送的功能。其实代码写到这一步,你可以使用定时器来实现定时推送的功能,另外为了解决跨域的问题,你也可以使用nginx配置反向代理。我这里只是一个基本的功能,没有使用nginx。
5、客户端代码
 <html xmlns="http://www.w3.org/1999/xhtml">
 <head>
     <meta http-equiv="Content-Type" content="text/html; charset=utf-8" />
     <title>java的架构师技术栈title>
     <script type="text/javascript">
         var socket;
         if(!window.WebSocket){
             window.WebSocket = window.MozWebSocket;
         }
         if(window.WebSocket){
             socket = new WebSocket("ws://localhost:8081/ws");
             socket.onmessage = function(event){
                 var ta = document.getElementById('responseText');
                 ta.value += event.data+"\r\n";
             };
             socket.onopen = function(event){
                 var ta = document.getElementById('responseText');
                 ta.value = "已连接";
             };
             socket.onclose = function(event){
                 var ta = document.getElementById('responseText');
                 ta.value = "已关闭";
             };
         }else{
             alert("您的浏览器不支持WebSocket协议!");
         }
         function send(message){
             if(!window.WebSocket){return;}
             if(socket.readyState == WebSocket.OPEN){
                 socket.send(message);
             }else{
                 alert("WebSocket 连接没有建立成功!");
             }
         }
     script>
 head>
 <body>
 <form onSubmit="return false;">
    <hr color="black" />
    <h3>客户端发送的信息h3>
     <label>名字label><input type="text" name="uid" value="java的架构师技术栈" /> <br />
     <label>内容label><input type="text" name="message" value="hello 我是冯冬冬" /> <br />
     <br /> <input type="button" value="点击发送" onClick="send(this.form.uid.value+':'+this.form.message.value)" />
     <hr color="black" />
     <h3>服务端返回的应答消息h3>
     <textarea id="responseText" style="width: 900px;height: 300px;">textarea>
 form>
 body>
 html>
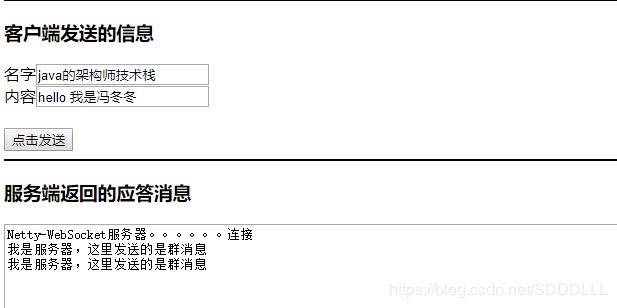
现在一切就绪,打开我们的服务器,然后再打开我们的网页客户端。看一下效果吧

同样的服务器也是同样的效果。这里就不粘贴演示了。OK,这就是一个最基本的功能,所有的测试均在我自己的电脑上实现,如有问题还请指正
