Spring学习(一)-- Spring介绍、IoC、使用注解
#Spring
一、Spring
Spring是一个轻量级的控制反转(IOC)和面向切面编程(AOP)的框架
非入侵
支持事务
学习SpringBoot完全掌握Spring和SpringMVC
- Spring Boot:快速开发的脚手架,基于它快速开发单个微服务,例如连接数据库 —“约定大于配置”
- Spring Cloud:基于Spring Boot实现
弊端:违背了原来的理念,配置十分繁琐,“配置地狱”
二、IOC理论推导
传统业务实现
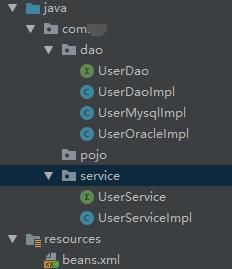
1、USerDao  接口
2、UserDaoimpl 接口实现
3、UserService 业务层
4、UserService 业务层实现
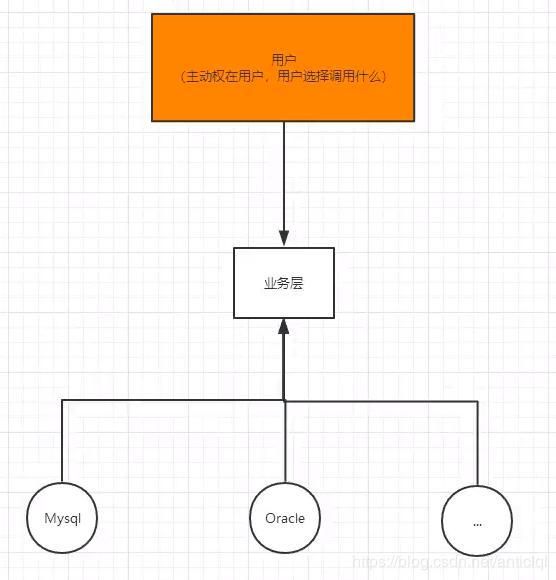
之前程序是主动创建对象
使用了set注入后,程序不再具有主动性,而是变成了被动的接受对象
从本质上解决问题,不用管理对象的创建,耦合性降低,更加专注的在业务的实现上,这是IOC的原型
三、IOC本质
控制反转(IOC)是一种设计思想,依赖注入(DI)是实现IoC的一种方法
IoC是Spring框架的核心内容, 使用多种方式实现了IoC
- XML配置
- 注解
控制反转是一种通过描述(xml或注解)并ton过第三方去生产或获取特定对象的方式。在Spring中实现控制反转的是IoC容器,其实现方法是依赖注入(DI)。
四、HelloSpring
dao层
UserDao
public interface UserDao {
	void getUser();
}
UserMysqlImpl
public class UserMysqlImpl implements UserDao {
    public void getUser() {
        System.out.println("Mysql请求用户数据");
    }
}
UserOracleImpl
public class UserOracleImpl implements UserDao {
    public void getUser() {
        System.out.println("Oracle请求用户数据");
    }
}
service层
UserService
public interface UserService {
    void getUser();
}
UserServiceImpl
public class UserServiceImpl implements UserService{

    private UserDao userDao;

    //利用set进行动态实现制的注入
    //之前程序是主动创建对象
    //使用了set注入后,程序不再具有主动性,而是变成了被动的接受对象

	//set函数是必须的否则无法注入userDao的值
    public void setUserDao(UserDao userDao){
        this.userDao = userDao;
    }

    public void getUser() {
        userDao.getUser();
    }
}
springr容器
beans.xml配置文件
<beans xmlns="http://www.springframework.org/schema/beans"
       xmlns:xsi="http://www.w3.org/2001/XMLSchema-instance"
       xsi:schemaLocation="http://www.springframework.org/schema/beans
        https://www.springframework.org/schema/beans/spring-beans.xsd">

    <bean id="mysqlImpl" class="com.lql.dao.UserMysqlImpl"/>
    <bean id="oracleImpl" class="com.lql.dao.UserOracleImpl"/>

    <bean id="serviceImpl" class="com.lql.service.UserServiceImpl">

        <property name="userDao" ref="oracleImpl"/>
    bean>

beans>
测试类(使用Junit测试,也可使用main函数测试)
@Test
public void getUserSpring(){
	//拿到Spring的容器
	ApplicationContext context = new ClassPathXmlApplicationContext("beans.xml");
	//需要什么就get什么
	UserServiceImpl serviceImpl = (UserServiceImpl)context.getBean("serviceImpl");
	serviceImpl.getUser();
}
五、IoC创建对象的方式
- 使用无参构造创建对象,默认
- 有参有三种方式(construtor-arg)
1、参数下标赋值–index value=""
2、通过参数的类型–java.lang.string value="" !!!不建议使用
3、直接通过参数名–property value=""
在对象注册的时候已经创建,并且只有一个实例
六、Spring配置
别名
<alias name="user" alias="userNew"/>
Bean的配置
<bean id="daoImpl" class="com.lql.dao.UserDaoImpl" name="dao2,d2">

bean>
import
一般用于团队开发,可以将多个配置文件导入合并为一个
七、依赖注入(DI)
- 构造器注入(前文)
- set方式注入(重点!!!)
依赖注入:set注入
依赖:bean对象的创建依赖容器
注入:bean对象的所有属性,由容器来注入 - 第三方注入(c、p命名空间注入)
依赖注入实例
Student.java实体类
public class Student {
    private String name;
    private Address address;
    private String[] book;
    private List<String> hobby;
    private Map<String,String> card;
    private Set<String> games;
    private Properties info;
    private String wife;

	//自行生成getter、setter、toString()
}
Address.java实体类
public class Address {
    private String name;
	//自行生成getter、setter、toString()
}
beans.xml配置文件
<beans xmlns="http://www.springframework.org/schema/beans"
       xmlns:xsi="http://www.w3.org/2001/XMLSchema-instance"
       xsi:schemaLocation="http://www.springframework.org/schema/beans
        https://www.springframework.org/schema/beans/spring-beans.xsd">

    <bean name="address" class="com.lql.pojo.Address">
        <property name="name" value="郑州"/>
    bean>

    <bean id="student" class="com.lql.pojo.Student">

        <property name="name" value="测试"/>


        <property name="address" ref="address"/>


        <property name="book">
            <array>
                <value>红楼梦value>
                <value>西游记value>
                <value>三国演义value>
                <value>水浒传value>
            array>
        property>


        <property name="hobby">
            <list>
                <value>听歌value>
                <value>看电影value>
                <value>画画value>
            list>
        property>


        <property name="card">
            <map>
                <entry key="身份证" value="123456789321321654"/>
                <entry key="校园卡" value="201677I1234"/>
                <entry key="银行卡" value="6666 6666 6666 6666 "/>
            map>
        property>


        <property name="games">
            <set>
                <value>LOLvalue>
                <value>COCvalue>
                <value>BOBvalue>
            set>
        property>


        <property name="wife">
            <null/>
        property>


        <property name="info">
            <props>
                <prop key="学号">123456prop>
                <prop key="性别">男prop>
            props>
        property>
    bean>
beans>
测试:
@Test
public void testDi(){
	ApplicationContext context = new ClassPathXmlApplicationContext("beans.xml");
	Student student =(Student) context.getBean("student");
	System.out.println(student);
}
输出结果:
/*
    * Student{
    * name='测试',
    * address=Address{
    *   name='郑州'
    * },
    * book=[红楼梦, 西游记, 三国演义, 水浒传],
    * hobby=[听歌, 看电影, 画画],
    * card={身份证=123456789321321654, 校园卡=201677I1234, 银行卡=6666 6666 6666 6666 },
    * games=[LOL, COC, BOB],
    * info={学号=123456, 性别=男},
    * wife='null'
    * }

     * */
c、p命名空间
<beans xmlns="http://www.springframework.org/schema/beans"
       xmlns:xsi="http://www.w3.org/2001/XMLSchema-instance"

    <bean id="user" class="com.lql.pojo.User" p:name="lql" p:age="18"/>


    <bean id="user2" class="com.lql.pojo.User" c:name="lql" c:age="18"/>

beans>
八、Bean作用域
singleton:容器中只存在一个bean对象
prototype:每次从容器中get的时候都会产生新对象
默认为单例
九、Bean的自动装配
自动装配是Spring是满足Bean依赖一种方式
Spring会在上下文中自动寻找,并自动给bean装配属性
在Spring中有三种装配方式
- 在xml中显示的配置
- 在java中显示配置
- 隐式的自动装配(重要)
Byname、Bytype
- byname:会自动在容器中上下文中查找,和自己对象set方法后面的值对应的 beanid,id跟属性名对应
- bytype:会自动在容器中上下文中查找,和自己对象属性类型相同的bean ,bean全局唯一才能使用
注解实现自动装配(重要)
使用注解须知
- 导入约束 context约束
- 配置注解的支持
<beans xmlns="http://www.springframework.org/schema/beans"
    xmlns:xsi="http://www.w3.org/2001/XMLSchema-instance"
    xmlns:context="http://www.springframework.org/schema/context"
    xsi:schemaLocation="http://www.springframework.org/schema/beans
        https://www.springframework.org/schema/beans/spring-beans.xsd
        http://www.springframework.org/schema/context
        https://www.springframework.org/schema/context/spring-context.xsd">

    <context:annotation-config/>
beans>
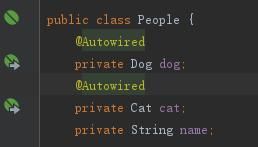
@Autowired
在类的属性上使用,也可以在set方法上使用(可以忽略set方法,前提是在这个自动装配的属性在IOC/Spring容器中存在,且符合名字byname)
@Qualifier
如果@Autowired自动装配的环境比较复杂,无法通过一个注解完成的时候,可以使用@Qualifier(value=“cat”)去配合使用,制定一个唯一的bean对象
@Resource
java.annotation的注解,可以进行两种,byname、bytype
@Autowired和@Resource的区别:
- 都是自动装配,都可以放在属性字段上
- 前者默认通过byType,找不到type则通过byName,而且必须要求这个对象存在;
- 后者默认通过byName,找不到name则通过byType,如果两个都找不到的情况下就报错
- 执行顺序不同:分别是byType、byName
十、使用注解开发
在Spring4之后使用注解开发,必须保证aop的包导入了
使用注解需要context约束,增加注解的支持
- bean
@Component
组件,放在类上,说明你这个类被Spring管理了,就是bean - 属性如何注入
@Value(“lql”)
值,给属性赋值 相当于property - 衍生的注解
@Component有几个衍生的注解,在web开发中,会按照mvc三层架构分层
dao:@Repository
controller:@Controller
service:@Service
这四个注解功能都是一样的,都表示将某个类注册到Spring中装配bean - 自动装配置
(上文) - 作用域
@Scope(“singleton”)、prototype 单例、原型 - 小结
xml与注解:- xml更加万能,适用于任何场合,维护方便
- 注解,不是自己的类使用不了,维护相对复杂
- 最佳实践:xml负责管理bean,注解负责属性的注入
- 在使用的过程中需要注意,要使注解实现需要扫描包和添加注解支持
<context:component-scan base-package="com.lql"/>

<context:annotation-config/>
十一、完全使用java的方式配置Spring
完全不使用xml配置,全权交给java来做
JavaConfig在Spring4之后,成为了一个核心功能
User.java实体类
//这个注解的意思是说明这个类被Spring接管了,注册到了容器中
@Component
public class User {
    private String name;

    public String getName() {
        return name;
    }

    @Value("lql")
    public void setName(String name) {
        this.name = name;
    }

    @Override
    public String toString() {
        return "User{" +
                "name='" + name + '\'' +
                '}';
    }
}
MyConfig.java 配置文件
//这个也会被Spring容器托管,注册到容器中,因为他本来就是一个@Component
//@Configuration代表这是一个配置类,就是和beans.xml是一样的
@Configuration
@ComponentScan("com.lql.pojo")
@Import(MyConfig2.class)        //将其他的配置引入
public class MyConfig {

    //注册一个bean,就相当于之前写的bean标签
    //这个方法的名字就相当于bean标签中的id
    //这个方法的返回值,就相当于bean标签中的class
    @Bean
    public User getUser(){
        return new User();      //就是返回要注入的bean对象
    }
}
MyConfig2.java配置文件
@Configuration
public class MyConfig2 {
}
使用Junit测试类
public class Mytest {
    @Test
    public void test(){
        //如果完全使用的配置类方式去做,我们就只能通过AnnotationConfig上下文来获取容器,通过配置类的class对象加载
        ApplicationContext context = new AnnotationConfigApplicationContext(MyConfig.class);
        User user = context.getBean("getUser", User.class);
        System.out.println(user);
    }
}
这种纯java的配置方式,在SpringBoot中随处可见!!!


![[外链图片转存失败,源站可能有防盗链机制,建议将图片保存下来直接上传(img-hRQX10k1-1574949236104)(spring_files/6.jpg)]](http://img.e-com-net.com/image/info8/b1e925449f244fd2b57da9b415e7fa02.jpg)