Spring学习(二)-- 代理模式、AOP、整合Mybatis、声明式事务
Spring2
1、代理模式
学习代理模式:是SpringAOP的底层(SpringAOP和SpringMVC)
代理模式的分类:
- 动态代理
- 静态代理
静态代理
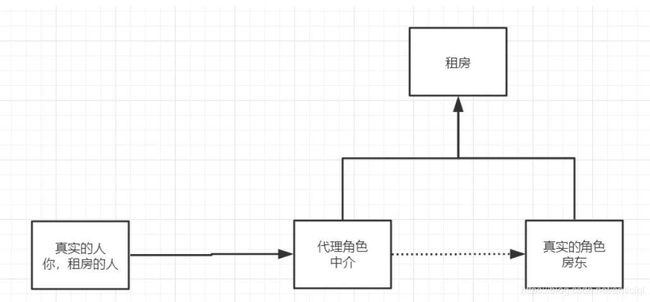
角色分析:
- 抽象角色:一般会使用接口和抽象类解决
- 真实角色:被代理的角色
- 代理角色:代理真实角色,代理真实角色后,我们会做一些附属操作
- 客户:访问代理对象的人
代理模式的好处:
- 可以使真实角色操作更加纯粹,不去关注公共的业务
- 公共也交给代理角色,实现了业务的分工
- 公共业务发生拓展的时候,方便集中管理
缺点:
- 一个真实角色对应一个代理角色,代码量翻倍,开发效率变低
例子:
- 接口
public interface UserService {
    void add();
    void delete();
    void update();
    void query();
}
- 真实角色
 public class UserServiceImpl implements UserService {
    public void add() {
        System.out.println("增加了一个用户");
    }

    public void delete() {
        System.out.println("删除了一个用户");
    }

    public void update() {
        System.out.println("更新了一个用户");
    }

    public void query() {
        System.out.println("查询了一个用户");
    }
}
- 代理角色
public class UserServiceProxy implements UserService{
    private UserServiceImpl userService;

    public void setUserService(UserServiceImpl userService) {
        this.userService = userService;
    }

    public void add() {
        log("add");
        userService.add();
    }

    public void delete() {
        log("delete");
        userService.delete();
    }

    public void update() {
        log("update");
        userService.update();
    }

    public void query() {
        log("query");
        userService.query();
    }

    private void log(String msg){
        System.out.println("[Debug] 使用了"+msg+"方法");
    }
}
- 客户端访问
public class Client {
	public static void main(String[] args) {
		UserServiceImpl userService = new UserServiceImpl();
		UserServiceProxy proxy = new UserServiceProxy();
		proxy.setUserService(userService);

		proxy.add();
	}
}
动态代理
- 动态代理和静态代理角色一样
- 动态代理的代理类是动态生成的,不是直接写好的
- 动态代理分为两大类
基于接口的动态代理–JDK动态代理【使用】
基于类的动态代理–cglib
java字节码javasist
需要了解两个类:
- Proxy:代理
- InvocationHandler:调用处理程序
动态代理的好处:
- 可以使真实角色操作更加纯粹,不去关注公共的业务
- 公共也交给代理角色,实现了业务的分工
- 公共业务发生拓展的时候,方便集中管理
- 一个动态代理类代理的是一个接口,一般对应的是一类业务
- 一个动态代理类可以代理多个类,只要是实现了同一个接口即可
动态代理实例
- ProxyInvocationHandler
//使用这个类自动生成代理类
public class ProxyInvocationHandler implements InvocationHandler {

    //被代理的接口
    private Object target;

    public void setRent(Object target) {
        this.target = target;
    }

    //生成得到代理类
    public Object getProxy(){
        return Proxy.newProxyInstance(
                this.getClass().getClassLoader(),       //参数1:要加载类在哪个位置
                target.getClass().getInterfaces(),        //参数2:要代理的接口是哪一个
                this);      //参数3:自身,本例中使用自己处理
    }

    //处理代理实例,并返回结果
    public Object invoke(Object proxy, Method method, Object[] args) throws Throwable {
        //动态代理的本质,就是使用反射机制实现
        log(method.getName());
        Object result = method.invoke(target,args);
        return result;
    }

    public void log(String msg){
        System.out.println("执行了"+msg+"方法");
    }
}
- Client(客户端访问)
public class Client {

    public static void main(String[] args) {
        //真实角色
        UserServiceImpl userService =  new UserServiceImpl();

        //代理角色此时不存在
        ProxyInvocationHandler pih = new ProxyInvocationHandler();
        //设置要代理的对象
        pih.setRent(userService);

        //动态生成代理类
        UserService proxy = (UserService) pih.getProxy();
        proxy.add();
    }

}
2、AOP【重点】
什么是AOP
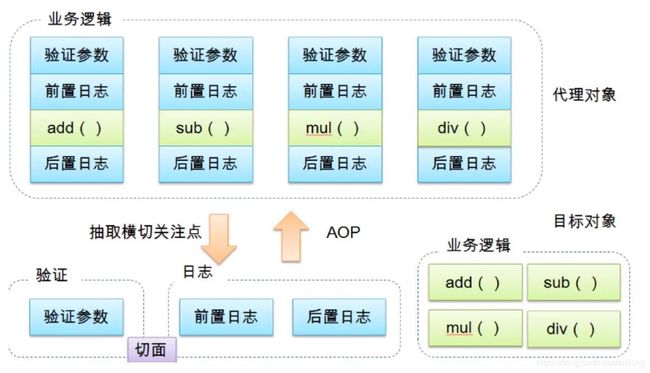
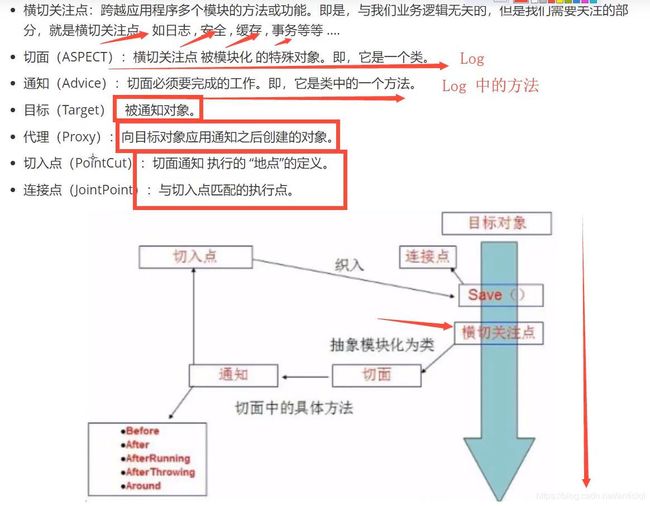
面向切面编程,通过预编译方式和运行期动态代理实现程序功能的统一维护的一种技术。
AOP在Spring中的作用
提供声明式事务,允许用户自定义切面
AOP实现
方式一:使用Spring的API接口【主要SpringAPI接口实现】
方式二:自定义类实现AOP【主要是切面定义】
方法三:使用注解实现
示例:
1. 定义的接口
public interface UserService {
    public void add();
    public void delete();
    public void update();
    public void select();
}
2. 实现类
public class UserServiceImpl implements UserService {
    public void add() {
        System.out.println("增加了一个用户");
    }

    public void delete() {
        System.out.println("删除了一个用户");
    }

    public void update() {
        System.out.println("更新了一个用户");
    }

    public void select() {
        System.out.println("查找了一个用户");
    }
}
方式1、2、3分别记为3.1、3.2、3.3
3. 三种方式
- 方式1:实现Spring的接口
1、定义实现Spring API接口的类
//此例实现的接口表示的意思是在方法执行前执行
public class Log implements MethodBeforeAdvice {

    /**
     *
     * @param method  要执行的目标对象的方法
     * @param objects 参数args
     * @param o 目标对象target
     * @throws Throwable
     */
    public void before(Method method, Object[] objects, Object o) throws Throwable {
        System.out.println(o.getClass().getName()+"的"+method.getName()+"方法执行了");
    }
}
2、在spring中注入并配置(applicationContext.xml,注意加aop约束)
<beans xmlns="http://www.springframework.org/schema/beans"
       xmlns:xsi="http://www.w3.org/2001/XMLSchema-instance"
       xmlns:aop="http://www.springframework.org/schema/aop"
       xsi:schemaLocation="http://www.springframework.org/schema/beans
        https://www.springframework.org/schema/beans/spring-beans.xsd
        http://www.springframework.org/schema/aop
        https://www.springframework.org/schema/aop/spring-aop.xsd">


    <bean id="userService" class="com.lql.service.UserServiceImpl"/>
    <bean id="log" class="com.lql.log.Log"/>


    <aop:config>

        <aop:pointcut id="pointcut" expression="execution(* com.lql.service.UserServiceImpl.*(..))"/>


        <aop:advisor advice-ref="log" pointcut-ref="pointcut" />
        <aop:advisor advice-ref="afterlog" pointcut-ref="pointcut" />
    aop:config>
beans>
- 方式2:自定义实现AOP
1、自定义实现aop类
public class DiyPointcut {
    public void before(){
        System.out.println("使用方法前");
    }

    public void after(){
        System.out.println("使用方法后");
    }
}
2、在spring中注入并配置(applicationContext.xml)
<beans xmlns="http://www.springframework.org/schema/beans"
       xmlns:xsi="http://www.w3.org/2001/XMLSchema-instance"
       xmlns:aop="http://www.springframework.org/schema/aop"
       xsi:schemaLocation="http://www.springframework.org/schema/beans
        https://www.springframework.org/schema/beans/spring-beans.xsd
        http://www.springframework.org/schema/aop
        https://www.springframework.org/schema/aop/spring-aop.xsd">


    <bean id="userService" class="com.lql.service.UserServiceImpl"/>


    <bean id="diy" class="com.lql.diy.DiyPointcut"/>

    <aop:config>


        <aop:aspect ref="diy">

            <aop:pointcut id="point" expression="execution(* com.lql.service.UserServiceImpl.*(..))"/>


            <aop:before method="before" pointcut-ref="point"/>
            <aop:after method="after" pointcut-ref="point"/>
        aop:aspect>
    aop:config>

beans>
- 方式3:使用注解实现
1、使用注解实现类
//使用注解方式实现AOP
//标注这个类是个切面
@Aspect
public class AnnotationPointcut {

    @Before("execution(* com.lql.service.UserServiceImpl.*(..))")
    public void before(){
        System.out.println("====使用方法前");
    }

    @After("execution(* com.lql.service.UserServiceImpl.*(..))")
    public void after(){
        System.out.println("使用方法后===");
    }

    //在环绕增强中,要给定一个参数,代表我们要获取处理切入的点
    @Around("execution(* com.lql.service.UserServiceImpl.*(..))")
    public void around(ProceedingJoinPoint jp) throws Throwable{
        System.out.println("环绕前");

        //获得签名
        Signature signature = jp.getSignature();
        System.out.println("signature:"+signature);
        //执行方法
        Object o = jp.proceed();
        System.out.println("环绕后");

        System.out.println(o);
    }
}
2、在spring中注入并配置
<beans xmlns="http://www.springframework.org/schema/beans"
       xmlns:xsi="http://www.w3.org/2001/XMLSchema-instance"
       xmlns:aop="http://www.springframework.org/schema/aop"
       xsi:schemaLocation="http://www.springframework.org/schema/beans
        https://www.springframework.org/schema/beans/spring-beans.xsd
        http://www.springframework.org/schema/aop
        https://www.springframework.org/schema/aop/spring-aop.xsd">


    <bean id="userService" class="com.lql.service.UserServiceImpl"/>


    <bean id="annotition" class="com.lql.diy.AnnotationPointcut"/>

    <aop:aspectj-autoproxy />

beans>
4. 测试
public class Mytest {
    @Test
    public void test(){
        ApplicationContext context = new ClassPathXmlApplicationContext("applicationContext.xml");
        //动态代理代理的是接口【注意点】
        UserService userService = context.getBean("userService",UserService.class);
        userService.add();
    }
}
3、整合Mybatis
步骤
- 导入jar包
junit
mybaits
mysql
spring
aop
mybatis-spring【new】 - 编写配置文件
- 测试
回顾Mybatis
- 编写实体类
- 编写配置文件
- 编写接口
- 编写Mapper.xml
- 测试
Mybatis-Spring
spring-dao.xml(可任意起名)
1. 编写数据源
    <bean id="dataSource" class="org.springframework.jdbc.datasource.DriverManagerDataSource">
        <property name="driverClassName" value="com.mysql.jdbc.Driver"/>
        <property name="url" value="jdbc:mysql://localhost:3306/mybatis?useSSL=true&useUnicode=true&characterEncoding=UTF-8"/>
        <property name="username" value="root"/>
        <property name="password" value="123456"/>
    bean>
2. sqlSessionFactory
    <bean id="sqlSessionFactory" class="org.mybatis.spring.SqlSessionFactoryBean">
        <property name="dataSource" ref="dataSource" />

        <property name="configLocation" value="classpath:mybatis-config.xml"/>
        <property name="mapperLocations" value="classpath:com/lql/dao/*.xml"/>
    bean>
mybatis-config.xml(也可直接在spring-dao.xml中配置)
<configuration>

    <typeAliases>
        <package name="com.lql.pojo"/>
    typeAliases>

configuration>
3. sqlSessionTemplate
<bean id="sqlSession" class="org.mybatis.spring.SqlSessionTemplate">

	<constructor-arg index="0" ref="sqlSessionFactory"/>
bean>
4. 给接口加实现类(两种方法)
set方法
public class UserMapperImpl implements UserMapper {

    //原来所有的操作都使用sqlSession来执行,现在使用SqlSessionTemplate
    private SqlSessionTemplate sqlSession;

    public void setSqlSession(SqlSessionTemplate sqlSession) {
        this.sqlSession = sqlSession;
    }

    public List<User> getUser() {
        UserMapper mapper = sqlSession.getMapper(UserMapper.class);
        return mapper.getUser();
    }
}
继承SqlSessionDaoSupport方法
public class UserMapperImpl2 extends SqlSessionDaoSupport implements UserMapper{

    public List<User> getUser() {
        SqlSession sqlSession = getSqlSession();
        UserMapper mapper = sqlSession.getMapper(UserMapper.class);
        return mapper.getUser();
    }
}
5. 将自己写的实现类注入到Spring中
<bean id="userMapper" class="com.lql.dao.UserMapperImpl">
	<property name="sqlSession" ref="sqlSession"/>
bean>

<bean id="userMapper2" class="com.lql.dao.UserMapperImpl2">
	<property name="sqlSessionFactory" ref="sqlSessionFactory"/>
bean>
6. 将所有的文件配置到同一个配置文件applicationContext.xml中
<beans xmlns="http://www.springframework.org/schema/beans"
   xmlns:xsi="http://www.w3.org/2001/XMLSchema-instance"
   xmlns:aop="http://www.springframework.org/schema/aop"
   xsi:schemaLocation="http://www.springframework.org/schema/beans
	https://www.springframework.org/schema/beans/spring-beans.xsd
	http://www.springframework.org/schema/aop
	https://www.springframework.org/schema/aop/spring-aop.xsd">

<import resource="spring-dao.xml"/>

<bean id="userMapper" class="com.lql.dao.UserMapperImpl">
	<property name="sqlSession" ref="sqlSession"/>
bean>

beans>
7. 测试
@Test
public void test2() throws Exception{
	ApplicationContext context = new ClassPathXmlApplicationContext("applicationContext.xml");
	UserMapper userMapper = context.getBean("userMapper2",UserMapper.class);
	List<User> users = userMapper.getUser();
	for (User user : users) {
		System.out.println(user);
	}
}
4、事务回顾
- 把一组业务当成一个业务来做,要么都成功,要么都失败
- 事务在项目开发中十分重要,涉及到数据一致性的问题
- 确保完整性和一致性
事务的ACID原则
- 原子性
- 一致性
- 隔离性:多个业务可能操作同一个资源,防止数据损坏
- 持久性:事务一旦提交,无论系统发生什么问题,结果都不会再受影响,被持久化的写入到存储器中
spring的事务管理
- 声明式事务:AOP
- 编程式事务:需要在代码中进行事务的管理
为什么需要事务?
- 如果不配置事务,可能存在数据提交不一致的情况
- 如果不在spring中去配置声明式事务,就需要在代码中配置事务
- 事务在项目的开发中十分重要,涉及到数据的一致性和完整性问题,不容马虎!
事务配置,使用aop方式
!!!添加事务支持:tx


<bean id="transactionManager" class="org.springframework.jdbc.datasource.DataSourceTransactionManager">
	<constructor-arg ref="dataSource"/>
bean>


<tx:advice id="txAdvice" transaction-manager="transactionManager">


	<tx:attributes>
		<tx:method name="add" propagation="REQUIRED"/>
		<tx:method name="delete" propagation="REQUIRED"/>
		<tx:method name="update" propagation="REQUIRED"/>
		<tx:method name="select" read-only="true" />
		<tx:method name="*" propagation="REQUIRED"/>
	tx:attributes>
tx:advice>


<aop:config>
	<aop:pointcut id="txpointcut" expression="execution(* com.lql.dao.*.*(..))"/>
	<aop:advisor advice-ref="txAdvice" pointcut-ref="txpointcut"/>
aop:config>
"true" />
		<tx:method name="*" propagation="REQUIRED"/>
	tx:attributes>
tx:advice>


<aop:config>
	<aop:pointcut id="txpointcut" expression="execution(* com.lql.dao.*.*(..))"/>
	<aop:advisor advice-ref="txAdvice" pointcut-ref="txpointcut"/>
aop:config>


