Java HashMap底层实现和原理分析(一)
文章目录
- HashMap的基本介绍
- HashMap 和 HashTable 区别
- HashMap源码分析
- HashMap()
- HashMap(int initialCapacity)
- HashMap(int initialCapacity, float loadFactor)
- tableSizeFor(initialCapacity)
- HashMap初始容量为什么是2的n次幂?
- HashMap扰动函数
- 参考
HashMap的基本介绍
HashMap基于哈希表的Map接口实现,是以key-value存储形式存在,即主要用来存放键值对。HashMap 的实现不是同步的,这意味着它不是线程安全的。它的key、value都可以为null。此外,HashMap中的映射不是有序的。
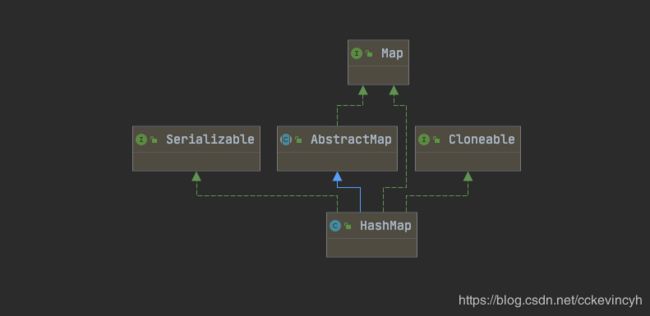
public class HashMap<K,V> extends AbstractMap<K,V>
    implements Map<K,V>, Cloneable, Serializable
    /**
     * Associates the specified value with the specified key in this map.
     * If the map previously contained a mapping for the key, the old
     * value is replaced.
     *
     * @param key key with which the specified value is to be associated
     * @param value value to be associated with the specified key
     * @return the previous value associated with key, or
     *         null if there was no mapping for key.
     *         (A null return can also indicate that the map
     *         previously associated null with key.)
     */
    public V put(K key, V value) {
        return putVal(hash(key), key, value, false, true);
    }
从方法上看HashMap的key和value都是可以为null的。
HashMap 和 HashTable 区别
- HashMap 不是线程安全的
- HashMap 是 map 接口的实现类,是将键映射到值的对象,其中键和值都是对象,并且不能包含重复键,但可以包含重复值。HashMap 允许 null key 和 null value,而 HashTable 不允许。
- HashMap的初始容量为16,填充因子默认是0.75。
- HashMap扩容时是当前容量翻倍即:capacity*2
- HashMap的hash方法在计算hash的时候对key的hashcode进行扰动函数计算,以获得更好的散列值,目的是为了减少hash冲突。
jdk1.8
/**
     * Computes key.hashCode() and spreads (XORs) higher bits of hash
     * to lower.  Because the table uses power-of-two masking, sets of
     * hashes that vary only in bits above the current mask will
     * always collide. (Among known examples are sets of Float keys
     * holding consecutive whole numbers in small tables.)  So we
     * apply a transform that spreads the impact of higher bits
     * downward. There is a tradeoff between speed, utility, and
     * quality of bit-spreading. Because many common sets of hashes
     * are already reasonably distributed (so don't benefit from
     * spreading), and because we use trees to handle large sets of
     * collisions in bins, we just XOR some shifted bits in the
     * cheapest possible way to reduce systematic lossage, as well as
     * to incorporate impact of the highest bits that would otherwise
     * never be used in index calculations because of table bounds.
     */
    static final int hash(Object key) {
        int h;
        return (key == null) ? 0 : (h = key.hashCode()) ^ (h >>> 16);
    }
jdk1.7
final int hash(Object k) {
        int h = hashSeed;
        if (0 != h && k instanceof String) {
            return sun.misc.Hashing.stringHash32((String) k);
        }

        h ^= k.hashCode();

        // This function ensures that hashCodes that differ only by
        // constant multiples at each bit position have a bounded
        // number of collisions (approximately 8 at default load factor).
        h ^= (h >>> 20) ^ (h >>> 12);
        return h ^ (h >>> 7) ^ (h >>> 4);
    }
然后对table数组长度取模。
jdk1.8
- HashTable 是线程安全的。
- HashMap 是 HashTable 的轻量级实现,HashTable实现了Map接口和Dictionary抽象类。他们都完成了Map 接口,主要区别在于 HashMap 允许 null key 和 null value,由于非线程安全,效率上可能高于 Hashtable。
public class Hashtable<K,V>
    extends Dictionary<K,V>
    implements Map<K,V>, Cloneable, java.io.Serializable
    /**
     * Maps the specified key to the specified
     * value in this hashtable. Neither the key nor the
     * value can be null.
     *
     * The value can be retrieved by calling the get method
     * with a key that is equal to the original key.
     *
     * @param      key     the hashtable key
     * @param      value   the value
     * @return     the previous value of the specified key in this hashtable,
     *             or null if it did not have one
     * @exception  NullPointerException  if the key or value is
     *               null
     * @see     Object#equals(Object)
     * @see     #get(Object)
     */
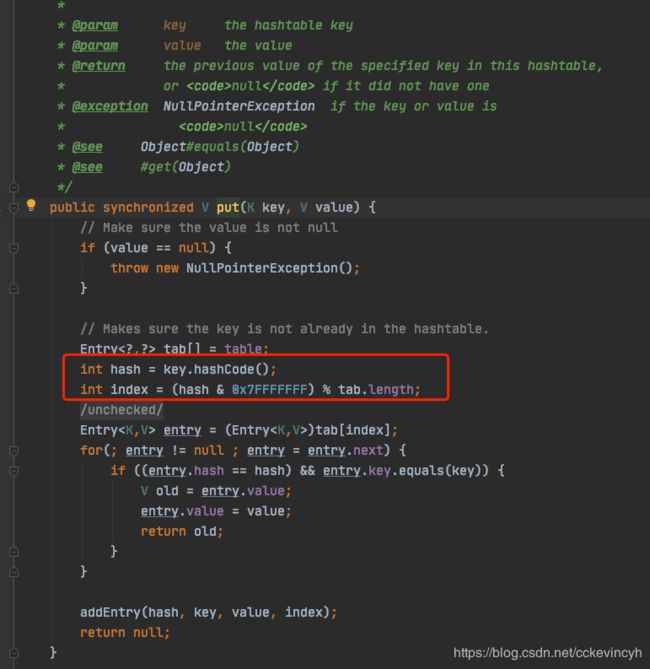
    public synchronized V put(K key, V value) {
        // Make sure the value is not null
        if (value == null) {
            throw new NullPointerException();
        }

        // Makes sure the key is not already in the hashtable.
        Entry<?,?> tab[] = table;
        int hash = key.hashCode();
        int index = (hash & 0x7FFFFFFF) % tab.length;
        @SuppressWarnings("unchecked")
        Entry<K,V> entry = (Entry<K,V>)tab[index];
        for(; entry != null ; entry = entry.next) {
            if ((entry.hash == hash) && entry.key.equals(key)) {
                V old = entry.value;
                entry.value = value;
                return old;
            }
        }

        addEntry(hash, key, value, index);
        return null;
    }
可以看到HashTable的key和value是不允许为null的,如果key和value为null的情况下会报NullPointerException,然后我们也可以看到HashTable的方法是加上了synchronized进行同步的,所以是线程安全的。
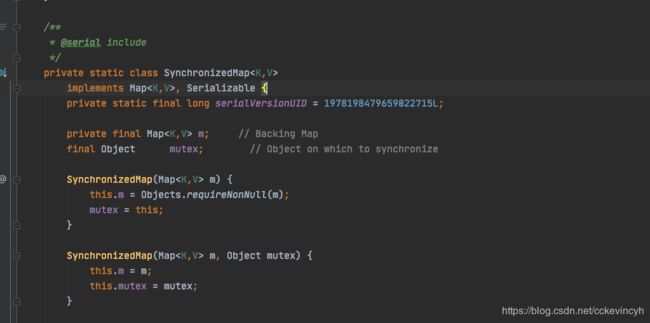
在多线程环境下若使用HashMap需要使用Collections.synchronizedMap()方法来获取一个线程安全的集合。
Collections.synchronizedMap()实现原理是Collections定义了一个SynchronizedMap的内部类,这个类实现了Map接口,在调用方法时使用synchronized来保证线程同步,当然了实际上操作的还是我们传入的HashMap实例,简单的说就是Collections.synchronizedMap()方法帮我们在操作HashMap时自动添加了synchronized来实现线程同步,类似的其它Collections.synchronizedXX方法也是类似原理。
- Hashtable初始容量为11,填充因子默认也是0.75。
    /**
     * Constructs a new, empty hashtable with a default initial capacity (11)
     * and load factor (0.75).
     */
    public Hashtable() {
        this(11, 0.75f);
    }
- Hashtable扩容时是容量翻倍+1即:capacity*2+1
/**
     * Increases the capacity of and internally reorganizes this
     * hashtable, in order to accommodate and access its entries more
     * efficiently.  This method is called automatically when the
     * number of keys in the hashtable exceeds this hashtable's capacity
     * and load factor.
     */
    @SuppressWarnings("unchecked")
    protected void rehash() {
        int oldCapacity = table.length;
        Entry<?,?>[] oldMap = table;

        // overflow-conscious code
        int newCapacity = (oldCapacity << 1) + 1;
        if (newCapacity - MAX_ARRAY_SIZE > 0) {
            if (oldCapacity == MAX_ARRAY_SIZE)
                // Keep running with MAX_ARRAY_SIZE buckets
                return;
            newCapacity = MAX_ARRAY_SIZE;
        }
        Entry<?,?>[] newMap = new Entry<?,?>[newCapacity];

        modCount++;
        threshold = (int)Math.min(newCapacity * loadFactor, MAX_ARRAY_SIZE + 1);
        table = newMap;

        for (int i = oldCapacity ; i-- > 0 ;) {
            for (Entry<K,V> old = (Entry<K,V>)oldMap[i] ; old != null ; ) {
                Entry<K,V> e = old;
                old = old.next;

                int index = (e.hash & 0x7FFFFFFF) % newCapacity;
                e.next = (Entry<K,V>)newMap[index];
                newMap[index] = e;
            }
        }
    }
- Hashtable计算hash是直接使用key的hashcode对table数组的长度直接进行取模
HashMap源码分析
下面代码没特殊说明的地方,都是使用jdk1.8的
HashMap()
无参构造函数
构造一个空的HashMap,初始容量为16,负载因子为0.75
 /**
     * Constructs an empty HashMap with the default initial capacity
     * (16) and the default load factor (0.75).
     */
    public HashMap() {
        this.loadFactor = DEFAULT_LOAD_FACTOR; // all other fields defaulted
    }
HashMap(int initialCapacity)
构造一个指定初始容量为initialCapacity,负载因子为0.75的空的HashMap
    /**
     * Constructs an empty HashMap with the specified initial
     * capacity and the default load factor (0.75).
     *
     * @param  initialCapacity the initial capacity.
     * @throws IllegalArgumentException if the initial capacity is negative.
     */
    public HashMap(int initialCapacity) {
        this(initialCapacity, DEFAULT_LOAD_FACTOR);
    }
HashMap(int initialCapacity, float loadFactor)
构造一个指定初始容量为initialCapacity,指定负载因子为loadFactor的空的HashMap
    /**
     * Constructs an empty HashMap with the specified initial
     * capacity and load factor.
     *
     * @param  initialCapacity the initial capacity
     * @param  loadFactor      the load factor
     * @throws IllegalArgumentException if the initial capacity is negative
     *         or the load factor is nonpositive
     */
    public HashMap(int initialCapacity, float loadFactor) {
        if (initialCapacity < 0)
            throw new IllegalArgumentException("Illegal initial capacity: " +
                                               initialCapacity);
        if (initialCapacity > MAXIMUM_CAPACITY)
            initialCapacity = MAXIMUM_CAPACITY;
        if (loadFactor <= 0 || Float.isNaN(loadFactor))
            throw new IllegalArgumentException("Illegal load factor: " +
                                               loadFactor);
        this.loadFactor = loadFactor;
        this.threshold = tableSizeFor(initialCapacity);
    }
当指定的初始容量initialCapacity小于0的时候,会报IllegalArgumentException。当指定的负载因子小于等于0或者是负载因子不是数字的时候会报IllegalArgumentException。当指定的初始容量initialCapacity大于MAXIMUM_CAPACITY的时候,指定initialCapacity等于MAXIMUM_CAPACITY。
设定threshold阈值,然后通过tableSizeFor(initialCapacity)方法来设置阈值。
tableSizeFor(initialCapacity)
接下来我们来看看这个tableSizeFor方法中做了什么?
    /**
     * Returns a power of two size for the given target capacity.
     */
    static final int tableSizeFor(int cap) {
        int n = cap - 1;
        n |= n >>> 1;
        n |= n >>> 2;
        n |= n >>> 4;
        n |= n >>> 8;
        n |= n >>> 16;
        return (n < 0) ? 1 : (n >= MAXIMUM_CAPACITY) ? MAXIMUM_CAPACITY : n + 1;
    }
简单从方法的注释上就可以看出来这个方法的作用是返回给定目标容量的2倍幂。也就是返回一个比指定容量大且最接近的2的幂次方整数。比如cap为10,则返回2的4次方,也就是16。
在来看这个方法的具体实现之前,我们先来巩固一下怎么所做与运算(&)还有或运算(|),以及异或运算(^)
-
与运算符(&)
运算规则:
0 & 0 = 0;0 & 1 = 0;1 & 0 = 0;1 & 1 = 1
即:两个同时为1,结果为1,否则为0
-
或运算(|)
运算规则:
0 | 0 = 0; 0 | 1 = 1; 1 | 0 = 1; 1 | 1 = 1;
即 :参加运算的两个对象,一个为1,其值为1。
-
异或运算符(^)
运算规则:
0 ^ 0 = 0; 0 ^ 1 = 1; 1 ^ 0 = 1;1 ^ 1 = 0;
即:参加运算的两个对象,如果两个位为“异”(值不同),则该位结果为1,否则为0。
接下来我们来看位运算
-
<<左移运算向左进行移位操作,高位丢弃,低位补 0,如
int a = 8; a << 3; 移位前:0000 0000 0000 0000 0000 0000 0000 1000 移位后:0000 0000 0000 0000 0000 0000 0100 0000 -
>>右移运算向右进行移位操作,对无符号数,高位补 0,对于有符号数,高位补符号位,如
unsigned int a = 8;
a >> 3;
移位前:0000 0000 0000 0000 0000 0000 0000 1000
移位后:0000 0000 0000 0000 0000 0000 0000 0001


int a = -8;
a >> 3;
移位前:1111 1111 1111 1111 1111 1111 1111 1000
移位前:1111 1111 1111 1111 1111 1111 1111 1111
数 a 向右移一位,相当于将 a 除以 2;数 a 向左移一位,相当于将 a 乘以 2
int a = 2; a >> 1; ---> 1 a << 1; ---> 4 -
>>>无符号右移>>>表示无符号右移,也叫逻辑右移,即若该数为正,则高位补0,而若该数为负数,则右移后高位同样补0
我们重新再来看看这个tableSizeFor是怎么实现的?
    /**
     * Returns a power of two size for the given target capacity.
     */
    static final int tableSizeFor(int cap) {
        int n = cap - 1;
        n |= n >>> 1;
        n |= n >>> 2;
        n |= n >>> 4;
        n |= n >>> 8;
        n |= n >>> 16;
        return (n < 0) ? 1 : (n >= MAXIMUM_CAPACITY) ? MAXIMUM_CAPACITY : n + 1;
    }
我们这里拿10来举例子,比如cap传进来是10,我们来看看他是怎么运算得到2的4次方16的。
因为是int类型占4个字节,32bit
cap = 10
n = cap - 1 = 9

0000 0000 0000 0000 0000 0000 0000 1001   n=9
0000 0000 0000 0000 0000 0000 0000 0100   n >>> 1           右移动1位
----------------------------------------------------------- 或(|)运算
0000 0000 0000 0000 0000 0000 0000 1100   n| n >>> 1
0000 0000 0000 0000 0000 0000 0000 0011   n >>> 2           右移动2位
----------------------------------------------------------- 或(|)运算
0000 0000 0000 0000 0000 0000 0000 1111   n |= n >>> 2
0000 0000 0000 0000 0000 0000 0000 0000   n >>> 4           右移动4位
----------------------------------------------------------- 或(|)运算
0000 0000 0000 0000 0000 0000 0000 1111   n |= n >>> 4
0000 0000 0000 0000 0000 0000 0000 0000   n >>> 8           右移动8位
----------------------------------------------------------- 或(|)运算
0000 0000 0000 0000 0000 0000 0000 1111   n |= n >>> 8
0000 0000 0000 0000 0000 0000 0000 0000   n >>> 16          右移动16位
----------------------------------------------------------- 或(|)运算
0000 0000 0000 0000 0000 0000 0000 1111   n |= n >>> 16
----------------------------------------------------------- 最后n>0 所以+1
0000 0000 0000 0000 0000 0000 0001 0000   n + 1 = 16
然后我们可以做如下的推论,假如n为如下(X表示不在乎是0还是1)
01XX XXXX XXXX XXXX XXXX XXXX XXXX XXXX   n
001X XXXX XXXX XXXX XXXX XXXX XXXX XXXX   n >>> 1           右移动1位
----------------------------------------------------------- 或(|)运算
011X XXXX XXXX XXXX XXXX XXXX XXXX XXXX   n| n >>> 1
0001 1XXX XXXX XXXX XXXX XXXX XXXX XXXX   n >>> 2           右移动2位
----------------------------------------------------------- 或(|)运算
0111 1XXX XXXX XXXX XXXX XXXX XXXX XXXX   n |= n >>> 2
0000 0111 1XXX XXXX XXXX XXXX XXXX XXXX   n >>> 4           右移动4位
----------------------------------------------------------- 或(|)运算
0111 1111 1XXX XXXX XXXX XXXX XXXX XXXX   n |= n >>> 4
0000 0000 0111 1111 1XXX XXXX XXXX XXXX   n >>> 8           右移动8位
----------------------------------------------------------- 或(|)运算
0111 1111 1111 1111 1XXX XXXX XXXX XXXX   n |= n >>> 8
0000 0000 0000 0000 0111 1111 1111 1111   n >>> 16          右移动16位
----------------------------------------------------------- 或(|)运算
0111 1111 1111 1111 1111 1111 1111 1111   n |= n >>> 16
----------------------------------------------------------- 最后n>0 所以+1
1000 0000 0000 0000 0000 0000 0000 0000   n + 1
可以看出来效果了吧,通过以上的这些无符号位移之后,就能得到比指定容量大且最接近的2的幂次方整数。
所以现在应该知道为啥一开始的时候需要对cap做减1操作。int n = cap - 1。
这是为了防止,cap已经是2的幂。如果cap已经是2的幂, 又没有执行这个减1操作,则执行完后面的几条无符号右移操作之后,返回的capacity将是这个cap的2倍。你们可以试试带入上面的计算过程。
我们再来探讨一下当cap=0的是,n=cap-1=-1
-1 的二进制求法是正数取反加1,1 的二进制表示为0000 0000 0000 0000 0000 0000 0000 0001,因此-1的二进制表示为1111 1111 1111 1111 1111 1111 1111 1111
1111 1111 1111 1111 1111 1111 1111 1111   n=-1
0111 1111 1111 1111 1111 1111 1111 1111   n >>> 1           右移动1位
----------------------------------------------------------- 或(|)运算
1111 1111 1111 1111 1111 1111 1111 1111   n| n >>> 1
0011 1111 1111 1111 1111 1111 1111 1111   n >>> 2           右移动2位
----------------------------------------------------------- 或(|)运算
1111 1111 1111 1111 1111 1111 1111 1111   n |= n >>> 2
0000 1111 1111 1111 1111 1111 1111 1111   n >>> 4           右移动4位
----------------------------------------------------------- 或(|)运算
1111 1111 1111 1111 1111 1111 1111 1111   n |= n >>> 4
0000 0000 1111 1111 1111 1111 1111 1111   n >>> 8           右移动8位
----------------------------------------------------------- 或(|)运算
1111 1111 1111 1111 1111 1111 1111 1111   n |= n >>> 8
0000 0000 0000 0000 1111 1111 1111 1111   n >>> 16          右移动16位
----------------------------------------------------------- 或(|)运算
1111 1111 1111 1111 1111 1111 1111 1111   n |= n >>> 16 = -1

当n=-1的时候满足n<0, 所以最后return 1
HashMap初始容量为什么是2的n次幂?
看完上面这么复杂的运算,就是为了拿到比指定容量大且最接近的2的幂次方整数。 那为什么HahshMap初始容量需要时2的n次幂?
我们先来看看HashMap的put方法。
public V put(K key, V value) {
    return putVal(hash(key), key, value, false, true);
}
我们知道HashMap是利用了哈希表的原理,哈希表让我们可以根据关键字快速查询数据的数据结构。而我们知道HashMap中这个关键字也就是key其实就是对象的HashCode计算出来的。然后HashMap中哈希函数采用的是取模的方式来映射key和value。
下面就是jdk1.8中HashMap的hash方法,他调用的就是Object的hashCode方法。返回的是一个int类型,范围就是-2^31 ~ 2^31-1 ,然后与h无符号右移16位后的二进制进行按位异或得到最后的 hash值,这一步我们称为扰动函数,为了减少哈希碰撞。具体扰动函数的作用后面我们会讲到他的作用。
同时从代码我们可以看出。所以我们也可以看出如果key为null的话,他的位置就是在数组的第一个位置
    static final int hash(Object key) {
        int h;
        return (key == null) ? 0 : (h = key.hashCode()) ^ (h >>> 16);
    }
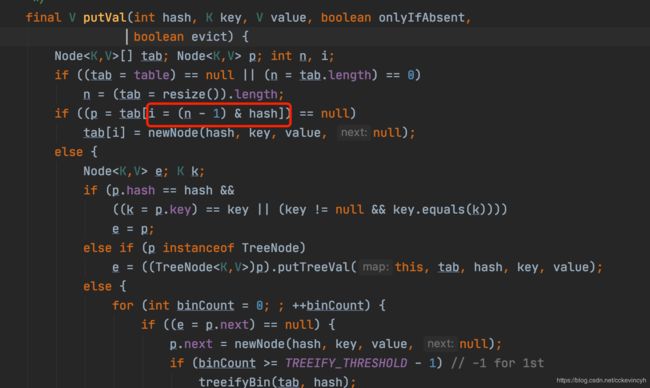
前面我们说到HashMap是通过取模的方式来计算对象的数组下标。而HashMap是它通过 hash & (table.length -1)来得到该对象的保存的数组下标,这是HashMap在速度上的优化。取余数本质是不断做除法,把剩余的数减去,运算效率要比位运算低。当 length 总是2的n次方时,hash & (length-1)运算等价于对 length 取模,也就是hash%length。那为啥一定是2的n次方呢?
我们可以看看HashMap的put方法
我们来模拟一下HashMap的put方法的过程。
- 这里传进来的hash是上面讲到的hash方法计算后返回的结果。
- n表示数组初始化的长度是16,也就是我们说的一定是2的n次方
&(按位与运算):运算规则:相同的二进制数位上,都是1的时候,结果为1,否则为零。^(按位异或运算):运算规则:相同的二进制数位上,数字相同,结果为0,不同为1。
首先我们来假设对象的hashcode的返回的int类型的数据如下:
1111 1111 1111 1111 1111 0000 1110 1010   h=key.hashCode()

1111 1111 1111 1111 1111 0000 1110 1010   h
0000 0000 0000 0000 1111 1111 1111 1111   h>>>16
-------------------------------------------------计算hash
1111 1111 1111 1111 0000 1111 0001 0101   hash = h ^ (h >>> 16)


0000 0000 0000 0000 0000 0000 0000 1111   n-1 = 16-1 = 15
1111 1111 1111 1111 0000 1111 0001 0101   hash
-------------------------------------------------计算下标
0000 0000 0000 0000 0000 0000 0000 0101   hash & (n -1)
所以得到数组下标二进制0101 => 十进制5
HashMap的容量为什么是2的n次幂?和这个(n - 1) & hash的计算方法有着千丝万缕的关系,符号&是按位与的计算,这是位运算,计算机能直接运算,特别高效。
从上面模拟n=16的情况看,当HashMap的容量是2的n次幂时,(n-1)的2进制也就是0000 0000 0000 0000 0000 0000 0000 1111 这样形式的(也就是得到最后都是1的形式),这样与添加元素的hash值进行位运算时,就只需要看添加元素的hash值了,因为不管是0还是1,只要和1做与运算都是他自己本身。这样能够充分的散列,使得添加的元素均匀分布在HashMap的每个位置上,减少hash碰撞,下面举例进行说明:
当HashMap的容量是16时,它的二进制是0000 0000 0000 0000 0000 0000 0001 0000,(n-1)的二进制是0000 0000 0000 0000 0000 0000 0000 1111,与hash值得计算结果如下:
0000 0000 0000 0000 0000 0000 0000 1111  n-1
0000 0000 0000 0000 0000 0000 0000 1110  hash值
----------------------------------------- &运算
0000 0000 0000 0000 0000 0000 0000 1110
0000 0000 0000 0000 0000 0000 0000 1111  n-1
0000 0000 0000 0000 0000 0000 0000 1101  hash值
----------------------------------------- &运算
0000 0000 0000 0000 0000 0000 0000 1101
0000 0000 0000 0000 0000 0000 0000 1111  n-1
0000 0000 0000 0000 0000 0000 0000 1011  hash值
----------------------------------------- &运算
0000 0000 0000 0000 0000 0000 0000 1011
0000 0000 0000 0000 0000 0000 0000 1111  n-1
0000 0000 0000 0000 0000 0000 0000 0111  hash值
----------------------------------------- &运算
0000 0000 0000 0000 0000 0000 0000 0111
以此类推,我们可以发现计算出来的数组下标都只是看hash值自身最后4位,而且当hash变化的只是最后的4位的时候,这个时候是没有碰撞的。
那假如n不是2的n次方的,那么效果是怎么样的,我们来看看。
下面就来看一下HashMap的容量不是2的n次幂的情况,当容量为10时,二进制为0000 0000 0000 0000 0000 0000 0000 1010,(n-1)的二进制是0000 0000 0000 0000 0000 0000 0000 1001,向里面添加同样的元素,结果为:
0000 0000 0000 0000 0000 0000 0000 1001  n-1
0000 0000 0000 0000 0000 0000 0000 1110  hash值
----------------------------------------- &运算
0000 0000 0000 0000 0000 0000 0000 1001
0000 0000 0000 0000 0000 0000 0000 1001  n-1
0000 0000 0000 0000 0000 0000 0000 1101  hash值
----------------------------------------- &运算
0000 0000 0000 0000 0000 0000 0000 1001
0000 0000 0000 0000 0000 0000 0000 1001  n-1
0000 0000 0000 0000 0000 0000 0000 1011  hash值
----------------------------------------- &运算
0000 0000 0000 0000 0000 0000 0000 1001
0000 0000 0000 0000 0000 0000 0000 1001  n-1
0000 0000 0000 0000 0000 0000 0000 0111  hash值
----------------------------------------- &运算
0000 0000 0000 0000 0000 0000 0000 0001
可以看到当hash的最后4位发生改变的时候,就已经发生了碰撞了。所以才要求HashMap的初始容量是2的n次幂。
HashMap扰动函数
在探讨2的n次方之后,我们再来看看前面我们提到的扰动函数,这个扰动函数是怎么减少hash碰撞的?
这个扰动函数的过程(jdk1.8中)简单来说就是:得到的 hashcode 转化为32位二进制,前16位和后16位(低16 bit和高16 bit)做了一个异或
问题:为什么要这样操作呢?
如果当n即数组长度很小,假设是16的话,那么n-1即为0000 0000 0000 0000 0000 0000 0000 1111 ,这样的值和hashCode()直接做按位与(&)操作,实际上只使用了哈希值的后4位。如果当哈希值前面16位变化很大,后面16位变化很小,这样就很容易造成哈希冲突了,因为最终的结果只看最后4位。所以这里把高低位都利用起来,从而解决了这个问题。
简单的说当桶数为 16 的时候,也就是n为16的时候,
决定落到哪个桶(哪个索引)是由初始 hash 值的最后 4 位决定的。经过扰动之后,决定落到哪个桶是由初始 hash 值的最后 4 位和第 13-16 位总共 8 位决定的
参考
hash表原理
HashMap底层实现和原理(源码解析)
HashMap初始容量为什么是2的n次幂及扩容为什么是2倍的形式
一个HashMap跟面试官扯了半个小时
HashMap 中的扰动函数有没有必要
HashMap的hash算法扰动函数
Hashmap的扰动函数


