SpringCloud微服务——基于security+oauth2的安全保护(二):授权服务
文章目录
- 依赖包
- 配置spring security
- 配置Authorization Server
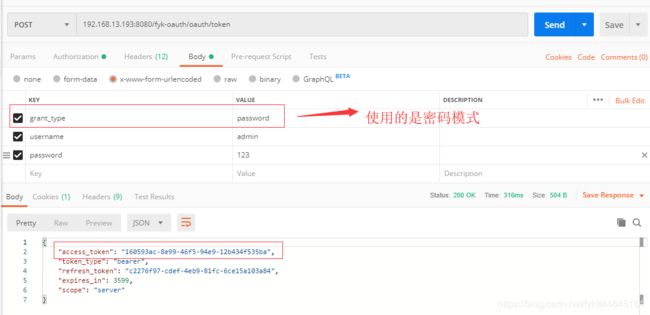
- 测试
- 获取token:
- 前端正式代码改造
依赖包
新建一个项目,然后加入依赖包:(项目中用到的其他依赖包略。)
<dependency>
	<groupId>org.springframework.cloudgroupId>
	<artifactId>spring-cloud-starter-oauth2artifactId>
dependency>
关于security和oauth2的依赖包只需要加这个就可以了,看这个配置,会把security也一起引入进来。
配置spring security
之所以要配置security,主要是因为在这个授权服务中,还是有一些资源需要保护(所以,严格说来,它也是一个资源服务)。比如:获取当前登录人的信息API(这个之后再说)。
@Configuration
@EnableWebSecurity		//开启web保护功能
@EnableGlobalMethodSecurity(prePostEnabled = true)	//开启在方法上的保护功能
public class SecurityConfiguration extends WebSecurityConfigurerAdapter {

	@Autowired
	private UserDetailServiceImpl userDetailServiceImpl;

	@Override
	@Bean
	public AuthenticationManager authenticationManagerBean() throws Exception {
		return super.authenticationManagerBean();
	}

	@Override
	protected void configure(AuthenticationManagerBuilder auth) throws Exception {
		auth.userDetailsService(userDetailServiceImpl).passwordEncoder(passwordEncoder);
		super.configure(auth);
	}

	@Override
	public void configure(HttpSecurity http) throws Exception {
		// @formatter:off
		http.authorizeRequests()
			// 允许一些资源可以访问
			.antMatchers(settings.getWhiteResources().split(",")).permitAll()
			// 允许一些URL可以访问
			.antMatchers(settings.getPermital().split(",")).permitAll()
			// 跨站请求伪造,这是一个放置跨站请求伪造的攻击的策略设置
			.and().csrf().disable()
			.sessionManagement().sessionCreationPolicy(SessionCreationPolicy.NEVER)
			// 设置一个拒绝访问的提示链接
			.and().exceptionHandling().accessDeniedPage(settings.getDeniedpage())
			.and().authorizeRequests().anyRequest().authenticated();
		// @formatter:on
	}
}
这里是通过继承WebSecurityConfigurerAdapter来实现security的功能的。该类中,有两个方法需要重写。这两个重载的方法,只有参数不一样,现在以参数名来区分各个方法进行介绍:
- HttpSecurity:该方法中,主要是配置一些资源的访问是否需要认证,以及其他的一些安全相关的配置;
- AuthenticationManagerBuilder:该方法就是配置一些信息来为之后构造AuthenticationManager。也就是authenticationManagerBean()方法的返回值,就是使用AuthenticationManagerBuilder建造的。
这里设置了一个userDetailsService,该类的大致代码如下:
@Service
public class UserDetailServiceImpl implements UserDetailsService{
	@Override
	public UserDetails loadUserByUsername(String username) throws UsernameNotFoundException {
		List<User> userList = userDao.getUsersByLoginName(username);
		User user = userList.get(0);
		Set<GrantedAuthority> dbAuthsSet = new HashSet<>();
		......
		return createUserDetails(user, dbAuths);
	}
}
其实,在这个类中,主要就是通过username(登录名)到数据库去查找该用户的信息,然后将该信息填充为UserDetails。这里的UserDetails仅仅是一个接口,也就是需要一个类来实现该接口,然后用用户表和权限表(如果有的话)的相关信息,填充好这个接口的方法就可以了。
需要说明的是,authenticationManagerBean()最终将返回值AuthenticationManager作为一个bean交由spring来管理,他会被授权服务配置类用到。
配置Authorization Server
授权服务类:首先要实现AuthorizationServerConfigurer接口;然后在该类上加上注解@EnableAuthorizationServer说明这是一个授权服务类;最后通过@Configuration注解,将该类交由Spring管理。
@Configuration
@EnableAuthorizationServer
public class OAuth2AuthorizationConfig extends AuthorizationServerConfigurerAdapter{

	@Override
	public void configure(ClientDetailsServiceConfigurer clients) throws Exception {
		clients.withClientDetails(clientDetailsService);
	}

	@Override
	public void configure(AuthorizationServerEndpointsConfigurer endpoints) throws Exception {
		// @formatter:off
		endpoints
			.tokenStore(getTokenStore())
			.authenticationManager(authenticationManager)
			.userDetailsService(userDetailsService)
			// 设置客户端可以使用get和post方式提交
			.allowedTokenEndpointRequestMethods(HttpMethod.GET, HttpMethod.POST);
		// @formatter:on
	}

	@Override
	public void configure(AuthorizationServerSecurityConfigurer oauthServer) throws Exception {
		// @formatter:off
		oauthServer
			// 设置一个编码方式
			.passwordEncoder(passwordEncoder)
			//获取token的请求,不进行拦截
			.tokenKeyAccess("permitAll()")
			//检查token的请求,要先通过验证
			.checkTokenAccess("isAuthenticated()")
			.allowFormAuthenticationForClients();
		// @formatter:on
	}
这里AuthorizationServerConfigurerAdapter就是实现了AuthorizationServerConfigurer接口,但是三个方法都是空的,这三个方法,就是我们需要处理的,方法的内容,在下面一一讲解(这三个重载的方法,根据参数的不同,都有不同的作用,以下以参数来区分介绍这个三个方法)。
- ClientDetailsServiceConfigurer:配置客户端信息
客户端的配置信息既可以放在内存中,也可以放在数据库中,也可以是直接搞的一些策略。这里我使用的是设置clients.withClientDetails(clientDetailsService);这里就是使用自己搞的一些策略。也就是客户端在获取token的时候,会给你个clientId,然后根据这个clientId返回ClientDetails就可以,至于是怎么得到的ClientDetails,那就自己搞了。这里,我还是使用的是到数据库中查找:(个人觉得这种方式很好,如果哪天不想用数据查了,用内存,用配置文件等等,也就在这里改了就是,隐藏了数据获取的细节)
 @Service
public final class ClientDetailsServiceImpl implements ClientDetailsService {

    @Autowired
    private OauthClientMapper oauthClientMapper;

    @Override
    public ClientDetails loadClientByClientId(String clientId) {
    	OauthClient client = this.oauthClientMapper.selectById(clientId);
        if(client==null){
            throw new ClientRegistrationException("客户端不存在");
        }
        return new ClientDetailsImpl(client);
    }
}
这里的ClientDetails是一个接口,也就是说,需要写一个类来实现它,而这个实现类很简单,仅仅是填充一些值罢了。这里,根据这个接口需要的值,将实体建立好(数据库脚本就不给了,根据这个实体,自己搞就可以了):
**
* 客户端表
* @author FYK<br/> 2019年02月13日
* @version 1.0
* @since JDK:1.8
*/
@Data
public class OauthClient implements Serializable{

	/**
	 * 序列化ID
	 */
	private static final long serialVersionUID = -3555674913099118797L;

	/**
	 * 记录唯一性标识
	 */
    private String id;

    /**
     * 客户端ID,唯一性标识,不可重复
     */
    private String clientId;

    /**
     * 此客户端可以访问的资源。如果为空,则可被调用方忽略
     */
    private String resourceIds;

    /**
     * 验证此客户端是否需要认证(1:需要认证;其他:不需要认证)。也就是说,如果不需要认证,则会忽略client_secret的校验
     */
    private Short isSecretreQuired;

    /**
     * 客户端密码(是否有效,与is_secretre_quired有关)
     */
    private String clientSecret;

    /**
     * 此客户端是否限于特定范围。如果为false,则将忽略身份验证请求的作用域。 (1:true;其他:false)
     */
    private Short isScoped;

    /**
     * 此客户端的范围。如果客户端没有作用域,则为空。
     */
    private String scope;

    /**
     * 为此客户端授权的授予类型。
     */
    private String authorizedGrantTypes;

    /**
     * 此客户端在“授权代码”访问授予期间使用的预定义重定向URI。
     */
    private String registeredRedirectUri;

    /**
     * 返回授予OAuth客户端的权限。请注意,这些权限不是使用授权访问令牌授予用户的权限。相反,这些权限是客户本身固有的。
     */
    private String authorities;

    /**
     * 客户端是否需要用户批准特定范围。(1:true;其他:false)
     */
    private Short isAutoApprove;

    /**
     * 此客户端的访问令牌有效期,单位:秒;
     */
    private Integer accessTokenValiditySeconds;

    /**
     * 此客户端的刷新令牌有效期,单位:秒;
     */
    private Integer refreshTokenValiditySeconds;

}
- AuthorizationServerEndpointsConfigurer:配置授权Token的节点和Token服务
这里需要配置的是:
tokenStore:token的存储方式(如果不存储token,那怎么知道用户带着访问资源的token,是不是有效的),这里采用jdbc的方式:(jdbc存储,需要执行一些脚本:获取脚本)。当然也支持其他方式,详见:redis存储、JWT。
public TokenStore getTokenStore() {
	JdbcTokenStore tokenStore = new JdbcTokenStore(dataSource);
	tokenStore.setAuthenticationKeyGenerator(authentication -> "FYK"+UUID.randomUUID().toString().replace("-", ""));
	return tokenStore;
}
authenticationManager:开启了用户密码认证。也就是说客户端除了带上client的信息外,还要带上用户信息。client信息可以理解为该客户端是否有权来向我所有token,这里如果开启了密码认证,则还要验证该用户的账号是不是我认同的,而不是随便哪个来都可以给个token。
说明:这里的authenticationManager,就是来自于上一节(配置spring security)中注入spring的bean。
- AuthorizationServerSecurityConfigurer:配置Token节点的安全策略
注释都写的很清楚了。需要说明的一点的,这里配置了一个密码的编码方式,这个密码就是OauthClient类中的clientSecret字段。
测试
到此为止,授权服务就算是完成了,测试一下:
获取token:
现在postMan上测试一下:

 到此为止,就已经是获取到了token了。
前端正式代码改造
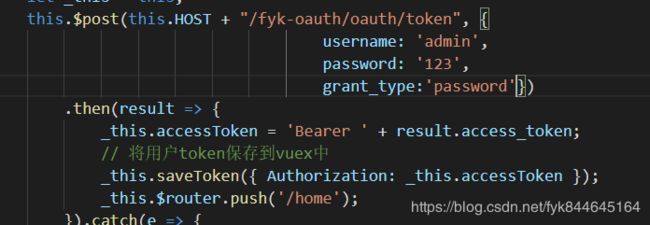
在实际的前端中使用,就是在登录的时候获取token,然后将获取到的token保存下来,再进行页面跳转。在跳转的页面中,如果需要访问某个受保护的API的时候,就带上之前获取的token:
这里是获取token:

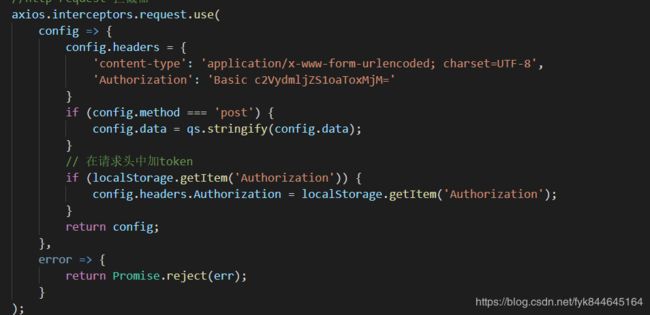
然后在request的拦截器中加入:
 这里要说明一下:只要到了登录页面,就会清除存储的Authorization。然后,获取到的token,在存储在Authorization中。因此,如果是登录也的提交,则使用的Authorization的值是Basic c2VydmljZS1oaToxMjM=。
这里Basic c2VydmljZS1oaToxMjM= 其实就是配置的客户端认证信息。在进行postMan测试的时候,填写了service-hi@123之后,在访问的时候,却带的认证信息是’Authorization’: ‘Basic c2VydmljZS1oaToxMjM=’。所以这里就这么带就好了。