Spring Cloud 应用篇 之 Hystrix Dashboard(断路器监控) 的基本搭建
在以往的文章里,已经讲解了 断路器 Hystrix 的基本使用,现在将介绍断路器的监控 Hystrix Dashboard 的基本搭建。
(一)简介
Hystrix Dashboard 是 Hystrix 的仪表盘组件,提供了数据监控,可以实时监控 Hystrix 的各个指标,然后通过图形化界面展示出来。
(二)搭建环境
1. 创建一个module(spring-cloud-hystrix-dashboard),创建步骤参考上一篇
2. Hystrix Dashboard 是个独立的服务,不用注册到 Eureka server,pom 文件导入以下依赖:
    org.springframework.cloud
    spring-cloud-starter-netflix-hystrix


    org.springframework.cloud
    spring-cloud-starter-netflix-hystrix-dashboard


    org.springframework.boot
    spring-boot-starter-actuator
3. 启动类,只要添加 @EnableHystrixDashboard 注解即可
@SpringBootApplication
@EnableHystrixDashboard
public class HystrixDashboardApplication {

    public static void main(String[] args) {

        SpringApplication.run(HystrixDashboardApplication.class, args);
    }
}
配置文件:
server:
  port: 8580

spring:
  application:
    name: spring-cloud-hystrix-dashboard
4. 要使被监控的服务打开 Actuator,并开启了断路器。
4.1 对 spring-demo-service-ribbon 服务进行监控
4.1.1 pom 文件添加依赖,此依赖是打开 Actuator 作用:
    org.springframework.boot
    spring-boot-starter-actuator
4.1.2 启动类添加 @EnableCircuitBreaker 注解
@SpringBootApplication
@EnableEurekaClient
@EnableCircuitBreaker
@EnableHystrix
public class ServiceRibbonApplication {

	public static void main(String[] args) {
        SpringApplication.run(ServiceRibbonApplication.class, args);
	}

	@Bean
	@LoadBalanced
	RestTemplate restTemplate() {
		return new RestTemplate();
	}

	@Bean
	public IRule ribbonRule() {
		return new RandomRule();	//这里配置策略,和配置文件对应
	}
}
4.1.3 如果是 spring boot 是低版本(1.x),到此配置就已经完成了,启动后就可以看到效果了,但是此项目使用的 spring boot 版本是 2.0,在 spring boot 升为 2.0 后,为了安全,默认 Actuator 只暴露了2个端点,heath 和 info,所以我们的配置还没有完成,下面继续
在配置文件中添加:
management:
  endpoints:
    web:
      exposure:
        include: '*'
  endpoint:
      health:
        show-details: ALWAYS
这个是用来暴露 Actuator 的所有端点的,这一点很重要,不配置你的 Hystrix Dashboard 会出现 Unable to connect to Command Metric Stream 的问题(这是个坑)
4.1.4 至此,配置已经完成
依次启动 eureka server、spring-demo-service、spring-demo-service-ribbon、spring-cloud-hystrix-dashboard,访问 http://localhost:8580/hystrix,界面如下:
Cluster via Turbine (default cluster): http://turbine-hostname:port/turbine.stream
Cluster via Turbine (custom cluster): http://turbine-hostname:port/turbine.stream?cluster=[clusterName]
Single Hystrix App: http://hystrix-app:port/hystrix.stream
这个是说明不同情况下不同的请求地址,前两个是对于集群模式使用的,最后一个是单节点模式使用的,此篇配置的是单节点模式,所以在页面的地址栏输入 http://localhost:8381/actuator/hystrix.stream
点击 Monitor Stream,页面跳转显示如下:
注:有可能你进来后页面显示的是 Loading... 状态,这个是因为你的服务没有被消费调用,所以此时没有数据监控,只要调用下被监控的服务,就会出现上图状态了。
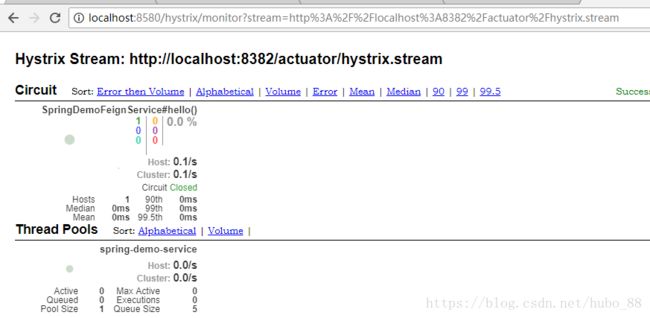
4.2 对 spring-demo-service-feign 服务进行监控
对 spring-demo-service-feign 服务的监控的配置,和以上配置类似,以下简单说明
4.2.1 pom 文件添加依赖:
    org.springframework.boot
    spring-boot-starter-actuator
4.2.2 启动类
@SpringBootApplication
@EnableEurekaClient
@EnableFeignClients
@EnableCircuitBreaker
@EnableHystrix
public class ServiceFeignApplication {

    public static void main(String[] args) {
        SpringApplication.run(ServiceFeignApplication.class, args);
    }
}
4.2.3 配置文件添加暴露端点
management:
  endpoints:
    web:
      exposure:
        include: '*'
  endpoint:
      health:
        show-details: ALWAYS
4.2.4 至此,配置已经完成
依次启动 eureka server、spring-demo-service、spring-demo-service-feign、spring-cloud-hystrix-dashboard,访问 http://localhost:8580/hystrix,界面和上面一样
输入 http://localhost:8382/actuator/hystrix.stream,点击 Monitor Stream,如下:
实心圆:颜色代表健康度,(绿-黄-红-橙递减);大小代表并发量。
曲线:请求量的变化
如果出现 Loading... 状态,就先消费调用下被监控的服务即可。


